Shifting infill relative to printed part
Is it possible to shift the infill pattern relative to the part I am slicing? I would like to align the pattern to the center point if it is at all possible.
RE: Shifting infill relative to printed part
You might get to where you want to be by playing with the infill angle but frankly, I feel in cases like this where precision is important, it's better to model it into the design in the first place rather than relying on infill magic.
RE: Shifting infill relative to printed part
I have noticed that the scale of the pattern is proportional to the infill percentage. At least it is with gyroid. Perhaps if you tinker with the infill percent by small increments you can get it closer to centered.
Mk3S+,SL1S
RE: Shifting infill relative to printed part
@martin-brousek wrote:
Is it possible to shift the infill pattern relative to the part I am slicing?
Yes, this is possible, and it's very simple to do.
Add a part to the model you want to change the infill placement of.
This is done by selecting the object right clicking and selecting add part.
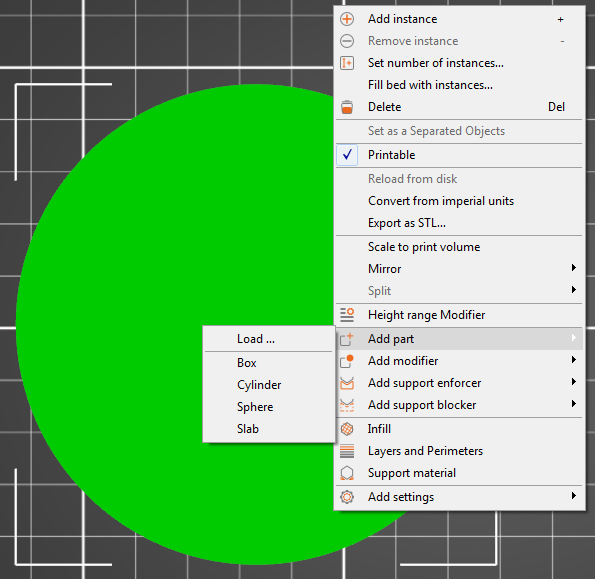
You can select any part from the menu or load one of your own.
I suggest scaling the part down after loading it, and it's generally a good idea to drop it to the bed after scaling.
![]()
by clicking on the (Drop to bed Icon).
Once this is done you can move the added part around (In and out closer and farther) to adjust the infill of your object.
Play around with it you will get a feel for how it works.
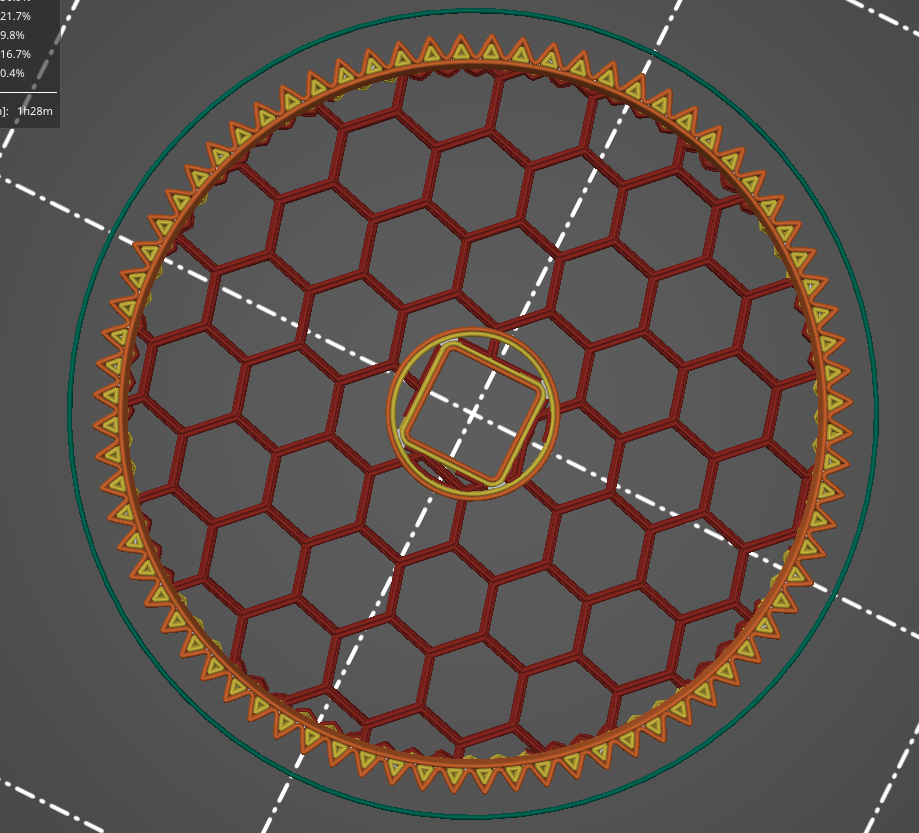
I used a 5% Honeycomb to demonstrate.
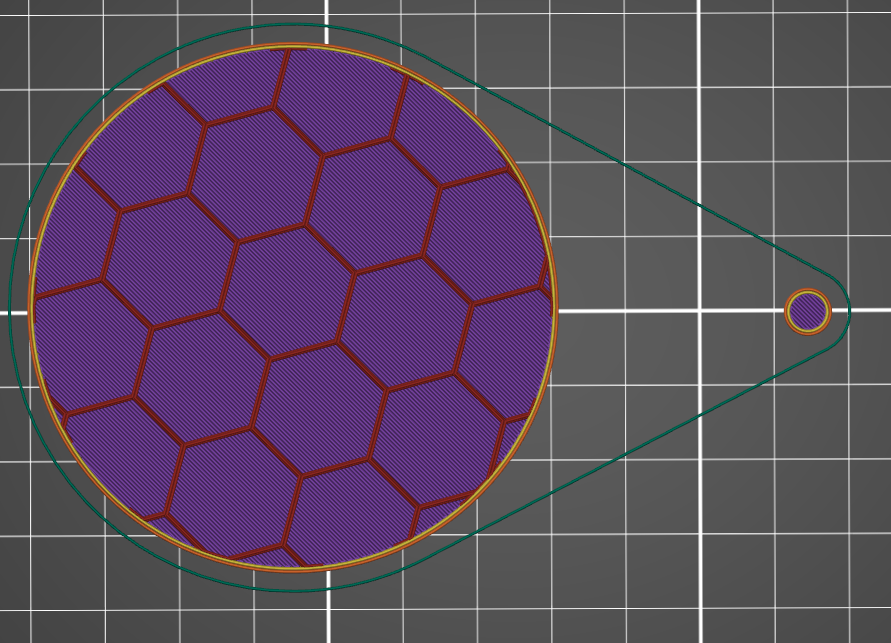

Using this method you can place the infill any way you like.
Enjoy
Swiss_Cheese
The Filament Whisperer
RE: Shifting infill relative to printed part
Hey, that's cheating! Adding parts...
😁😉😄
But you're right! Whatever it takes.
@fuchsr
From one pragmatist to another, I usually add two, one for X and one for the Y.

But 🤫 we want them to think about it, "more better" learning that way.
😉
Swiss_Cheese
The Filament Whisperer
RE: Shifting infill relative to printed part
Thank you very much. This allows decently precise positioning of the infill. However, I can't help but wonder why and how this works. It seem the movement of the infil is not exactly proportional to the movement of the added part but rather maybe moving at half rate. This could mean that the slicer calculates some kind of midpoint of the whole printed part and starts the infil from there? (This seems to be the case after experimenting with different scales of infill in a simple cylinder) Then there would be just one last question to be answered: Why the hell does the 'origin' of the honeycomb infill pattern move when changing infill angle? 😀 The placement seems to be most natural at 30°+k*60° but even that origin doesn't strike me as the first choice from a programming standpoint.
Shifting infill relative to printed part
@martin-brousek
Your welcome.
By my understanding its based on the Infill percentage, (%) of the volume of the model, by adding the "parts" your changing the volume of the model there by the shape of the infill by (%) slightly each time you move the parts farther or closer (at least that's how I figured it out). If you were to place the control parts inside the volume they would have no effect. It makes perfect sense, when you "cut" something in Slicer it's new coordinates are similarly redistributed by the same math (Area or Volume) it seems.
Bottom line is it gives us the ability to control the infill regardless of percentage used. BTW, this works in 3 dimensions, I've been doing it this way for quite a long time and have developed some other techniques to speed this process up, maybe one day I'll write a tutorial about it.
Anyway, good luck with your project Please let us know how things go.
Regards
Swiss_Cheese
The Filament Whisperer