PrusaSlicer Missing Perimeters
Hi all,
I am pretty new to the 3D printing world, so please forgive my terminology. I will try to explain my issue while showing images and a .3mf file to hopefully lead the conversation.
Basically when I slice a model (and I am finding this in almost all models I slice, there are obvious small voids in the perimeter of each layer.
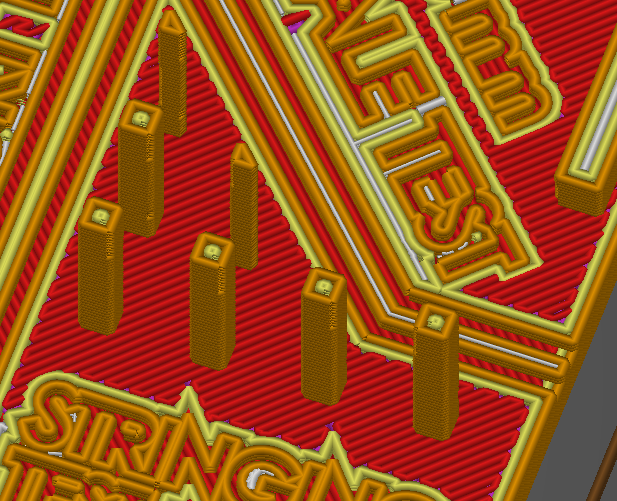
I am using basically standard settings: 0.20mm quality, Prusament PLA, and Original Prusa Mini. Also, note that these voids show up on the actual print as well. Find the .3mf attached. PRUSA.3mf
I would appriciate any help
Best Answer by Neophyl:
Thats the seam. Its where the start and end of a perimeter are. If your printer and filament are tuned correctly the actual printed seam can be minimised but you cant ever fully remove it. Depending on the slicer settings it can either be aligned or rear etc but the PS default puts them in corners which looks like what its doing on your slice.
RE: PrusaSlicer Missing Perimeters
@neophyl
Thank you for the reply. That makes sense. I guess I thought that the seam would change in the slicer if I changed settings. Anyway, any tips on how to prevent the seam from showing up in my prints? Where do I start? I do not see a setting that jumps out to me? Is this tied to wipe or retraction?
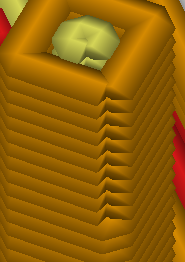
Here are a couple of examples. These marks are at the seam showed in slicer.

RE: PrusaSlicer Missing Perimeters
I'd suggest starting with http://projects.ttlexceeded.com/3dprinting_techniques_calibrating_filament.html Bob is a member here (Bobstro). His site contains lots of useful information. Id certainly be trying different retraction settings though as p;art of trying to tune things.
Although the fact you have a mini with a bowden setup makes that more difficult, as is the nature of bowden vs direct drive. Those corners dont look very good either, lots of overshoot.
RE: PrusaSlicer Missing Perimeters
@neophyl
Thanks for all your help. After hours of troubleshooting, I realized that I was shipped the wrong nozzle and it was actually .25mm instead of .40mm! I didn't even think to check the nozzle as the packaging said .40. Anyways, as you can imagine, that fixed 90% of my issues. I am still having some challenges, especially with bridging that I am trying to work through.
The link you sent was very informative. With the nozzle corrected, my wall thickness is pretty close, but varies between top and bottom and slightly between the sides of the cube. The bottom tends to measure between .90-.92mm and the top between .78-.84mm. I am not super confident in my caliper accuracy at that small of a measurement, so I left my extrusion multiplier as it was. As far as linear advancement, PRUSA just sent out an update on those numbers so I will see how that works out.
I am perplexed with my bridging issues, as I feel like they looked much better a month ago. Everything I read says a lower temperature would improve bridging, but that seems interesting to me in this case as for now I am using a steel nozzle until my replacement .40mm bronze nozzle arrives. And everything I read said steel nozzles may require 5-10C increase in temperature do to its thermal conductivity.
Anyways, that is a long way of saying thanks for your help and I am a noob and was using the wrong nozzle. 🙂
Happy Printing.
-MB