Prusaslicer 2.1.0 sequential vase mode printing of tall objects
They say "curiosity killed the cat", but it can also open a whole new realm of possibilities. It also can get me in 'hot water'.
I like to explore the possibilities of software to better understand how it behaves and what it can do.
What if I explored 'this feature' and 'that feature' and could I combine them to discover something more about Prusaslicer. I decided to try it with two features, "vase mode" and "sequential printing" of 150 mm tall cylinders. The cat is alive and I am not in hot water.
Rather than try to explain it, I am posting a short video of the results.
If you want to check out the settings, here is the 3MF test file I created.
Quality is the Journey, not the Destination. My limited prints->
RE: Prusaslicer 2.1.0 sequential vase mode printing of tall objects
Always verify your object placement and sequence of printing so the carriage ( including cables ) and the X-axis lower rod will not collide with already printed objects
Quality is the Journey, not the Destination. My limited prints->
RE: Prusaslicer 2.1.0 sequential vase mode printing of tall objects
Next investigation:
4 objects, 40+ mm tall, sequential print, vase mode, 2 colours.
MK3S, Prusa supplied firmware, Prusaslicer 2.1.0, Rainer's profiles.
The cat is happy. I shot myself in the foot on this one and Prusaslicer shot me in the other foot, but it worked. Prusaslicer did not warn me that 2 of the objecsts were too close and when the third object started to print, the fan shroud hit the second object and knocked it off the build plate. No harm, no foul. I placed he third object in what would turn out to be the path the carriage would take for the filament change for the fourth object. It removed the third object from the build plate for me. Again, no harm, but lesson learned.
I did colour changes on the second and forth object. Here is how it looked in Prusaslicer: 2-colour-seq-vase-mode-plate.jpg
Quality is the Journey, not the Destination. My limited prints->
RE: Prusaslicer 2.1.0 sequential vase mode printing of tall objects
Edit timeout.
When the printer is parking for a filament change, I don't think it should ever move downward. There is a risk of the carriage colliding with the model. I will check if it is the same in 2.2.x.
Quality is the Journey, not the Destination. My limited prints->
RE: Prusaslicer 2.1.0 sequential vase mode printing of tall objects
Hey interesting work
But to be honest I never understood why there is still some sequential printing - from my knowledge it is a technique from the "old" days. If you wanted to print a lot of parts but you did not 100% trust your printer. Then it would be beneficial to finish parts in sequence so that if something fails you have at least some parts finished instead of a full print bed with 65% finished parts.
But please open my eyes for the real use case 😉
Cheers
RE: Prusaslicer 2.1.0 sequential vase mode printing of tall objects
@lechuck71
This started because of ' you can't do this" and "you can't do that". Because I am curious and want to know how things work ( or don't ) I experiment a lot.
Another member of the forum wanted to know how he could reduce the insane amount of travel he was seeing when slicing 3 parts he had on the plate. Sure enough, the nozzle was running around like a mad (wo)man. I did some testing with his 3mf file and by rearranging the parts and using sequential print, the travel was reduced considerably, at least on the screen. Not sure if it helped him as there was no reply. I wish people wouldn't just drop a topic without some form of feedback.
So then I started experimenting (playing) and ended up with the test above with 3 150 mm tall cylinders.
If I slice them using sequential print and just disable spiral mode I get an estimated print time of 1h 29m 40s.
Disable sequential print and I get an estimated print time of 2h 11m 56s.
Since they are 755 layers tall, the nozzle travels diagonally across the build plate about 1510 times while not printing anything.
In sequential print mode, it makes the same trip 2 times. That is a big difference, and there should be little to no post print processing required.
There are members here that think the mesh bed leveling takes too long and every second they can shave off a 12 hour print job counts.
There are cases where the time saving can be big, which might be worth saving (like above). I just don't like the sound of my carriage racing at high speed when I can avoid it.
Do I always use sequential print? No. Every job is unique and the pros and cons for each method has to be evaluated and ultimately you have to decide.
I prefer to reproduce a problem and then try to find a solution. There may be more than one solution.
There are 'real' cases, but a real case to me may not be real to you, the other way around.
Kenn
Quality is the Journey, not the Destination. My limited prints->
RE: Prusaslicer 2.1.0 sequential vase mode printing of tall objects
I do trust my printer. In the beginning, not so much. Now, I will start an 8-10 hour print and go to bed and sleep soundly, waking up to a complete print. FYI, to me and 3D printing, old is 10 months ago.
Quality is the Journey, not the Destination. My limited prints->
RE: Prusaslicer 2.1.0 sequential vase mode printing of tall objects
@kennd
Interesting stuff.
"I wish people wouldn't just drop a topic without some form of feedback" me too
RE: Prusaslicer 2.1.0 sequential vase mode printing of tall objects
@lechuck71
Hi
For me a real usecase is when i print smaller items (clips, holders, shims, spacers etc) as they are usually 15-30mm tall and not so large in x-y.
Or several iterations of the same object.
This way i can get reliable layerbonding with petg for example, minimize travels between layers.
This is my use or sequence printing.
Prusa Mini+ kit. BondTech extruder. FW 5.1.2
Prusa MK3S+ kit. Stock. FW 3.11.0
Prusa MK3S+, used. Stock. FW 3.13.3
RE: Prusaslicer 2.1.0 sequential vase mode printing of tall objects
Currently all my testing is with PLA. My 'goal' is to figure out how to print multiple vase (spiral) mode prints at one time with colour changes at different places on each object. I have succeeded, but I am having difficulty determining reliably repeatable results.
Once I get the colour changing working reliably and document it, I will try the above with PETG and possibly TPU.
With the current situation,my wife doesn't min d me spending so much time at the computer. Something about me and her hair. 😀
Quality is the Journey, not the Destination. My limited prints->
RE: Prusaslicer 2.1.0 sequential vase mode printing of tall objects
I have one project file that allows me to print multiple objects in vase mode sequentially with with colour changes where wanted on each object. The problem I have now is repeating it. I have checked the project config file and cannot find what is different about it from my other attempts. As long as nothing happens to this config file, I should be OK. I will keep checking.
Remember, above where I had an issue with carriage colliding with objects when it move to change filament? I found a quick trick to avoid it. I took the height of the highest object (45 mm) and added 5 mm and in the tool change custom gcode I modified the 'M600' to 'M600 Z50'. Now it clears all the objects. One of my colour changes happens at 44.5 mm, so the carriage raise to 94.5 mm. Have to be careful I don 't reach the maximum Z height. There could be a more elegant solution, but that is for another day, or someone else.
If you have disabled your filament sensor, sadly the following does not apply to you. A real quick and dirty way to change colours during a vase mode print is to cut the filament just above where it enters the extruder. Not precise, but it works. The printer treats it like any other filament run-out.
Quality is the Journey, not the Destination. My limited prints->
RE: Prusaslicer 2.1.0 sequential vase mode printing of tall objects
This topic started after a forum member asked for assistance in reducing the amount of non-printing travel during one of his projects.
It got me thinking about how effective doing sequential object printing would be in reducing non-printing travel and how much time it could cut off a print job.
It expanded from there and I found 2 features in PrusaSlicer 2.1.0 that are “undocumented” but can be quite useful.
The first is printing more than one object in “spiral” mode at one time. A video link and project file are included in my first post.
The second is the ability to do colour changes during “spiral” mode printing of multiple objects. This does require some custom start gcode which PrusaSlicer makes easy to add. Some optional manual editing of the final gcode eliminates an extra filament change at the beginning. It requires that objects are printed in the right order and that the first object printed DOES NOT have any colour change. If it does, PrusaSlicer generates an INVAILD DATA msg and will not slice.
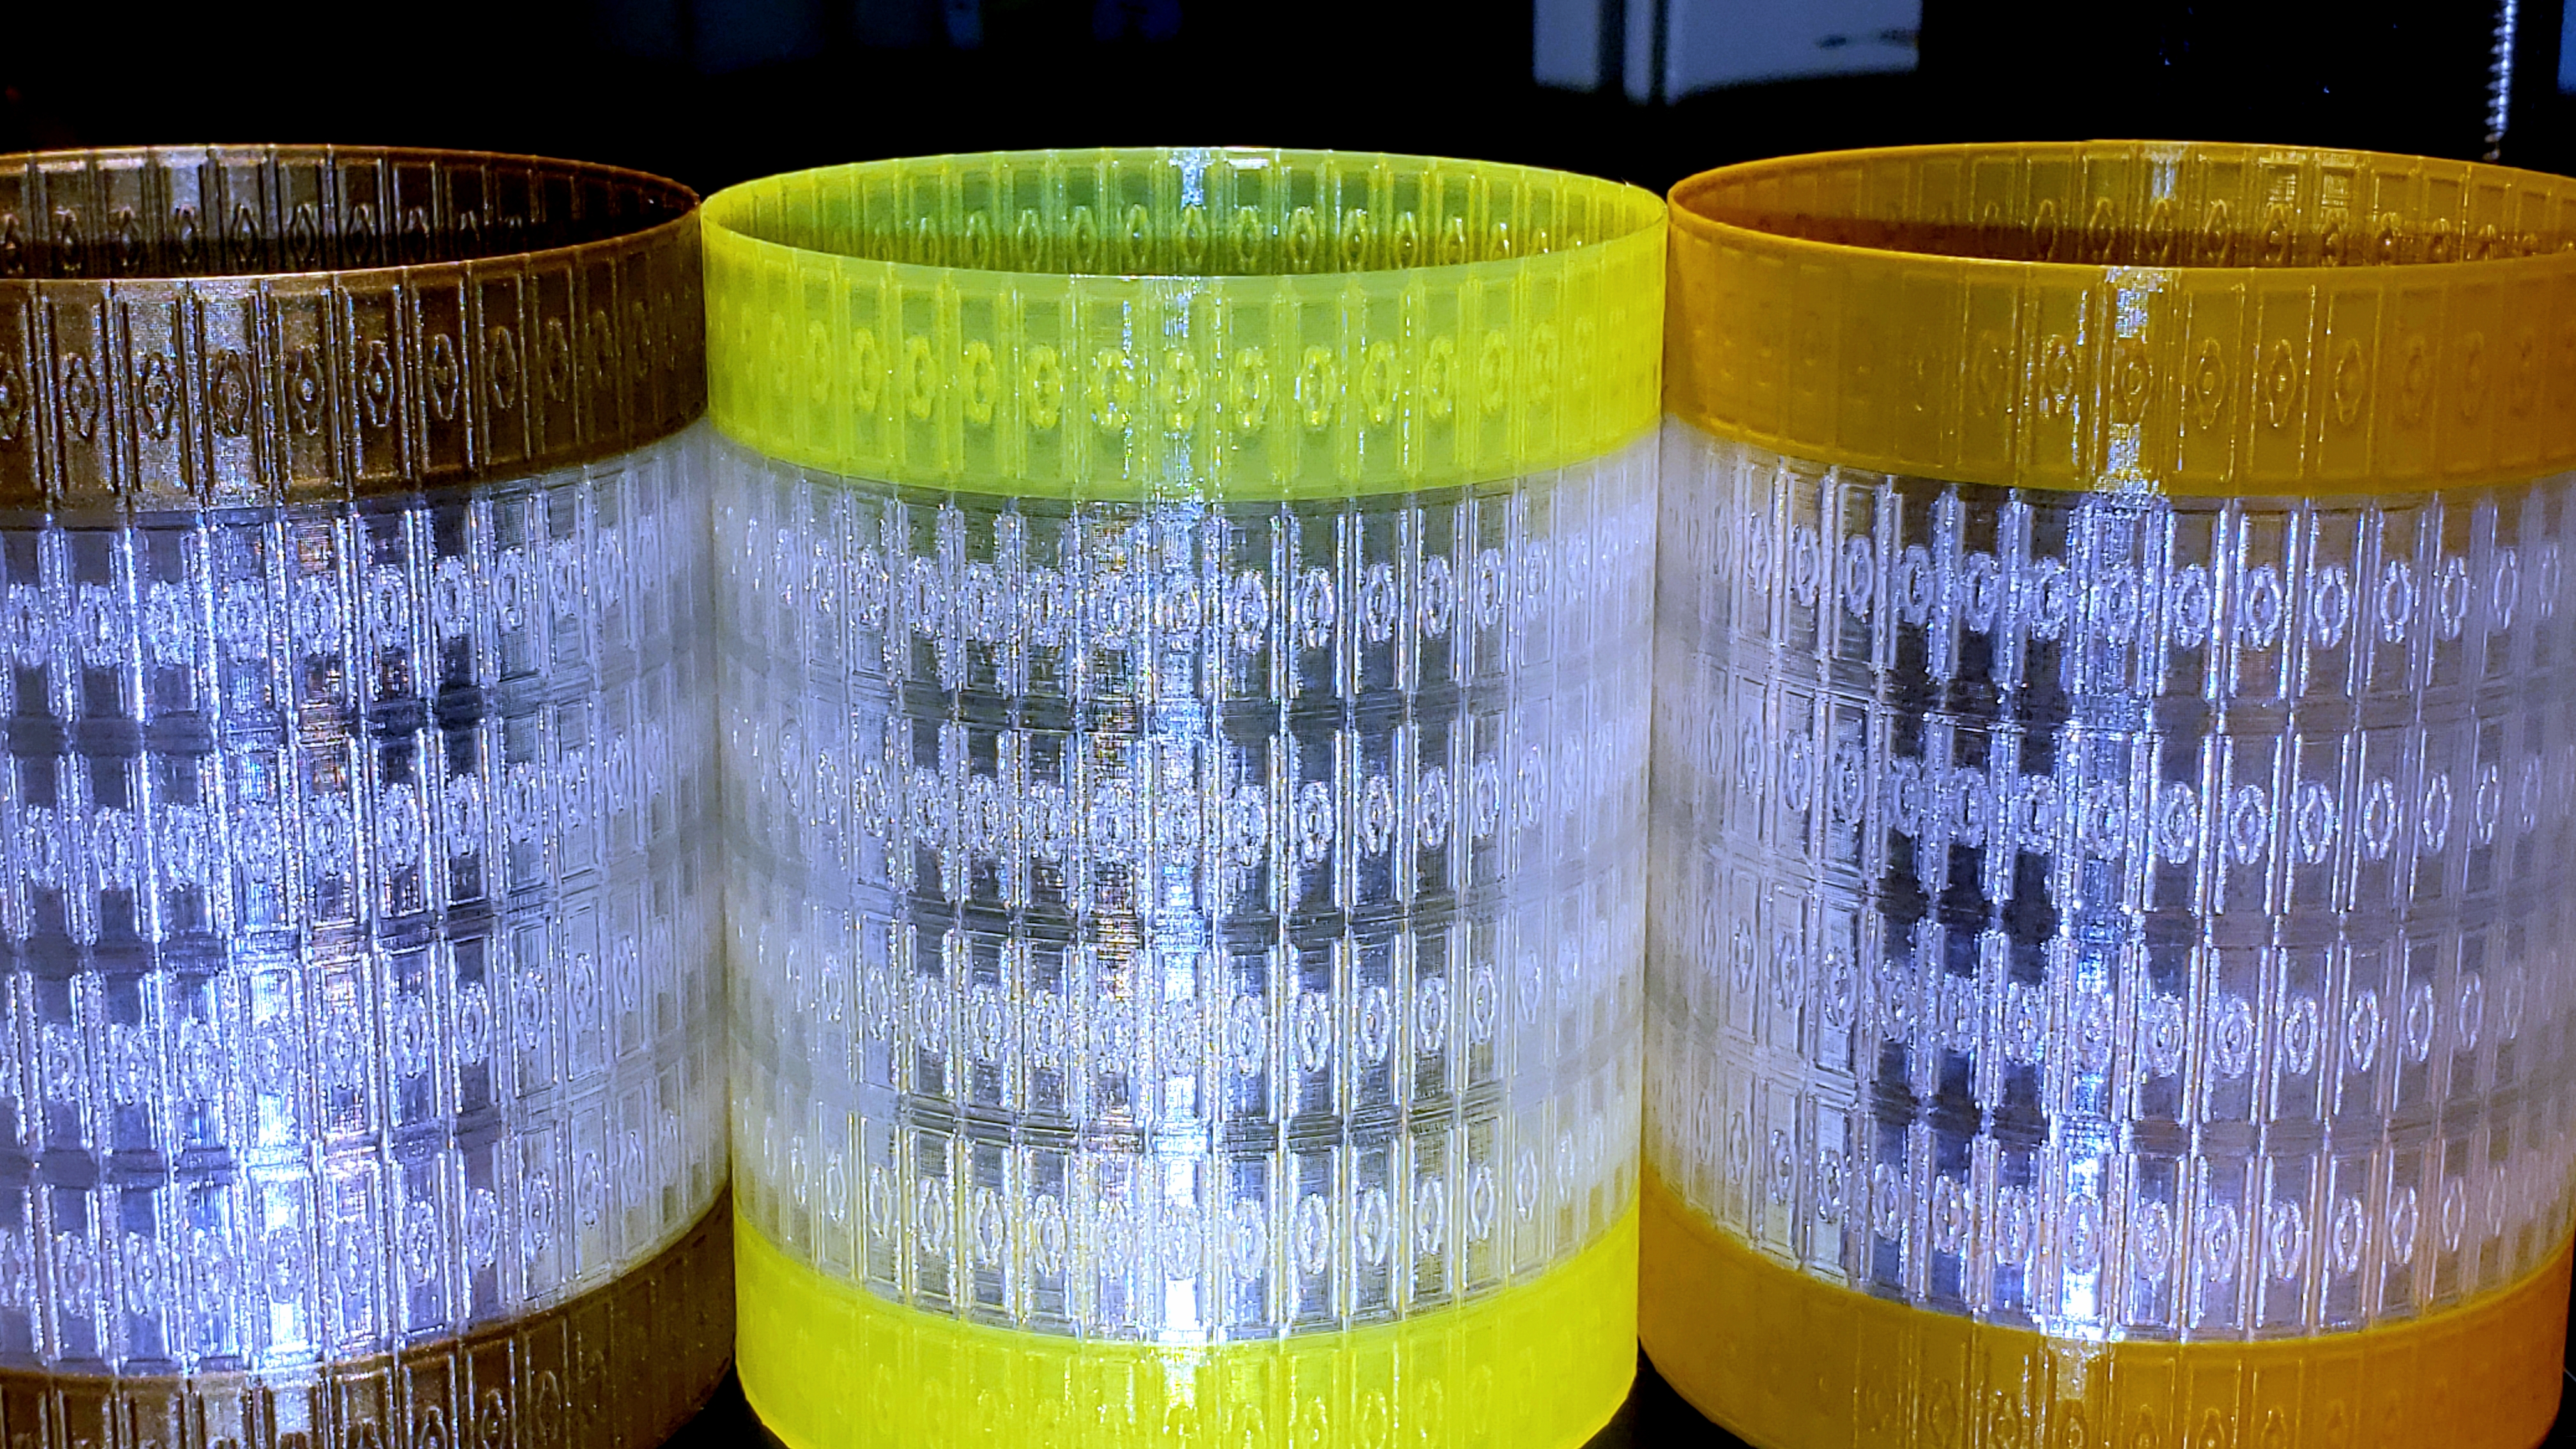
In the pics above; the first object was printed all white; the second with gold bottom, white band and thin gold rim; the third was all gold; and the fourth with gold bottom and white top. These were modified from the vase sample Prusa supplied with the kit.
Final observations (hopefully) on sequential printing.
Sequential mode printing of objects is worth understanding!
I found that it was important to pay close attention to “Print settings → Output options → Sequential printing → Extruder clearance”. The height clearance must be greater than tallest object to avoid collisions between either the nozzle or X-axis lower rod and already printed objects. It is easier than trying to arrange objects and print order to get away with a smaller number.
As this was an exercise to determine if it was possible, I set the height to 5 mm above the tallest object. I didn't go to maximum Z-axis height printing. There may be a more elegant solution in the End G-code section, but ???
At first, I forgot to take into consideration the Y-axis distance between the lower X-axis rod and the nozzle. It has to be taken into account for objects that are side-by-side. Even if PrusaSlicer is happy with the spacing. In this case the second object has to be set back far enough that the X-axis rod will clear the first object. If not, the lower rod will come down hard on the first object printed and the result is a Z calibration forced.(experience speaking)
I had to make sure I set back objects far enough to avoid this from happening.
In addition, I had to ensure that the cable support and cable would not hit any previously printed objects. (experience again)
I got the best results by limiting the number of objects being printed at a time. I could get 5 of my test objects to print, but it was more work than it was worth. Not to mention the number of times I had to abort because I learned something new. (the hard way)
Practice before you want to use it for a project, and then practice some more. Repeat as needed...
Was investigating sequential printing worth it?
I think so because it shortens overall print time and I hate the sound of my extruder and bed racing around doing nothing but making noise. I compare it to going grocery shopping for 50 items and making 50 trips and buying 1 item each trip to making 1 trip and buying all 50 items a once. Both work, but one makes more sense to me.
Whenever I can, I use sequential printing when printing multiple objects at once, now that I understand it better.
Final observations (hopefully) on sequential spiral mode printing.
The considerations above for sequential printing apply.
Sequential spiral mode printing of objects is worth learning and understanding!
According to all the information I could find, it is not possible to print more than one spiral mode object in a project.
By combining sequential printing and spiral mode I was able to print the tall cylinders above in one print job. I could also print up to 5 of my test vases (spiral mode) in one print job.
I suspect this was missed or inadvertently lost from the documentation.
Lastly, doing colour changes during spiral mode printing.
This was the toughest feature to figure out. I had one project that worked, but I had difficulty reproducing it, until I dismantled it piece by piece until I found the key.
It can be done with stock PrusaSlicer print profiles.
In my experience, this feature could use some tweaking.
It relies on modifiers which are not easy to place accurately,
specifically the Z-axis position as the height value in the slicer uses a reference point that I could not decipher. I expected the Z height to be zero and not some negative (-xx.xx) value. I suspect that modifiers were never intended for the level of accuracy that I would have liked for this use.
It would be nice if the layer height property could be used.
I, or more specifically my assistant “experience”, found out that if M600 Z(height of tallest object +5 mm) was not added to Printer Settings → Custom G-code → Tool change G-code, the printer will auto-eject any object in the path the extruder takes to the default filament change position.
I created a very small sacrificial ring only a few mm in diameter and .2 mm high to use as my first object on the plate.
Then I imported the object(s) I wanted to print with colour changes.
The sacrificial ring did not show in preview mode and did not print.
Attempts without a skirt and modified start gcode resulted in a first layer outer perimeter with a 4 -5 mm gap, so I moved the first tool change (filament change) to before the intro line and restored a single layer skirt.
PrusaSlicer setting to be aware of:
Print settings → Notes
detailed list of settings can be found here
credit and explanations can be found here
Printer Settings → Custom G-code → Tool change G-code
Print Settings → Layers and Perimeters → Spiral vase
Print Settings → Skirt and brim
Print Settings → Multiple Extruders → Wipe tower
Print settings → Output options → Sequential printing → Complete individual objects
Print settings → Output options → Sequential printing → Extruder clearance
Printer Settings → General → Capabilities → Extruders
Printer Settings → Custom G-code → Start G-code
Printer Settings → Custom G-code → Tool change G-code
Printer Settings → Extruder x → Preview → Extruder Color
I will include a zip file with the project file and a modified gcode file if anyone is interested. As with any gcode file, you are responsible for determining if you want to run it on your machine. It was created for PLA using Prusament filament settings, even though I use a generic brand of filament, using PrusaSlicer 2.1.0 for my MK3S without any extra tweaks. This project was created to see if I could combine sequential printing of multiple tall objects in spiral mode with colour changes.
Use at your own risk!
Quality is the Journey, not the Destination. My limited prints->
RE: Prusaslicer 2.1.0 sequential vase mode printing of tall objects
Because I could not get the M600 to use a variable Z offset, I opted for an offset > the height of the objects, which almost maxed out the Z height limit of the extruder. I might have gotten away with the default Z offset if I had moved the filament X-Y position to the right rear.
The current filament change position is too close to the first object, letting hot plastic from change to hit and stick to the first object. Post print cleanup,.
Quality is the Journey, not the Destination. My limited prints->
RE: Prusaslicer 2.1.0 sequential vase mode printing of tall objects
..
Quality is the Journey, not the Destination. My limited prints->
RE: Prusaslicer 2.1.0 sequential vase mode printing of tall objects
arrrgh! timeouts!
project file
Quality is the Journey, not the Destination. My limited prints->
RE: Prusaslicer 2.1.0 sequential vase mode printing of tall objects
gcode file
Quality is the Journey, not the Destination. My limited prints->
RE: Prusaslicer 2.1.0 sequential vase mode printing of tall objects
Quality is the Journey, not the Destination. My limited prints->
RE: Prusaslicer 2.1.0 sequential vase mode printing of tall objects
On to next journey of discovery. I wonder what it will be?
Quality is the Journey, not the Destination. My limited prints->
A stray cosmic ray resulted in my original project file being removed from this thread. Looks like less than 2 dozen threads were affected (mostly pictures). The threads/file affected were about 1 year old. Forum Administration is aware of it and are investigating. Therefore, I am re-attaching the project file so that the write up will make more sense.
Quality is the Journey, not the Destination. My limited prints->