Overhang problems with 0.6mm nozzle and Prusa Mini profiles
Hi,
My 3D printing setup includes an Original Prusa Mini with super PINDA upgrade and a silicon hotend sock. At present moment I am using 0.6 mm. nozzle and Prusament PLA Galaxy Silver. I tried to print the “MatterHackers' Mascot Phil A Ment” ( https://www.thingiverse.com/thing:2557603 ) via latest stable Prusa Slicer 2.3.3 using stock profiles: Printer: “Original Prusa MINI & MINI+ 0.6 nozzle”, Filament: “Prusament PLA”, Print settings: “0.30mm QUALITY”. I made a few changes to the default print settings: “CHECKED: Extra perimeters if needed”, “CHECKED: Detect this walls”, “CHECKED: Detect bridging parameters”, “Infill density: 10%”. All other settings were left unchanged.
According to the Thingiverse information the spaceman should print without any problems and without any support. The problem appeared when my printing process reached the hand fingers and things become messy.
I localized the problem to the starting point on the fingers that is a steep overhang. When the 3D printer was printing this part the filament started to behaves like a jelly/chewing gum instead of a hard material. And because this overhang then is a base for the fingers they also were not properly printed because they were also moving up&down during the printing.

I then downloaded and tried to print the Massive Overhang Test ( https://www.thingiverse.com/thing:40382 ). I sliced the test patterns with angle under 50° and left only 55°, 60°, 65° and 70°. During the 11 minutes printing process the filament behaved again like a chewing gum as seen on the video I took: https://www.udoma.org/tmp/PrusaMini/overhang/OverhangTest.mp4
The final result is not a pleasant one:

Here are the 3MF and STL files:
- https://www.udoma.org/tmp/PrusaMini/overhang/OverhangTest.3mf
- https://www.udoma.org/tmp/PrusaMini/overhang/OverhangTest.stl
I checked the Prusa Mini fans with the integrated self-test and they behave normally. During the test they were nosier (throttled to 100% I think) compared to their behavior during the printing process.
Is this “jelly”/”chewing gum” elastic behavior normal? How could I fix it in PrusaSlicer and how could I print the “MatterHackers' Mascot Phil A Ment” without any problem using my setup?
Overhangs are tricky with FFF printing
[...] According to the Thingiverse information the spaceman should print without any problems and without any support. The problem appeared when my printing process reached the hand fingers and things become messy.
Those parts of the print are tricky since they are overhangs. Filament is literally being printed over open air with nothing underneath it. Modern 3D printers can do reasonable printing to a point with overhangs and bridging (open area supported at each end) but gravity still counts. The trick is to quickly extrude the molten filament, then quickly cool it so it doesn't stay in that "chewing gum" state long enough to sag. Even in those conditions, the more one layer overhangs relative to the previous layers, the stringier the extrusions look and the more they're likely to sag. Since there's nothing underneath, you don't get the "squish" between layers that gives your vertical walls a nice appearance. This figure below illustrates the problem:
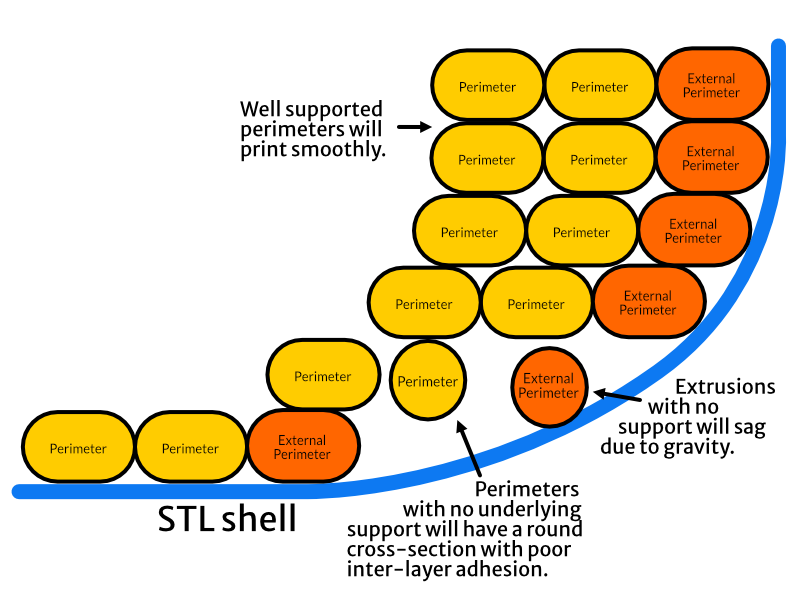
One key is that the amount of overhang relative to the layer height makes a big difference. You're using 0.65mm wide extrusions at a 0.25mm layer height. This is good as you want a high width:height ratio. You might try reducing layer heights, either for the entire model, or using the variable layer height feature, to reduce layer heights on the overhang layers. You can apply layer height adjustments manually, or let PrusaSlicer do much of the work for you:
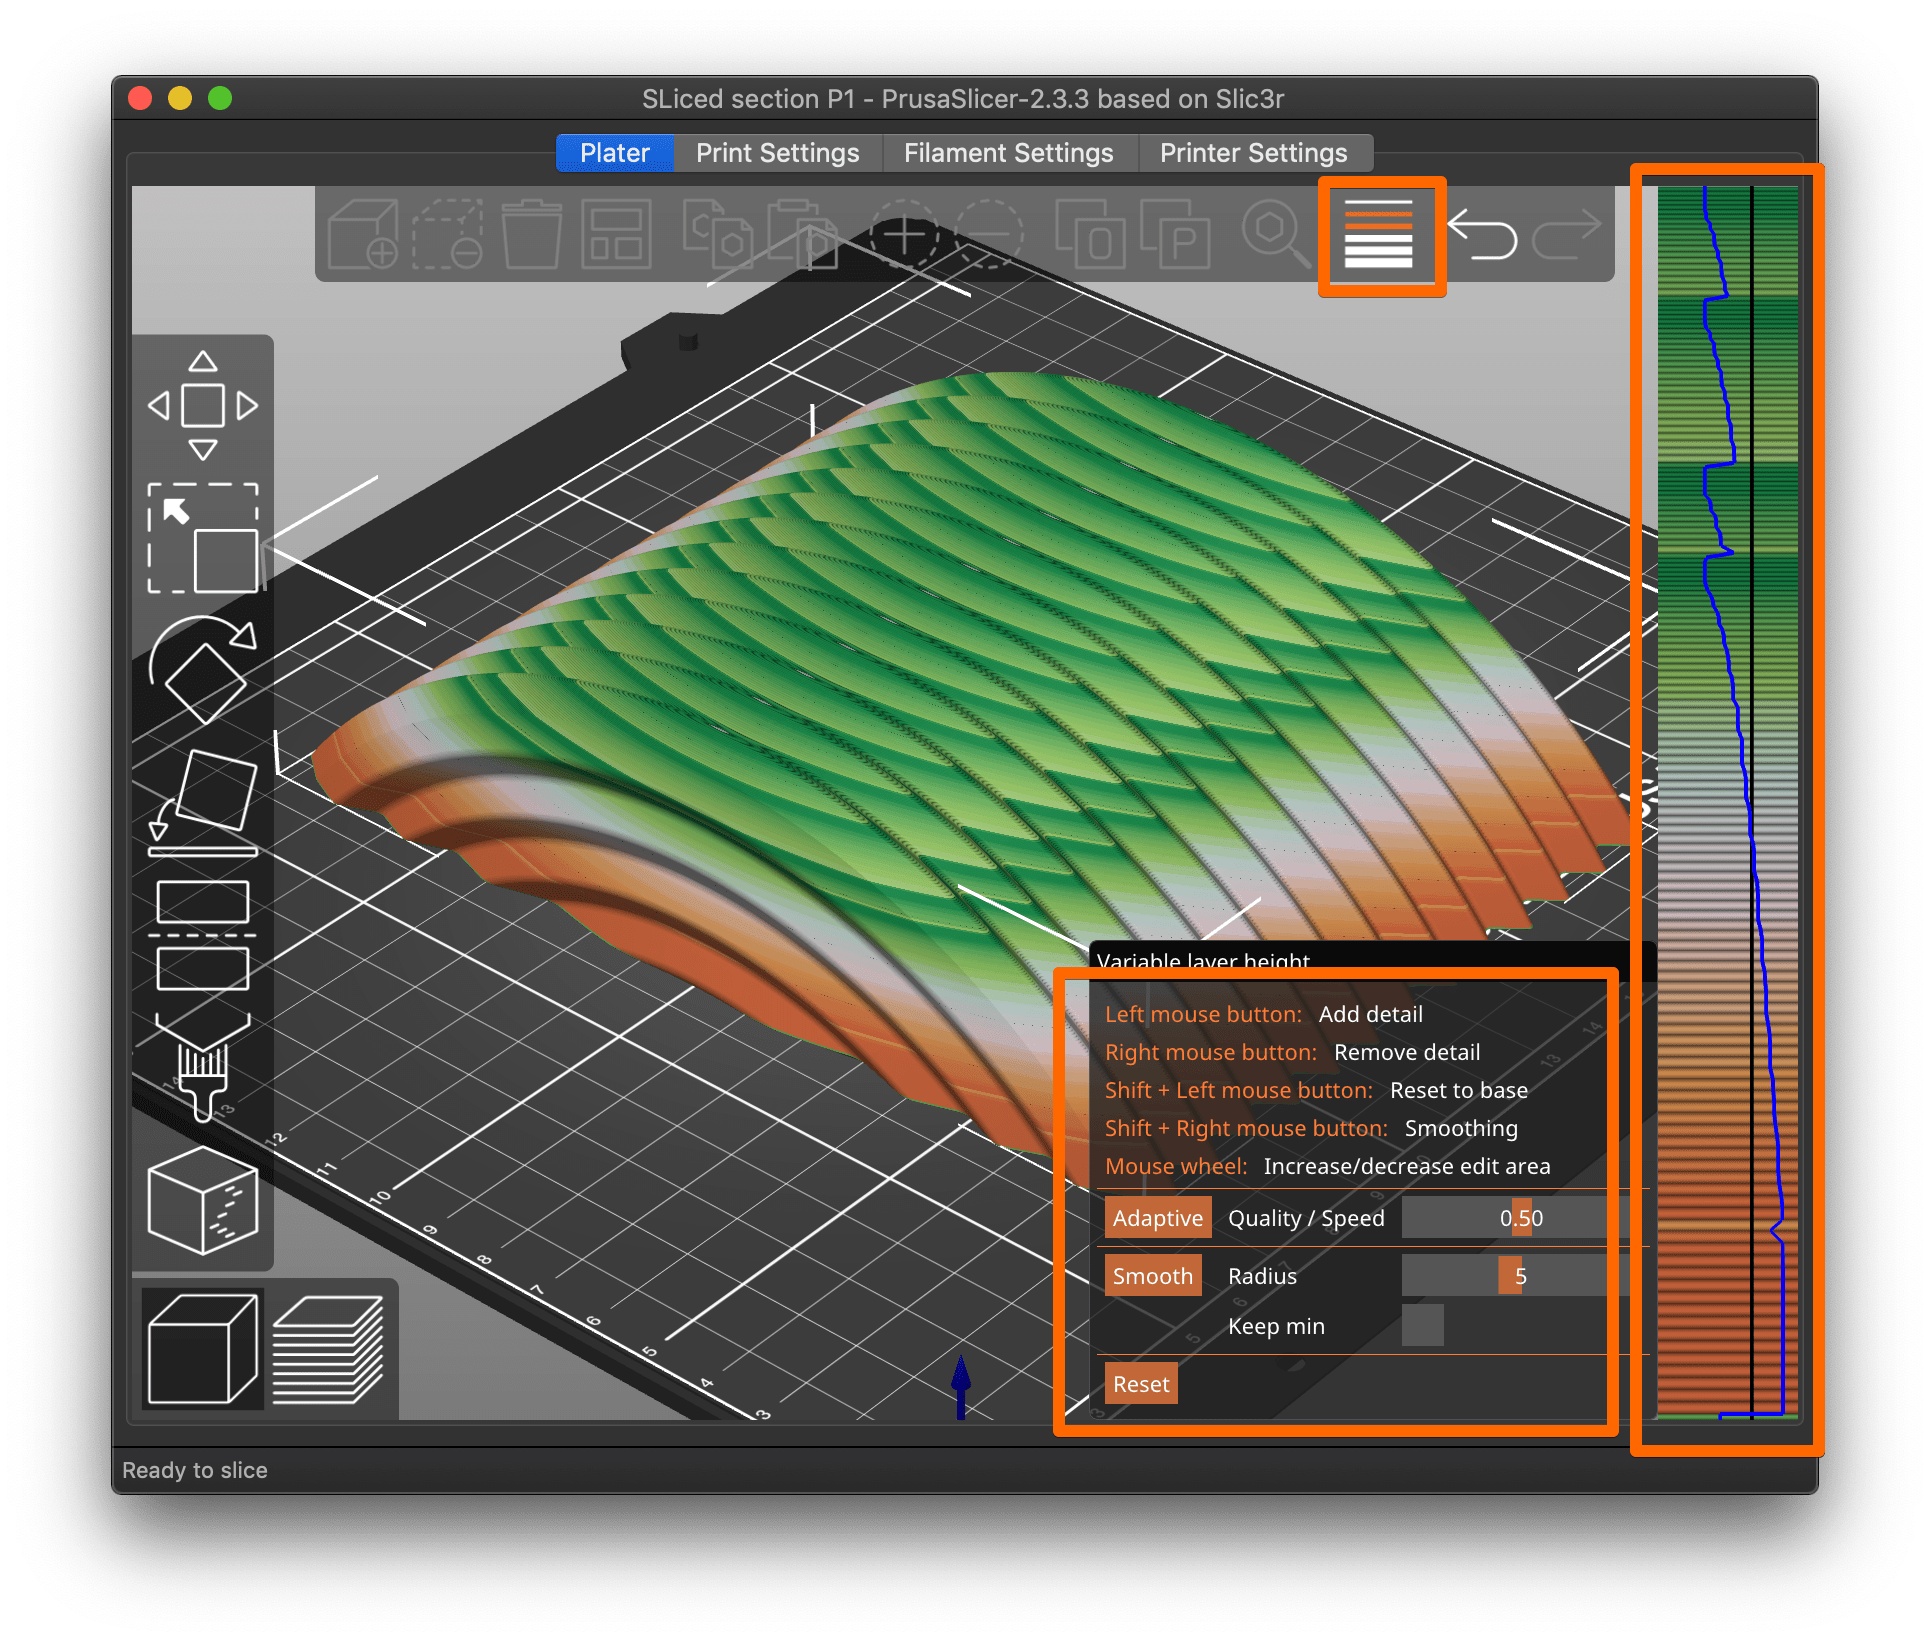
To use automatic variable layer heights:
- Select your part in the Plater view (each part on the print bed can have different heights) and click on the button at top with the "hamburger" stack of horizontal lines to open the variable layer height panel.
- Adjust the settings and select Adaptive or Smooth to have the slicer detect areas that will benefit from lower layer heights.
- You can see the results in the vertical bar at the right. Hover over it to see what layer heights have been selected at different heights.
You can hit Reset and play around with the adjustments to find what works best for a particular print. One hint: The upper and lower height ranges are determined based on your Printer Settings->Extruder 1->Minimum and Maximum layer height settings.
Temperatures and cooling also are important. You can try reducing your printing temperature which can help in some cases. Be sure cooling is set to 100% (default for PLA) and try rotating the part to verify cooling is even on all sides.
Strange build of filament at the front edge of the slope
I witness something interesting during the printing process when watching the video: https://www.udoma.org/tmp/PrusaMini/overhang/OverhangTest.mp4
At about 3rd minute of the video the 55° and 60° slopes were processing OK while 65° slope start building up filament at the end and 70° slope started losing filament at the end:

It is obvious that 70° slope is losing filament because it just drops over the front edge where there is no support. What I do not understand is why the 65° slope is building a lot of filament at the edge and how to prevent it? Also why all layers of filament behave like a chewing gum or a sponge even after 10 layers above them !?!