Filament direction when bridging a ceiling
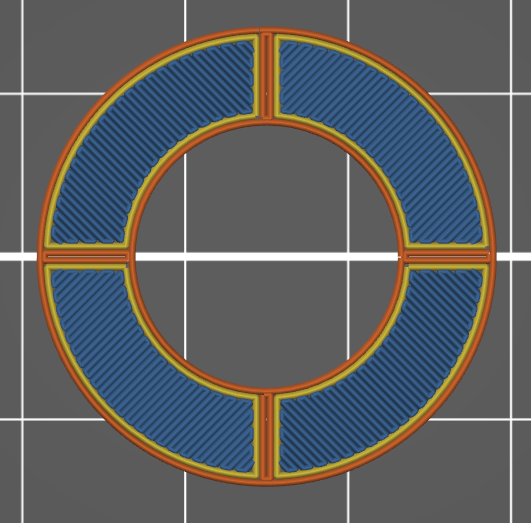
Hi, I found that often when slicing small to medium, rectangular ceilings (in this example 55mm x 16mm of void), PrusaSlicer usually bridges this gap across the long side instead of the short side, so it takes the longer way. In my mind, this might cause the sagging of the first ceiling layer as I experienced it.
1) Is this actually better than bridging the short side? (The Mini is my first printer, I got it 6 months ago, so I'm no expert on filament behaviour.)
2) If it's not better: Is there an option in PrusaSlicer to modify this orientation, or maybe even a way to avoid this automatically?
(I'm running PrusaSlicer 2.3.0 on Windows 10.)

Best Answer by Neophyl:
You can manually define the bridging angle. Its in Print Settings>Infill>Advanced>Bridging Angle. This changes it globally but you can use modifiers (either height or shape) and its one of the available settings for those so you can have it different in different places. Its an advanced (yellow) tagged option so you need to be out of basic mode to see it.
RE: Filament direction when bridging a ceiling
@neophyl
Cool, thanks, it works!
The number of options is a bit overwhelming. Well, now there's also a forum entry to point people to the right option. 🙂
RE: Filament direction when bridging a ceiling
The same behavior is in version 2.4.2 as well. Changing the angle for the whole part is not effective when you have a part with a few different bridges. Unfortunately, you can't change the angle with a height modifier. This would be a great feature for the future.
RE: Filament direction when bridging a ceiling
Yes you can.
Where? I can't find an option within height range modifier for bridging angle.
RE: Filament direction when bridging a ceiling
Where? I can't find an option within height range modifier for bridging angle.
Right click on the modifier's gear icon. Look under Add Settings→Infill.
It's well worth spending some time going through all the menus in PS. There's a lot of stuff you can do with modifiers.
RE: Filament direction when bridging a ceiling
@hedo3d
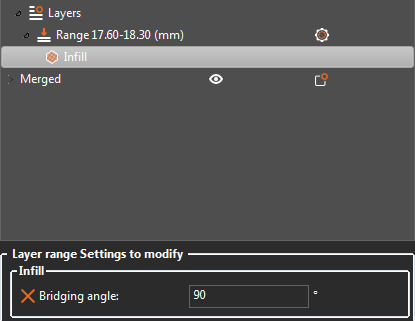
you'll need to be in "Expert" mode. then assign your height range modifier, and the range to modify. Right click on the range Now in expert mode you should have the option "Add settings" click on that. select Infill from the resulting menu then select "Bridging angle" by ticking the box, press OK. Now the option will appear under the object menu.
Once you get a good understanding you can setup every manner of Bridge type.

Hope this helps.
Regards
Swiss_Cheese
The Filament Whisperer
RE: Filament direction when bridging a ceiling
I should have mentioned you don't actually need to use modifiers for this, None of my examples had modifiers but I didn't want to be confusing, you can get the same result with Height range and mesh modifiers. However they aren't a must. So just keep that in the back of your mind for later, as you advance.
The Filament Whisperer
RE: Filament direction when bridging a ceiling
@swiss_cheese
Thank you for the explanation. Now I found it. I was a little confused by the 2 INFILL options and I thought they had the same functions behind them.
many thanks
RE: Filament direction when bridging a ceiling
@hedo3d
I understand the confusion, one is for the most "Basic" of options and the other offers many many more options, that's why it's only found in "Advanced".
Now you see that you can apply almost all settings to "Objects" and certain "Parts" this will make PrusaSlicer much more powerful for you. As Fuchsr mentioned above it is well worth spending some time going through and getting acquainted with the advanced menus. I will add to that, settings applied to Objects and Parts override the settings in in the main menus. there's a lot to learn there.
Glad I could help.
Swiss_Cheese
The Filament Whisperer