Interesting bug-like-feature but I'm not sure it's the same thing (and can't tell without seeing settings)
[...] Problem is, I get another result with "Z-lift 0.2"
Ah, now this is a good example of why I ask to see settings. We are both at the same starting point so it's easier to compare notes.
I can't figure which setting cause this difference?
This is interesting. On my Mac, with my PrusaSlicer defaults, I don't get that extra line, but ...
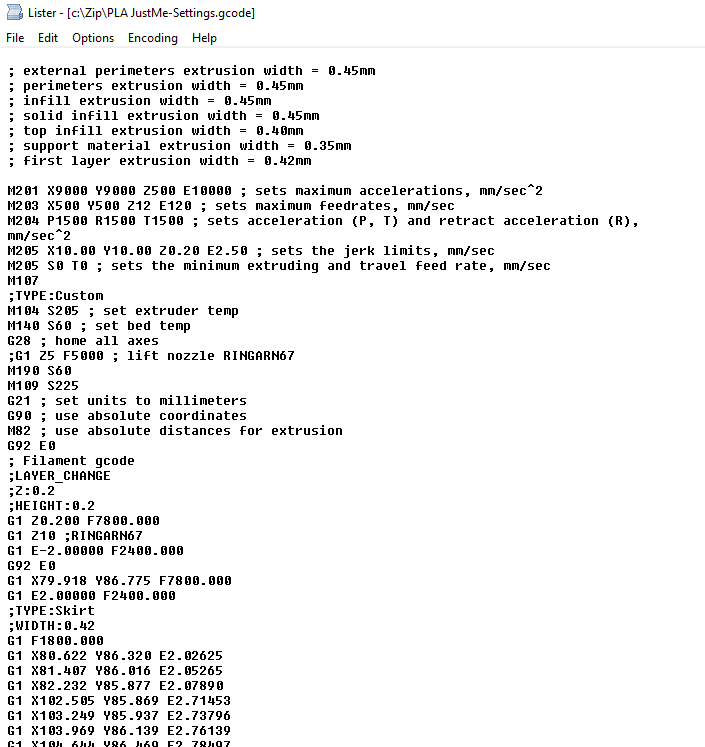
File is attached
Yes! Thank you.
The only reason I can understand this is that Mac version and PC version differ
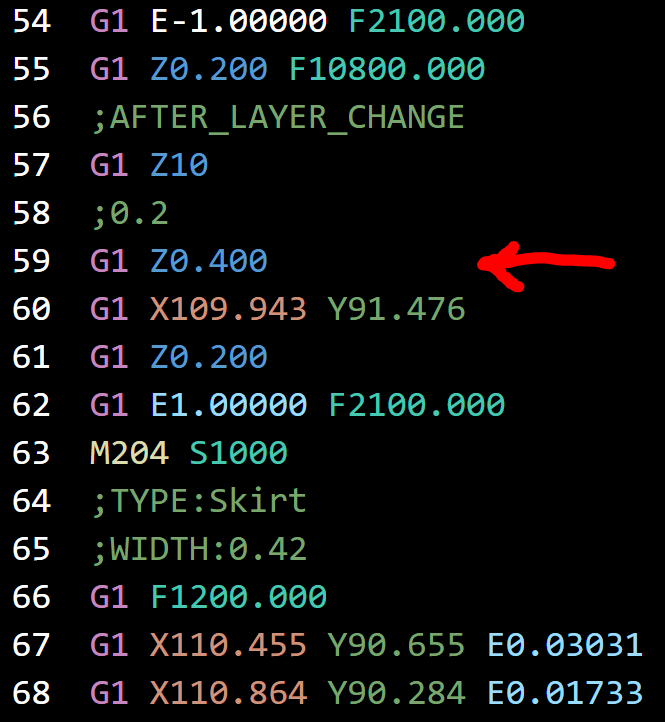
Aha! I can trigger the behavior both ways on my Mac. I loaded your config and added the Z10 move and got this:
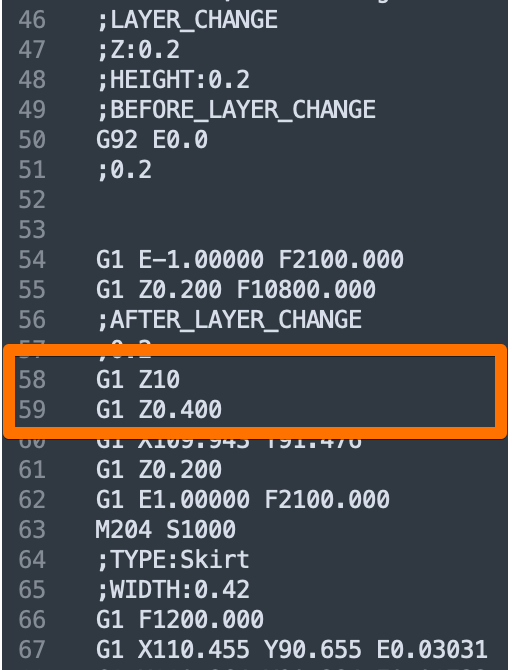
Line 58 is the Z10 move as expected, but then it does that Z0.4 move. I then went into your printer settings and clicked the little orange "undo" button for the layer change gcode boxes and sliced again:
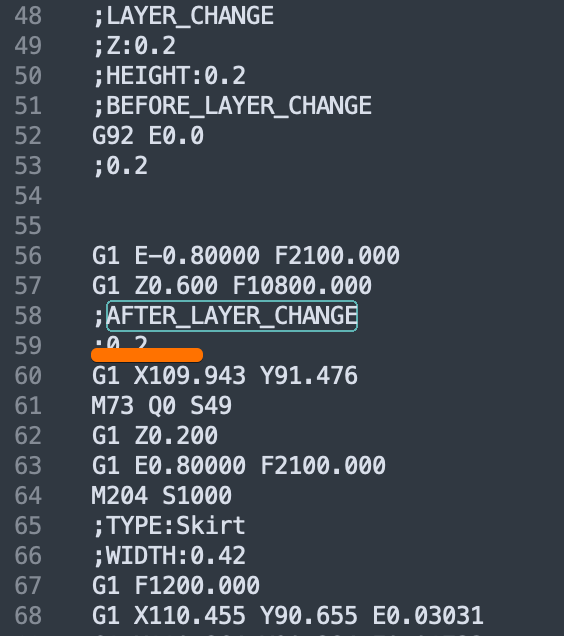
This mirrors my earlier results. So then I shoved some nonsense values into the before and after layer change gcode. Nothing changed with before layer change, but inserting a nonsense Z value (7) into after layer change gcode yielded this;
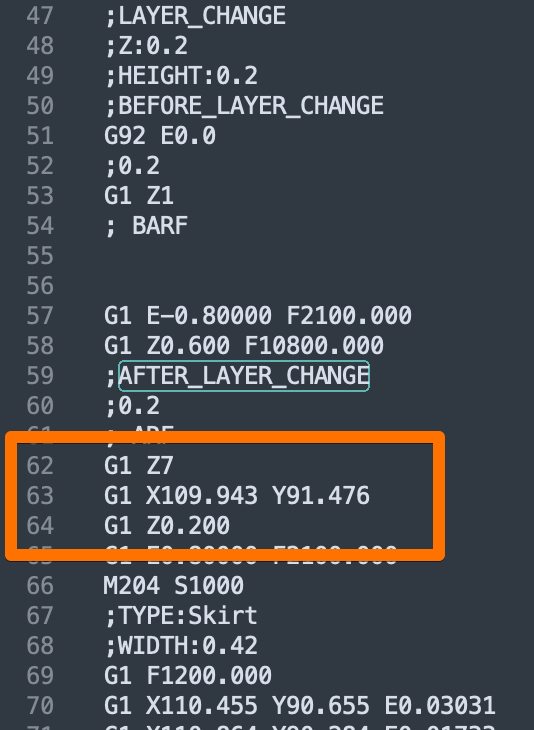
Oddly enough, the nonsense Z move doesn't seem to be detected on other layers:
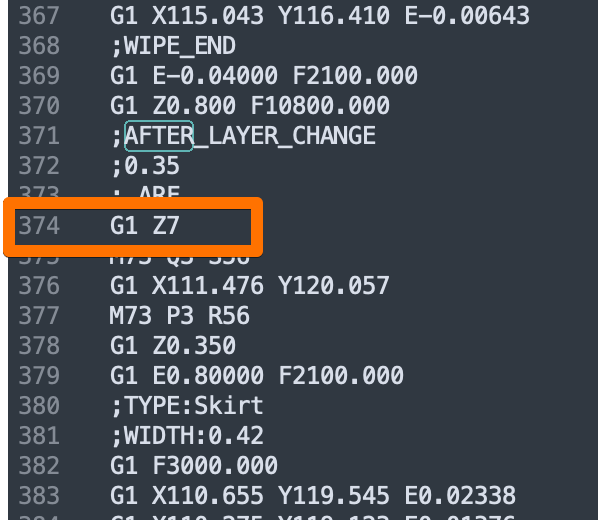
So it does look like if a Z change is detected before an explicit Z move on layer 1 (only) is generated by the slicer, it issues a "safety" correction to 0.4mm but only for layer 1. That inserts the spurious "safety" (?) line that is followed up with the "actual" layer height (line 61 in your last example). This ONLY happens on layer 1, so... doesn't strike me as a big deal.
That correction seems to be independent of the printer extruder settings. Changing Z lift distance doesn't affect it. Not sure if it's always 0.4mm or not. Unfortunately, I don't have @justme-2 's settings to look for similarities, but you and I are seeing 0.4mm inserted there. I think you may have tiggered a bug-like-feature by inserting that gcode, but I'm not sure it's the same problem as in the @justme-2 's post.
I'm curious to see if saving the printer preset matters and try a few more things now that we can reproduce this particular problem (which may be one big red herring and false trail). Sadly, not tonight! Big question for @justme-2 is whether their setup is using any Z moves in the startup gcode that we haven't been shown?
RE: No idea how to do it
Well, I have to admit I have no idea how to make the 3mf file that Ringarn67 made.
BTW, in the startup gcode I have the 'G1 Z5' line that is shown in the beginning of the files I posted right after the homing comand.
@justme-2
Which one?
I am right now creating a bunch of 3mf-file with different settings to see if we could come to a conclusion on all this.
And I still agree with you, it is a very strange behavior
Prusa i3 MK3S+ FW 3.11.0 (kit dec -20), PrusaSlicer 2.5.0+win64, Fusion 360, Windows 10
I suspect it's a safety feature triggered by any Z movement before printing the 1st layer
[...] BTW, in the startup gcode I have the 'G1 Z5' line that is shown in the beginning of the files I posted right after the homing comand.
Good to know. Not to belabor this, but seeing the full settings (zipped up 3mf project file) would have helped!
I think what is going on is that PrusaSlicer sees any Z movement in the 1st layer gcode and inserts "safety" commands to move the nozzle to a reasonable level. It doesn't interpret the gcode to try to figure out exactly where it is -- that might be tricky with slicer math -- but just goes for a "known safe" height. If your nozzle happens to be low as in the case of printing a prime line at the default 0.15mm on a Prusa Mk3, it moves UP to 0.4mm. If it's anything else, it'll move up or down to 0.4mm. Then the normal layer height moves occur which bring it down to your real 1st layer height. That's where the redundant line seems to come from, at least from what I'm finding. I suspect this is a safety feature to deal with the bed scraping issue @ringarn67 asked about.
@justme-2 I'm not sure this is the exact cause of your original duplicate movements, but it sure seems close. Right now, I'm mostly curious why it seems to be 0.4mm in some cases, 0.2mm in others. Perhaps some awareness of the printer type?
In any case, this really seems to be a one-time correction that's only applied on the 1st layer. While perhaps redundant, is it truly disrupting anything?
Clarification
I should have written: "I think what is going on is that PrusaSlicer detects any Z movement before the first print move on the 1st layer and inserts...". If that Z motion is caused by start gcode or after layer change gcode, it seems to be triggered.
Again, I'm not sure why this is a problem. If you have the nozzle raised, sure you could have it slope to the 1st print point, but every single move afterwards is going to be at that "dangerous" height. Not sure why such a move with nothing on the bed is a problem when the same height will be used for movement all over the bed after it is full of the 1st layer.
All that said, if it's really a problem, a very simple post-processing script could simply pull that line out now that we know where it appears.
Here You Go
@justme-2
Here is two files, one 3mf with your settings, taken directly from your uploaded g-code
I have made 2 changes, both in "Printer Settings", "Custom g-code", both "tagged" with RINGARN67
I commented out G1 Z5 F5000 lift nozzle in your start G-code, and added {if layer_num==0}G1 Z10{endif} in your after layer change g-code.
I have tested sooo many different settings and as far I can see this will work just fine,
As Long As Lift-Z Is Something Other Than 0.2
The other file is gcode generated from the above mentioned 3mf
Prusa i3 MK3S+ FW 3.11.0 (kit dec -20), PrusaSlicer 2.5.0+win64, Fusion 360, Windows 10
The Problem
Again, I'm not sure why this is a problem. If you have the nozzle raised, sure you could have it slope to the 1st print point, but every single move afterwards is going to be at that "dangerous" height. Not sure why such a move with nothing on the bed is a problem when the same height will be used for movement all over the bed after it is full of the 1st layer.
Here is the problem. All from changing settings within Prusaslicer, no custom g-code what so ever.
The setting that screw everything up is "Skirt Height 0(zero) layers"
As I see it, it is a problem if you can change settings so nozzle scratching the bed
And as I said earlier, I think they are somehow related.
I will PM you all my test files later, time for dinner now 😀 so you can test them too and see if there is any difference.
Prusa i3 MK3S+ FW 3.11.0 (kit dec -20), PrusaSlicer 2.5.0+win64, Fusion 360, Windows 10
Can you set skirt loops > 0 AND skirt height to 0?
Here is the problem. All from changing settings within Prusaslicer, no custom g-code what so ever.
The setting that screw everything up is "Skirt Height 0(zero) layers"
Ah, interesting. I usually disable the skirt. Will have to check that out (when I don't have other stuff to do).
As I see it, it is a problem if you can change settings so nozzle scratching the bed
And as I said earlier, I think they are somehow related.
I haven't seen settings that will move Z to 0. Are you saying skirt height to 0 layers will trigger it? I set Loops to 0, so never thought to try a height of 0. You may have found a bug in the Skirt settings. Height should not be 0 if Loops is not 0. That's not a valid combination, so once loops is set to 0, disabling the other options would be safer. An interesting unintended consequence, though a true edge case.
Other than this possible case, I still don't think that "safety" move is a big deal. Looking forward to seeing your 3MFs if you nail it down. (I've got work to do for a bit, so can't play.)
I will PM you all my test files later, time for dinner now 😀 so you can test them too and see if there is any difference.
Yes You Can
Here is the problem. All from changing settings within Prusaslicer, no custom g-code what so ever.
The setting that screw everything up is "Skirt Height 0(zero) layers"Ah, interesting. I usually disable the skirt. Will have to check that out (when I don't have other stuff to do).
As I see it, it is a problem if you can change settings so nozzle scratching the bed
And as I said earlier, I think they are somehow related.I haven't seen settings that will move Z to 0. Are you saying skirt height to 0 layers will trigger it? I set Loops to 0, so never thought to try a height of 0. You may have found a bug in the Skirt settings. Height should not be 0 if Loops is not 0. That's not a valid combination, so once loops is set to 0, disabling the other options would be safer. An interesting unintended consequence, though a true edge case.
Other than this possible case, I still don't think that "safety" move is a big deal. Looking forward to seeing your 3MFs if you nail it down. (I've got work to do for a bit, so can't play.)
I will PM you all my test files later, time for dinner now 😀 so you can test them too and see if there is any difference.
Yes, if skirt height is Zero and vase mode without bottom layers, (a "pipe") will trigger it.
I usually set loops to 0. However, there was on time I changed the wrong setting, Height instead of Loops, and saw a line go from end of primeline to part.
It is clearly visible in the file I attach, 3mf and my generated g-code
Forgot the files in my last post 😣
And as said before, there is some very strange z-moves on my lcd screen when I tried it, don't know if printer really did them.
Of course with some safety, Live Z +0,5 from my "real" height
Prusa i3 MK3S+ FW 3.11.0 (kit dec -20), PrusaSlicer 2.5.0+win64, Fusion 360, Windows 10
RE: Didn't work
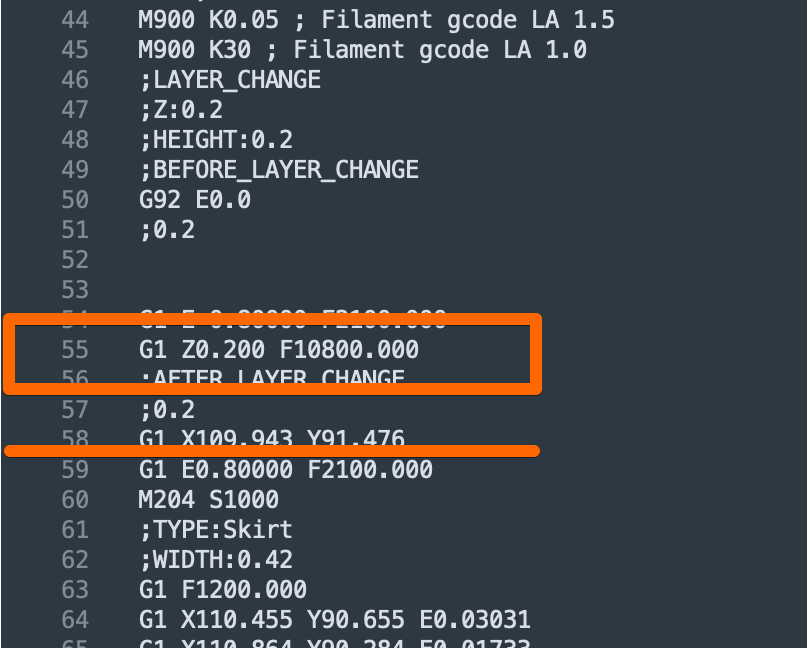
Ringarn67, I loaded the .emf file you've made with my settings including you changes and it doesn't work as it should.
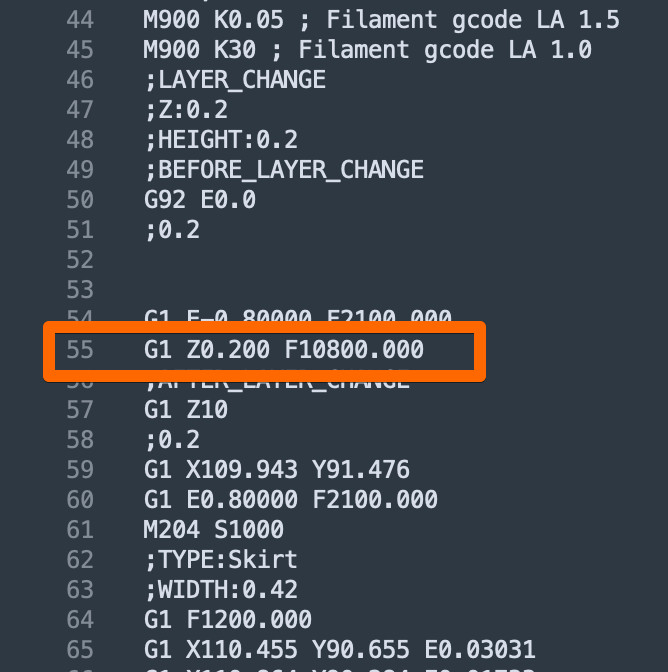
Look at the picture after the layer change. It goes to Z0.2 then up to Z10 with your name in the comment but then it doesn't go down to Z0.2
I didn't try to print it just looked at the file.
@justme-2
You are absolutely correct
I thought I was done with this yesterday, apparently I am not 😣
Will continue when I come home from work.
I have attached a file where everything works just as I, and you, want.....
Prusa i3 MK3S+ FW 3.11.0 (kit dec -20), PrusaSlicer 2.5.0+win64, Fusion 360, Windows 10
Re
I tried the last file and it doesn't work correctly either.
First off, it's not my settings at all. I don't have a Prusa printer but a clone I made myself. Using the Prusa settings is not working correctly with my printer which is why I have it set as custom printer.
Second, it has the same problem as I've mentioned in my previous post that it goes up but doesn't go down.
Two things I wonder about. First, do the Prusa people monitor the forum and second, should I open a ticket about this.
Z-lift SETTING triggers initial Z setting before XY moves, Z correction is issued after XY prints before printing IF Z-lift SETTING is >0. Need to see SETTINGS.
[...] I have attached a file where everything works just as I, and you, want.....
Is this what you want? I was very confused by the floating skirt, but it's easily explained (see below).
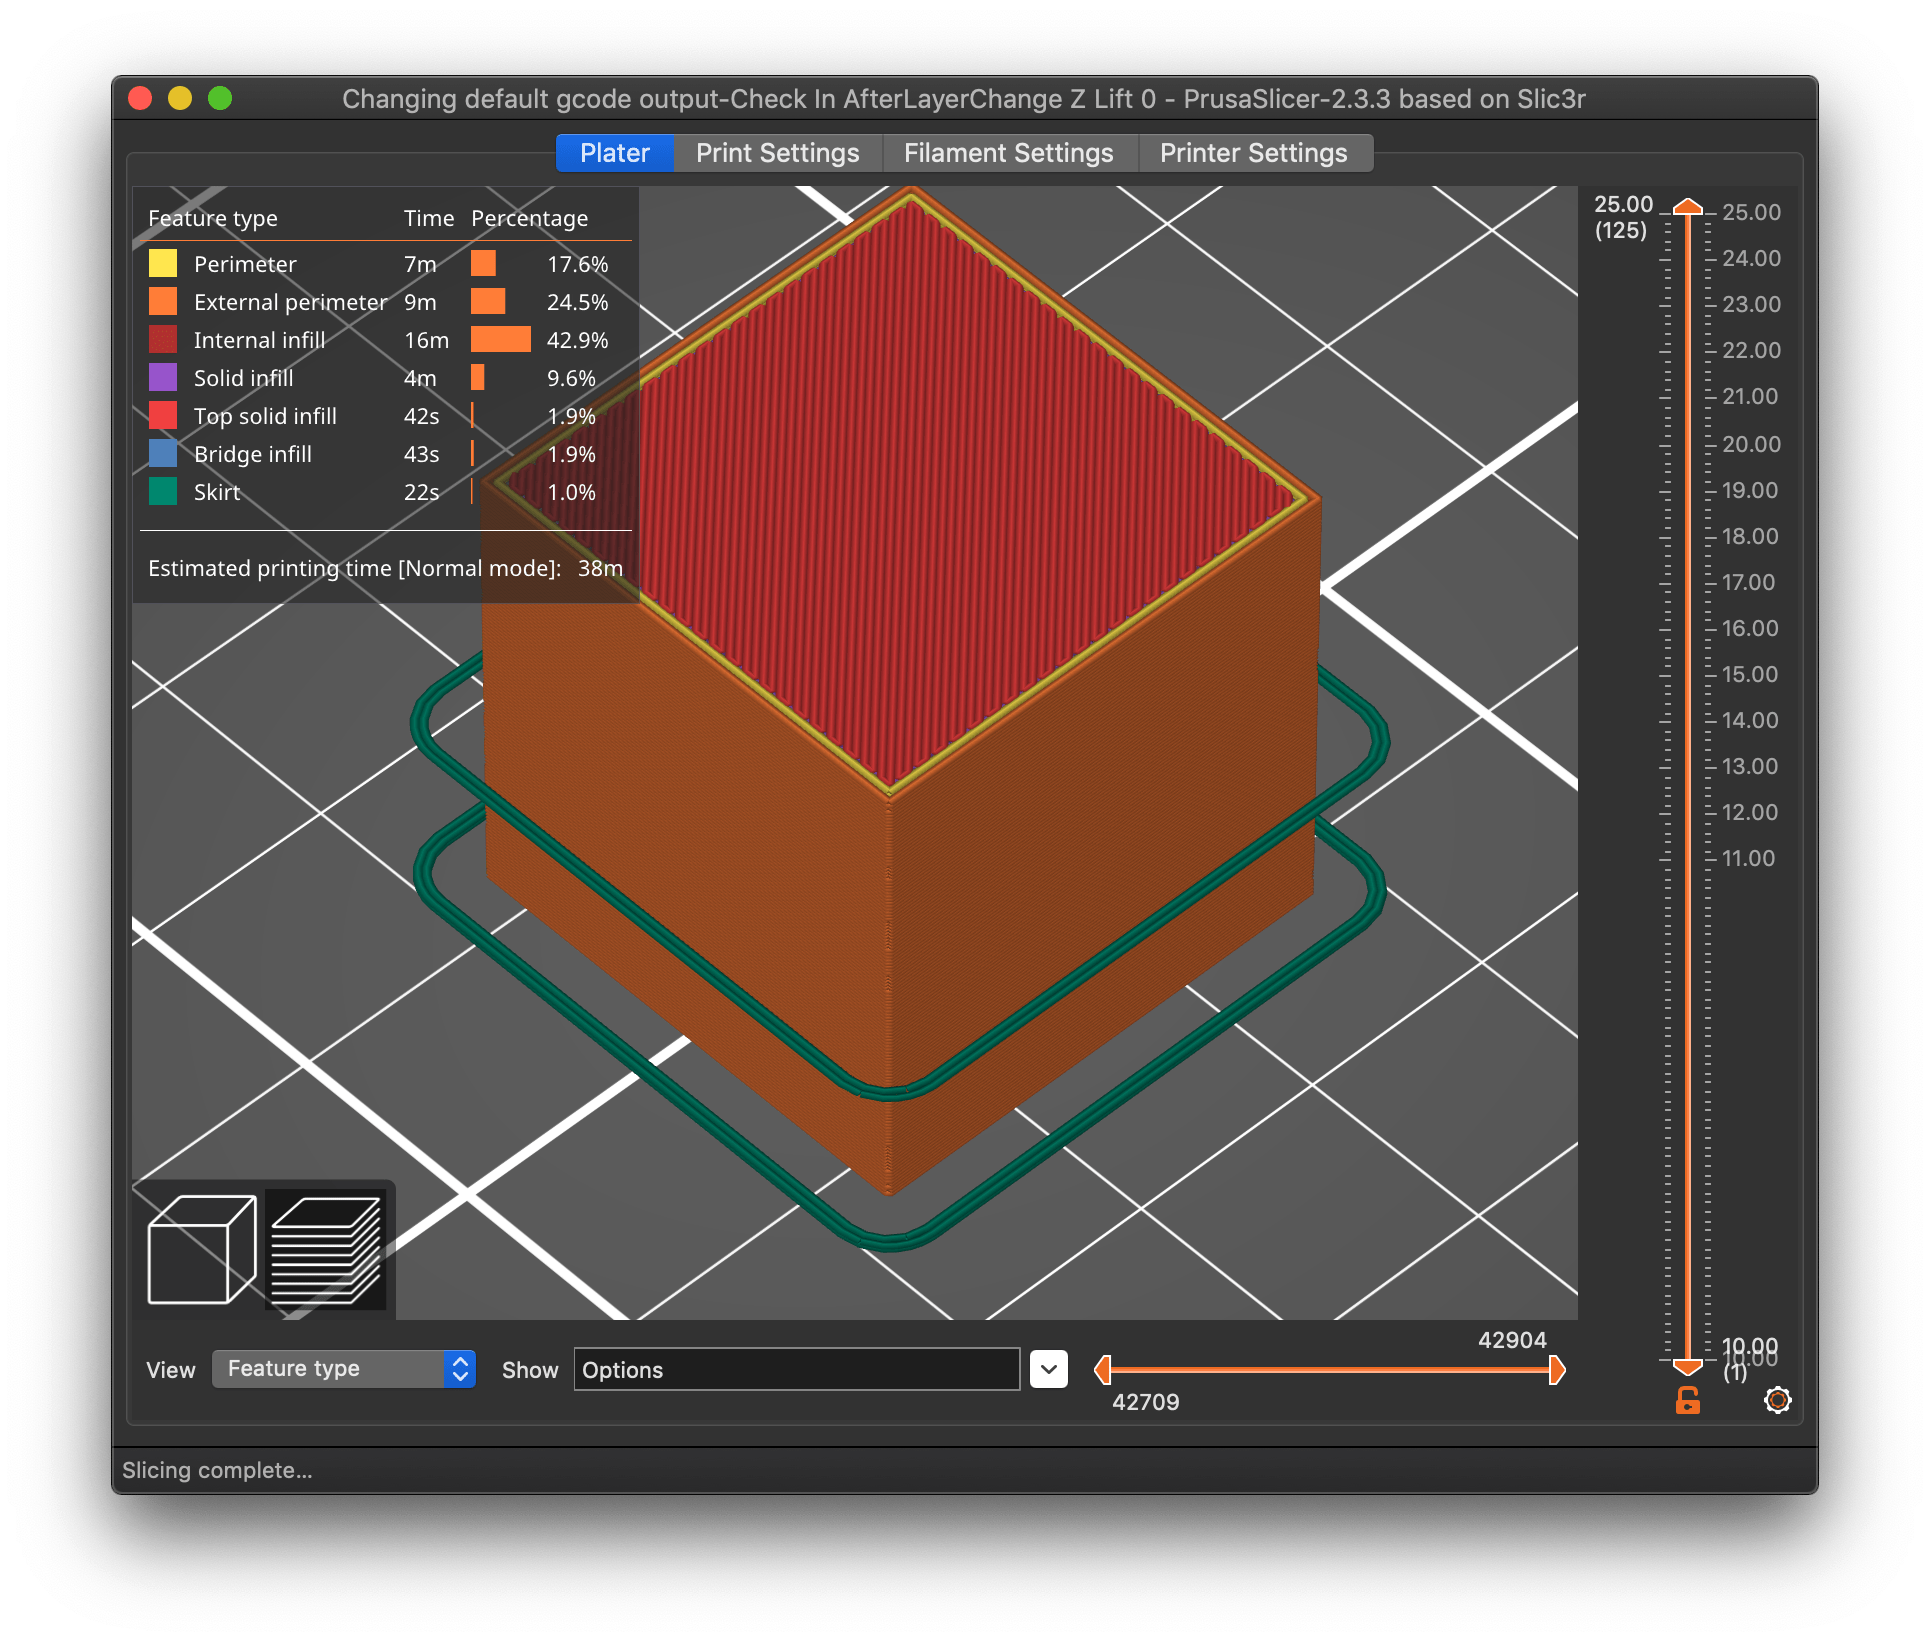
Here's the gcode I'm seeing with your 3MF settings (a good example of why we need to see settings). These examples all have your Z10 move in AFTER LAYER CHANGE in place:
Disabling your Lift Z 0 in Filament Overrides gets rid of the 2nd skirt. Here's the resulting gcode with that setting disabled:
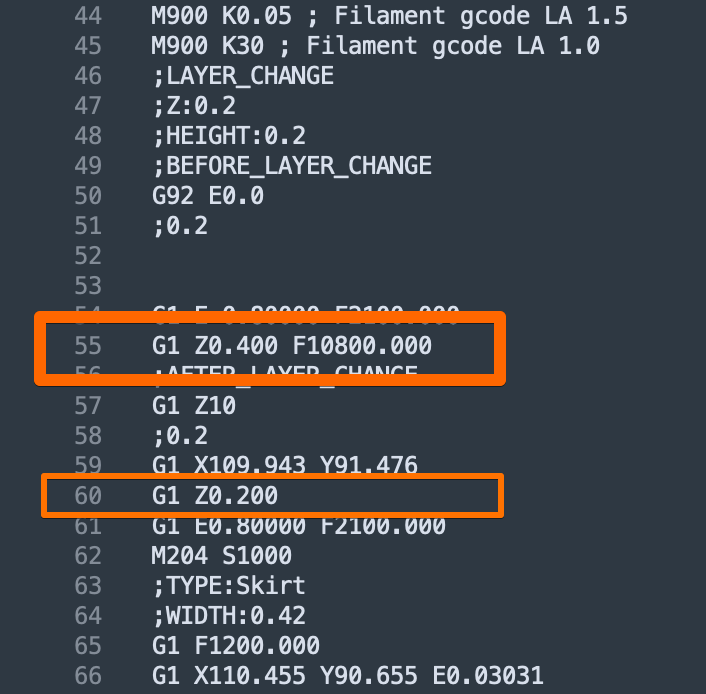
So z-lift 0 override puts in a 0.2 "safety" move, disabling it puts in a 0.4 "safety" line which matches up with your Extruder 1 0.4mm z-lift. It has also detected the Z10 in AFTER_LAYER_CHANGE and inserted a Z correction before printing. This makes sense. If I then set a 0.6mm z-lift in Extruder 1, I get this:
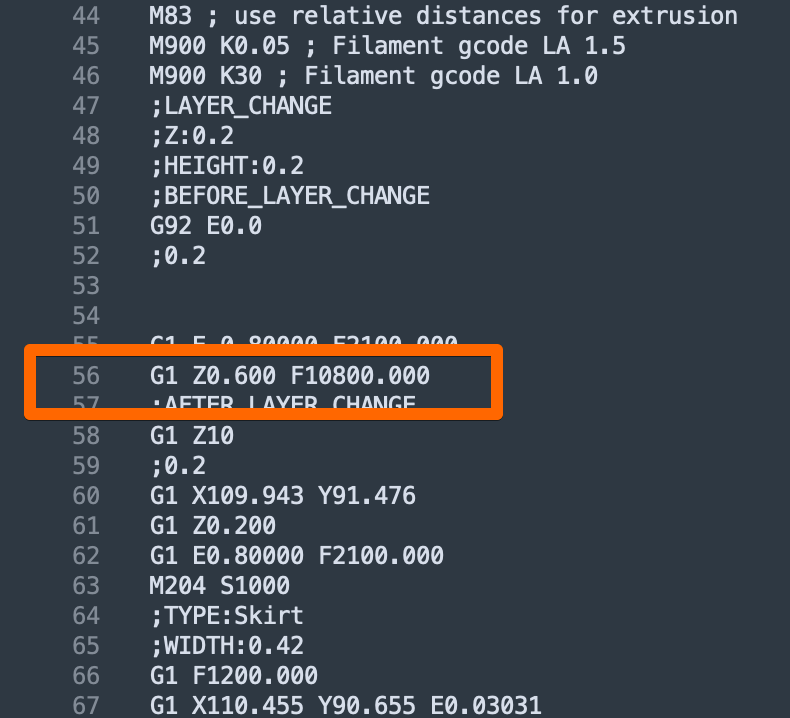
Notice the safety line 56 value changed and correction line 61 has been added. Setting z-lift to 0 in Extruder 1 settings produces this:
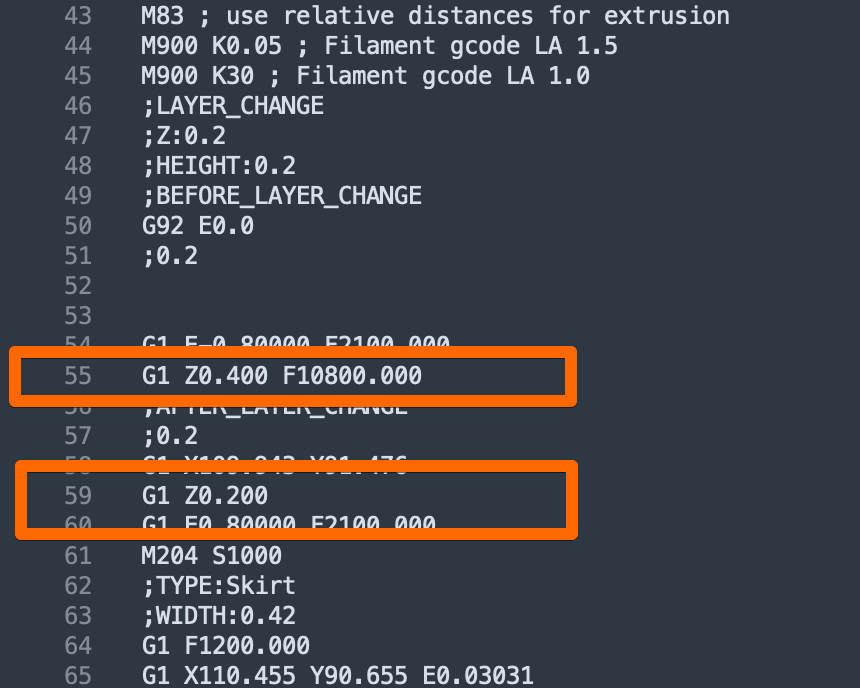
Finally, here's a control using only default Prusa preset settings with no Z move in gcode. Notice line 55 matches the Z-lift set for Extruder 1 in printer settings and 59 moves Z to the 1st layer height before printing.
So the "safety" line seems to follow the following logic:
- If z-lift is > 0, whether from extruder settings or filament overrides, PrusaSlicer will inserts a G1 ZXXX move that matches the set z-lift before starting the 1st layer printing. A G1 ZXXX is inserted after the XY move for the start of printing independent of any inserted gcode.
- If z-lift is 0, whether from extruder settings or filament overrides, PrusaSlicer will inserts a G1 Z0.0200 move before starting the 1st layer printing. No G1 ZXXX is inserted after the XY move for the start of printing.
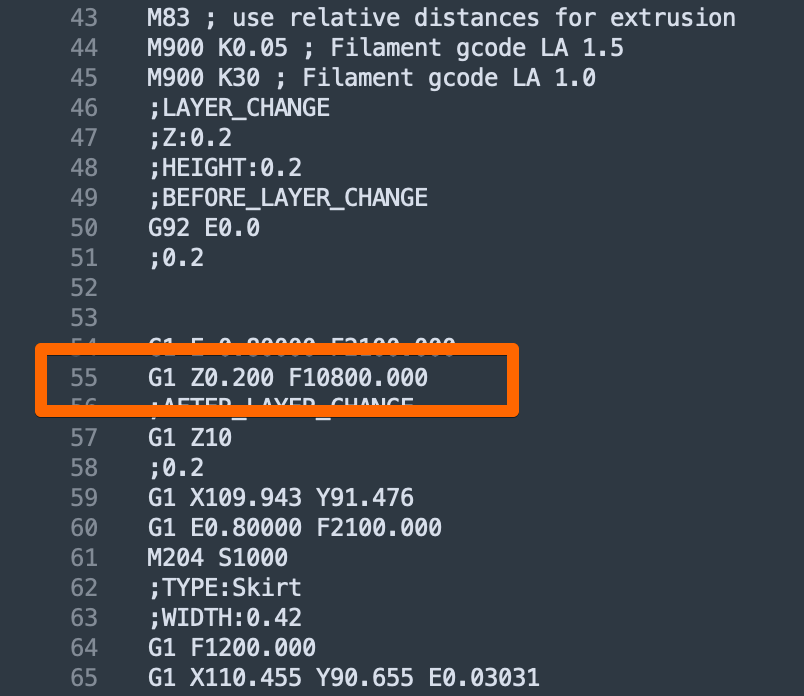
I think what you've discovered is that Z-lift impacts whether or not a Z adjustment is made after XY moves immediately before the start of printing. This only seems to matter on layer 1. The manual Z move in gcode does not seem to matter. To test, I reset to all Prusa preset settings and changed z-lift to 0 in Extruder 1 settings. Notice line 55 is set to Z0.2 and there is no Z correction after the XY move before at the start of printing:
Unless I'm missing something, the mystery "safety" line is triggered by your z-lift setting:
- If z-lift is 0, PrusaSlicer inserts a 0.2mm "safety" line on layer 1 before any XY movement to ensure you are NOT scraping the bed before it moves to start printing. (It doesn't look at your gcode settings.)
- If z-lift is > 0, PrusaSlicer inserts your setting value into the "safety" line. Presumably, you know what you're doing, so it doesn't change anything else. Z was 0and it adds the specified z-lift from your settings before any XY moves to start printing.
- After the XY move to start printing, if z-lift is > 0, it will adjust to the 1st layer height. If z-lift is 0, it assumes the nozzle is where it should be.
This makes sense to me:
- Before the 1st print move a default minimum of 0.2mm is inserted. Otherwise, it inserts your z-lift setting. This is a "safety" check to ensure the nozzle is > 0 before moving.
- After moving to the 1st print point, the slicer checks to see if IT moved Z using z-lift. If it has, it inserts a Z move to your 1st layer height. It does not try to interpret any Z or other moves you inserted.
- After the 1st layer, none of this matters.
The "dual skirt" IS caused by your manually inserted Z10 move. This shows up in preview mode, so the slicer does track where the nozzle is in XYZ space based on manual gcode. This is a completely different issue I think. No start or layer change gcode figures into the initial 1st layer moves or gcode commands and are not related to the "safety" initial Z setting OR final Z adjustment after XY moves when printing starts.
This is an "interesting but inconsequential" issue in my mind. It's all about an initial safety check easily explained by slicer settings. It only applies to the 1st layer. If you want your initial XY move to start higher for some reason, you can do this with a 2nd virtual extruder or post-processing script. Manually stuffing in gcode will NOT change this behavior.
I'm going to say it again: We need to be comparing actual PrusaSlicer settings, not trying to interpret screenshots. If any manual editing or non-obvious, unexplained changes have been made, we end up playing guessing games. The only reason I've been able to do any meaningful testing has been @ringarn67's supplied 3MF settings. I'm not even going to try interpreting any results without a 3MF to look at. This has been way too much work.
The "safety" Z moves are based on z-lift settings
[...] Look at the picture after the layer change. It goes to Z0.2 then up to Z10 with your name in the comment but then it doesn't go down to Z0.2
That is explained by the z-lift setting per my previous post:
- If you set z-lift to 0, PrusaSlicer (apparently) inserts a "safety" G1 Z0.2 line to raise the nozzle above the bed to avoid damage before the 1st XY move.
- If you set z-lift > 0, PrusaSlicer inserts your setting value into the G1 ZXXX line before the 1st XY move.
- After the 1st XY move, if PrusaSlicer has made a z-lift Z move, PrusaSlicer will insert a G1 ZXXX move to set the nozzle to the 1st layer height you specified in your settings. PrusaSlicer is unaware of any Z move manually inserted in gcode.
I believe your mystery moving and disappearing Z move lines are triggered by the following:
- There is always SOME initial Z move, whether using a default of 0.2mm or the z-lift value you specified in your settings. This is to avoid dragging the nozzle on the 1st XY move (which only applies to non-Prusa printers).
- IF you specify a z-lift setting, the slicer will insert a Z move to your specified layer height after the 1st XY move (as it should).
- The slicer is not attempting to interpret any gcode Z moves you inserted.
IF you have specified a manual Z move in gcode, you will see this in the slicer preview. In this example, an elevated skirt prints.
I didn't try to print it just looked at the file.
I wouldn't! 😀
If we could only edit for a few minutes ...
Correcting my previous post:
So z-lift 0 override puts in a 0.2 "safety" move, disabling it puts in a 0.4 "safety" line which matches up with your Extruder 1 0.4mm z-lift. It has not detected the Z10 in AFTER_LAYER_CHANGE and but inserted a Z correction before printing because of the z-lift setting. This makes sense. If I then set a 0.6mm z-lift in Extruder 1, I get this:
RE: Thank You
Thank YOU @bobstro for getting me down to earth when I'm carried away. (again 😉 )
And thanks for explaining things. It all, (at least most of it) make sense for me too when I read your post.
Now I know and understand what and how I should do to make it work when I need it
I have 48 files in my folder for testing all these settings, 24 3mf's and 24 gcodes, obviously I got lost in all the settings and files 😀
I didn't try to print it just looked at the file.
I wouldn't! 😀
Me neither 😔
But still, skirt height "0", together with vase mode and no bottom layer, will generate "Z0.000" values in g-code 🤔
Prusa i3 MK3S+ FW 3.11.0 (kit dec -20), PrusaSlicer 2.5.0+win64, Fusion 360, Windows 10
Stress testing is hard to do (on purpose)
Thank YOU @bobstro for getting me down to earth when I'm carried away. (again 😉 )
Nothing like a red herring (false clue) to get us going WAY down the rabbit hole! I hate mysteries like this and always want to know WHY a program is doing such things.
And thanks for explaining things. It all, (at least most of it) make sense for me too when I read your post.
My hypothesis seems to hold up under the conditions we tested. I'm sure there are other "interesting" interactions with software as complicated as PrusaSlicer has become.
[...] But still, skirt height "0", together with vase mode and no bottom layer, will generate "Z0.000" values in g-code 🤔
You are doing stress testing by trying all sorts of uncommon user settings. This is invaluable for the development team. Skirt loops with 0 height are one example. Try to keep notes on what you've observed and post to GitHub. I'm sure there's a combination of settings that will cause the printer to explode if you keep looking!
RE: Not over yet!
My woes continue. In the beginning of each file there are some M commands. M201 to M205. I HAVE TO DELETE THEM!!! If I don't the printer fails in the Z axis. It's either the acceleration or the jerk or what ever. The printer homes perfect, including the Z axis and then, when it's supposed to go up to Z5 it makes a whining noise and doesn't go up. If I keep the printer running the part comes out squished, like maybe only 70% of it's supposed height.
They are obviously not needed since the printer prints fine when I erase them all.
As I've mentioned before. I don't have a Prusa printer, I have a clone with an Arduino Uno with RAMPS1.4 and Marlin 1.6.x
Go into Printer Settings>Machine Limits. In there is a dropdown. It defaults to emit to gcode. That puts the M20x commands defining the limits into your gcode. Best practice is to read the ones stored back from your machine eeprom and plug them into the actual settings there. That way theres no problem as the ones included in the code match the machine settings.
However the drop down also has Use for time estimates or ignore. When either of those are selected then it does not include the M20x gcode commands into the output.
Its best practice to make those match the machine as that way the print time estimates are way more accurate.
Re
Thanks, Neophyl, I chose the ignore and now I don't have it in the output file! 👍 👍