Re: Still zero successful prints
Finally the reason for this was that this two screws - see attached picture - were slightly tightened (1-2mm) to strong. After loosing the two screws slightly to be even with the body (up to 0,5mm protude out of the body) all the issues were gone.
Link to the manual:
https://manual.prusa3d.com/Guide/2.+Pulley+body+assembly/755#s12429
I should try going looser, I've been using "flush with the top" because it's very repeatable, but I could back off a bit. I have to go an extra half mm because of my spring retainers ( https://www.thingiverse.com/thing:3152199 ), they are great but have width.
I maintain an informal list of San Diego, CA 3D printing enthusiasts. PM me for details. If you include a contact email and I can add you to the informal mailing list.
Re: Still zero successful prints
Not really. Please post a picture how deep are they now. Without knowing how tight it was previously for you and how much you've loosen it, it's not very helpful.
Same thing applies to the manual. It lack of this information. Some people are saying the screw heads should be flush with the plastic body.
My screws are flush with the body but also tests with more loose screw (~1mm out of the body) have been successfull.
Based on my experience my main message for users who have issues with filament change rate is the following:
1. First to check and tune this two screws before doing anything else !!!!! The spring tention is very essential and sensitive for filament change.
2. The screws should be flush (or stand out slightly) with the body .... BUT should definetely not tightened more than flush. Only 1-2mm inside the body can already cause issues. For wood makers 1-2mm is "nothing". 😉
Re: Still zero successful prints
I am making progress. My best is almost 80 filament changes before it shits the bed. Just a few more tweaks...
Do you want to try printing the attached Gustav? This is something I have (at last) successfully printed.
Uses E1 to E4, all PLA. Basic purge, so ignore colour bleeding. Slight modification to an earlier upload which would not print on my printer.
Peter
Unfortunately that was worse. The retraction looked ok but on unload it had the worst string I've seen yet. This jammed the next load. I cleared that but it was still having trouble. Also the wipe tower that KISS uses was not friendly to the volcano. During the cooling move it created a large blob and later switch directions, running into the blob and dislocating part of the tower before I stopped it all. Thanks for test though.
I tried some other options in slic3r, like no ramming, extreme ramming, 1 cooling move, many cooling moves, etc. All failed mid print after string build up. In one case though, everything looked like it was working, but the MMU stopped after an unload and then blinked slowly claiming a load fail. The ball was down and FINDA light was on, so I know the unload worked, but the selector did not move over to the load slot. I tried the buttons and could not get it to move slots. Eventually I did something, or it timed out, and said everything was good, but stayed on the unload slot, didn't actually load any filament and started air printing. Is there a known firmware bug?
Re: Still zero successful prints
Unfortunately that was worse. The retraction looked ok but on unload it had the worst string I've seen yet. This jammed the next load. I cleared that but it was still having trouble. Also the wipe tower that KISS uses was not friendly to the volcano. During the cooling move it created a large blob and later switch directions, running into the blob and dislocating part of the tower before I stopped it all. Thanks for test though.
Well, thanks for trying. Sounds to me as though the Volcano requires a lot more ramming to remove more filament and also to reduce the stringing. I suppose that makes sense with the larger melt zone.
I tried some other options in slic3r, like no ramming, extreme ramming, 1 cooling move, many cooling moves, etc. All failed mid print after string build up. In one case though, everything looked like it was working, but the MMU stopped after an unload and then blinked slowly claiming a load fail. The ball was down and FINDA light was on, so I know the unload worked, but the selector did not move over to the load slot. I tried the buttons and could not get it to move slots. Eventually I did something, or it timed out, and said everything was good, but stayed on the unload slot, didn't actually load any filament and started air printing. Is there a known firmware bug?
This is not a fault; you just have to know which buttons to press and when to press them. It's likely that you had a string blocking the ball, but a some point, a light tap may have released the ball. At this point, you need to press the middle button and then the right button. But I suspect that you may need to remove the FINDA and clean out the ball chamber.
Peter
Please note: I do not have any affiliation with Prusa Research. Any advices given are offered in good faith. It is your responsibility to ensure that by following my advice you do not suffer or cause injury, damage…
Re: Still zero successful prints
I am pretty much in the same boat.
I received the kit in september and spend some time in tweaking and research what possibly goes wrong during my prints. To eleminate weak filament, I orderd two spools of PLA at Prusa and a Spool of Prusament. A month later the order arrived (all was on stock, but this is another story).
So, I started to testprint a sample gcode (sheep), before I started the print, I updated the firmeware of the printer to the newest version. Made a pre-check and cleaned everything which could possible got dirty from the previous attempts.
Here is the result:


Weak infill and after some filament changes later (green) the yellow filament was stuck above the bondtech gears.


By trying to pull the filament by hand, I noticed the uncommon high resistance.


The tip is deformed


Width 2.12 mm
Seems to me the PTFE tube is defective, isn't it? I have to say that the printer was in for service recently and the PTFE tube was replaced in the course of the maintenance work (new design of the hotend and so on).
Re: Still zero successful prints
I am pretty much in the same boat.
I received the kit in september and spend some time in tweaking and research what possibly goes wrong during my prints. To eleminate weak filament, I orderd two spools of PLA at Prusa and a Spool of Prusament. A month later the order arrived (all was on stock, but this is another story).
So, I started to testprint a sample gcode (sheep), before I started the print, I updated the firmeware of the printer to the newest version. Made a pre-check and cleaned everything which could possible got dirty from the previous attempts.
Here is the result:
Weak infill and after some filament changes later (green) the yellow filament was stuck above the bondtech gears.
By trying to pull the filament by hand, I noticed the uncommon high resistance.
The tip is deformed
Width 2.12 mm
Seems to me the PTFE tube is defective, isn't it? I have to say that the printer was in for service recently and the PTFE tube was replaced in the course of the maintenance work (new design of the hotend and so on).
Your sheep looks alot like mine did at first. Did u watch Cris Warkcocki's video on filament path resistance?
What ramming settings are you using?
Did u calibrate Bowden length?
Check bondtech gear alignment in mk3's extruder?
Can u take a picture of your tips?
Pauls roller design has order of magnitudes less resistance and uses same parts:
https://www.thingiverse.com/thing:3113520
Prusa MK3 preassembled (R2/B6) > (R3/B/7)
Prusa MK2.5 kit > MK3 > MK3+MMU2 (R3/B/7) 😀
Prusa SL1 3D printer + Curing and Washing Machine (day1 order)
Taz6
CR10s4
Delta 3ku
Re: Still zero successful prints
Your sheep looks alot like mine did at first. Did u watch Cris Warkcocki's video on filament path resistance?
What ramming settings are you using?
Did u calibrate Bowden length?
Check bondtech gear alignment in mk3's extruder?
Can u take a picture of your tips?
Pauls roller design has order of magnitudes less resistance and uses same parts:
https://www.thingiverse.com/thing:3113520
I didn't know this video before, I skiped trough it but I did a similiar job to my MMU2 before. I will definitely watch the video in full lenght soon.
What ramming settings are u using? I don't use a self generated gcode, I tried a prusa tested gcode as sample.
Did u calibrate Bowden length? Yes, and I think it works good
Check bondtech gear alignment in mk3's extruder? Yes, straight like mentioned. Preload screws are set to be 0,5mm above the surface without filament loaded (works well without MMU installed)
Can u take a picture of your tips?


In other cases I had issues with stringing, which chaused MMU jams but not in this case.
Beyond that, I noticed that you'll need uncommon force to feed filament trought the PTFE tubes / MMU all the way to the extruder. Such a high force, that the bondtech gears where slipping all the time 🙁
Figured out that these five holes for the PTFE tube where not round and by pushing in the PTFE tube, the tube got squeezed and the internal diameter was close to the outer diameter of the filament which causes the high friction. I used a wood driller by hand to debur the plastic, and et voilà; very low friction 😉

Next improvement: the spool holders. Found a spool holder which uses this litte ball-bearing-add-ons (will rework them to a slightly smaller outer diameter)


This reduced the friction again, and alot.
Re: Still zero successful prints
I have had nothing but good experiences sofar with Prusa, I started with an MK2S, upgraded it with MMU1 and later with MK2.5. Each upgrade was a success, untill now. I am sorry to conclude that MMU2 is a step back from MMU1. The mechanics are too sensitive to be reliable in my opinion and the software (firmware + Slicr) needs some tweaking. It is difficult to get filaments in, switching filaments is too error prone - takes changing advance settings in Slicr to work at all and the way the filaments are pushed and pulled (without bondtech) does not help too.
For the moment I will only print single color prints, I hope some changes in the design will be made to make the solution mor reliable for multi color prints in the future.
Re: Still zero successful prints
I found that my issue with getting good tips was caused by the ruby tipped nozzle I was using, once I went back to the stock brass nozzle, all my troubles went away! At least most of my troubles any way. I've had some small issues like strings stuck up in the FINDA ball from when I was having tip issues, but that's been cleaned out and no longer having that problem, and a few other little things that have been fixed. But all my tips are now perfect, with no strings. I've been using Slic3r General PLA settings except for the "Loading Speed at Startup", and "Loading Speed" settings. These are set to 19mm/s, and 21mm/s respectfully to keep the MMU from grinding the filament during load sequence. And I've also set the number of cooling passes to 2. I've been using Hatchbox, eSun, and Matterhackers Build PLAs. I've had no skipped layers over the past 4 prints I've done. I explain why the ruby nozzle was my problem in this post.
Not sure if anyone here is using a ruby nozzle or not, but if you are, try switching to a brass nozzle and see if that helps.
Re: Still zero successful prints
I have a ruby nozzle... looks like I have to remove it! Thanks for the tip!
- Martin
Re: Still zero successful prints
I have had nothing but good experiences sofar with Prusa, I started with an MK2S, upgraded it with MMU1 and later with MK2.5. Each upgrade was a success, untill now. I am sorry to conclude that MMU2 is a step back from MMU1. The mechanics are too sensitive to be reliable in my opinion and the software (firmware + Slicr) needs some tweaking. It is difficult to get filaments in, switching filaments is too error prone - takes changing advance settings in Slicr to work at all and the way the filaments are pushed and pulled (without bondtech) does not help too.
For the moment I will only print single color prints, I hope some changes in the design will be made to make the solution mor reliable for multi color prints in the future.
Yes it is very finicky. I found another fail mode that may help some folks. Put thread lock on the tension screws. They can slowly back themselves out after many idler moves and release the tension just enough to cause a load or unload fail. It only takes a couple turns between success and fail.
In other news, I do now have my first print that completed to 100%. But I had to intervene a couple times so I am not yet declaring first successful print. Getting close.
Re: Still zero successful prints
@Jitx
Ok so where's the pic. We wanna see this almost there
Prusa MK3 preassembled (R2/B6) > (R3/B/7)
Prusa MK2.5 kit > MK3 > MK3+MMU2 (R3/B/7) 😀
Prusa SL1 3D printer + Curing and Washing Machine (day1 order)
Taz6
CR10s4
Delta 3ku
Re: Still zero successful prints
what i like to do is i mark the position of the bolts with a marker and then i can visually see if they move or not over time.
this also gives you a zero point that you can count back and forth from to find a sweet spot easier.
“One does not simply use a picture as signature on Prusa forumsâ€
Re: Still zero successful prints
Mine sit flush with the top, so it's pretty obvious if they are off.
I don't know if my little retainer washers help prevent turning. technically they DO rub on both bolt and side, which I don't like since it may slightly reduce the spring's effectiveness, but no problems since I did it.
I maintain an informal list of San Diego, CA 3D printing enthusiasts. PM me for details. If you include a contact email and I can add you to the informal mailing list.
Re: Still zero successful prints
@Jitx
Ok so where's the pic. We wanna see this almost there
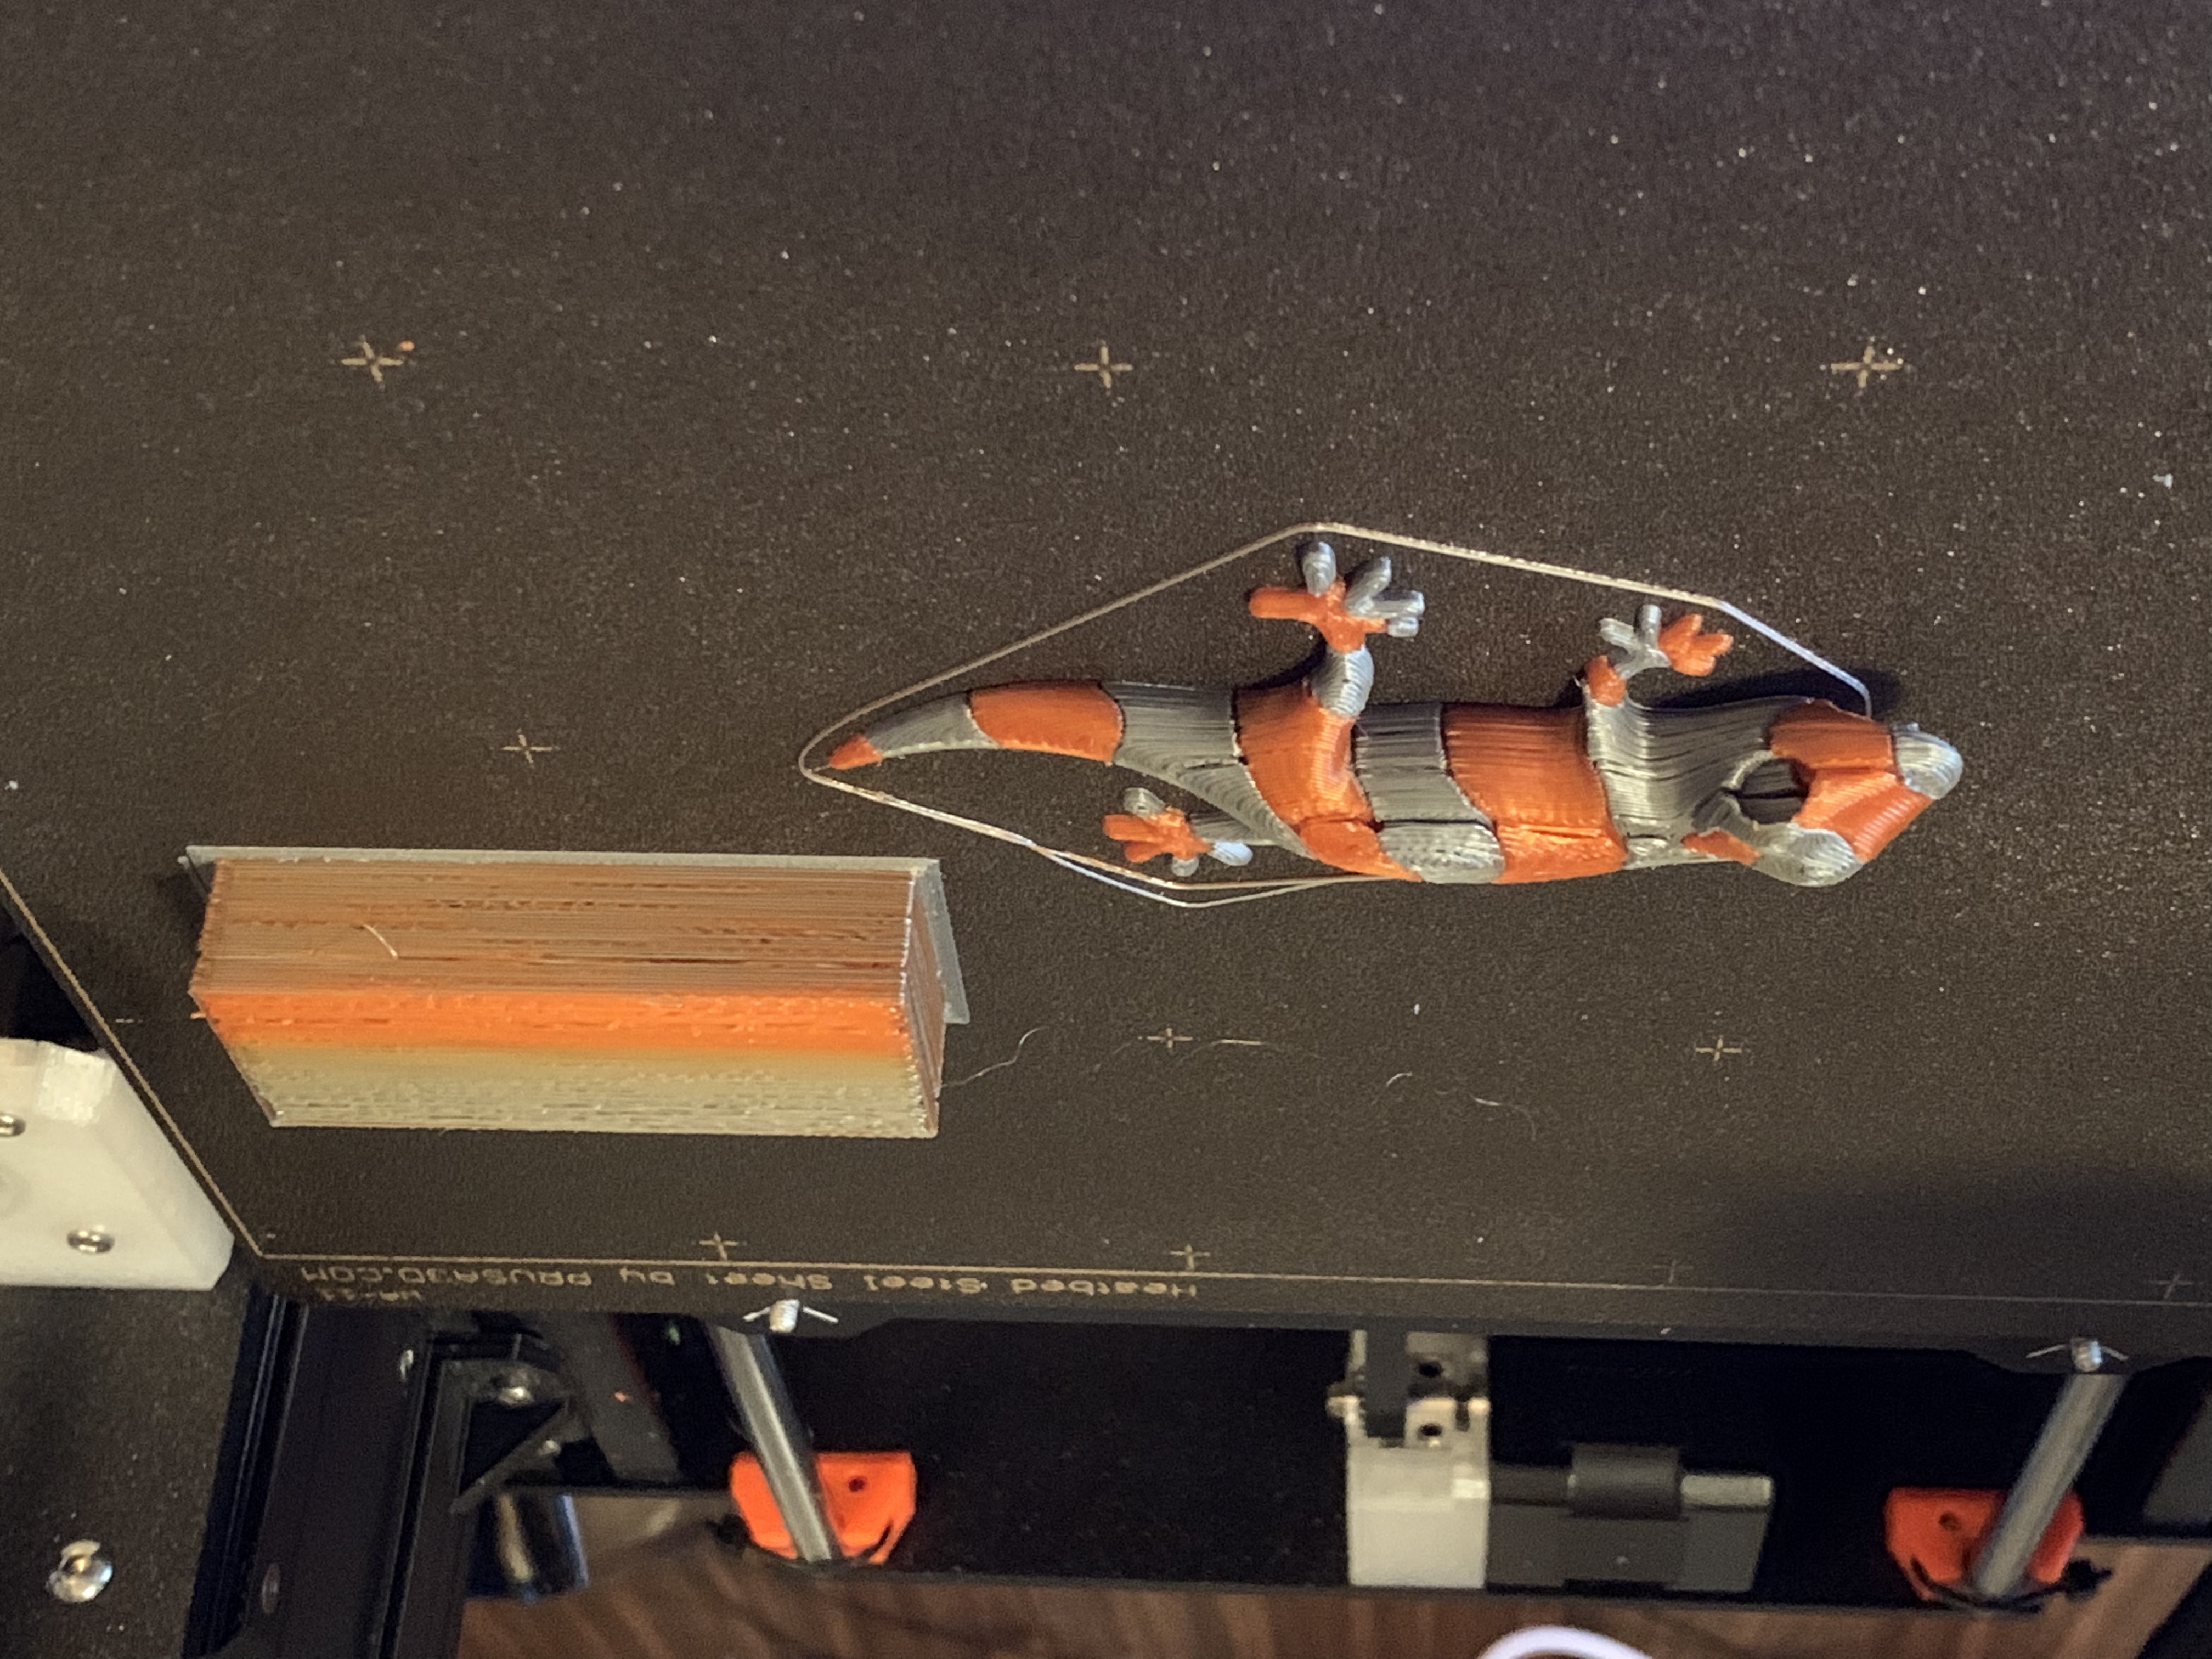
You asked for it.
Re: Still zero successful prints
That is progress. Until prusa develops a way to detect layer skips we're stuck. So for now tweak your ramming settings and unload speeds for the filament your using to get better tips.
Better tips > less stringing > less layer skips
Prusa MK3 preassembled (R2/B6) > (R3/B/7)
Prusa MK2.5 kit > MK3 > MK3+MMU2 (R3/B/7) 😀
Prusa SL1 3D printer + Curing and Washing Machine (day1 order)
Taz6
CR10s4
Delta 3ku
Re: Still zero successful prints
I managed to fine tune/fix my MMU unit after some tweaking on the sensor and touching up plastic parts. I ran several dummy prints without connecting the orange hose to the extruder and got zero jams. Problem only appear when it is connected to the extruder. The tip of the filament becomes deformed and with some stringing and these causes friction and sometimes could not go into the ptfe tubes in the extruder. I tried to play around with filament settings including temperature, speed and ramming but still having intermittent filament jamming on orange tube and on extruder.
Until now I still don’t have even single successful print without jam.
keep at it. it can be done with 100% default settings. at least with inland pla under pruse pla settings. only thing I can say I did was take small fles and drill bits and cleaned up some holes. but I did not even redo my extruder yet. but ive had 500 filament change prints go perfect.
I have a Prusa,therefore I research.
Re: Still zero successful prints
I managed to fine tune/fix my MMU unit after some tweaking on the sensor and touching up plastic parts. I ran several dummy prints without connecting the orange hose to the extruder and got zero jams. Problem only appear when it is connected to the extruder. The tip of the filament becomes deformed and with some stringing and these causes friction and sometimes could not go into the ptfe tubes in the extruder. I tried to play around with filament settings including temperature, speed and ramming but still having intermittent filament jamming on orange tube and on extruder.
Until now I still don’t have even single successful print without jam.
keep at it. it can be done with 100% default settings. at least with inland pla under pruse pla settings. only thing I can say I did was take small fles and drill bits and cleaned up some holes. but I did not even redo my extruder yet. but ive had 500 filament change prints go perfect.
As I have mentioned, my MMU should be ok since I ran dry Or dummy mode with filament on MMU. The problem I am having is the blobbed tip and some intermittent stringging when I start to connect it to the extruder.
MMU2 is junk...
Another unhappy MMU2 customer here.
I've been fighting the MMU2 for weeks and only had 1 successful print so far, but wasted loads of filament in fails and trial-and-error troubleshooting.
I've tried every suggestion here, as well as the filament sensor mod with pass-through PTFE connector (and calibrated to suit).
I've even cut off the long feed PTFE tubes to reduce friction, but it will still fail to unload or load a while later.
To me (and I hope the Prusa MMU team read this...)
- The method of blindly feeding filament a measured distance to the extruder after it's passed the FINDA is flawed. Any slip and the load fails, so a layer is missed. It *should* wait for the filament sensor to detect it at the extruder and THEN feed it a measured distance. (Yes, I know the filament sensor is unreliable - suggest a micro-switch based type instead).
- The whole issue with filament tails affecting things is rubbish. It should use the knife to cut them off and be done with it.
- Whenever filament is moving, either loading or printing, BOTH the extruder motor and the MMU feed motor should be used in parallel to ensure that the filament is moving correctly - this would eliminate most slip issues.
- The MMU2 needs feedback on the position of the selector and the bearing drum. This had gone out of sync many times and it just carries on blindly. A BCD or whatever position sensor would help here.
- We need menu options, accessible anytime, to manipulate the position of each MMU motor - or at least reset them to a known-good position without a full reset.
- The delicate position of the MMU screw tension is too unreliable - this needs a re-design to make it fool-proof.
- The existing spool reel holders are rubbish. An unload of a full reel usually results in a tangle on the next load.
- The existing pivoting PTFE > reel holder brackets are rubbish - they often move causing a kink on unload.
I though the MMU1 was bad, resulting in poor print quality, but the MMU2 is just junk right now. Posts here and on the Facebook groups show countless users struggling. The amount of improved parts on Thingiverse confirm that the existing design is poor - Prusa should be taking the lead here and providing upgraded parts to overcome design issues.
Improved firmware could help here also.
In the meantime, my Prusa is resigned to gather dust and i'm forced to use my old Chinese FFCP clone for most of my 3D printing needs because it works reliably day-in, day-out without constant issues and needing babysitting.