Re: Stepper Motor Upgrades to Eliminate VFA's (Vertical Fine Artifacts)
Don't take the stepper apart for grinding a shaft flat.
Even If you prefer to believe we can reasonably take apart and reassemble the motor without altering stator flux density, do not take it apart. Just seal the motor adequately to avoid grindings getting into the motor. There is no need to take it apart. I mention it merely because the video shows a motor being taken apart.
Search against "stepper disassembly torque' for further detail, but that is a solved issue. I will leave it just at this
https://www.kollmorgen.com/en-us/blogs/_blog-in-motion/articles/paul-coughlin/3-key-reasons-for-not-taking-shortcuts-for-motor-repairs/
One of the biggest issues repair shops face surround stepper motors and the replacement of bearings. The problem lies in the way the motors are magnetized. For the Brushless AC Servo motor, the rotor is magnetized radially, as a single component, and is then placed into the stator assembly. The Stepper motor is magnetized axially as a complete motor. When you remove the stepper rotor/shaft assembly from the stator you collapse the magnetic field. This causes a loss in torque of up to 50% when reassembled. Most of the repair shops will disassemble the motor, replace the bearings, and re-assemble the motor unaware that the magnetic circuitry has been weakened. The end customer will then receive the repaired motor only to find out that the torque has been severely reduced.
Re: Stepper Motor Upgrades to Eliminate VFA's (Vertical Fine Artifacts)
Agreed there's no need to disassemble - I'm not debating that.
But a blog post is not a credible source. This is the problem with the internet - "Everyone is an expert" and misinformation proliferates as it is blindly accepted as canon and regurgitated by others, and supported only with anecdotes and circular references. Not only is it a blog post, but it is a post by a company with a vested interest in selling you a *new* motor.
I also did a casual search and did not see any credible scientific references on the phenomenon, which is why I asked for your source. And until I find one, I will remain highly skeptical of said woo-woo hand-wavy explanation; magnetic fields do not spontaneously collapse of their own accord when established in a magnetic material; there has to be an external influence.
Re: Stepper Motor Upgrades to Eliminate VFA's (Vertical Fine Artifacts)
Off point, but it is equally valid to demand your credible source that the phenomenon does not exist. Asking for a "credible source" is also an oft used, low effort argument tactic. So where is YOUR credible source?
Re: Stepper Motor Upgrades to Eliminate VFA's (Vertical Fine Artifacts)
Off point, but it is equally valid to demand your credible source that the phenomenon does not exist. Asking for a "credible source" is also an oft used, lazy argument tactic. So where is YOUR credible source?
Well within your rights to ask. And I will readily admit I do not have one beyond my scientific background and knowledge of magnetism.
HOWEVER, this is not at all two sides of the same coin; in the scientific community, the burden of proof is on the claimant, not on everyone else to disprove their claim (though they are certainly free to produce evidence to that extent) To counter it, I would have to prove that every other possible source of loss sums together to add to the total loss of torque observed. To support the claim, one would only need to demonstrate in a verifiable way that *any* of the observed loss can be attributed to the proposed collapse of the field.
Consider it like the null hypothesis in statistics - that the observed effect is caused by random chance vs the variable being studied; the task is to test and disprove the null hypothesis by showing that the effect *is* the result of the variable under study; One cannot definitively prove the effect is random chance as the scope of possible (unstudied) variables to eliminate is essentially infinite, one can only disprove the same by showing that it is not solely caused by such and that the variable in question influences the results.
Either way, I think we are indeed done discussing this; Barring any new evidence, opposing viewpoints have been presented and it is up to a reader to decide for themselves which they subscribe to until such evidence comes along.
Re: Stepper Motor Upgrades to Eliminate VFA's (Vertical Fine Artifacts)
Bottom line: Don't take apart the steppers when grinding new shaft flats.
The OMC and Moons 0.9 degree steppers both need flats ground for most secure mounting of the drive pulley. Yes, highly torqued set screws can grip a round shaft, but having one screw engaging a flat is preferred.
The Moons' flat ends too far from the motor body. For y-axis usage, It can only engage with a reverse oriented, shorter length drive pulley. The one unit I have found that is short enough, the Der Blue brand unit, is probably not going to be best fit to avoid tooth wave issues. All my other drive pulley samples must be oriented with collet towards the motor body. That places their set screws on the shaft's round portion.
The OMC steppers simply lack a shaft flat.
Re: Stepper Motor Upgrades to Eliminate VFA's (Vertical Fine Artifacts)
This discussion does not help resolve VFA's issue ... 😉
And yes magnet can lose their force, permanent magnets can become weaker with impacts, I think this do not apply to neodymium magnets. and I'm sure about this and yes I can prove it! BTW heat can remove magnetism from magnets too, search for Curie temperature.
Absolutely, I never disagreed with that. Just that it happens without any external influence like that, as the liked site suggests. Hence my initial statement the purported loss was probably from one of those things (impact to the rotor, etc)
... Unless you're heating your motors to get them apart, or bashing them with a hammer... 😆
Re: Stepper Motor Upgrades to Eliminate VFA's (Vertical Fine Artifacts)
The short reason modern steppers can be damaged by disassembly is the materials are magnetized very close to their physical limits with the stator inserted. Removing the stator locally alters the shape and intensity of the magnetic field which can produce gradients strong enough to permanently alter the parts magnetic field. Considering this entire thread deals with small non-uniformities in the magnetic fields of the motors, stator removal poses a massive risk. This is a settled issue professionally and Paul Coughlin and Kolh Morgan are highly credible in the field of motion control.
Keep up the great work, I have been following your threads from the beginning.
Interesting; thank you for the additional explanation.
Re: Stepper Motor Upgrades to Eliminate VFA's (Vertical Fine Artifacts)
Double thanks for the explanation.
Compiling my firmware for 0.9 degree motor support
You may wish to refer to the Prusa README.md document for more detailed instructions regarding compilation of the firmware.
Warning: You are definitely in experimental firmware territory here.
Here is my "quick" summary for compiling my 0.9 degree motor support firmware
============
Obtain Arduino IDE
Visit https://www.arduino.cc/en/Main/Software and download the Arduino IDE for your OS.
I successfully use Arduino 1.8.8 for OSX.
Prusa instructions mention their internally using version 1.8.5
Install on your computer
============
Prepare Arduino IDE to handle EINSY board
As downloaded, the Arduino IDE does not know about the EINSY RAMBO board. You must adjust some IDE settings to download board info from Ultimachine.
1. Launch Arduino.
2. In Preferences -> Settings Tab
Additional Boards Manager URLs textfield enter...
https://raw.githubusercontent.com/ultimachine/ArduinoAddons/master/package_ultimachine_index.json
3. Accept (OK) new preference setting
4. Tools -> Board -> Boards Manager
Select the RAMBo board, which is listed something like "RepRap Arduino-compabilty Mother Board (RAMBo) by Ultimachine"
Board info will download become noted as "Installed." Depending on server load this can take anywhere from seconds to minutes.
You many need to "update" the board to get the latest version. That is 1.0.1 as of this writing.
5. Close Board Manager
6. Tools -> Board, select RAMBo as target board. Do not select any other board.
7. QUIT Arduino IDE
8. Set compiler flags in platform.txt for newly installed RAMBo board
Use your OS file search function to find platform.txt
Under OSX, it will be in
~/Library/Arduino15/packages/rambo/hardware/avr/1.0.1
Open platform.txt
Add "-Wl,-u,vfprintf -lprintf_flt -lm" to "compiler.c.elf.flags=" before existing flag "-Wl,--gc-sections"
On my system that meant adding the following line in platform.txt
compiler.c.elf.flags=-w -Os -Wl,-u,vfprintf -lprintf_flt -lm -Wl,--gc-sections
Save your changes to platform.txt
============
Obtain firmware files.
0.9 degree motors require my firmware branch that contains 0.9 degree stepper support....
https://github.com/guykuo/Prusa-Firmware/tree/0.9-Degree-Stepper-Support
Be sure you are in the 0.9 Degree Stepper Support branch
Click on "Clone or Download" and DOWNLOAD ZIP to your computer
Unzip the newly downloaded Prusa-Firmware-0.9-Degree-Stepper-Support.zip
Inside the unzipped folder "Prusa-Firmware-0.9-Degree-Stepper-Support" you will find a folder named "Firmware"
That folder contains the firmware files you need. Place the firmware folder where you wish to keep it on your drive.
=============
Set Printer Variant
Using the correct variant file sets the printer model for the firmware.
In Firmware/variants you will find several header (.h) files. Each printer model has one specific file.
Mk3 needs 1_75mm_MK3-EINSy10a-E3Dv6full.h
Mk3s needs 1_75mm_MK3S-EINSy10a-E3Dv6full.h
Find the correct variant file for your printer model!!!!!!
Rename the variant file for your printer to be...
Configuration_prusa.h
Move Configuration_prusa.h to the main firmware folder.
=============
Set Language Support (already done for you in my branch)
Normally you would need to set language support in config.h to primary language only.
I have already done so in my branch. So you do not need to do this.
However, if you build from a Prusa branch you MUST do this.
Otherwise, firmware will not run properly. Instead, your LCD will display random letters and likely boot loop.
The changes needed are near bottom of the file. It should look like this...
//LANG - Multi-language support
#define LANG_MODE 0 // primary language only
//#define LANG_MODE 1 // sec. language support
#define LANG_SIZE_RESERVED 0x2f00 // reserved space for secondary language (12032 bytes)
You can make the edit from within Arduino IDE, but again, this has already been done in my branch.
=============
Set Motor Defines, Compile, Upload
My firmware branch includes changes for 0.9 degree motor support. All the important edits have been tagged with a comment.
Search for Kuo in all sketch tabs to view my changes.
For most users, you only need to specify which motors are 0.9 degree units.
1. Launch Arduino IDE
2. Open the Firmware.ino file which is inside your firmware folder
3. Select the Configuration_prusa.h tab
4. Scroll down until you see...
	/*------------------------------------

	 AXIS SETTINGS

	 *------------------------------------*/

	//Uncomment the below for 0.9 degree Moons MS17HA2P4100 or OMC 17HM15-0904S stepper motor on x, y, e axis

	//Motors used should be 1 amp or lower current rating to avoid overheating TMC2130 drivers in Stealtchop

	#define X_AXIS_MOTOR_09 //kuo exper

	#define Y_AXIS_MOTOR_09 //kuo exper

	//#define E_AXIS_MOTOR_09 //kuo exper
My _AXIS_MOTOR_09 defines are probably all you need to modify. The rest of my firmware changes are controlled by these defines.
Uncomment only the axes that you want to be 0.9 degree motors. In the above example, x and y are set to be 0.9 degree motors, but not the extruder.
Save your changes
5. Test compile with Sketch -> Verify/Compile
Compiler will complete the job.
If you see a warning about a missing bootloader, you probably have an older, RAMBo board 1.0.0 definition installed as your target board.
6. To compile and upload to the printer, connect your computer to the USB port of EINSY.
Sketch -> Upload
The firmware will compile and upload to printer. Do NOT interrupt the update!!!! Let it complete.
You may also need to use Tools --> Port to select the correct USB port of your computer.
Re: Stepper Motor Upgrades to Eliminate VFA's (Vertical Fine Artifacts)
And this is a perfect example of an open source community can do !
X-Axis homing
If you have problems with x-axis homing when Z is high, push the extruder cable bundle leftward during the x-homing motion. That bundle's spring tension makes is a lot harder for x-axis homing to get a good "hit" when z is high.
One thing that helps is to release some of the tension in the bundle
Raise Z-axis up high and have x all the way left.
Loosen the EINSY enclosure clip and retighten the clip.
That will make the left, top position have a bit less spring resistance from the extruder cable.
Re: Stepper Motor Upgrades to Eliminate VFA's (Vertical Fine Artifacts)
Fantastic work! I've ordered some Moons 0.9 steppers for my X and Y. Do you have a wiring diagram? Thanks!
Re: Stepper Motor Upgrades to Eliminate VFA's (Vertical Fine Artifacts)
I used these YOTINO Bipolar Stepper Motor Cables. They already have the JST-XHP connector the motor end. The other end has Duponts that can plug directly into the EINSY. Keeping the Dupont end oriented with color coding same as the existing cables and it was fine.
https://www.amazon.com/gp/product/B07CBV8DVZ
The only "mod" I did was to twist the coil pairs to reduce EM effects, but I don't think that is absolutely necessary. To twist the pairs, I unclipped the terminals from the Dupont end, twisted a pair and then reinserted the terminals.
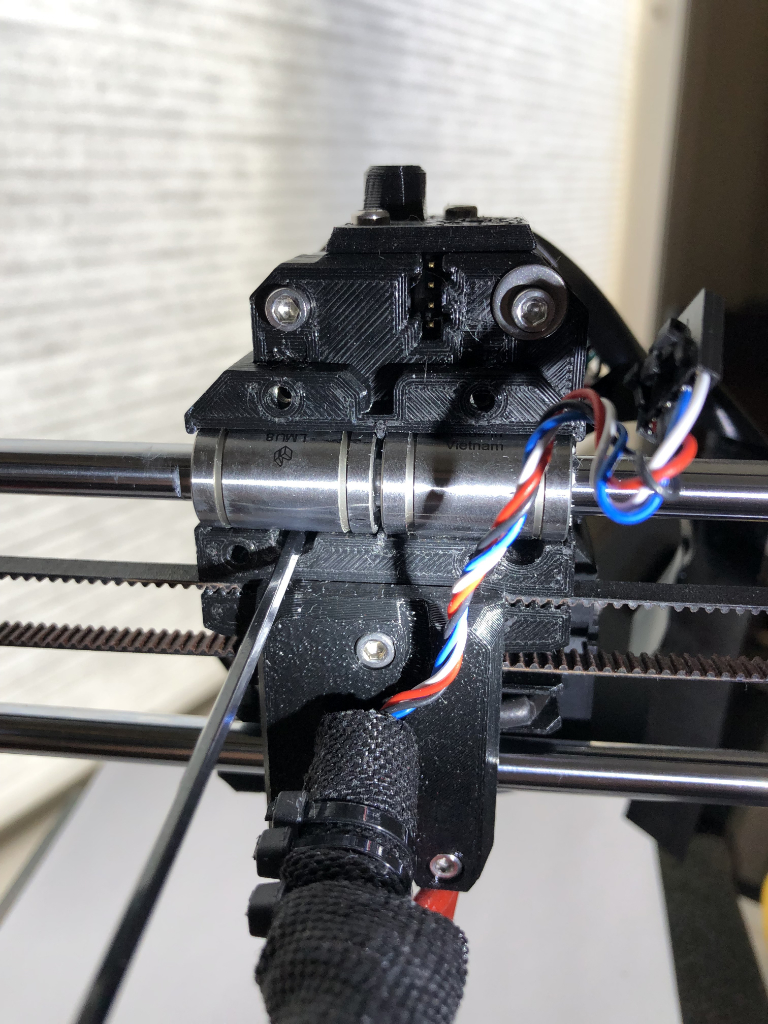
Here are picts of the EINSY and Moons' ends of the Yotino cable. Pay attention to which connector on the motor goes to which connector on the EINSY jack. The color coding and exact wiring order on these 3rd party cables may vary.

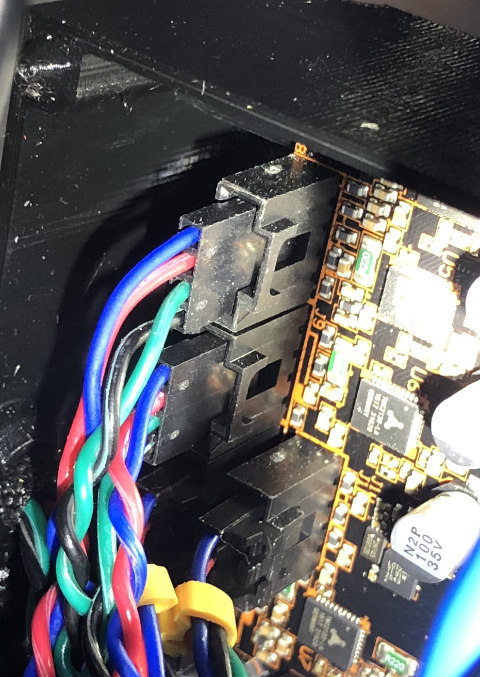
You can see a little of how I twisted red/ blue pair and green/black pair to reduce EM effects.
OMC (StepperOnline) motor worked when I connected their 4 leads to the matching 4 colored wires of the Yotino cable.
Finally! The 3rd attempt at a Moons' for my y-axis arrived. It's a good one. Its detents are fine, soft, and evenly spaced when I slowly finger rotate the shaft. The prior, bad ones, had super notchy, widely spaced detents.
Given that I got some bad Moon's, I wonder if there are better units among the OMC motors. I only got one OMC for testing, but that one DOES have fine, soft, even feeling detents.
Re: Stepper Motor Upgrades to Eliminate VFA's (Vertical Fine Artifacts)
Newest Moons 0.9 on y-axis was creating some y-layer shifts in Stealth. This particular unit is very smooth running and gets rid of VFA's as desired, but must produce a bit less torque than my prior units. It's probably still within spec. Adjusting my firmware to give a bit more current to the y-motor fixed this motor's y-layer shift problem. Lower current is cooler, but it has to be high enough to achieve good motion control on outliers.
I'm still tuning the TMC2130 settings in the firmware and make updates in my branch as I make improvements.
Two things to remember while tuning for the 0.9's
1. The x-axis is the most prone to problems with sensorless homing. Velocity, distance moved, running current, and stallguard threshold all play a role
2. Y-axis moves the most mass and is most prone to layer shifts if insufficient running current.
BTW, don't forget to add heatsinks to the TMC2130's if using 0.9 motors.
OMC to Yotino Wiring Detail
If you want to play with both the OMC (StepperOnline) 17HM15-0904S and Moons MS17HA2P4100 0.9 steppers, it is easier to wire the OMC motor to match the pinout of the Moons. That lets you use the same cable. As I mentioned earlier, match the OMC wire colors with the Yotino wire colors. This assumes they don't change the Yotino cable color order. You can also look at where each wire goes on the JST-HXP connector.
Pardon my messy, quick tack soldering and plastic welding on the JST-HXP header. I didn't have a 6 position header in stock. So, I trimmed and plastic welded two 3 position headers together to make a six position header.

Wire a six position JST-HXP header onto the OMC wires and you can conveniently interchange Moon's and OMC motors.
My firmware TMC2130 settings should allow either motor to be used. I found the Moons to be better at eliminating VFA's, but I have only tested a single OMC motor. Someone else may wish to do more experimenting with the lower cost OMC.
Re: Stepper Motor Upgrades to Eliminate VFA's (Vertical Fine Artifacts)
From the photo, it seems that Bondetch sells OMC pancake motors with their extruder.
Re: Stepper Motor Upgrades to Eliminate VFA's (Vertical Fine Artifacts)
I have no idea how well the OMC 1.8's behave let alone their pancake unit. With the 3:1 gearing, even a non-monotonic motor will have its artifacts squeezed together and hopefully harder to see.
Re: Stepper Motor Upgrades to Eliminate VFA's (Vertical Fine Artifacts)
I modified my extruder to allow much easier swapping out of the motor. No more tearing down the extruder nor even undoing the extruder cable bundle! https://github.com/gregsaun/bear_extruder_and_x_axis/issues/32
Now I can more easily test alternative motors on the extruder. Without this mod, swapping out the motor was hazardous to the parts and took a long time. Now an extruder motor swap is 10-15 minutes, not much more than swapping out an x or y motor.
NB. This is on a Bear extruder.

I take off this modified top carriage cover. One bolt had to be moved to make room for new bolt access holes.
New access holes give access to lower motor bolts without even moving bearings out of the way.