Stepper Motor Upgrades to Eliminate VFA's (Vertical Fine Artifacts)
This is a continuation of my old thread https://shop.prusa3d.com/forum/user-mods-octoprint-enclosures-nozzles--f65/fine-vertical-artifacts-trinamic-chop-tuning-any-e-t27265.html which began as an attempt to tune out VFA's using Trinamic driver settings and the stock Prusa stepper motors. At page 7 of that thread, I discover that Moon's steppers made a huge improvement in surface finish quality. Read pages 7 to the end of the old thread to get caught up.
I am starting a new thread because the most effective solution turned out to be replacing the stock stepper motors for ones with more monotonic stepping behavior. Tuning Trinamic parameters continues to be needed to refine new motors, but they simply cannot eliminate VFA's on the stock motors. You can only reduce them a little bit.
What are VFA's (Vertical Fine Artifacts)? They are fine vertical lines that appear on printed surfaces. They recur with each e-cycle of the stepper. Basically, the stock Prusa/LDO steppers don't move uniformly. They periodically accelerate/decelerate during each electrical step cycle. The uneven motion is synchronized with the step cycle and shows up as areas of greater and lesser filament deposition. Because x and y axis position remains in sync with motor step position, the VFA's remain in the same location. The VFA's remain in same horizontal position on x and y axis as printing advances up the object. We see these as fine vertical lines in print surfaces.

VFA's tend to be worst on the y-axis, but also occur on the x-axis with a lesser amplitude. Unlike ringing, VFAs do not fade as one gets further from edge transitions. They run across the entire surface.
But I don't see any VFA's on my prints!
Most likely they are present but hidden by larger scale artifacts caused by vibration and tolerance linear bearings. These larger magnitude artifacts can hide the VFA's. Look carefully at your flat surfaces that were printed along the y-axis and you will probably find the VFA's hidden amongst other surface noise.
Ironically, upgrading the MK3 to better grade bearings and rods or otherwise refining mechanical consistency and reducing vibration make VFA's more apparent and sharper. Sloppy, noisy linear motion in a not so optimized mechanical build creates larger distortions masking the VFA's.
Removing the current, worst artifact reveals the next layer of smaller artifacts. Once you refine your MK3 enough to be more detailed, VFA's are left as a visible surface artifact. If you print in PETG, the glossy finish further magnifies VFA visibility.
Here are videos showing how surface finish has improved. I never could capture this adequately in still images. Video better shows specular surface effects.
y-plane
x-plane
-------
As you can see in the linked videos, sloppy linear guides and vibration can hide VFA's. They are there, but the other noise swamps them out.
Going to more refined and higher detail printing with better bearings, rods and alignment sharpens prints, removes gross artifacts, and reveals VFA's
Switching to a more monotonic behaving 1.8 degree Moons' motor makes a big improvement in VFA's
Switching to 0.9 degree stepper further improves surface finish even more.
=======================
Based on my testing, 0.9 degree stepper motors are staying on my MK3's x and y axes. They make such a big leap in surface finish quality that I simply will not go back. They do require firmware changes to work correctly.
Moon's 1.8 degree MS17HD2P4100 are proven to make a substantial improvement in VFA's and do not require firmware changes. The prints are not as nice as possible with 0.9 degree steppers, but some users will have difficulty switching to 0.9's.
LDO 1.8 degree cooler LDO-42STH40-1004ASR are another "drop-in" motor in competition with Moon's 1.8 degree MS17HD2P4100. I have not tested them head to head against each other. I have several on order.
We are presently testing different motors and trying to get the 0.9's working without overheating the Trinamic 2130 drivers in stealth mode.
LDO 1.8 degree cool motors LDO-42STH40-1004ASR are to be tested in x, y, e positions
Moons' 0.9 degree stepper MS17HA2P4100 are in bhawkeyes hands and soon to arrive here.
LDO 0.9 degree stepper are working in my MK3. The print quality is the best I have ever seen from my printer, but these may be supplanted by Moons' 0.9 degree MS17HA2P4100's soon.
New motor testing and tuning will be reported in this new thread.
Re: Stepper Motor Upgrades to Eliminate VFA's (Vertical Fine Artifacts)
[Repost]
--------
I put together some motor specs. I think the Moons' MS17HA2P4100 0.9 degree unit might be a better choice than the LDO-42STH40-1684MAC I have on the machine. It might allow a bit more headroom for the TMC2130.
1.8 degree motors
LDO 1.8º Prusa Stock LDO-42STH40-1004A (XYE) <-- produces VFA's in print unless bearings & rods are bad enough to mask problem
Voltage 6.5 V
Resistance 6.5 ohm
Current 1.00 A
Holding Torque 0.48 Nm
Weight
Inductance 3.2 mH
LDO 1.8º "Cooler" LDO-42STH40-1004ASR <-- Designed as Moon's rival chris.o7 has running on x-axis.. ( I have some on order for testing)
Voltage 4.1 V
Resistance 4.1 ohm
Current 1.0 A
Hold Torque 0.47 Nm
Weight 280 gm
MS17HD2P4100 Moons 1.8 <--- drop in replacement gives good reduction in VFA's without firmware mods. $50 cost
Voltage 3.9 volt
Resistance 3.9 ohm
Current 1.0 A
Hold Torque 0.48 Nm
Weight 280 gm
inductance 8.9 mH
0.9 degree motors (Requires modified firmware)
LDO 0.9º LDO-42STH40-1684MAC <--- Ultimate print quality improvement. El cheapo 0.9 makes big leap beyond Moon's 1.8 print quality.
Works in spreadcycle but hits TMC2130 thermal limit for stealth. $15-$25, cheap for lots of print improvement, but may not be best choice.
Voltage 2.8 volt
Resistance 1.65 ohm
Current 1.68 A
Hold Torque 0.36 Nm
Weight 280 gm
Moons 0.9 MS17HA4P4200 <-- probably worse than LDO 0.9 due to higher current requirement. Would not select this one.
Voltage 2.22 volt
Resistance 1.11 ohm
Current 2 A
Hold Torque 0.25 Nm
Weight 230 gm
inductance 2.5 mH
Moons 0.9 MS17HA2P4150 <---- probably slight better than LDO 0.9, but still pretty high current
Voltage 2.97 volt
Resistance 1.98 ohm
Current 1.5 A
Hold Torque 0.4 Nm
Weight 290 gm
inductance 5.4 mH
Moons 0.9 MS17HA2P4100 <--- likely better choice than LDO 0.9 (bhawkeye has this but still building printer. I have ordered for testing)
Voltage 3.9 volt
Resistance 3.9 ohm
Current 1.0 A
Hold Torque 0.39 Nm
Weight 290 gm
inductance 11.2 mH
Re: Stepper Motor Upgrades to Eliminate VFA's (Vertical Fine Artifacts)
My reading of the firmware's tmc2130_setup_chopper is that TMC2130_REG_IHOLD_IRUN register is being written using the same current values that are obtained from tmc2130_current_r array. That is populated from TMC2130_CURRENTS_R.
These are the same ones earlier found in Configuration.prusa.h
#define TMC2130_CURRENTS_H {16, 20, 35, 30} // default holding currents for all axes
#define TMC2130_CURRENTS_R {16, 20, 35, 30} // default running currents for all axes
Firmware seems to verify these ARE used to set IRUN for stealtchop.
VERIFIED with printer and current probe. TMC2130_CURRENTS_H {16, 20, 35, 30} does affect stealthchop. However, how it works isn't entirely intuitive. Going too low on IRUN boosts coil current. If you set below 5, it goes so high that a few seconds of motion overheat the TMC2130
Above 22 and higher speed motion gets really weird sounding and distorted on scope.
A value of 8-10 is okay in stealth chop, is lower than stock setting and still lets spreadcycle to move xy carriages well.
16 microsteps tried again.
In stealth, the max velocity gets throttled. That is probably why I could print in Stealth with 16 microsteps.
In spreadcycle, there isn't any speed throttling, but fast motion isn't well controlled - hence the layer shifts.
I think we could run in 16 microsteps in spreadcycle but would need to more carefully go through firmware and limit feed rates.
I am going with
#define TMC2130_CURRENTS_H {10, 10, 35, 30} // default holding currents for all axes
#define TMC2130_CURRENTS_R {10, 10, 35, 30} // default running currents for all axes
for the time being. At least until the Moon's 0.9's get installed.
Re: Stepper Motor Upgrades to Eliminate VFA's (Vertical Fine Artifacts)
Does anyone know why the hold currents are the same as the run currents? Doesn't make sense to me - especially for the Extruder.
Re: Stepper Motor Upgrades to Eliminate VFA's (Vertical Fine Artifacts)
I am curious if the 1.8 degree steppers are a drop in on the MK2/MK2S and if there would be any difference on those machines?
Re: Stepper Motor Upgrades to Eliminate VFA's (Vertical Fine Artifacts)
I am curious if the 1.8 degree steppers are a drop in on the MK2/MK2S and if there would be any difference on those machines?
I'm volunteering you to find out. I think they would work, but it's a completely different driver chip.
Yes, it is odd that the hold currents aren't the ~70% Trinamic suggested reduced values.
Here is what the Mk3 with 0.9 degree LDO's on x and y, run currents = 10 and normal (spread cycle) are capable of doing. This is PETG, 0.4 mm nozzle, 0.15 mm/layer without any cleanup. There really isn't a loss of resolution at 8 microsteps x 400 steps. You can read Benchy on the print.
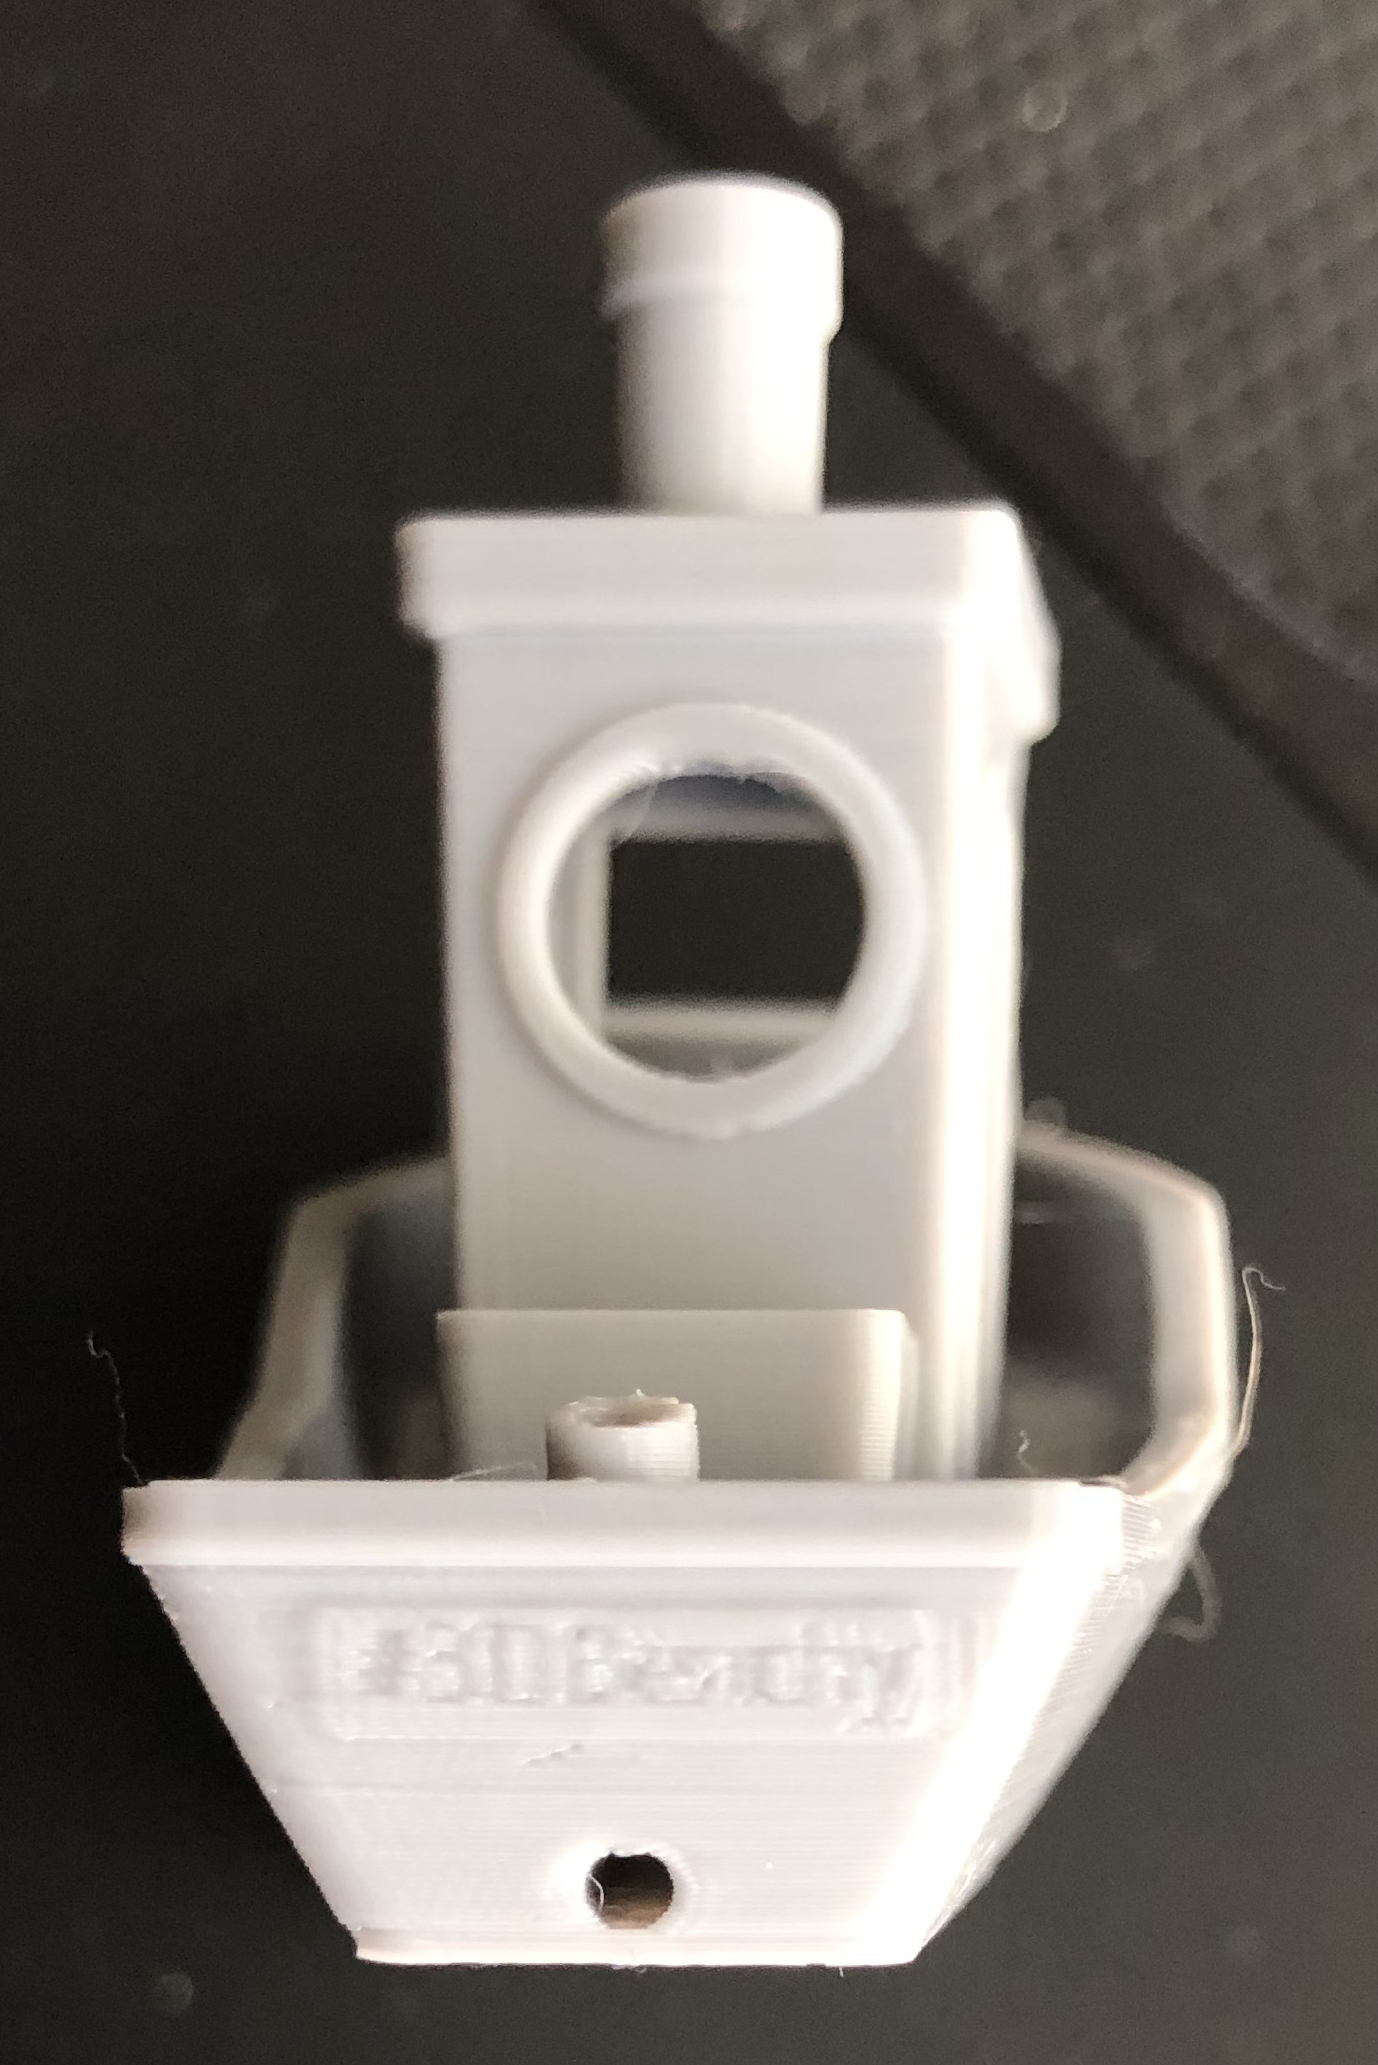

The 3D Benchy is readable on the stern. The sides are smoother than ever. Biggest flaw is the characteristic Slic3r bulge at solid layer transitions.
Some 0.9 degree Moons' MS17HA2P4100's have arrived. Should have some results with them soon.
Re: Stepper Motor Upgrades to Eliminate VFA's (Vertical Fine Artifacts)
I will see if i can get hold of a stepper and give it a try. I was hoping you would say yeah they drop straight in but understand it isn't always that simple.
That is a very smooth Benchy. It is a clear improvement.
Appreciate you doing work like this as it can be a little thankless sometimes.
Re: Stepper Motor Upgrades to Eliminate VFA's (Vertical Fine Artifacts)
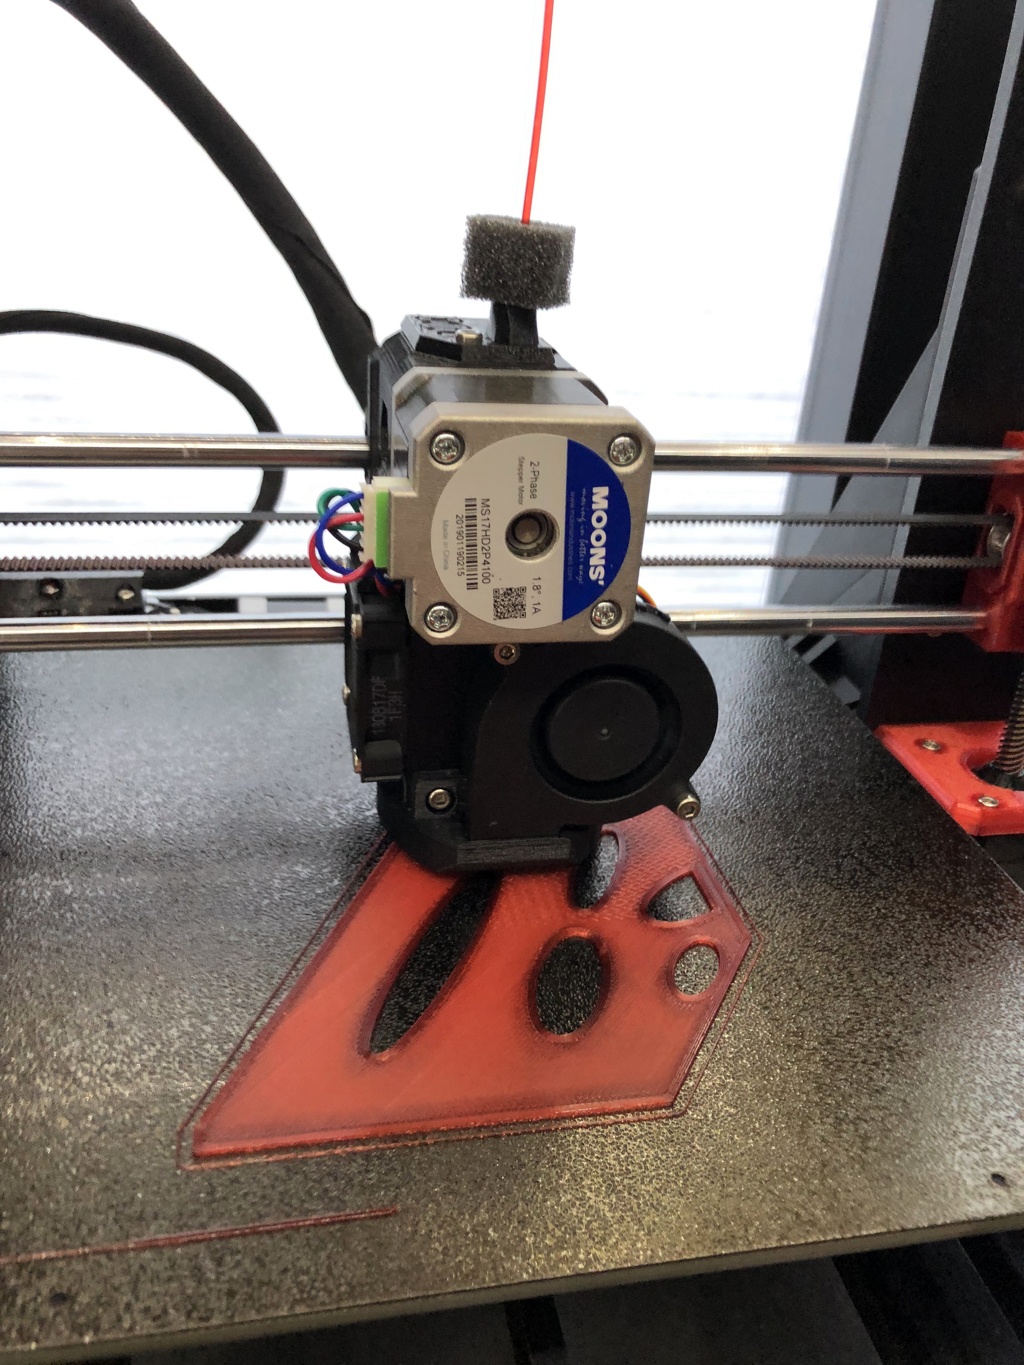
Moons' MS17HA2P4100 0.9 degree / 1 amp motors have been installed on x and y axes.
Stealthmode no longer goes completely wild on current draw. Peak to peak ma read
Spread Cycle (aka normal) 700 ma
Stealtchop (aka stealth) 924 ma
The LDO's would about double the ma draw. Definitely not reinstalling those LDO's. They were a useful, accidental intro to 0.9 degree motors, but really too much draw for stealth mode. I really want stealth mode working because the current waveforms are essentially perfect in stealth. Spreadcycle is electrically noisy by comparison. Even with the hysterises values perfected, it's never going to match the smoothness of stealthcop. The Moons' more controlled current draw under Stealth suggests they will be okay. I'll test that in a while. First I'm getting the safer spreadcycle mode working.
Another thing that was totally weird on the LDO's in normal mode is that during fast motions, there waveform became segmented blocks rather than smoothed. It was in smaller number of gross steps as speed increased. Under the same settings, the Moon's 0.9s have a smoothed current waveform and that doesn't devolve into smaller number of blocky steps. I am completely dumbfounded by the LDO's getting driven by such a different waveform. The TMC21380's are be sensing something different, but this is in spread cycle. I would not have expected such a finding. At any rate, the smoother current waveform with the Moons' is preferable.
Moons' 0.9 motors are also much quieter than the LDO 0.9's. The only weird noise I am hearing is a brief squeak about a 200 Hz during deceleration of fast moves. Some more tuning might fix that. Still really early with tuning for the motor. Otherwise, in spreadcycle printing, the XY motors are now much quieter than the print fan. That's a definite improvement over the LDO's.
I also cut a hole in my EINSY case and installed some small stepper driver heatsinks at the thermal vias for the x and y TMC2130's. That's the back side of the EINSY board.
Stealthguard threshold for x and y need to be 1 for homing to work on the Moon's
First test print is under way.....
Re: Stepper Motor Upgrades to Eliminate VFA's (Vertical Fine Artifacts)
XYZ cube printed using Moon's 0.9 degree motors is even cleaner than that done with LDO 0.9's. See the video showing surface finish at
Upper Left: Stock Prusa/LDO 1.8 degree LDO-42STH40-1004A motors
Upper Right: Moons' 1.8 degree MS17HD2P4100 motors
Lower Left: LDO 0.9 degree LDO-42STH40-1684MAC motors (caution current load of this motor is too high for stealth mode)
Lower Right: Moons 0.9 degree MS17HA2P4100 motors
The Moons' MS17HA2P4100 0.9 degree motor produces exceptional surface finish - essentially of vertical fine artifacts. Printed cube is sharpest and cleanest of four motors. However, requires modified firmware to work.
Moon's 1.8 degree MS17HD2P4100 is definitely better than stock, but does not produce as fine a surface finish as the 0.9 degree motors. Its advantage is not requiring modified firmware
I think we have a winner in the MS17HA2P4100.
Oddities - had to INCREASE stallguard threshold to 6 for x and y to get homing detection reliable. I kept adjusting it downward (even went negative) and things got worse.
Printer is now attempting a long topgraphic print in Stealthchop. That overheated the TMC2130's when I tried with the LDO 0.9's. We'll see in about 8 hours, but half an hour in and I can keep my fingertips on the new driver heatsinks. They are hot, but not burning hot. The LDO's made the driver chips so hot just a second long touch was too much to bear. It is cooler despite me feeing the heat conductive side with the Moons rather than the epoxy side with the LDO's.
----
One hour into print, the new Trinamic heatsinks measure 65C. The die is good to 120C before printer panics. Even assuming a fair bit of thermal resistance, I strongly suspect we're going to be OK in Stealth with the MS17HA2P4100's.
Re: Stepper Motor Upgrades to Eliminate VFA's (Vertical Fine Artifacts)
The long, topographic printed completed successfully without overheating in Stealth mode. So, yes, the Trinamic 2130's can manage the Moons' 0.9 steppers in stealth. This is with little heatsinks attached. It might be ok without the heatsinks, but they are dirt cheap and may give a bit more thermal headroom.
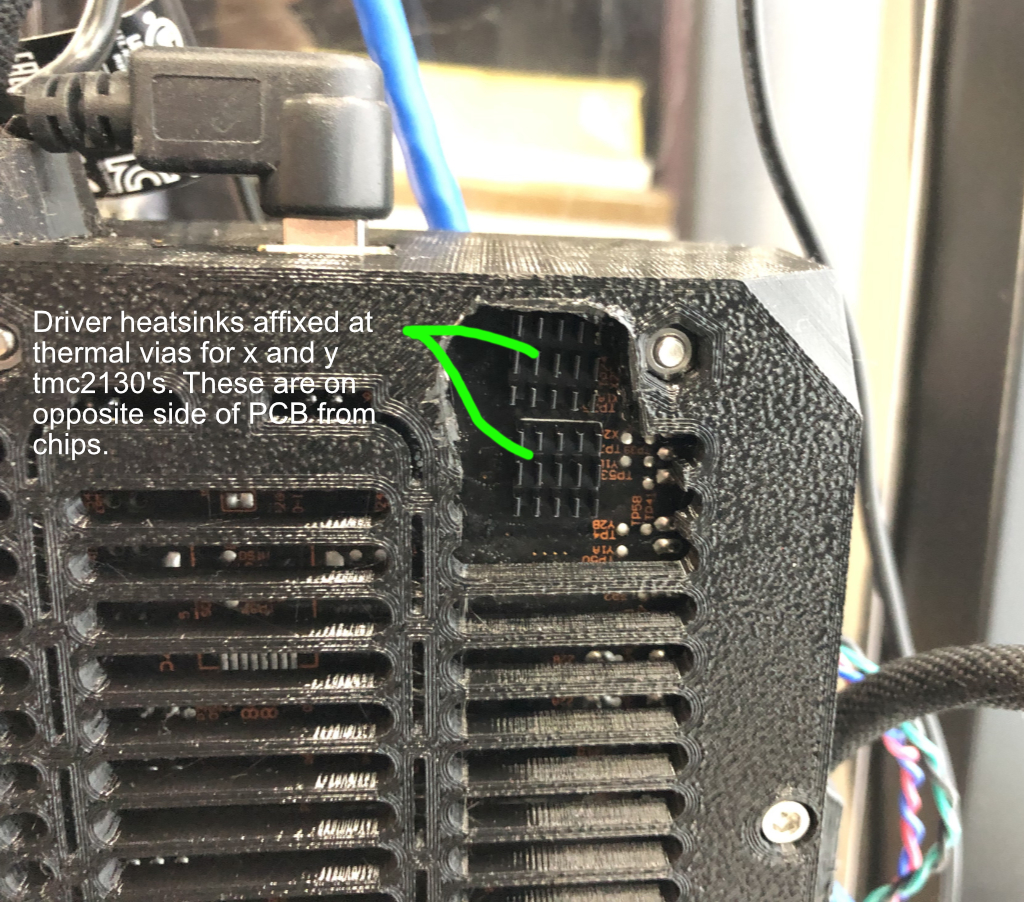
Don't be confused by my reverse EINSY case. The heatsinks go on the NON-component side of the pc board. That is the side where the TMC2130's are designed to dump heat, not the epoxy body side. Because the extruder cable bundle limits heatsink height on a reverse EINSY case, I ended up using some short ones from a raspberry pi kit. Usual driver heatsinks are a bit taller and would be ok in a stand orientation EINSY case.
Today's work is going back and tuning Spread cycle hysteresis and Stealthchop PWM_GRAD coefficients to match the Moons 0.9 degree MS17HA2P4100 motors.
Re: Stepper Motor Upgrades to Eliminate VFA's (Vertical Fine Artifacts)
Time for some more encouragement, guy! Been following you since you first began your quest to get rid of VFAs through driver tuning. You keep raising the bar every few days. Well done, sir! You have a keen mind.
I'm really excited to see where you end up at the conclusion of this journey. I intend to adopt your modifications once you finish. If I had the skills and knowledge, I'd help out, but to be honest, most of what you and other are discussing is FM (f**king magic) to me. Well done!
Re: Stepper Motor Upgrades to Eliminate VFA's (Vertical Fine Artifacts)
Thanks. Nice to know someone is following the progress and might get some benefit from the work. Basically, I have eliminated VFA's by switching to 0.9 degree motors on X and Y. If I look very closely there are some super faint VFA's at twice the old frequency, but they are practically invisible. I'd call them gone.
The next task was getting a 0.9 degree motor that the TMC2130 can successfully regulate in Stealthchop. The LDO 0.9's simply were too high a current and you can't actually regulate TMC2130 current in Stealthchop. I could run them in spread cycle because you CAN set current in spread cycle (aka standard mode). Thankfully, the Moons' MS17HA2P4100 0.9 degree motors are playing nice with the TMC2130's stealth mode. They can be used in both modes. Added some heatsinks and the setup survived a long, stealth print inside a 32C enclosure. If it can tolerate stealth mode, spread cycle is no problem.
Tuning hysteresis for Moons' MS17HA2P4100 was completed. Like the LDO 0.9's they seem to do best with less hysteresis than the stock motors. Prusa tuned hysteresis
hstr 5
hend 1
The Moons' MS17HA2P4100 0.9 degree are quietest with hysteresis turned nearly off
hstr 0
hend 0
The Trinamics always maintain some hysteresis current. These settings are the lowest one can go. Hend = 0 is actually negative.
Stealthchop has a PWM_GRAD coefficient that sets how quickly the chip regulates current. I used my scope and current probe while moving the motors through multiple accelerations and decelerations. Although, both x and y are electrically similar, the Y-axis requires extra caution during tuning due to its higher mass.
Low values for PWM_GRAD 1 to 4 give good carriage control, but you hear an annoying squeak during fast decels. Also, you see large current overshoots on the scope.
High values for PWM_GRAD 10 to 15 give very good current clamping and no more squeaks, but the y-axis is too heavy to use high values. If one over-regulates the overshoots, the y-axis will layer shift due to insufficient torque during big velocity changes.
Mid values PWM_GRAD 5-6 seems to be a good compromise. It's going to require additional print jobs to verify all is good.

Here are the firmware changes I have needed to make to the Moons' MS17HA2P4100 0.9 degree work....
[EDIT added changes needed to make sensorless homing reliable with Moons 0.9 degree motors]
in Configuration_prusa.h
//#define HOMING_FEEDRATE {3000, 3000, 800, 0} // set the homing speeds (mm/min) // 3000 is also valid for stallGuard homing. Valid range: 2200 - 3000
#define HOMING_FEEDRATE {3300, 3300, 800, 0} // set the homing speeds (mm/min) // Kuo faster feedrate needed for reliable Moons 0.9 degree motor stallGuard
//#define TMC2130_USTEPS_XY 16 // microstep resolution for XY axes
#define TMC2130_USTEPS_XY 8 // kuo reduce XY microsteps to 8 because EINSY cannot keep up with 16
//#define TMC2130_PWM_GRAD_X 2 // PWMCONF
#define TMC2130_PWM_GRAD_X 5 // Kuo higher better limits current overshoot and avoids squeak, but must be low enough to control accel/decel
//#define TMC2130_PWM_GRAD_Y 2 // PWMCONF
#define TMC2130_PWM_GRAD_Y 5 // Kuo higher better limits current overshoot and avoids squeak, but must be low enough to control accel/decel
// TMC2130_PWM_GRAD_Y 12 yields tight regulation, but causes layer shifts on y
// 2,3,4 squeak during fast declerations.
//#define TMC2130_SG_THRS_X 3 // stallguard sensitivity for X axis
//#define TMC2130_SG_THRS_Y 3 // stallguard sensitivity for Y axis
#define TMC2130_SG_THRS_X 7 // stallguard threshold for X axis (Kuo Must be higher with Moons 0.9)
#define TMC2130_SG_THRS_Y 7 // stallguard threshold for Y axis (Kuo Must be higher with Moons 0.9)
#define TMC2130_SG_THRS_X_HOME 8 // homing stallguard threshold for X axis (Kuo added for easier independent setting)
#define TMC2130_SG_THRS_Y_HOME 8 // homing stallguard sensitivity for Y axis (Kuo added for easier independent setting)
//#define TMC2130_CURRENTS_H {16, 20, 35, 30} // default holding currents for all axes
//#define TMC2130_CURRENTS_R {16, 20, 35, 30} // default running currents for all axes
#define TMC2130_CURRENTS_H {16, 20, 35, 30} // kuo Not Changed. Tested lower but better stealth regulation if unchanged.
#define TMC2130_CURRENTS_R {16, 20, 35, 30} // kuo Not Changed. Tested lower but better stealth regulation if unchanged.
in tmc2130.cpp
//uint8_t tmc2130_current_r_home[4] = {8, 10, 20, 18};
uint8_t tmc2130_current_r_home[4] = {6, 8, 20, 18}; //kuo homing current reduced for Moon's 0.9. Homing is always spreadcycle. So lower IS lower current.
//uint8_t tmc2130_sg_thr_home[4] = {3, 3, TMC2130_SG_THRS_Z, TMC2130_SG_THRS_E};
uint8_t tmc2130_sg_thr_home[4] = {TMC2130_SG_THRS_X_HOME, TMC2130_SG_THRS_Y_HOME, TMC2130_SG_THRS_Z, TMC2130_SG_THRS_E}; //Kuo apply constants from Configuration_prusa.h
//tmc2130_chopper_config_t tmc2130_chopper_config[4] = {
// {TMC2130_TOFF_XYZ, 5, 1, 2, 0},
// {TMC2130_TOFF_XYZ, 5, 1, 2, 0},
// {TMC2130_TOFF_XYZ, 5, 1, 2, 0},
// {TMC2130_TOFF_E, 5, 1, 2, 0}
//};
//Kuo Very low hysteresis makes least noise for xy Moons 0.9 motors
tmc2130_chopper_config_t tmc2130_chopper_config[4] = {
{3, 0, 0, 2, 0},
{3, 0, 0, 2, 0},
{TMC2130_TOFF_XYZ, 5, 1, 2, 0},
{TMC2130_TOFF_E, 5, 1, 2, 0}
};
in Marlin_main.cpp
// Move away from the collision to a known distance from the left end stop with the collision detection disabled.
endstops_hit_on_purpose();
enable_endstops(false);
current_position[axis] = 0;
plan_set_position(current_position[X_AXIS], current_position[Y_AXIS], current_position[Z_AXIS], current_position[E_AXIS]);
// destination[axis] = -10.f * axis_home_dir;
destination[axis] = -15.f * axis_home_dir; // Kuo move away from end stop slightly further
plan_buffer_line(destination[X_AXIS], destination[Y_AXIS], destination[Z_AXIS], destination[E_AXIS], feedrate/60, active_extruder);
st_synchronize();
endstops_hit_on_purpose();
// Now move left up to the collision, this time with a repeatable velocity.
enable_endstops(true);
// destination[axis] = 11.f * axis_home_dir;
destination[axis] = 16.f * axis_home_dir; // Kuo this must be farther than prior move away distance to actually hit end stop
No need to redefine steps per unit via gcode because no net change. We doubled motor resolution but also halved the microsteps.
Re: Stepper Motor Upgrades to Eliminate VFA's (Vertical Fine Artifacts)
Very good news. Thanks for all your work on this issue. I will directly benefit from all your efforts.
Just a nit, but you might want to put heatsinks on all the TMC2130's, as they are all heavily connected to the ground plane, to dump their heat. This is a fairly high thermal conduction path, so quite a bit of the heat is going there - reducing headroom for the other 2130's. Also, the Z & E drivers are operating at reasonably high currents.
ps - would love to see some print pictures from the new stealth mode. 😀
Re: Stepper Motor Upgrades to Eliminate VFA's (Vertical Fine Artifacts)
Easy enough to add more heatsinks.
Now in midst of another 10 hour stealth mode torture test. This time with large object lying flat to stress both x and y motors more equally. Heatsinks are still reading 65C even during fast solid layer infill.
Here is yesterday's topographic print in black PETG. It is gorgeous and shiny when viewed live. Photo is taken at about 30 degrees. I have not cleaned up the print other than tearing off the brim.
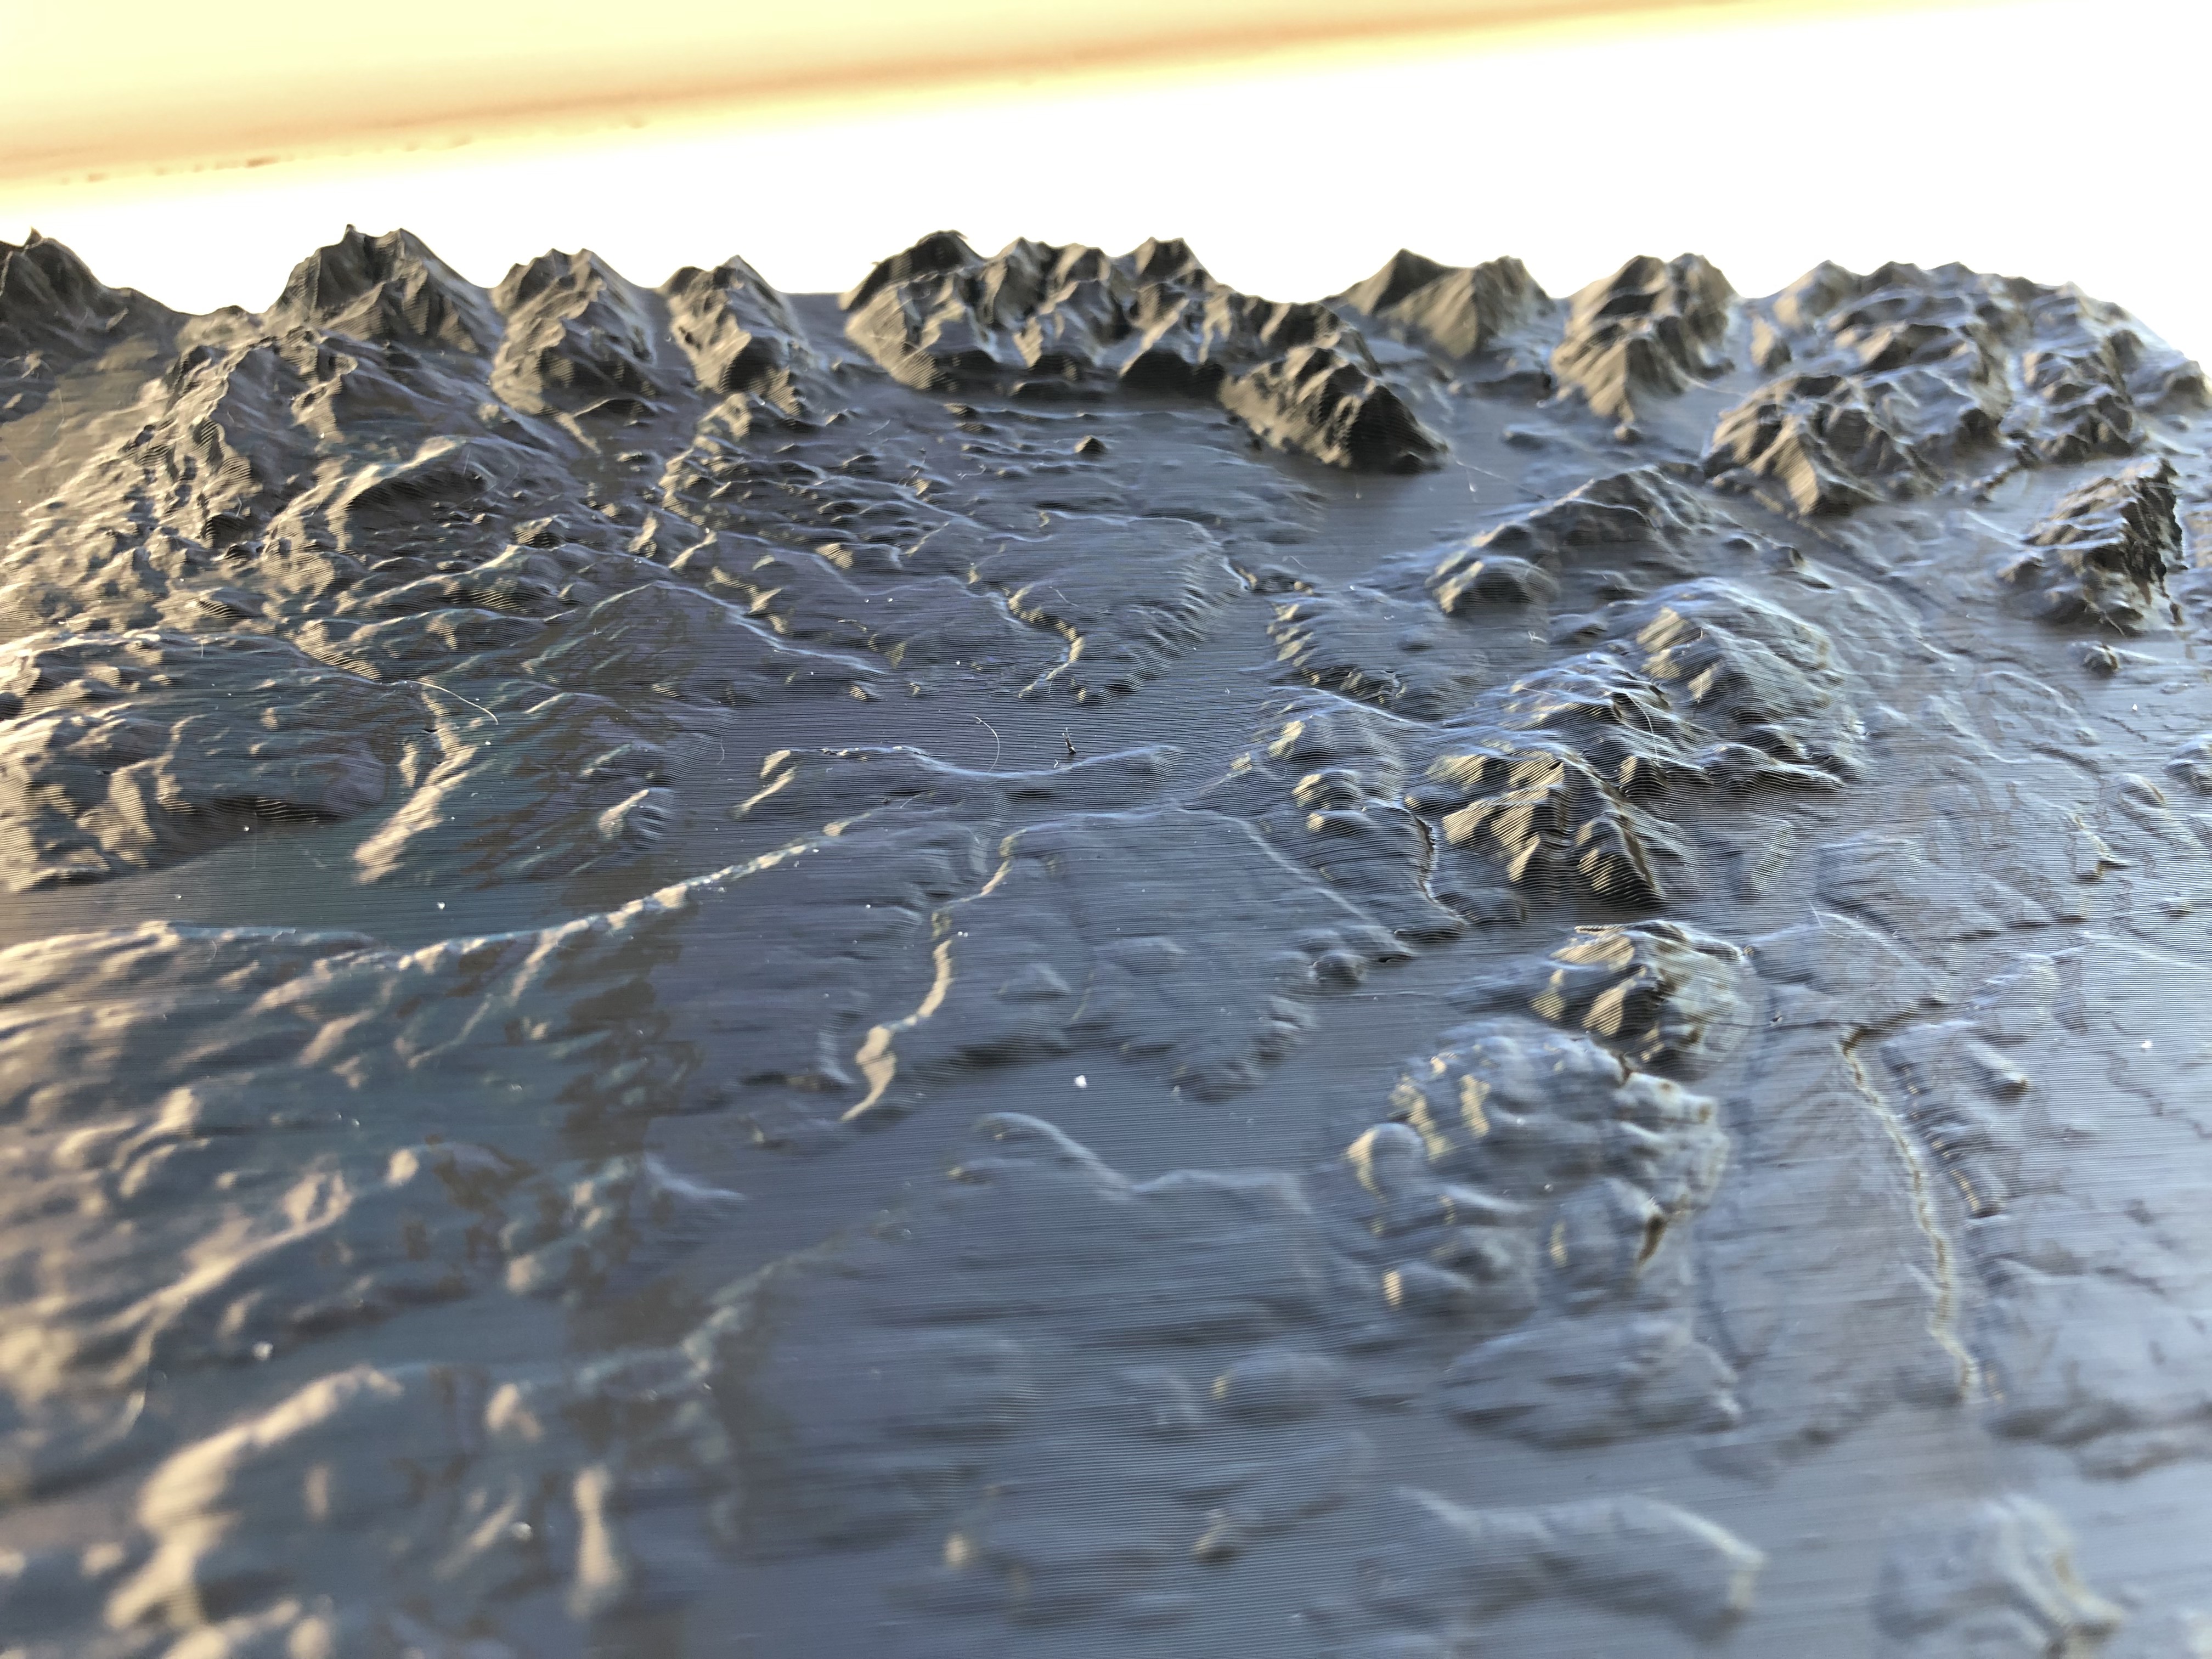
I REALLY like how the prints look with the 0.9 degree motors. Do you see any VFA's? I don't. 😀
I think the PWM_GRAD at 5 is working just fine on the latest torture test. If this remains stable in stealth, we're pretty much golden for spread cycle.
My last annoying issue is x-axis homing. It can still fail about 1/30 - 40 times. Just re-attempting homing usually corrects it. Would be great if x - homing never failed.
Re: Stepper Motor Upgrades to Eliminate VFA's (Vertical Fine Artifacts)
I'm really curious, have you tried a 1.8 moon on the z axis?
If you have, I'd be curious to see the photo of stock vs 1.8 moon, or maybe even 0.9. I'm not exactly sure how that works, if 0.9 would work on Z or not. But since it helped all the other axis, why not try on Z?
Re: Stepper Motor Upgrades to Eliminate VFA's (Vertical Fine Artifacts)
I'm really curious, have you tried a 1.8 moon on the z axis?
No. The Z-axis motors have integrated lead screws. Also, they are unusually high resistance motors (8 ohms). Getting an electrical match and new lead screws would be two barriers. I'm not as concerned over z-axis monotonicity because those motors have a lot of mechanical advantage via the lead screws. Z is already at 400 steps/mm given the lead screws. I suspect that reduction ratio is enough to hide whatever non-monotonicity the stock z steppers have.
Long, stealth mode test print is nearly done. The highest heatsink temperature I measured was 67C. No squeaks during deceleration nor layer shifts either. PWM_GRAD = 5 looks to be good choice for these Moons' 0.9 motors.
Sensorless Homing Fix
I believe I have fixed sensorless homing for the Moon's 0.9 degree motors. The x-axis was the one giving occasional trouble. It would fail to home once every 30 to 40 times. The printer would reset after a homing failure. Because my g-code print job startup includes two homing operations, that meant two chances for a print job to fail startup. Not ideal especially since the 2nd one was AFTER a long wait for PINDA warmup and G7 mesh. Once a print job was actually printing, there were no further problems.
Increasing BOTH the distance and feedrate the axis moves before hitting the end stop seems to fix the issue. I have not been able to get homing to fail after...
Increase xy homing feedrate from 3000 to 3300
Increase pre-hit, move distance from 10 mm to 15 mm
Neither change alone fixed things. Required both to get things reliable. The higher feedrate gives stallguard more feedback current to detect. The longer distance gives more time for current to stabilize before hitting end stop.
I have revised the firmware changes posted earlier to also include the following...
Sensorless homing fix for Moons 0.9 motor
in Configuration_prusa.h
/#define HOMING_FEEDRATE {3000, 3000, 800, 0} // set the homing speeds (mm/min) // 3000 is also valid for stallGuard homing. Valid range: 2200 - 3000
#define HOMING_FEEDRATE {3300, 3300, 800, 0} // set the homing speeds (mm/min) // Kuo faster feedrate needed for reliable Moons 0.9 degree motor stallGuard
in Marlin_main.cpp
// Move away from the collision to a known distance from the left end stop with the collision detection disabled.
endstops_hit_on_purpose();
enable_endstops(false);
current_position[axis] = 0;
plan_set_position(current_position[X_AXIS], current_position[Y_AXIS], current_position[Z_AXIS], current_position[E_AXIS]);
// destination[axis] = -10.f * axis_home_dir;
destination[axis] = -15.f * axis_home_dir; // Kuo move away from end stop slightly further
plan_buffer_line(destination[X_AXIS], destination[Y_AXIS], destination[Z_AXIS], destination[E_AXIS], feedrate/60, active_extruder);
st_synchronize();
endstops_hit_on_purpose();
// Now move left up to the collision, this time with a repeatable velocity.
enable_endstops(true);
// destination[axis] = 11.f * axis_home_dir;
destination[axis] = 16.f * axis_home_dir; // Kuo this must be farther than prior move away distance to actually hit end stop
I think this fixes the last obstacle to using Moon's 0.9's as x and y motors. They are a bit noisier than stock motors, but the massively improved surface finish quality makes them worthwhile to me. Still can't hear the printer from the next room (in Stealth).
Also took a few minutes and added heatsinks for the E and Z axis TMC2130 chips. Interestingly, z-axis driver chip actually runs hotter than the extruder chip. X and Y with the 0.9's are definitely the hottest of the four TMC2130's.
We now have current and thermal load at reasonable levels thanks to the 1 amp Moon 0.9 motors and heatsinks.
Stealth mode PWM_GRAD is adjusted for good axis motion control, and sensorless finally works well.
😀 😀 😀 Basically, achieved my main quest. VFA's are essentially gone.
Next, is going back to fine tune the motors with the waveform table and verify my initial (but already working) hysteresis and PWM_GRAD settings are optimal.
X Y E waveform correction towers (PETG and PLA)
For those who want to test the effects of Trinamic waveform correction factors on X Y and E axis simultaneously, here are my XYE waveform towers. These change waveform correction all three x, y and e axes every 5 mm height. The bottom is at linear correction off. At 5 mm it becomes 1.030. The 90 mm band is 1.200. At the top (95 mm), linear correction is turned back off.
NB. The startup for these towers takes a bit longer than the default Prusa start sequencet. They use a light version of my startup code. That includes PINDA preheat before mesh and you will see a pause AFTER mesh for the nozzle to heat up. Also the waste line is dropped from an easy to remove height.
Both PETG and PLA version gcodes are included.

With these towers, one can examine effects of Trinamic waveform correction on diagonal 602 effects of e-xis, and fine vertical effects of x and y e-cycles all on a single print.
If you wish to create your own towers, set layer height to 0.2 mm, 2 perimeters, zero infill. Tower should be at least 10 cm tall.
My custom, before layer change g-code is...
;BEFORE_LAYER_CHANGE

G92 E0.0
{if layer_z == 5.0}
TMC_SET_WAVE_E30
TMC_SET_WAVE_X30
TMC_SET_WAVE_Y30
{elsif layer_z == 10.0}
TMC_SET_WAVE_E40
TMC_SET_WAVE_X40
TMC_SET_WAVE_Y40
{elsif layer_z == 15.0}
TMC_SET_WAVE_E50
TMC_SET_WAVE_X50
TMC_SET_WAVE_Y50
{elsif layer_z == 20.0}
TMC_SET_WAVE_E60
TMC_SET_WAVE_X60
TMC_SET_WAVE_Y60
{elsif layer_z == 25.0}
TMC_SET_WAVE_E70
TMC_SET_WAVE_X70
TMC_SET_WAVE_Y70
{elsif layer_z == 30.0}
TMC_SET_WAVE_E80
TMC_SET_WAVE_X80
TMC_SET_WAVE_Y80
{elsif layer_z == 35.0}
TMC_SET_WAVE_E90
TMC_SET_WAVE_X90
TMC_SET_WAVE_Y90
{elsif layer_z == 40.0}
TMC_SET_WAVE_E100
TMC_SET_WAVE_X100
TMC_SET_WAVE_Y100
{elsif layer_z == 45.0}
TMC_SET_WAVE_E110
TMC_SET_WAVE_X110
TMC_SET_WAVE_Y110
{elsif layer_z == 50.0}
TMC_SET_WAVE_E120
TMC_SET_WAVE_X120
TMC_SET_WAVE_Y120
{elsif layer_z == 55.0}
TMC_SET_WAVE_E130
TMC_SET_WAVE_X130
TMC_SET_WAVE_Y130
{elsif layer_z == 60.0}
TMC_SET_WAVE_E140
TMC_SET_WAVE_X140
TMC_SET_WAVE_Y140
{elsif layer_z == 65.0}
TMC_SET_WAVE_E150
TMC_SET_WAVE_X150
TMC_SET_WAVE_Y150
{elsif layer_z == 70.0}
TMC_SET_WAVE_E160
TMC_SET_WAVE_X160
TMC_SET_WAVE_Y160
{elsif layer_z == 75.0}
TMC_SET_WAVE_E170
TMC_SET_WAVE_X170
TMC_SET_WAVE_Y170
{elsif layer_z == 80.0}
TMC_SET_WAVE_E180
TMC_SET_WAVE_X180
TMC_SET_WAVE_Y180
{elsif layer_z == 85.0}
TMC_SET_WAVE_E190
TMC_SET_WAVE_X190
TMC_SET_WAVE_Y190
{elsif layer_z == 90.0}
TMC_SET_WAVE_E200
TMC_SET_WAVE_X200
TMC_SET_WAVE_Y200
{elsif layer_z == 95.0}
TMC_SET_WAVE_E0
TMC_SET_WAVE_X0
TMC_SET_WAVE_Y0
{endif}
Re: Stepper Motor Upgrades to Eliminate VFA's (Vertical Fine Artifacts)
Interestingly, z-axis driver chip actually runs hotter than the extruder chip.
This makes total sense, since the Z driver is driving both Z steppers in parallel - making the resistance seen by the driver just 4 ohms, along with the increased current that it is set at. In fact, based on all the excellent data that you have generated along this journey, I'm kind of surprised at the tuning values for the Z driver.
Also, if you are interested, my constant torque version of tmc2130_set_wave is done. I had a little trouble fine tuning it & ran tons of simulations, but since I was focusing my efforts on it - I haven't yet finished my printer build. I intended to finish my printer & test the new code myself, but you are too fast for me. So, if you want I can post it.
Thanks, again for your diligent pursuit of MK3 goodness 😀
Re: Stepper Motor Upgrades to Eliminate VFA's (Vertical Fine Artifacts)
Also, if you are interested, my constant torque version of tmc2130_set_wave is done. I had a little trouble fine tuning it & ran tons of simulations, but since I was focusing my efforts on it - I haven't yet finished my printer build. I intended to finish my printer & test the new code myself, but you are too fast for me. So, if you want I can post it.
Yes. Please post, but is it possible to get it as a series of commented code snippets with diffs? I just finished patching today's 3.6.0 mk3 prerelease branch with N7 mesh to work with 0.9 Moons. I would rather not undo all that to test your tmc2130_set_wave. Easier if I could simply edit your changes into my files.