Profile for a 0.3 mm nozzle
Hi.
Spent most of the day installing a new 0.3 mm nozzle (the smallest I have at home) to print small parts.
Installing was quick off course but creating a working profile turned out to be a nightmare.
Read the Prusa blogs about creating non-existing nozzle profiles from the stock ones.
Hard to summarize all my tests but non of them where successful.
I think the threads I found from Prusa employees saying it would be too much to include other than 0.25 and 0.4 (and larger ones) is kind of non-productive for the end-users. Having a skilled 3D print engineer "develope" a profile for a 0.3 mm nozzle would be beneficial for all customer rather than having the customer go through trial and errors. As you might notice I'm somewhat frustrated so sorry for that 🙂
Searched for a profile on other sites but came up short.
Please Prusa supply an 0.3 mm nozzle profile! Or please somebody share if you have something working! Thanks in advance!
First layer calibration is successful but I guess since I can only select the 0.25 mm nozzle it's not fully correct. I tried raising it.. And tuning during print but all my prints during first layer. Tried slowing the print down, lowering temp by 5-10 degrees. 110%-120% of nozzle for layer width. And setting to zero to default to values calculated from the nozzle size.
Best Answer by bobstro:
The brim & skirt should hold firmly. I'm going to give you a big info dump to read through. I recommend working on these issues 1st. The reason is that, while you've got some definite print issues going on with the "arches", a loose print will aggravate that problem. Cooling is something to look at, but again, after you've got your Live-Z and bed adhesion working properly. Here's the sort of result you're after for your 1st layer:
-
Part warping or lifting along edges.
-
Bumping or knocking noises as the part moves under the nozzle.
-
Uneven vertical surfaces and bulges caused by print lifting and compression of overlying layers.
-
Spaghetti resulting from parts moving during printing.
-
The dreaded "blob of doom" caused by the part lifting and sticking to the nozzle as it extrudes filament.
-
A dirty PEI print surface. Even if you don't think this is the cause, it's always a good idea to make sure your PEI surface is clean before trying any other fixes. If it's a smooth PEI sheet, take it to the kitchen sink and give it a good dunk with Dawn (original formula, no vinegar or hand softener variants) dishwashing soap or your local equivalent (e.g. Fairy in UK). Use a clean paper towel to clean it off, and another to dry it. Avoid using any sponge or cloth that has been in contact with grease. Above all else, avoid touching the PEI print surface. Once it's good and clean, you should be able to use 91%+ isopropyl alcohol between prints, 100% acetone when that fails , and another dunk when acetone fails. Worst-case, use a 3M 7445 ScotchBrite (1200-1500 grit) pad or equivalent on smooth PEI to give it a very light buff, but only infrequently. If you've got a textured powder-coated PEI print surface, the official instructions are to use 91%+ isopropyl alcohol on it only. Rumors persist that some have had good luck getting started with these sheets by giving them a wipe with 100% acetone and a dunk with Dawn. Either way, there's no real warranty on these sheets. YMMV.
-
If you have not already done so, try using Jeff Jordan's "Life Adjust" procedure for calibrating your Live-Z setting. It is much easier to use and understand than the onboard routine and much easier to make mid-print adjustments accurately with. In general, start high (less negative) and work lower (more negative) in large increments (e.g. 0.1mm) until the filament starts to stick on its own. When you've got your Live-Z setting adjusted properly, you should be able to gently rub the extruded lines on the PEI surface without dislodging them. Then start lowering (more negative) the level until there are no gaps between layers. You should not be able to peel the lines apart after printing, but the top should be regular.
RE: Profile for a 0.3 mm nozzle
I've got notes and sample profiles here that should get you started.
RE: Profile for a 0.3 mm nozzle
@bobstro
I read your documentation earlier today and downloaded a few pastebins named Prusa but could not really make it work. Will try again and see if I missed something.
Downloaded
RE: Profile for a 0.3 mm nozzle
I read it again. I didnt load the config bundle but tried to "import config" which lead to only a 0.4mm config being imported. Now I see them all. Will try them shortly! Thanks for replying!
RE: Profile for a 0.3 mm nozzle
Tried printer "Mk3 0.30 nozzle (20210111)" and printer seettings "MK3 QUALITY 0.24mm layers for 0.30mm+ nozzle (RLG 20200508)"
Which seems to be the finest details available but the latest version of Prusa Slic3r complains that:
Error: First layer height cannot be greater than nozzle size.
First layer is set to 200% which is default. Correct??
RE: Profile for a 0.3 mm nozzle
Switched back from 2.3.1 to 2.2.0 with the same issue using the Filament profile Generic PLA (Prusa) and the above Printer settings and Printer profile.
What am I missing?
RE: Profile for a 0.3 mm nozzle
First layer height should be 0.20mm on all of the profiles. I use that for all my prints regardless of nozzle size (except for 0.15mm). That is set with this parameter:
first_layer_height = 0.2
RE: Profile for a 0.3 mm nozzle
Wups - Forgot to add that I've got a lot more notes on nozzle selection and use here.
RE: Profile for a 0.3 mm nozzle
@bobstro thanks for taking time to help out! Much appreciated!
But loading your profile "MK3 QUALITY 0.24mm for 0.30mm + nozzle" ... Maybe that is not the nozzle size??
First layer height is 0.35mm which is not achievable using a 0.30mm nozzle.
RE: Profile for a 0.3 mm nozzle
Not really sure what is happening. The mesh-bed-leveling starts with bed-temp 80 and 160 degree nozzle temp. Then starts the priming then halts at the end of priming stuck ad the print bed. Updated my Prusa firmware today to the latest. Something is really wrong here.
Just noticed your custom G-code. Is this really safe? hotend parked for a long time at the same place in the print bed?
This is the reason for my thread I guess. A Prusa supported 0.3 nozzle setting.
RE: Profile for a 0.3 mm nozzle
Realized a simple solution is to order a few 0.25 mm nozzles and see how that works out. Unfortunately 0.25 is not a common size in Sweden so I will have to park this issue for a few days... Any hints/tips in the mean time?
RE: Profile for a 0.3 mm nozzle
But loading your profile "MK3 QUALITY 0.24mm for 0.30mm + nozzle" ... Maybe that is not the nozzle size??
That is a print (not printer) preset that can be safely used with nozzles of 0.30mm or greater size. Keep in mind that you select 2 things separately:
- The printer preset that includes the nozzle information.
- The print preset that includes the layer height and extrusion width information.
I have configured the print profiles to only display when you select among compatible printer profiles. After you select a printer profile with your desired nozzle size, select among the print profiles. Again, I suggest using 0.2mm layer heights starting out, specifically the MK3 QUALITY 0.20mm layers for 0.25mm+ nozzle preset.
First layer height is 0.35mm which is not achievable using a 0.30mm nozzle.
You have changed something from my profile. My baseline print profile contains the following setting:
first_layer_height = 0.2
Not really sure what is happening. The mesh-bed-leveling starts with bed-temp 80 and 160 degree nozzle temp. Then starts the priming then halts at the end of priming stuck ad the print bed. Updated my Prusa firmware today to the latest. Something is really wrong here.
Please read the note on the page with the links to the profiles that reads:
For printers other than the Mk3S and Mk3S+, I use a PINDA warmup procedure. This is to ensure a consistent ambient temperature for mesh bed leveling with older PINDA probe versions. You’ll notice the nozzle will warm to 160C and move to the center-rear of the heated bed as it warms to 35C. Nothing seems to happen, particularly on the first print of a session in a cold setting.Be patient and monitor the temperatures under Support->Temperatures on the printer menu. Once the PINDA probe has warmed to 35C, the print will continue. More information on this procedure can be found in my Customizing PrusaSlicer start g-code notes.
I have confirmation back from dozens of people using these profiles with Mk3 and Mk3s variants with no issues. The startup gcode behaves differently if you have an older PINDA type. What version are you using?
Just noticed your custom G-code. Is this really safe? hotend parked for a long time at the same place in the print bed?
Yes. The PINDA warmup pause is done with the nozzle at 160C when positioned at the center-rear of the bed. The final nozzle warmup is done with the nozzle raised (unlike the Prusa startup gcode) specifically to protect the bed.
Realized a simple solution is to order a few 0.25 mm nozzles and see how that works out. Unfortunately 0.25 is not a common size in Sweden so I will have to park this issue for a few days... Any hints/tips in the mean time?
Figuring out how the settings work so you're not dependent on a specific nozzle or waiting for others to develop a profile is where I'd start. There's nothing particularly tricky about the settings if you don't like any of my settings. Just copy over the relevant settings to a new profile.
RE: Profile for a 0.3 mm nozzle
@bobstro thanks for sticking with me even though I'm a bit frustrated. Ordered 0.25 mm nozzles from Prusa but they will take a few days to arrive so in the meantime I can fiddle with print settings. I'm not 3D printing every day but a lot when I have a need. I must admit it's been a while.
But for the record I cleared all my config by moving away $HOME/.config/PrusaSlicer and started with a clean slate. Imported your two .ini files.
Selecting the 0.30 mm nozzle printer setting and the print setting (0.25 or 0.30) renders the error once again.
I opened the ini file and as you say the first_layer_height is 0.2 but not in the UI. Tried the same procedure with an older Prusa Slic3r version. Same behaviour.
RE: Profile for a 0.3 mm nozzle
Tried to print after switching manually to 0.20 mm first_layer_height.
But the priming process was strange. It went over itself two times. Got the famous blob of plastic.
RE: Profile for a 0.3 mm nozzle
I'm baffled as to why you're having so much trouble. Printing with a 0.3mm nozzle is not tricky at all.
- Have you done a Live-Z print with it?
- Have you tried a PID tune to account for any changes in the heating characteristics?
Other than that, all I really change are:
- The minimum and maximum layer heights for the printer (extruder) settings.
- Keep layer heights in print settings less than 80% of the nozzle size.
- Keep extrusion widths in print settings within 120% of the nozzle size.
These basics should get you going. Once you are happy with the results, you can tweak a few more things.
RE: Profile for a 0.3 mm nozzle
@frippe75
Why not save the project into a .3mf file, zip it into an archive and upload it here. Seeing the actual work you are trying to print may help determine where the confusion is.
RE: Profile for a 0.3 mm nozzle
@tim-2
Great idea!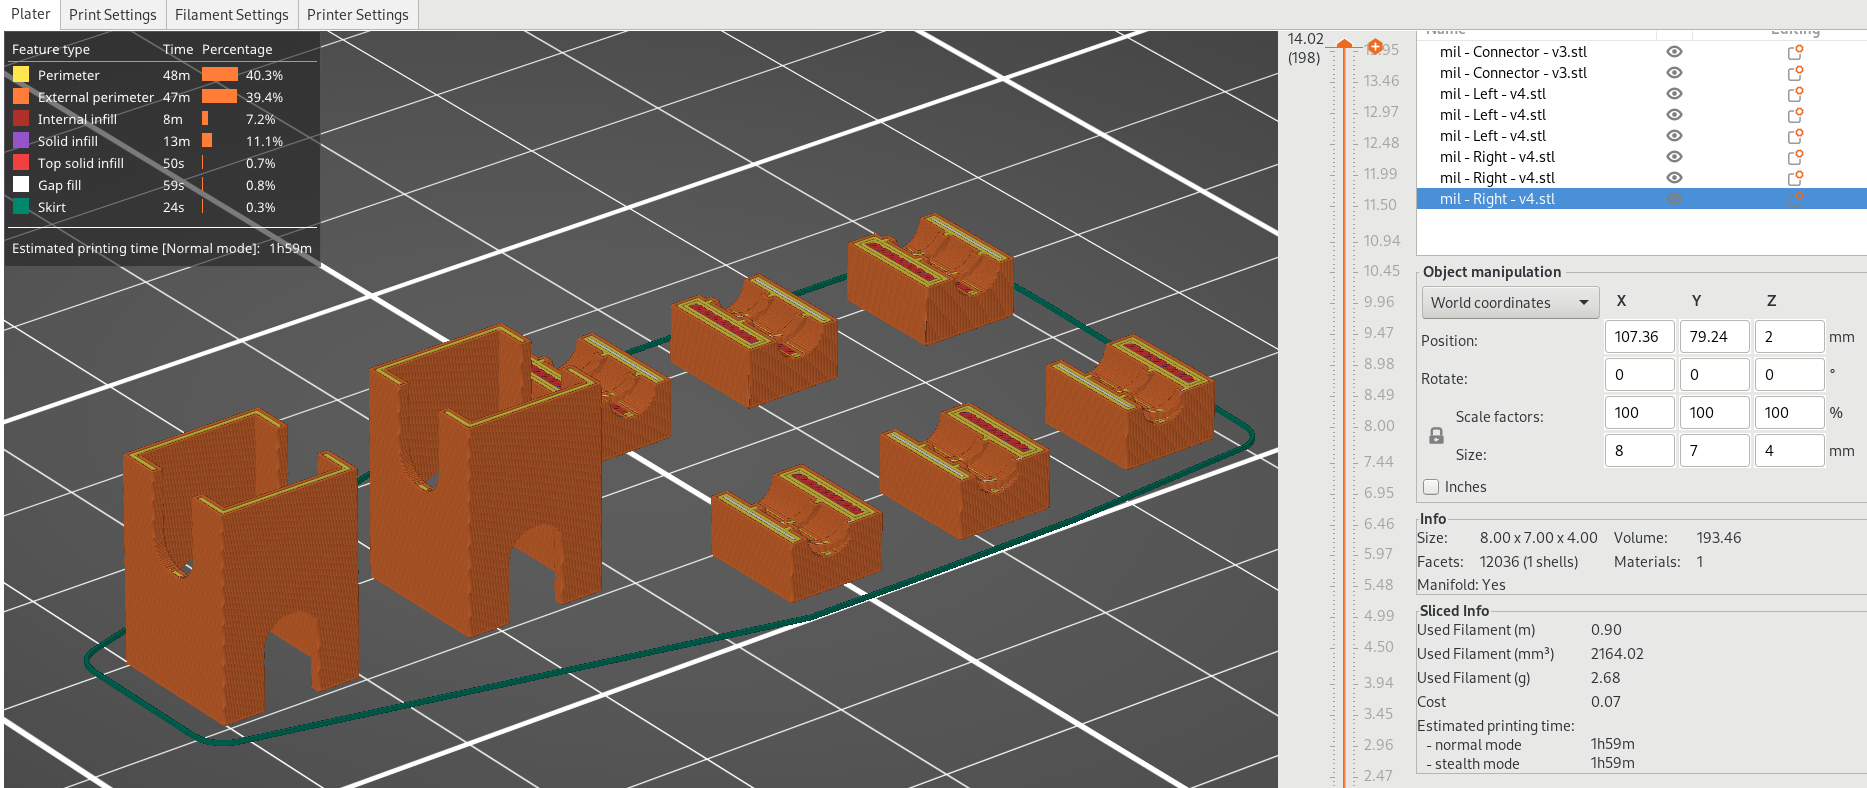
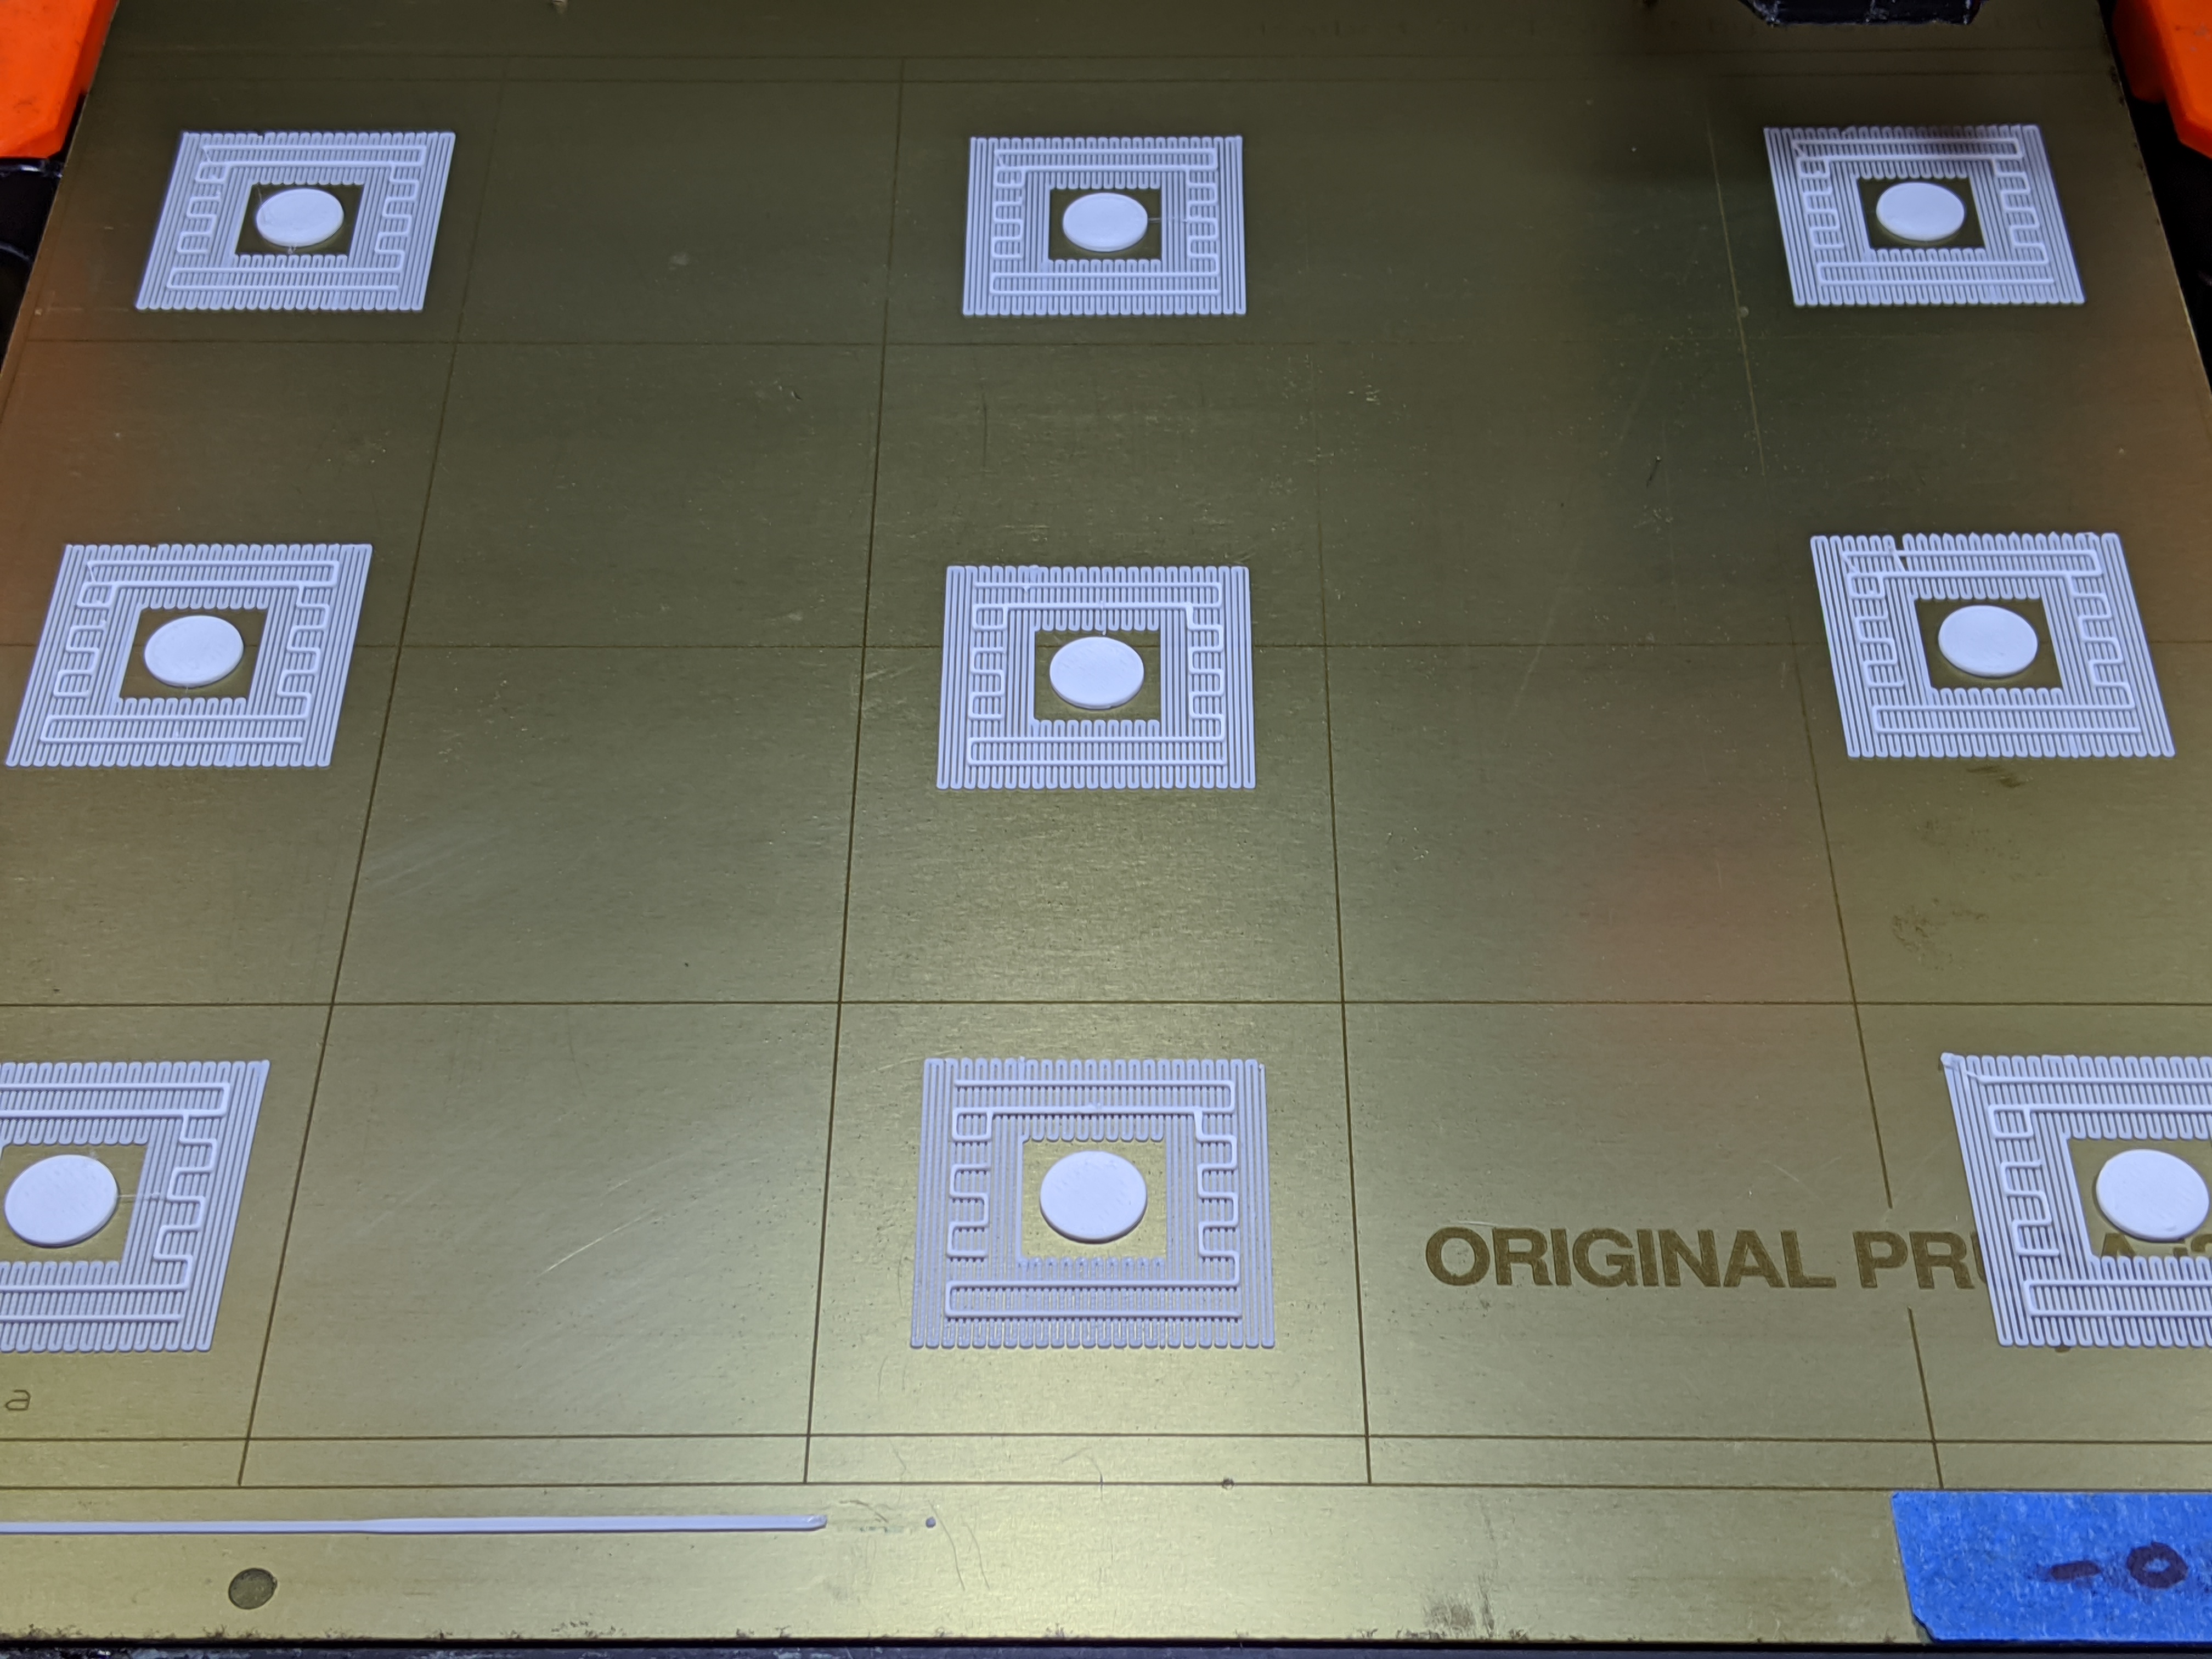
Quite small parts. I got off to a good start today where it printed successfully all the way to maybe layer 35-40 and then create a big fur-ball.
The "Tower" parts seems to be the issue. Will try to create only the lower more solid parts.

One of them actually printed sucessfully in some regards. Its warped a bit, not flat. Elephant foot looking

RE: Profile for a 0.3 mm nozzle
Tried the "tower" pieces with and without support
RE: Profile for a 0.3 mm nozzle
Trying different things and I must say my Prusa MK3 is behaving strangely. After the firmware upgrade to the latest the Z-layer calibration is much much faster. The up-down motion on each of the 9-points is much shorter making it a more speedier process. But during my last print it was different behaviour on each point. Almost frooze at one point.. Something seems broken hardware wise and not sure how to go about this. Starting looking at basic troubleshooting steps with belt tensioning and so on... But .. sigh.... 3D printing sometimes is a pain-in-the-b-t.... I always end up troubleshooting the 3D printer rather than iterating over the actual 3D model....
RE: Profile for a 0.3 mm nozzle
Adding brims to my next attempt. Not sure why I didn't think of that...