Re: Official 3D printer enclosure from Prusa Research
Printer now inside, no mods at all needed for any cables, all is original MK3 parts loads of room to move around.

Do you have STLs or a TV link for those LACK leg braces? Obviously I could redraw them if needed but it'd save some time if someone's already shared them 🙂
Re: Official 3D printer enclosure from Prusa Research
Here you go 2 links below one file is the brackets reduced and perfect size, 24 brackets, I use 2 for each leg, printed in PETG
http://www.mediafire.com/folder/f20ei00244iedpy,i21t7kiywy4d63x/shared
And the STL file below that you can modify if needed.
http://www.mediafire.com/file/i21t7kiywy4d63x/90%25C3%2582%25C2%25BA_Bracket.stl/file
woot, thanks!
Re: Official 3D printer enclosure from Prusa Research
Disco fever time, big exhaust and this thing will roar............. 😀 😀 😀 😀 😀

Re: Official 3D printer enclosure from Prusa Research
What brand name is that enclosure? Do you know if they are available in the US?
I bought the 12U version of this one.
Not as tall so I can't mount the filament inside, but with the MMU2 I couldn't anyway. Does make it a challenge to work on the MMU2 unit but once I got it working reliably I haven't needed to remove it from the cabinet.
Unfortunately these cabinets are much more expensive for us here in the US.
Thanks. I made one with Lack tables but I have never been very happy with it. It is stable and will work for now, but I will likely upgrade.
--------------------
Chuck H
3D Printer Review Blog
Re: Official 3D printer enclosure from Prusa Research
Slowly but surely getting there 🙂 Still needs LED's , exhaust fans etc. The PSU has moved outside to avoid it dying from a heat stroke 😆

Re: Official 3D printer enclosure from Prusa Research
Slowly but surely getting there 🙂 Still needs LED's , exhaust fans etc. The PSU has moved outside to avoid it dying from a heat stroke 😆
You should post a list of parts and links. I might try to build one.
--------------------
Chuck H
3D Printer Review Blog
Re: Official 3D printer enclosure from Prusa Research
Slowly but surely getting there 🙂 Still needs LED's , exhaust fans etc. The PSU has moved outside to avoid it dying from a heat stroke 😆
You should post a list of parts and links. I might try to build one.
--------------------
Chuck H
3D Printer Review Blog
Re: Official 3D printer enclosure from Prusa Research
Here’s my lack enclosure using the Walmart parson’s tables (2 for $25). They are slightly smaller than the ikea ones by less than an inch, but worked fine after mounting the lcd outside and using the 90 degree heat bed connector. I want to order longer ribbon cables.
I put xt60 connectors on the psu connections and cut a hole through the table and printed a grommet to run all of the wires and mount the psu on the leg. I printed a raspberry pi case that had ‘ears’ to mount under the table using a logitech camera.
I’m not sure the paver was necessary but with it, it’s rock solid while printing. I waited until I mounted the tables on top of each other and measured before ordering the acrylic from tap plastics (about $60).
I wish there was an easier way to remove the side acrylic to work on the printer.
Ray
Re: Official 3D printer enclosure from Prusa Research
Slowly but surely getting there 🙂 Still needs LED's , exhaust fans etc. The PSU has moved outside to avoid it dying from a heat stroke 😆
You should post a list of parts and links. I might try to build one.


Re: Official 3D printer enclosure from Prusa Research
I want to build my own enclosure with aluminium profiles. My idea is to put the printer on a pull-out drawer for better access. I`ll upload the CAD-files when it is ready - hopefully not in "prusa time" 😀
Re: Official 3D printer enclosure from Prusa Research
I want to build my own enclosure with aluminium profiles. My idea is to put the printer on a pull-out drawer for better access. I`ll upload the CAD-files when it is ready - hopefully not in "prusa time" 😀
That is an interesting idea.
--------------------
Chuck H
3D Printer Review Blog
Re: Official 3D printer enclosure from Prusa Research
Ok. Got a spare bedroom set up with my printers. Have an MK3 in the lack enclosure. Well, I have a palette 2 pro that i'm wanting to connect and use with this MK3, but also a repbox (repkord.com) filament box that needs to be incorporated into the mix as well. So, I'm looking for room setup options for feeding the filament from the repbox to the palette 2 pro then to the prusa inside the enclosure. GO!!!!
I thought about use the mounting bracket with the palette 2 pro and mounting it to the side of the top table but I'm concerned about the table being able to support the weight of the palette 2 pro and not tipping the table over (or pulling the screws out of the table)..
If you want to mount your P2 upside down above your enclosure a friend of mine made a stand: https://www.thingiverse.com/thing:3412482
Ive been using it for a while with my lack setup and it works great
Re: Official 3D printer enclosure from Prusa Research
Thanks. I saw the upside down stand and just don't care for it. Idea/concept is great and adds an alternative mounting option but just wasn't something I cared for. currently, I put my filament spool holder on the shelf beneath the printer (I did a 3 table enclosure) and have the palette 2 pro sitting on top and run my filament up the side of the box. Not ideal, and if I leave it this way, I want to find a way to incorporate a filament guide of some kind to keep them feeding straight.
Re: Official 3D printer enclosure from Prusa Research
Since I got my MMU2s I've been trying to figure out how to incorporate it into my prusa "official" LACK enclosure. I thought all the leg extensions ruined the look of the enclosure - and dealing with some older filament I was spending a lot of time fiddling with the MMU2s and wasn't looking forward to hassles of manipulating the MMU deep inside the enclosure.
Likewise, putting the MMU on top, in the back of the unit, would also make it too hard to work on. I ended up finding this link https://www.thingiverse.com/thing:3160443 (MMU 2.0 Lack Enclosure Mount) from Spockman07 and loved the top-side approach for mounting the MMU. I did not use his MMU mount - I opted for Command Strips instead (provides decent isolation from vibrations), but I did use Spokman07's "skirt" which is part of the same download.
But it left the filament buffer in limbo. Where should it go? My solution was to design mounting brackets for the buffer, based on the Prusa component: s-buffer-spacer ( https://www.prusa3d.com/prusa-i3-printable-parts/ ) . The result is side-mounted buffer that is easy to remove, load and attach. When combined with Vertigo235's "Prusa MMU2 PTFE Holder M10 Passthrough Adapter", https://www.thingiverse.com/thing:3233579 A MUST HAVE FOR EVERY MMU OWNER!!, the solution is perfect for me.
The power supply is mounted under the table (per the Prusa LACK design), but I put a few Molex connectors to make it easy to unplug the PSU and power fail cables and route them through thebeetleuk's Ikea Lack Gromet ( https://www.thingiverse.com/thing:2225786 )
Finally, I can't say enough about Fucosk's "Prusa MMU2 PTFE Tubes Separator" ( https://www.thingiverse.com/thing:3166394 ) . Simple, quick to print, and it makes everything look professional.
Here's the complete list of what makes up my LACK enclosure. I spent hours looking for all this info when I first started. Hopefully putting all of this in one place this will assist someone else.
You can see pictures of the enclosure in this Thingiverse thing: https://www.thingiverse.com/thing:3573611
Use , My Description , Link , Source/Owner
LACK, General Lack Hardware, https://www.thingiverse.com/thing:2864118 , cisardom
LACK, Revised Door Latches with Round magnets, https://www.thingiverse.com/thing:2923031 , Rvd11t
LACK, Second Table Leg Mounts (Lack stacker), https://www.thingiverse.com/thing:1908582 , JWdR
MISC, Spool Holders, https://www.thingiverse.com/thing:2926059 , kmccon
OCTO, Camera Holder, https://www.thingiverse.com/thing:2818559 , Kev31779
LACK, LED Strip Holder, https://www.thingiverse.com/thing:2989976 , trv (me)
MISC, Please Do Not Touch Sign, https://www.thingiverse.com/thing:1977933 , muzz64
OCTO, Pi Case (COVER only), https://www.thingiverse.com/thing:559858 , Adrien12
MMU, MMU Mount (SKIRT only), https://www.thingiverse.com/thing:3160443 , spockman07
MMU, PTFE Tube Separator, https://www.thingiverse.com/thing:3166394 , fucosk
MISC, Extruder Indicator, https://www.thingiverse.com/thing:2638857 , Petclaud
MISC, Nozzle Holder, https://www.thingiverse.com/thing:2760208 , Frodotus
MMU, MMU PTFE Mount, https://www.thingiverse.com/thing:3233579 , vertigo235
OCTO, PI Mount, https://www.thingiverse.com/thing:2843889 , Coopey
LACK, 60 deg heatbed cable, https://www.thingiverse.com/thing:2890592 , OakMountain
LACK, PSU Frame Brace, https://www.thingiverse.com/thing:2859884 , mikolaszuza
LACK, Grommet for middle table, https://www.thingiverse.com/thing:2225786 , thebeetleuk
MMU, Filament Buffer mount, https://www.thingiverse.com/thing:3573611 , trv (me)
Other parts used:
LACK, LEDBerg Strip (Ikea), Cant buy online. Found in store.
LACK, Power Supply Molex, https://www.amazon.com/gp/product/B075R34LJ4/
(Was originally going to put power fail cable in this connector, but changed my mind last minute. Only need a 4 conductor connector instead of this 6 pin one.)
MMU, Molex Connectors for MMU extension and power fail
https://www.digikey.com/product-detail/en/molex/0050579405/WM2903-ND/115035
https://www.digikey.com/product-detail/en/molex/0701070004/WM2536-ND/210971
https://www.digikey.com/product-detail/en/molex/0050579404/WM2902-ND/115057
https://www.digikey.com/product-detail/en/molex/0701070003/WM2535-ND/210970
https://www.digikey.com/product-detail/en/molex/0016020107/WM2517CT-ND/467804
https://www.digikey.com/product-detail/en/molex/0016020086/WM2510CT-ND/467802
MISC, Bearings for spool holders, https://www.amazon.com/gp/product/B07216D1SZ/
MMU, PTFE Tubing, https://www.amazon.com/gp/product/B073RDFTDV/
MMU, PTFE Fittings, https://www.amazon.com/gp/product/B01IB81IHG/
LACK / MISC, Magnets for LACK and extruder indicators, https://www.amazon.com/gp/product/B077VF298K/
Re: Official 3D printer enclosure from Prusa Research
Finished mine a While back with all sorts of custom personal tweaks...
How did you do the drawer?
designed en 3d printed it . posted the design on thingiverse
RE: Official 3D printer enclosure from Prusa Research
Since I got my MMU2s I've been trying to figure out how to incorporate it into my prusa "official" LACK enclosure. I thought all the leg extensions ruined the look of the enclosure - and dealing with some older filament I was spending a lot of time fiddling with the MMU2s and wasn't looking forward to hassles of manipulating the MMU deep inside the enclosure.
Likewise, putting the MMU on top, in the back of the unit, would also make it too hard to work on. I ended up finding this link https://www.thingiverse.com/thing:3160443 (MMU 2.0 Lack Enclosure Mount) from Spockman07 and loved the top-side approach for mounting the MMU. I did not use his MMU mount - I opted for Command Strips instead (provides decent isolation from vibrations), but I did use Spokman07's "skirt" which is part of the same download.
.....
Adding a photo. Filament Buffer mounted with these: https://www.prusaprinters.org/prints/1016-mmu2s-filament-buffer-lack-mount

RE: Official 3D printer enclosure from Prusa Research
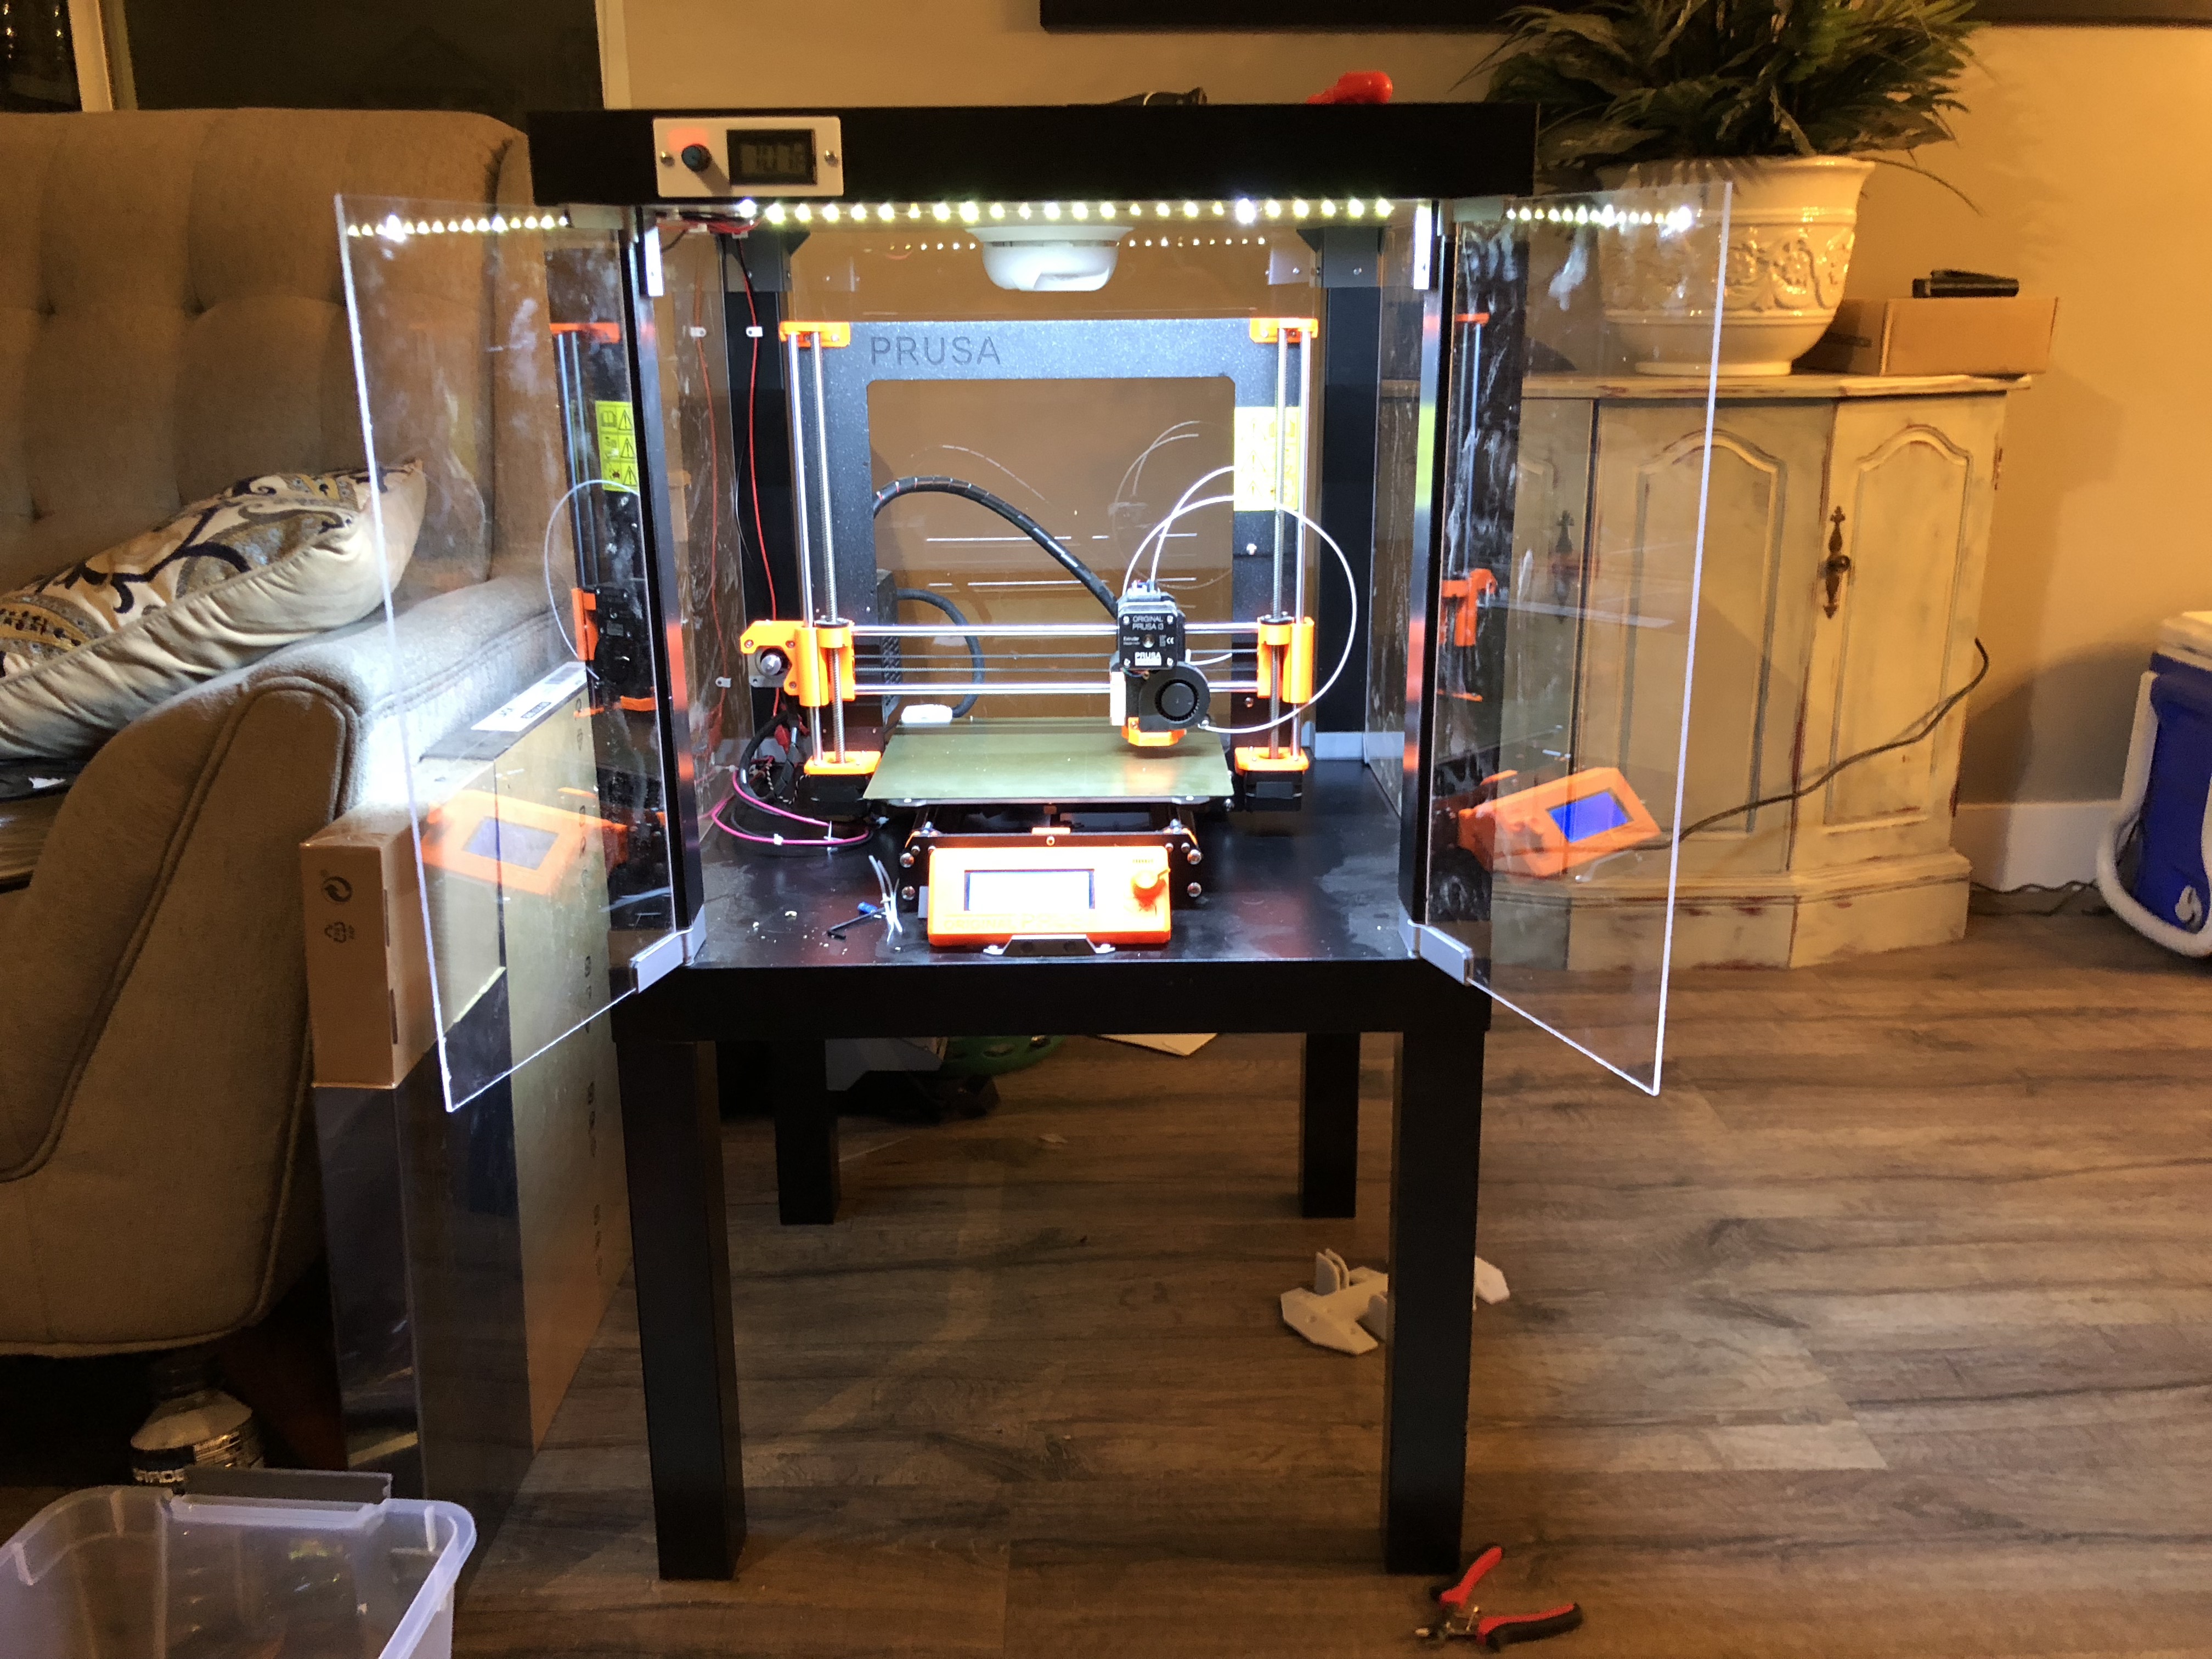
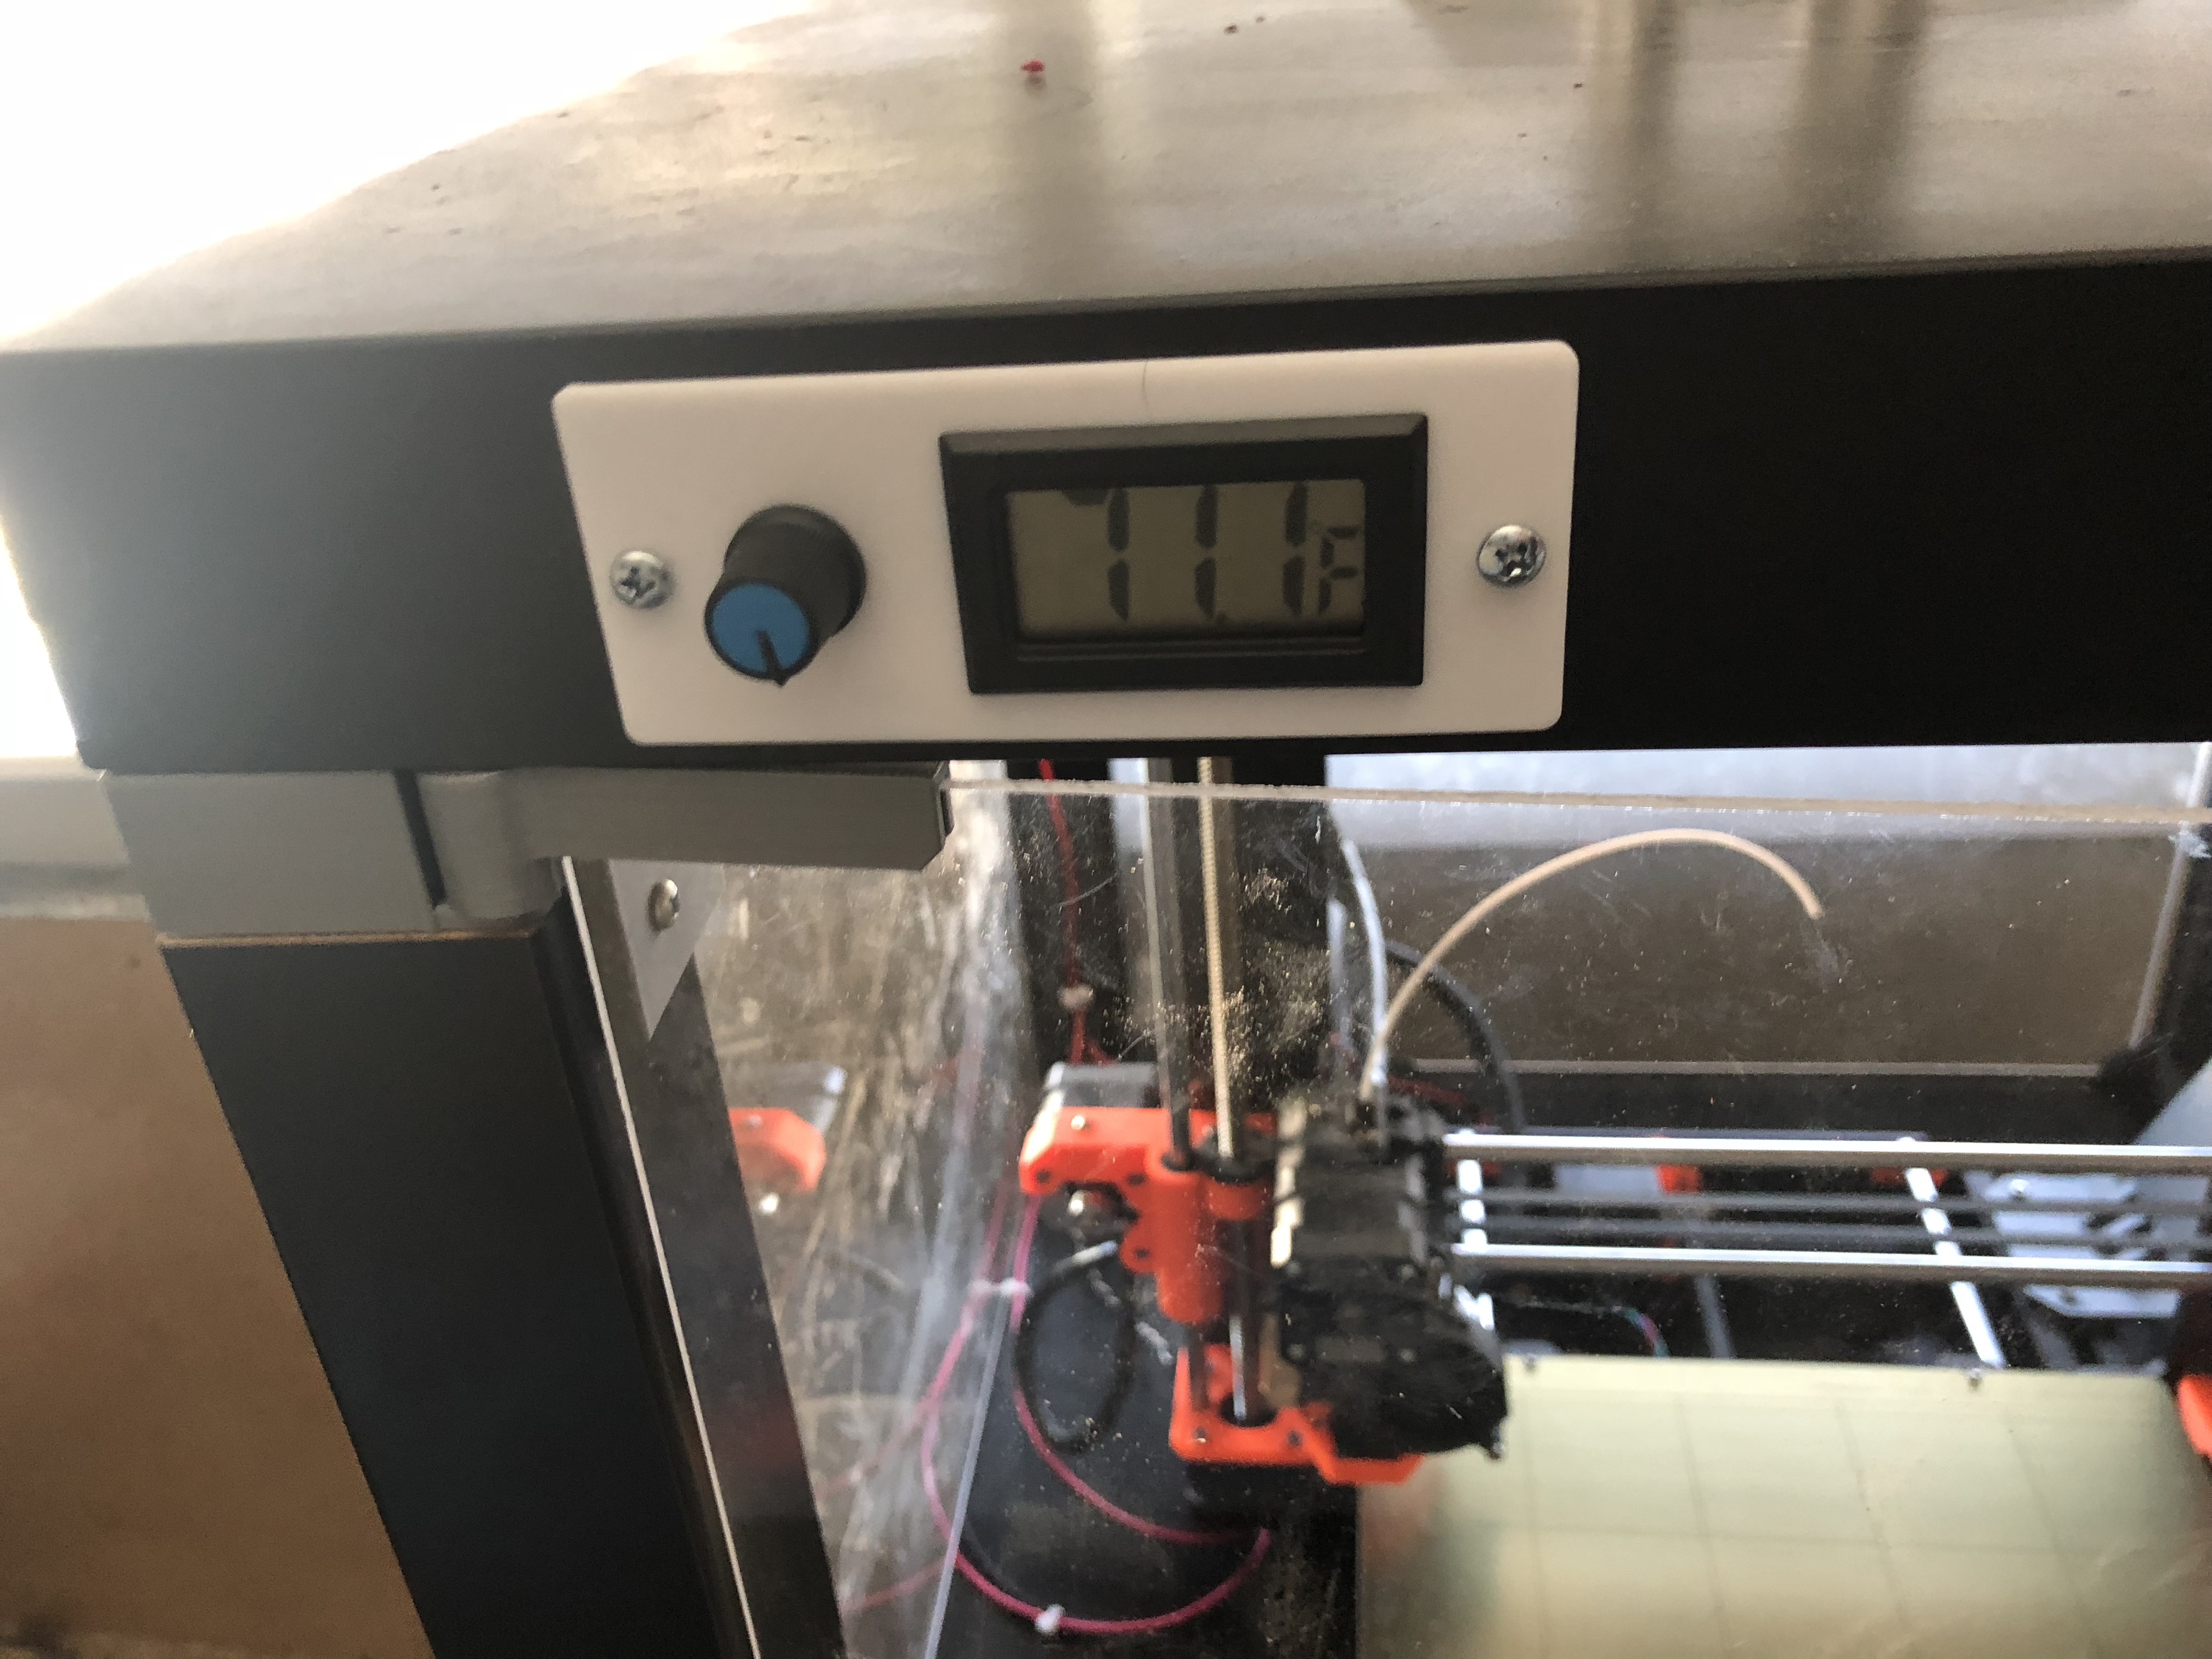
I completed my enclosure, with a couple modifications. I gave myself a little control panel inset into the side of the top LACK table top. I can see the internal temperature and adjust the brightness of the LED strip.
I absolutely love being able to control the brightness of my LEDs. I mounted the dimmer and thermometer LCD to a 3d printed frame, and routed the wires inside the enclosure. Nice and clean.
Thermometer: https://www.amazon.com/gp/product/B00PQ2GJNY/ref=oh_aui_detailpage_o09_s01?ie=UTF8&psc=1
"Dimmer" (worked fine with 24V leds): https://www.amazon.com/gp/product/B01241VJ4S/ref=oh_aui_detailpage_o09_s01?ie=UTF8&psc=1

Well I bought these parts to duplicate your effort then I realized I don't see where you posted a link to the frame you designed to mount everything. Is and STL of the part posted anywhere?
RE: Official 3D printer enclosure from Prusa Research
"Dimmer" (worked fine with 24V leds): https://www.amazon.com/gp/product/B01241VJ4S/ref=oh_aui_detailpage_o09_s01?ie=UTF8&psc=1
I bought this dimmer and a strip of white dimmable LEDs but this dimmer didn't work for me at all.
I think it is because the dimmer is rated for 5 amps and my black PSU outputs 10 amps. I'm pretty sure I blew a fuse on it or something.
I've ordered a different dimmer from amazon that is rates for up to 10 amps. and I'll report back if I have better luck with that.