Buildtak Printing Surface ON TOP the Prusa buildplate
Hey everyone,
I've been having serious difficulty with getting models to stick to my build plate... I've tried everything, from uhu stick glue, to cleaning with acetone, to light sanding to squishing the first layer. sometimes it works, but the first layer is always a mess, and it's getting frustrating.
So just before I order the Buildtak plate, I had a thought - why need use their stick on build plate (which I used before) on top of the Prusa plate? I saw a lot of references to their original flexplate, but couldn't find anyone who tried their stick on build plate.
So, what do you think?
Re: Buildtak Printing Surface ON TOP the Prusa buildplate
Hi,
not an answer to your question, but just a question to understand why you want to move over to an other buildsurface.
My question is: why do you think the buildtak will solve your problem with first layer?
If you can't get a consisted 1st layer, that should be solved first I think.
I had the same issue and tried it out with other buildsurfaces, but that's only false hope 😀
To tackle the problem I did:
I used the onoffical fw with hyper fine bedleveling (I have a MK2s). Made my bed as flat as possible (mesh bed visualizer), with washers, aluminium folie between screws, etc (choose your own way). When as flat as possible, I did the hyper fine bedleveling. I get a very nice 1ste layer.
Between every print (also with adjusting the hyper fine bedleveling) I give my printer 30-60 minutes to cool down so my PINDA is cooled down.
It takes time but it works.
I made my own magnetic print build surface (magnets under the bed, no PEI sheet, then a steel sheet with PEI on it. And it prinst very well.
Maybe this will help
Regards
Frans
Frans Krau
Europe, Holland, Apeldoorn
Re: Buildtak Printing Surface ON TOP the Prusa buildplate
What material?
Re: Buildtak Printing Surface ON TOP the Prusa buildplate
So, what do you think?
Choosing a different plate will not solve your problem. Try to understand what's wrong right now. Make some test pritns and post it either in the FB group or here. People will help you.
Often linked posts:
Going small with MMU2
Real Multi Material
My prints on Instagram
Re: Buildtak Printing Surface ON TOP the Prusa buildplate
Same problem here, I couldn’t get good prints on the Prusa PEI. So I got the BuildTak. It scratched the sh*t out of my heat bed, but I eventually got it dialed in. I found that a lot of prints wouldn’t pop off when I flexed, so I ended up having to scrape and pry anyway.
In the end my experience with the BuildTak taught me how to dial-in the first layer. I went back to the Prusa plate, dialed it in finally, and haven’t looked back. Maybe you can save the money and the scratched heatbed, and just go straight to settings up the PEI.
Maybe run the First layer cal and post some pics?
When someone asks you if you're a god, you say, "YES!"
Re: Buildtak Printing Surface ON TOP the Prusa buildplate
I have no experience of the buildtek surface, just using the PEI as supplied.
In my experience, and as in other posts, manual etc. there are two main tasks to do to ensure a good first layer.
1 ensure that the bed is level and the nozzle height is correct. Very fine tuning on the height can have considerable differences to the print quality.
2 ensure that the surface is clean. I started off using The various chemicals suggested but found that a light scrub with a fine surface non-metallic scourer with washing up liquid works every time for PLA and PETG. Rinse and dry after scrubbing before using the build plate. As the plate is double sided, I keep one side for PLA and the other for PETG. When flexing to remove prints ensure that you do not grip any of the print area (I did it this morning and had to abandon the print and re-clean the build surface )
The Mk3 stats shows that I have clocked up 74 days of printing in 170 days of owning the printer and long may the usage continue!
Re: Buildtak Printing Surface ON TOP the Prusa buildplate
Can't help with the new surface as well.
However, I also think you can solve this easier:
With standard settings I had trouble to stick even PLA to the PEI sheet in some cases. I found two major solutions:
1) Decrease the speed for the 1st layer to about 50% of Prusa's standard settings (at least for PETG. For PLA it should work).
2) The built-in 1st layer height calibration does not allow you to adjust the Z-offset perfectly.
Use the built-in calibration tool for a rough setting. Then print the 3D Benchy which is saved on the Prusa's SD card by default (PLA).
You can stop the print after 3 layers and remove it. The bottom of the Benchy has some writing on it. Adjust your 1st layer until this writing looks perfect. This way you can easily adjust your 1st layer to a precision of 0.01mm. (You will see a difference in the first layer of the benchy by a change of 0.01mm)
When this is done, the other materials will work as well (working with PETG, Nylon and PC).
I do not use Acetone because it will degrade the PEI on the long term. I only go with Isopropanol 98%.
Re: Buildtak Printing Surface ON TOP the Prusa buildplate
I have a plate with fake buildtak sticker from China and it works great, but do not place it on your oryginal prusa Pei sheet. Just buy raw spring sheet from china with 2 stickers for both sides. Or go to Leroy Merlin/home depot, buy steel sheet and cut it to the correct size - i did that.
No problem at all with the first layer.
Re: Buildtak Printing Surface ON TOP the Prusa buildplate
Hi everyone, and thank you for your replies!
After writing this, and doing some more reading online, I went ahead and added a a buildtek sheet to the existing build plate (sorry wojciech.k5, I didn't see your post in time).
While it dramatically improved things, but its far from perfect, I still need to adjust the Z at the beginning of every print. With the height fluctuating like crazy (sometimes it's 0.165, sometimes it's 0.230), and the first layer still looking bad, it seems the problem is only bypassed and not actually solved.
In this picture, you can see that the print started ok (the part on the right) but then something goes wrong:

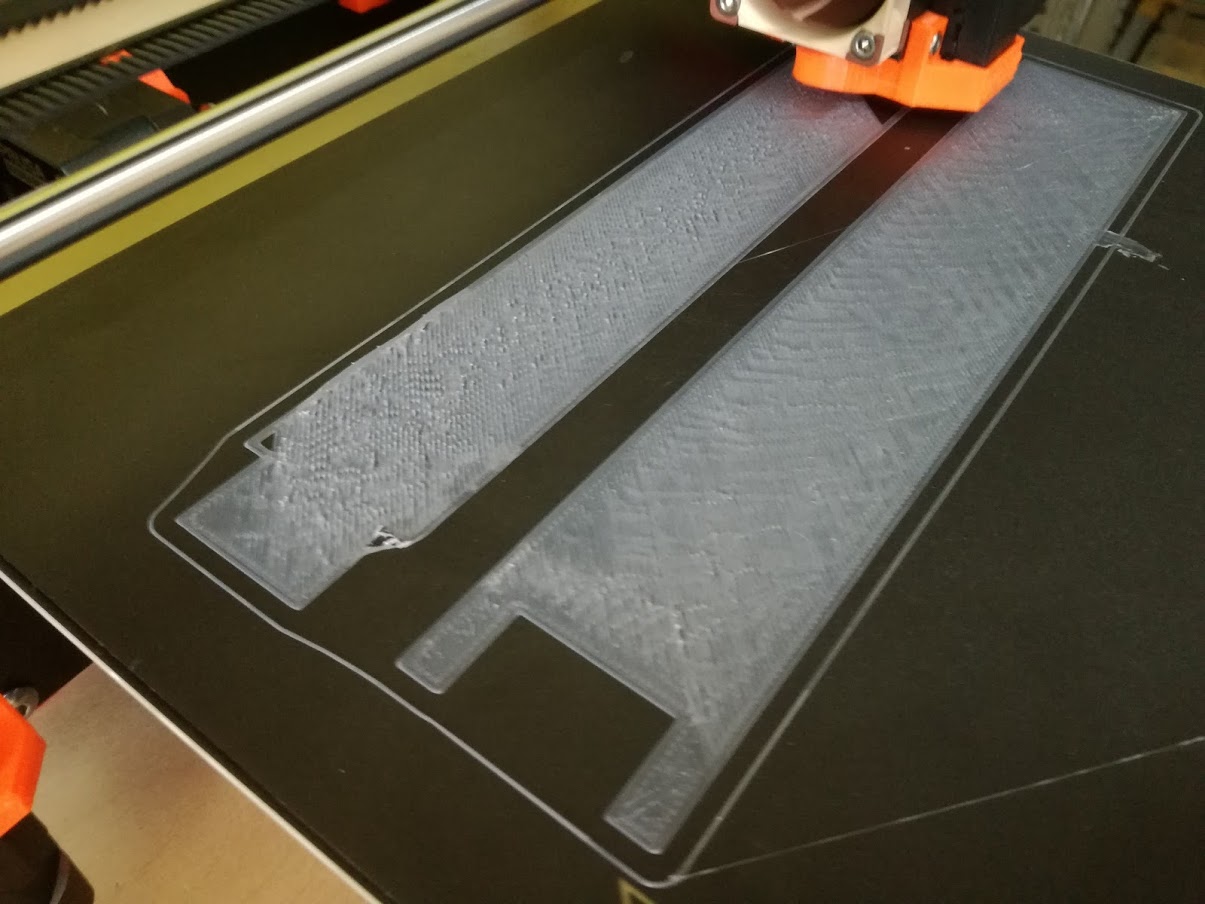
Every few prints I still come across an issue with buildup around the nozzle, with lumps of filament building up around the nozzle and not sticking. Im using ESUN PLA, which might also be a problem. Oozing is also becoming a serious issue to the extenet of it draging parts and causing lumps. I tried to raise the retraction to 0.3 with no results, and at 0.4 the print gets messed up completely.
I suspect the build plate is indeed not very flat, but im not sure how to straighten it. Any good tutorials out there?
Thank you all!
Omri.
Re: Buildtak Printing Surface ON TOP the Prusa buildplate
You maybe a little too low. I had this problem with PETG. The key to good first layer adhesion is a good live-z.
I will tell you that I if you plan to use Buildtac, I recommend buying their spring steel sheets. I have used one for a few weeks. Things stick to it very well and some stick too much.
--------------------
Chuck H
3D Printer Review Blog
Re: Buildtak Printing Surface ON TOP the Prusa buildplate
I had all the same issues with the spring steel build plate. Nothing would stick on the first layer regardless of how I cleaned or prepped the plat or what type or brand of material I was printing.
I finally gave up on it and went back to using hair spray as I did with my old printer and its glass bed.
Just a light mist and let it dry for the first coat other wise it will separate and bead up.
But after that first coat you can spray heavier coat.
Then I just give it a lite coat between prints the wash it with soap and water once a week.
My printer has been running day and night on a InMoov robot since without a fail.
But I do love the spring steel magnetic bed.
That was a great idea.
Re: Buildtak Printing Surface ON TOP the Prusa buildplate
I agree, this first layer looks like the nozzle is too low, and not just a little.
Do a small square, only 1 layer, and lower the nozzle until the extrusions are just welded together, then you should have a smooth surface.
Slow down your print, that also helps, especially with the first layer. I like 80% for PLA and even 60% for PETG for the first layer