Re: Mini-Rambo 1.3 and e3d with PT100
Hi Bryan,
I receive the same error message too, but it doesn't impact me. The upload process should still work. Does the error message stop the upload process?
-Jack
Re: Mini-Rambo 1.3 and e3d with PT100
I know this is an older thread, but has anyone gotten anywhere with this? I am planning on adding the PT100 to my Mini Rambo and am having difficulty finding where to connect at least 2 of the 3 wires.
Re: Mini-Rambo 1.3 and e3d with PT100
Aaron
The PT100 amplifier board has 3 connections onto the RAMBo - +5V, 0V and Signal. The RAMBo thermistor pins are 0V and signal, so you only need to find a +5V source, which I believe is available on the unused max end-stop pins. I have a feeling that +5V and 0V are also available on the P3 connector (pins 10 and 9)
Peter
Please note: I do not have any affiliation with Prusa Research. Any advices given are offered in good faith. It is your responsibility to ensure that by following my advice you do not suffer or cause injury, damage…
Re: Mini-Rambo 1.3 and e3d with PT100
I've been traveling too much to be able to set up mine yet, but I recall the same thing. The wiki page for the PT100 has some more info about it, and I also recall that the firmware needs to be recompiled with the correct sensor type as well.
Re: Mini-Rambo 1.3 and e3d with PT100
Hello, I too am trying to interface a PT100 to the Rambo, but I'm very confused.
I have done some research http://www.iqinstruments.com/iqshop/technical/pt100.html that indicates that the PT100 is not a thermocouple type of device, it is a type of thermistor that has 100 ohms of resistance at 0 degrees C and 138.5 (or 139) ohms at 100 degrees C.
I measured the resistance of my PT100; it was 106.7 ohms (17.4 degrees C, about right) at room temperature. It started rising when I put my hand on it.
So, if it's a thermistor, why is an amplifier required? You can't amplify a resistance.
I did connect the amplifier to the mini-RAMBo with signal and ground going to T0 (where the original thermistor was connected) and +5 going to pin 1 on P3. This provided a reading of 300 degrees which did not change regardless of whether the PT100 was plugged into the amplifier or not.
I also have another point of confusion; there are two references to PT100 in the THERMISTORS SETTINGS area of the configuration_prusa.h file:
// 20 is the PT100 circuit found in the Ultimainboard V2.x

// 147 is Pt100 with 4k7 pullup
The T0 input has a 4k7 pullup, so I chose 147. Should it be 20 instead? If so, why?
Can anybody explain this so I can understand it? Is there a reliable step-by-step set of instructions for interfacing PT100 to mini-RAMBo 1.3a?
Re: Mini-Rambo 1.3 and e3d with PT100
Bob
The mini RAMBo circuitry is the same for all 3 thermistor inputs:

The "amplifier" is required in order to obtain a sufficient variation in voltage that can be interpreted as a digital value within the processor.
I had a look at the thermistor table code for this. With the default thermistor, the following applies:
   {1*OVERSAMPLENR, 713},

   {17*OVERSAMPLENR, 300}, //top rating 300C

   {20*OVERSAMPLENR, 290},

   {23*OVERSAMPLENR, 280},

   {27*OVERSAMPLENR, 270},

   {31*OVERSAMPLENR, 260},

   {37*OVERSAMPLENR, 250},

   {43*OVERSAMPLENR, 240},

   {51*OVERSAMPLENR, 230},

   {61*OVERSAMPLENR, 220},

   {73*OVERSAMPLENR, 210},

   {87*OVERSAMPLENR, 200},

   {106*OVERSAMPLENR, 190},

   {128*OVERSAMPLENR, 180},

   {155*OVERSAMPLENR, 170},

   {189*OVERSAMPLENR, 160},

   {230*OVERSAMPLENR, 150},

   {278*OVERSAMPLENR, 140},

   {336*OVERSAMPLENR, 130},

   {402*OVERSAMPLENR, 120},

   {476*OVERSAMPLENR, 110},

   {554*OVERSAMPLENR, 100},

   {635*OVERSAMPLENR, 90},

   {713*OVERSAMPLENR, 80},

   {784*OVERSAMPLENR, 70},

   {846*OVERSAMPLENR, 60},

   {897*OVERSAMPLENR, 50},

   {937*OVERSAMPLENR, 40},

   {966*OVERSAMPLENR, 30},

   {986*OVERSAMPLENR, 20},

   {1000*OVERSAMPLENR, 10},

   {1010*OVERSAMPLENR, 0}
OVERSAMPLENR is a constant value (16). The left hand column is the analogue reading and the right hand column is the associated temperature.
For the PT100 with pullup (type 147) the code is somewhat less:
const short temptable_147[][2] PROGMEM = {

// only few values are needed as the curve is very flat

  PtLine(0,100,4700)

  PtLine(50,100,4700)

  PtLine(100,100,4700)

  PtLine(150,100,4700)

  PtLine(200,100,4700)

  PtLine(250,100,4700)

  PtLine(300,100,4700)

};
In addition, the following definitions are present:
#define PtA 3.9083E-3

#define PtB -5.775E-7

#define PtRt(T,R0) ((R0)*(1.0+(PtA)*(T)+(PtB)*(T)*(T)))

#define PtAdVal(T,R0,Rup) (short)(1024/(Rup/PtRt(T,R0)+1))

#define PtLine(T,R0,Rup) { PtAdVal(T,R0,Rup)*OVERSAMPLENR, T },
These are used to generate the analogue values basically using the temperature constants (in this case, the left hand column).
Unfortunately, I don't have time to investigate this further, but hopefully, it will give you a clue.
Peter
Please note: I do not have any affiliation with Prusa Research. Any advices given are offered in good faith. It is your responsibility to ensure that by following my advice you do not suffer or cause injury, damage…
Re: Mini-Rambo 1.3 and e3d with PT100
I have spent quite a bit of time figuring out about PT100 and miniRAMBo, and since I don’t know of anywhere else you can find this information all in one place, I thought I would document it here.
First, some facts. Some of you may already know all of this, but I did not:
1. PT100 is not a thermocouple. It is a thermistor which has 100 ohms at 0 degrees C, and increases resistance with increasing temperature (opposite of most thermistors).
2. The PT100 “amplifier” is not actually an amplifier at all; instead it converts the resistance reading from the PT100 to a voltage in the range 0-5 volts.
3. The PT100 can be connected directly to the T0 (or other thermistor) input on the miniRAMBo without using the amplifier. Sensor type for this is 147.
4. In the above configuration the PT100 is one leg of a voltage divider with the 4k7 pull-up resistor on the other leg. Since the useful range of resistance on the PT100 is between 150 – 200 ohms the analog signal is pretty small, but surprisingly it works!
5. Still in reference to the PT100 direct connect (type 147) configuration, I found the temperature table in the firmware was providing a reading of -10 at room temperature, which prevented the heater from starting. I recalculated the table manually but had to substitute the first two values to avoid the negative reading. The calculated table in the firmware is probably ok except for the first couple of values.
Here is the table I calculated:
const short temptable_147[][2] PROGMEM = {

// only few values are needed as the curve is very flat

{292,0}, // first two entries are bogus, just to get the heater running

{356,50},

{469,100},

{531,150},

{590,200},

{649,250},

{708,300},

{763,350},

{819,400},

{872,450},

};
6. You CANNOT connect the output of the PT100 amplifier to any of the thermistor inputs unless you first remove the 4k7 pull-up resistor. It won’t work with the pull-up in place (at least for me) no matter what sensor type you select.
7. You also can’t (easily) connect it anywhere else since miniRAMBo does not provide any auxiliary analog inputs.
Based on these facts, you have four choices:
1. Use the PT100 directly (in type 147 mode). As I mentioned, this works surprisingly well.
2. Remove the 4k7 pull-up resistor on one of the thermistor inputs and attach the amplifier (sensor type 20). I didn’t try this as it looked pretty daunting to get that tiny little SMD off the board without destroying something.
3. Provide your own auxiliary analog input by soldering a wire to one of the unused analog inputs on the processor and attach the amplifier output here. The physical pins available for this are 82-89 (ADC15-ADC8) and 91-94 (ADC6-ADC3). Set the sensor type to 20 in configuration_prusa.h and the TEMP_0_PIN to the selected ADC number(3-6, 8-15) in pins.h
4. Abandon the idea of using a PT100 at all. I wish I had chosen this option, but the machine was already built using the PT100 and I didn’t want to unbuild it.
At some point I think I will try soldering a wire to pin 94 on the processor and using the “amplifier”, but at the present time I have the PT100 connected at T0 and identified as sensor type 147.
I am getting acceptable results with this so far. We'll see how it goes.
Re: Mini-Rambo 1.3 and e3d with PT100
Bob
That is quite brilliant. Thank you for the information.
Peter
Please note: I do not have any affiliation with Prusa Research. Any advices given are offered in good faith. It is your responsibility to ensure that by following my advice you do not suffer or cause injury, damage…
Re: Mini-Rambo 1.3 and e3d with PT100
Here is the table I calculated:
Hi Bob,
Can you please tell us how this table was calculated? Did you have to use a known good thermocouple and measure against it?
Thanks,
Madhu.
Re: Mini-Rambo 1.3 and e3d with PT100
I used a PT100 temperature table that I found here: http://www.micropik.com/PDF/pt100.pdf to do the calculations.
First calculate the voltage for each temperature using the standard voltage divider calculation based on 5V and 4k7 pull-up on the other leg, then convert the voltages to 10 bit ADC values (voltage * (1024/5)), then multiply by 16 (the firmware sums 16 readings for each measurement).
Finally, I replaced the first two entries in the table with arbitrarily lower numbers in order to avoid getting negative readings. For some reason the higher temperatures seem ok, but the first few are too low. I have no explanation for this.
I have gotten good prints in both PLA and ABS using this table and the 147 sensor type.
Re: Mini-Rambo 1.3 and e3d with PT100
For anyone following this thread, there's a happy ending! It turns out you can use the PT100 with the E3D amplifier on the miniRAMBo without any modifications.
Thanks to the great work by some people on the Marlin developer forum, a temperature table has been developed that makes this work. The thread of discussion and documentation is here:
https://github.com/MarlinFirmware/Marlin/issues/5543
Just set TEMP_SENSOR_0 to 20, and replace the temperature table with this one:
const short temptable_20[][2] PROGMEM = {

  {   0 * OVERSAMPLENR,    0 },

  { 243 * OVERSAMPLENR,    1 },

  { 251 * OVERSAMPLENR,   10 },

  { 261 * OVERSAMPLENR,   20 },

  { 269 * OVERSAMPLENR,   30 },

  { 277 * OVERSAMPLENR,   40 },

  { 285 * OVERSAMPLENR,   50 },

  { 293 * OVERSAMPLENR,   60 },

  { 301 * OVERSAMPLENR,   70 },

  { 309 * OVERSAMPLENR,   80 },

  { 317 * OVERSAMPLENR,   90 },

  { 325 * OVERSAMPLENR,  100 },

  { 333 * OVERSAMPLENR,  110 },

  { 343 * OVERSAMPLENR,  120 },

  { 351 * OVERSAMPLENR,  130 },

  { 357 * OVERSAMPLENR,  140 },

  { 365 * OVERSAMPLENR,  150 },

  { 373 * OVERSAMPLENR,  160 },

  { 381 * OVERSAMPLENR,  170 },

  { 389 * OVERSAMPLENR,  180 },

  { 397 * OVERSAMPLENR,  190 },

  { 405 * OVERSAMPLENR,  200 },

  { 413 * OVERSAMPLENR,  210 },

  { 421 * OVERSAMPLENR,  220 },

  { 429 * OVERSAMPLENR,  230 },

  { 436 * OVERSAMPLENR,  240 },

  { 444 * OVERSAMPLENR,  250 },

  { 452 * OVERSAMPLENR,  260 },

  { 458 * OVERSAMPLENR,  270 },

  { 466 * OVERSAMPLENR,  280 },

  { 474 * OVERSAMPLENR,  290 },

  { 480 * OVERSAMPLENR,  300 },

  { 488 * OVERSAMPLENR,  310 },

  { 496 * OVERSAMPLENR,  320 },

  { 504 * OVERSAMPLENR,  330 },

  { 510 * OVERSAMPLENR,  340 },

  { 518 * OVERSAMPLENR,  350 },

  { 524 * OVERSAMPLENR,  360 },

  { 532 * OVERSAMPLENR,  370 },

  { 538 * OVERSAMPLENR,  380 },

  { 546 * OVERSAMPLENR,  390 },

  { 554 * OVERSAMPLENR,  400 },

};
I have implemented this and it works! When connecting the amplifier to the T0 input, be sure to connect the 0v pin on the amplifier to the ground side of the input pair, and the signal pin to the pull-up resistor.
Re: Mini-Rambo 1.3 and e3d with PT100
I've actually submitted a pull request for the PT100 sensor with amp to be included in Prusa's version of marlin.
I think this way is much cleaner, and all you have to do us uncomment #defines in configuration_prusa.h
Re: Mini-Rambo 1.3 and e3d with PT100
Good idea.
By the way if you are a developer on the Prusa firmware, you may want to know that the source link on the drivers page actually points to the 3.0.10-alpha source. I downloaded it and was getting some strange results from the XYZ calibration.
You may want to check what this link is pointed at or make it more clear for users wanting to compile from source.
Re: Mini-Rambo 1.3 and e3d with PT100
It sounds like you guys found a solution here. I'm Planning on installing the PT100 on my printer arriving in a few days, Although I'm pretty sure ill eventually figure out how to connect the hardware properly, I'm completely cluless regarding the firmware & how to use the table mentioned above. Is there a pre-converted firmware that I can download somewhere that has this updated table?
-Steve
I've been working on testing the PT100 with an amplifier and without. The Amplifier definitely makes a big difference in the temperature resolution. I have submitted a pull request to have the PT100 information be merged into the main Prusa MK2 sources. I don't expect this to happen for quite awhile so you will probably have to patch the source code yourself.
As for wiring it up, I'm going to refer to a picture that was posted in this forum some time back about this topic (with a few modifications):
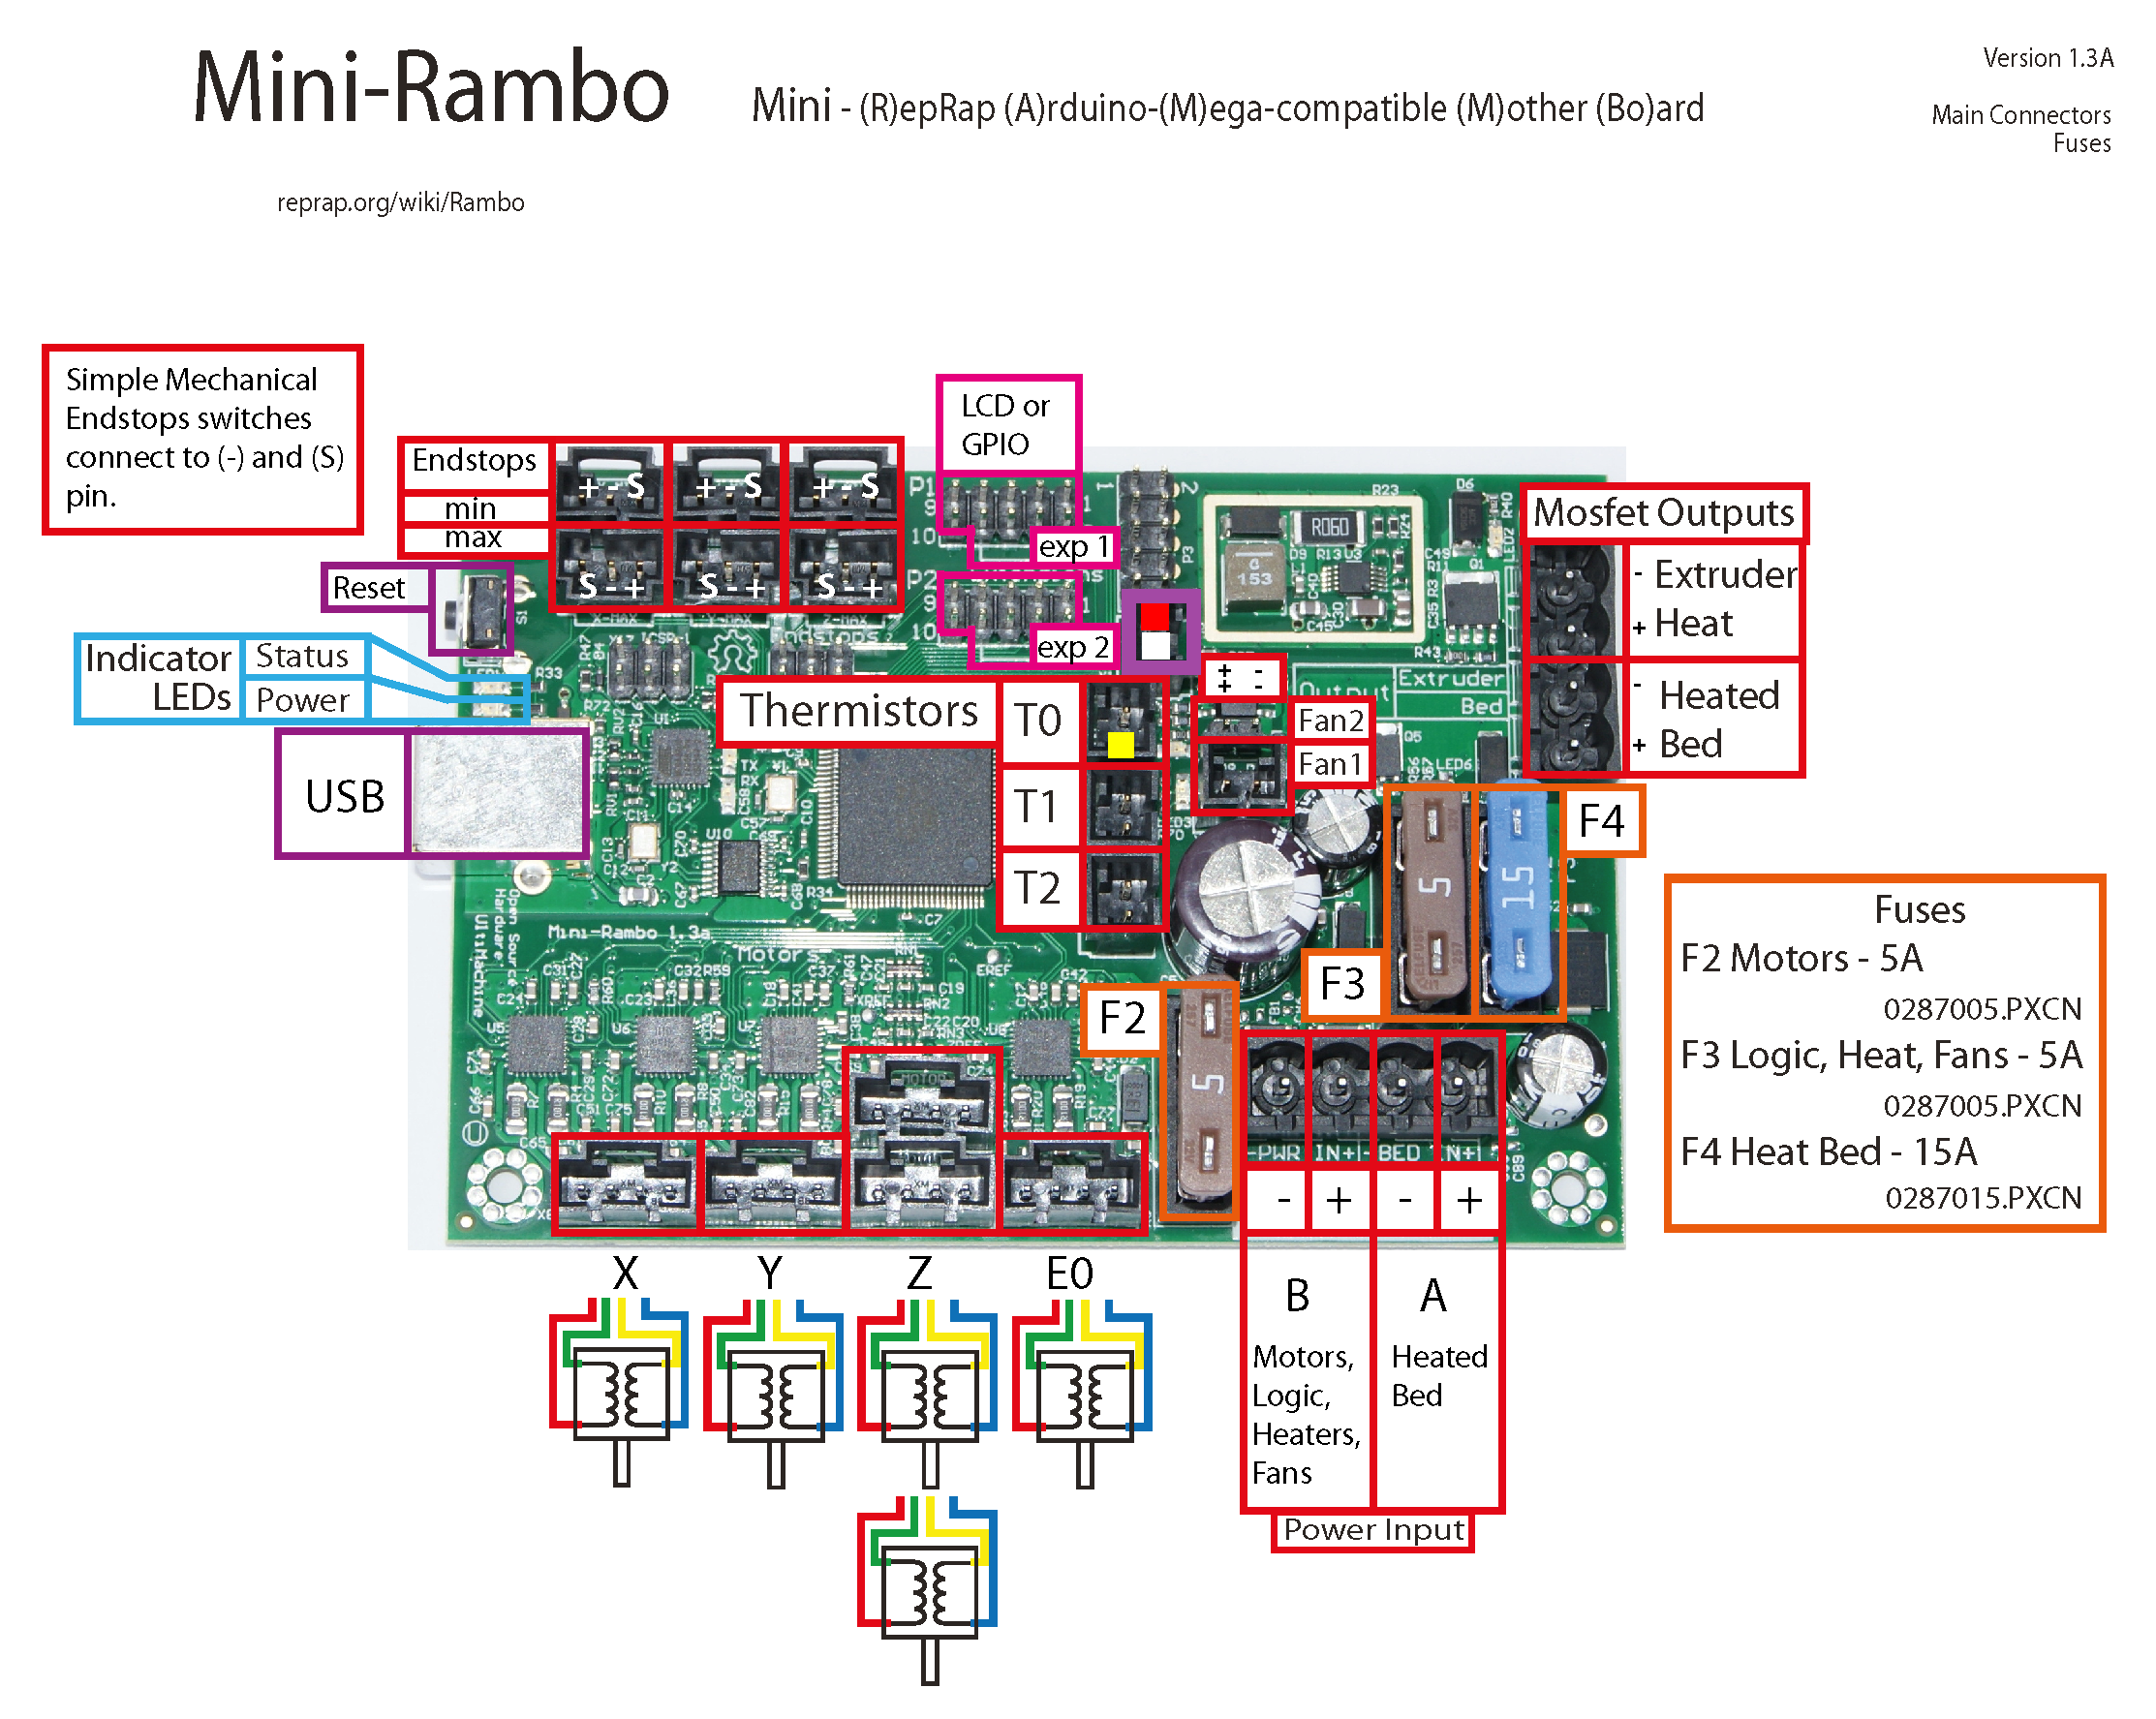
In the purple rectangle, the Red square is for the Positive lead coming from the E3D PT100 amplifier, the white square is for the Negative lead, and the Yellow square near T0 is for the Signal lead.
You will also need a Female to Female DuPont connector similar to a 3-wire Sensor Cable but one end will need to have a single pin DuPont connector and a double pin DuPont connector (to match the picture above).
With this configuration and a 40W heater cartridge, I was able to get the hot end to 410C. I know that I wanted to, I could probably push that higher after modifying the firmware limits.
Re: Mini-Rambo 1.3 and e3d with PT100
Hi Aaron
That is great, thank you.
Just a couple of minor issues:
The P3 connector is used by the multi-material upgrade; that may interfere with your suggested connections.
According to E3D: aluminium blocks begin to lose integrity beyond 350C So you may need to obtain (if you haven't yet) the new plated copper block.
Peter
Please note: I do not have any affiliation with Prusa Research. Any advices given are offered in good faith. It is your responsibility to ensure that by following my advice you do not suffer or cause injury, damage…
Re: Mini-Rambo 1.3 and e3d with PT100
Hi Aaron
That is great, thank you.
Just a couple of minor issues:
The P3 connector is used by the multi-material upgrade; that may interfere with your suggested connections.
According to E3D: aluminium blocks begin to lose integrity beyond 350C So you may need to obtain (if you haven't yet) the new plated copper block.
Peter
If you look at the original picture in the post I linked, the Purple rectangle focuses on the connecter below P3. And yes, I'm aware that P3 is used for the MultiMaterial upgrade. I have corrected the picture with a more High Resolution version.
Re: Mini-Rambo 1.3 and e3d with PT100
Thanks for pointing me to this post ayourk. As I said in the other post, I'm interested in going to ~350C so that I can print Ultem 9085 ( http://www.3dxtech.com/ultem-9085-3d-printing-filament/ ). (It also recommends bed temp of 110-120C, but I imagine 100C may work). I bought the Prusa i3 mk2 in November of last year.
To go to the higher temperature I was thinking I'd follow in your path and use this PT100 upgrade kit: http://e3d-online.com/V6-PT100-Sensor-Kit . You mentioned that you were able to get to 410C with a 40W heater upgrade (this?: http://e3d-online.com/Electrical/Components/Heater-Cartridge-12v-40w ) Do you imagine that you could get to 350C without doing the upgrade? Is the silicone sock worthwhile in maintaining higher temperatures?
Also, PJR, you mentioned that at 350C the aluminum heater block starts to lose integrity, are these the parts you were referring to upgrading?: http://e3d-online.com/E3D-v6/Plated-Copper-Heater-Block
http://e3d-online.com/V6-Hotend-Copper-Nozzles
If those parts are required, another issue is that heater block and heater cartridge seem to be out of stock. I will contact them to see when they'll come back in stock unless you could point me towards another supplier?
Thanks for all of your help and documentation of previous work!
Re: Mini-Rambo 1.3 and e3d with PT100
Justin,
According to E3D specs the silicone sock should not be used for temperatures above 300C.
Re: Mini-Rambo 1.3 and e3d with PT100
Thanks for pointing me to this post ayourk. As I said in the other post, I'm interested in going to ~350C so that I can print Ultem 9085 ( http://www.3dxtech.com/ultem-9085-3d-printing-filament/ ). (It also recommends bed temp of 110-120C, but I imagine 100C may work). I bought the Prusa i3 mk2 in November of last year.
To go to the higher temperature I was thinking I'd follow in your path and use this PT100 upgrade kit: http://e3d-online.com/V6-PT100-Sensor-Kit . You mentioned that you were able to get to 410C with a 40W heater upgrade (this?: http://e3d-online.com/Electrical/Components/Heater-Cartridge-12v-40w ) Do you imagine that you could get to 350C without doing the upgrade? Is the silicone sock worthwhile in maintaining higher temperatures?
Also, PJR, you mentioned that at 350C the aluminum heater block starts to lose integrity, are these the parts you were referring to upgrading?: http://e3d-online.com/E3D-v6/Plated-Copper-Heater-Block
http://e3d-online.com/V6-Hotend-Copper-Nozzles
If those parts are required, another issue is that heater block and heater cartridge seem to be out of stock. I will contact them to see when they'll come back in stock unless you could point me towards another supplier?
Thanks for all of your help and documentation of previous work!
I've also been looking at this as well so I'm extremely interested. For the higher temperature of 300+ C it would be smart to upgrade to the nickel plated copper E3D block purchased along with a nickel plated copper nozzle. This should provide a more consistent temperature since copper is an amazing thermal conductor. I've also been looking at upgraded to the PT100 upgrade kit so I could get above the 300+C also and from what I read this seems superior to the type k thermocouple. I'm interested in trying out Polycarbonate and eventually maybe Ultem.
Oh yeah and the stock heater cartridge is 30 watts.
As far as the silicone sock goes, E3D states that at 300 C the socks see no degradation but if run up to 400 C you will see reduced life of the sock.
edited for source information: http://e3d-online.com/Socks-Launch