Warping Help
Hi there!
I seem to be having a bit of a warping problem for one of my prints. Its a pretty small print but its quite thick. Its also a print for manufacturing and as such I print about 8 at a time. When doing so, it might happen that some prints come out great and others are completely warped.
I am using Prusa black PLA 1.75mm, with a nozzle temp of 218 and a bed temp of 65. I have played with some settings regarding the first layer - with some success and when I use a brim, I don't get any warping!
However, I am trying to achieve the same results without a brim as this adds an extra (a little bit annoying) step in our manufacturing process.
Does anyone have some suggestions or tips to tackle this? (we regularly, clean the bed with IPA)
Thanks in advance!
RE: Warping Help
Do you find the position on the bed affects the amount of warping? Is it possible to redesign the parts to reduce the thickness?
RE: Warping Help
I usually run my PLA at 70 degrees. I don't think that is always necessary, but I haven't experienced warping since running at that temperature. The areas that are warping, are they sharp corners? If so, can you change the angle/add fillets to the design?
RE: Warping Help
It could be the cold temperature of the room, cold enclosure(let enclosure heat up before printing), it could be temperature difference while printing.
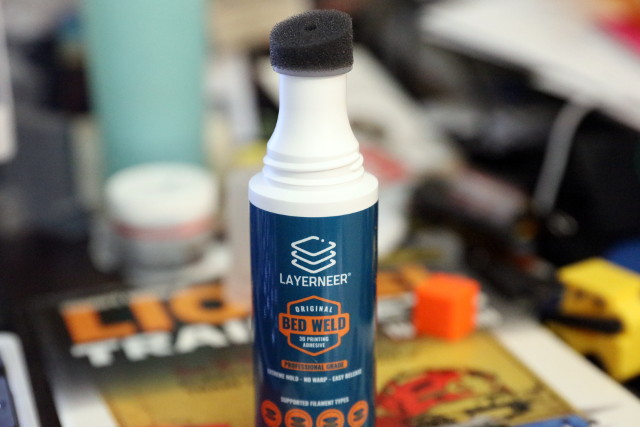
RE: Warping Help
Apologies to those who are sick of me posting this.
One product I've found really helps in cases like this. Layerneer Bed Weld.
I'll often dab a bit right where the corners of a flat piece will hit and it does prevent warping and curl-up.
RE: Warping Help
[..] I am using Prusa black PLA 1.75mm, with a nozzle temp of 218 and a bed temp of 65. I have played with some settings regarding the first layer - with some success and when I use a brim, I don't get any warping!
In normal circumstances, heating the bed a bit can help adhesion. 65-68C is normally ideal for PLA in my experience. However, I noticed that in cooler months, the difference between the part next to the bed and higher layers can make warping a bit worse. I've cooled my bed temps down a bit and warping isn't as extreme. It also helps if there are no cold drafts on the print. Not necessarily a full enclosure, but I found simply placing my printer in a cabinet helped. If you've tried cleaning the bed properly and are still having problems, a bit of adhesion booster can help. Strategically placed mouse ears can help as well.
However, I am trying to achieve the same results without a brim as this adds an extra (a little bit annoying) step in our manufacturing process.
Does anyone have some suggestions or tips to tackle this? (we regularly, clean the bed with IPA)
Thanks in advance!
RE: Warping Help
Grr. Hate the short edit window. Adjusting Live-Z down a bit (-0.02mm) can also help. There's a bit of range over which you'll get good results, and bit of extra squish helps a lot with adhesion. I personally like mouse ears since they work independently of the bed location or condition.
RE: Warping Help
And apologies to those who are sick of seeing this advice.
The first thing to check when adhesion is poor is bed cleanliness.
Wash the bed with dishwashing detergent (Dawn/Fairy) and plenty of HOT water. Dry with fresh paper towel and avoid touching the surface. IPA is useful for a while but it doesn't clear everything away. Use soapy water every time you have these problems and perhaps once a year at most, use acetone.
Cheerio,
RE: Warping Help
@bobstro
Mouse ears are great. Do you embed the part in the mouse ear or rest the part on top of the ear? Also do you add the ears in CAD or in PrusaSicer?
RE: Warping Help
Thanks everyone for the responses! This community is great!
I will get into trying some of the temperature related ideas, mouse ears and live-Z settings - as well as thorough bed cleaning! I am trying to avoid going back to CAD for this fix.
RE: Warping Help
Mouse ears are great. Do you embed the part in the mouse ear or rest the part on top of the ear? Also do you add the ears in CAD or in PrusaSicer?
I usually add them in the slicer. You can create them as separate parts, in which case the print will be on top of the ears, adding extra filament. This can be good for adhesion, but bad for finish. If you add them as a part to the print, they're integrated in as a single part when slicing, so there's no double-extrusion. This looks better.
For parts I'm designing, I may include mouse ears on sharp corners and thin extensions.
RE: Warping Help
@bobstro
"If you add them as a part to the print, they're integrated in as a single part when slicing"
In my particular use case I found that wasn't the case. See attached, note oval boss appears in layer 2. I found I had to raise the Z of the part by 1 mm so that it sat ontop of a clean 1 mm thick cylinder
Maybe I did it wrong, I imported an .STL, added a cylinder to it, positioned the cylinder in it, reduced the height of the cylinder to 1mm and dropped the cylinder to the bed.