Problems Printing With Inland PETG
First layer is good, but past that it puts tears in outer walls and then the infill self destructs as pictured.
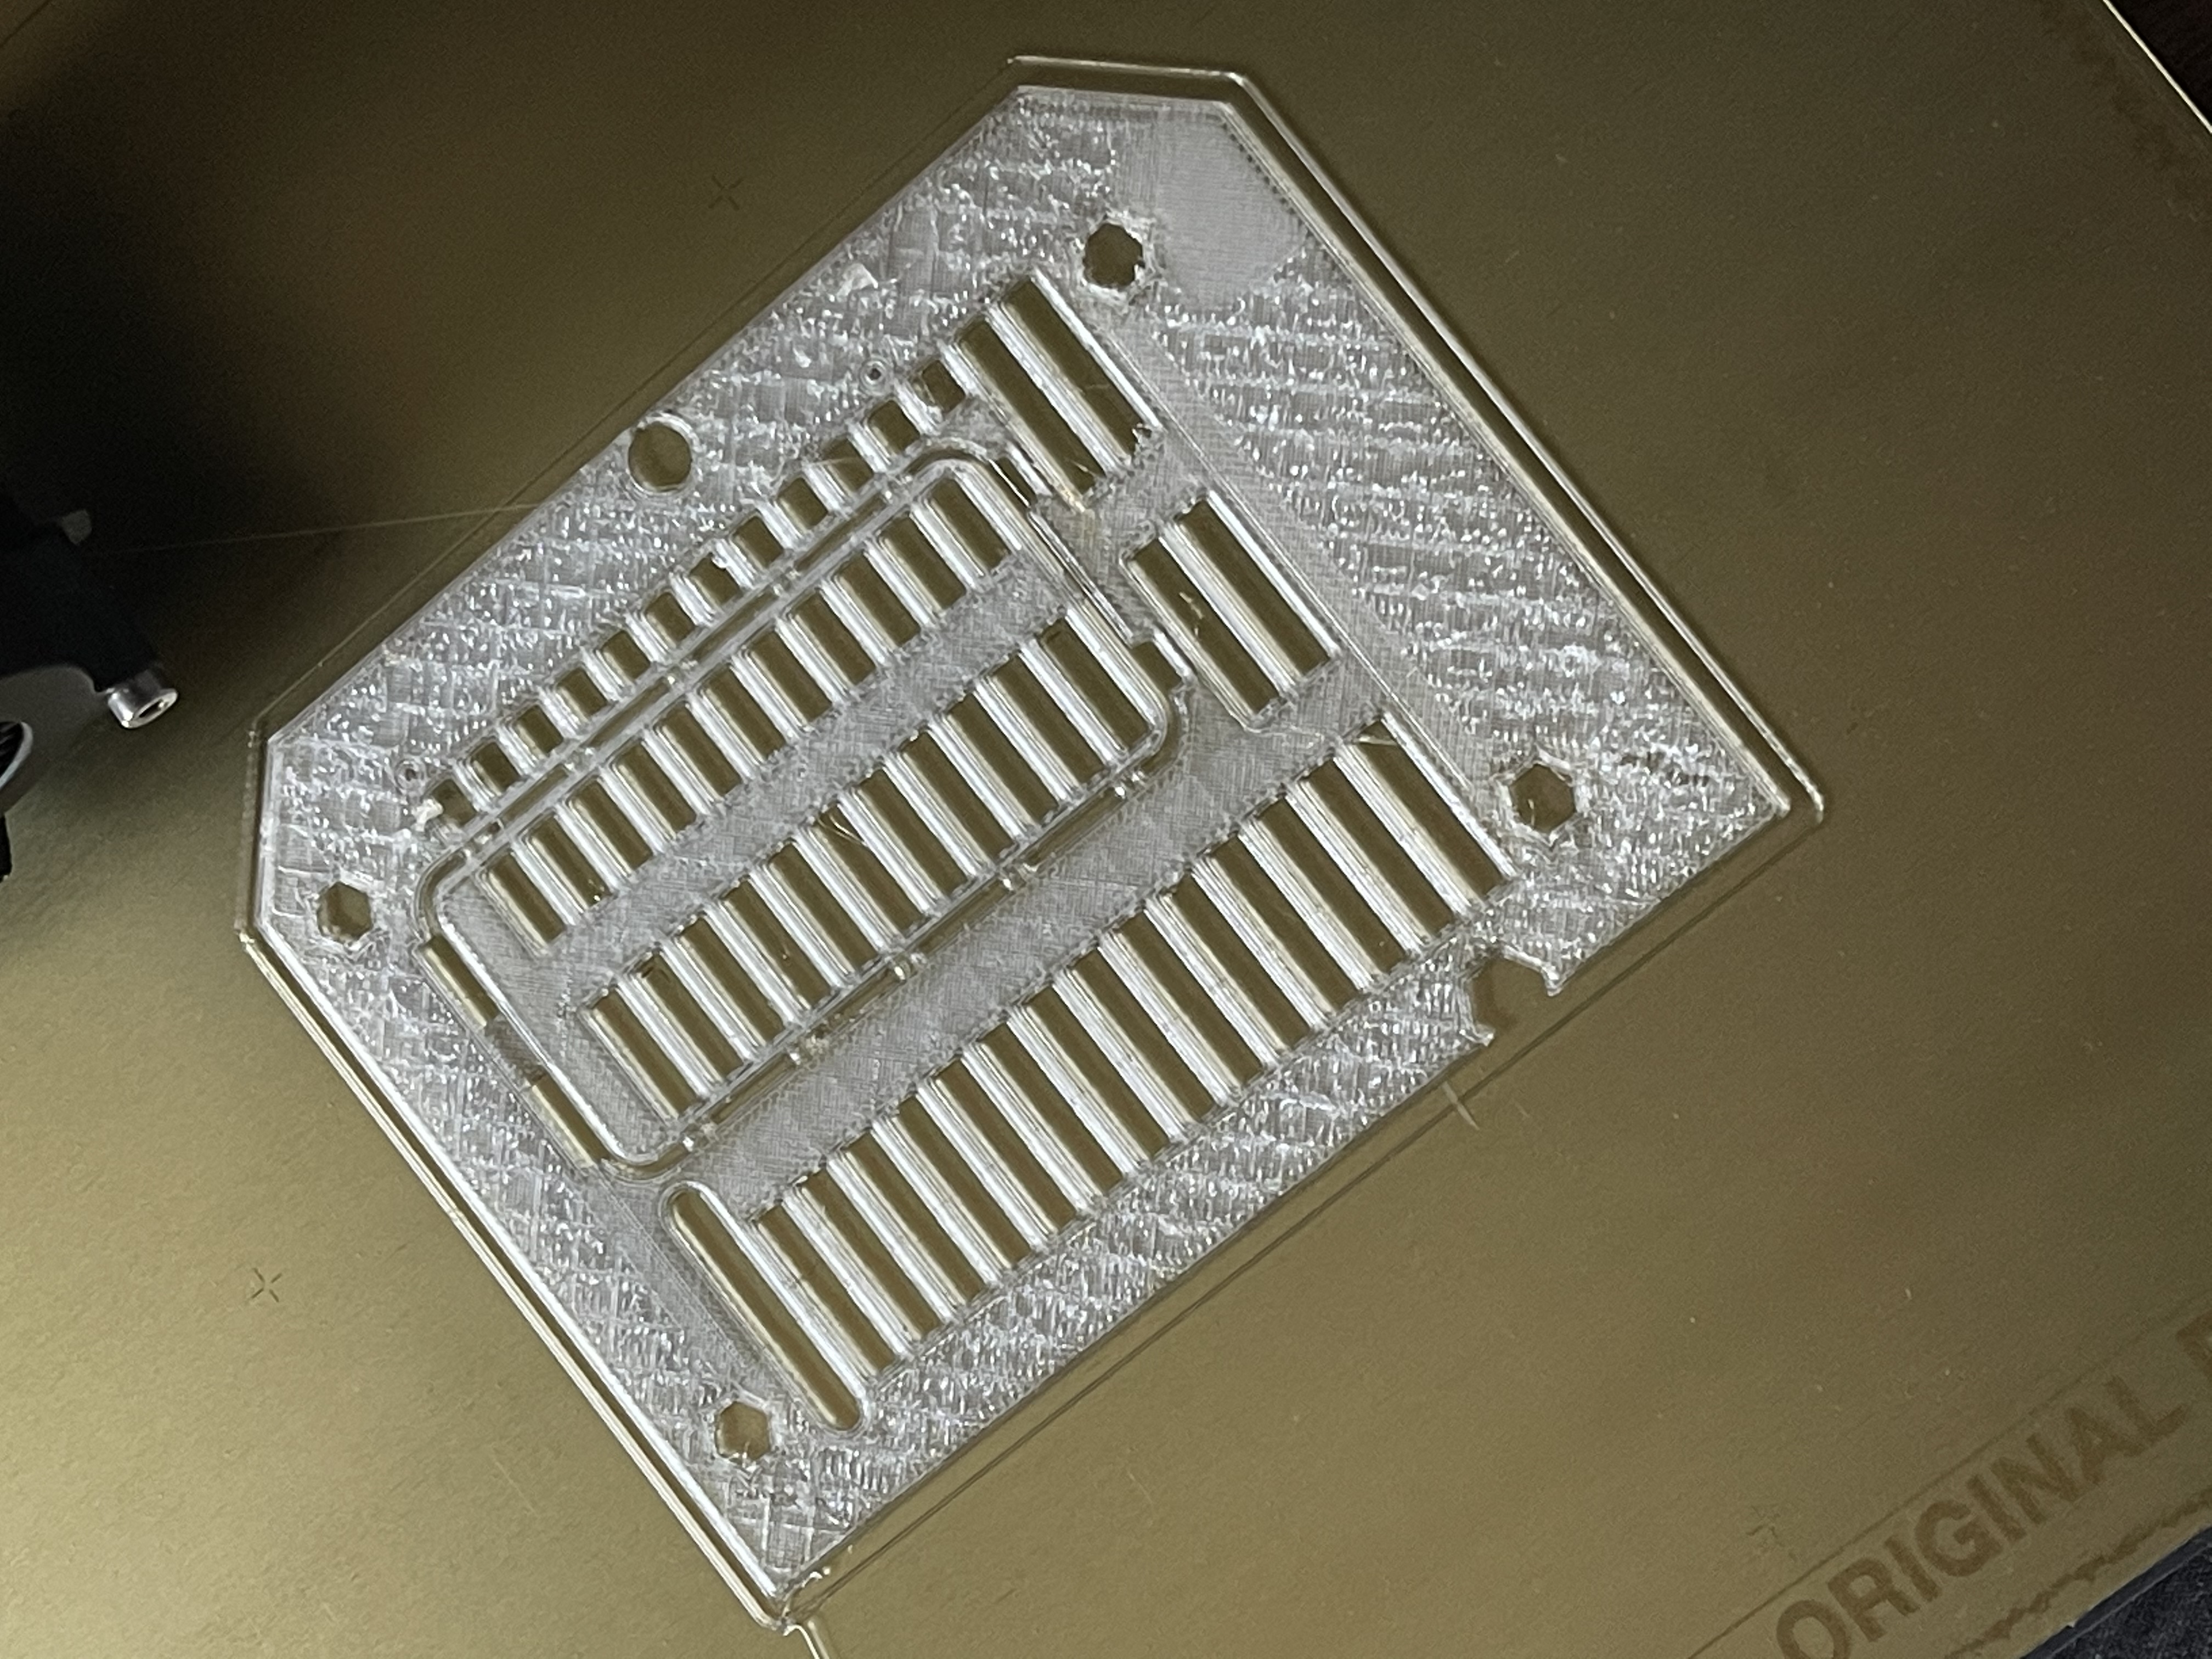

Print temp: 240c
Bed temp: 90c
Nozzle: .4mm
Printer: Prusa MK3
Slicer: PrusaSlicer
Nozzle Retraction: Prusaslicer default for genetic PETG
Tried printing at 225-240 and still the same issue.
Tried bed temp between 80-90.
Set extrusion multiplier to .9 - 1
Any help greatly appreciated
RE: Problems Printing With Inland PETG
I’ve had my MK3S+ for just over a month and have a few hundred hours of printing on it. Most of that printing has been with Inland PETG. I have not had any problems like you are showing. My setting have all been the with the PrusaSlicer defaults for Generic PETG. I know that doesn’t solve your problem, but maybe gives some confirmation that your settings are about right.
What layer height are you printing with. I have not gone thinner than 0.2 mm. Both 0.2 and 0.3 mm have worked well for me.
RE: Problems Printing With Inland PETG
@egar
I was printing at .15, I’ll try .2. I will say I purchased it second hand and therefore did not build it myself, any parts I should check adjustment on that could cause that?
RE: Problems Printing With Inland PETG
@nanabas
I’m a relative newbie here - any advice I’d have would likely just be speculation. There are many knowledgeable and helpful people on this forum. I’m sure the more experienced members will offer you some helpful suggestions.
RE: Problems Printing With Inland PETG
Make picture of your first layer.
Make a temp tower.
Print a different test model, to see if this works.
RE: Problems Printing With Inland PETG
@nanabas
It's been a couple of days. Any luck at resolving your issue?
The pictures appeared to me that the nozzle was dragging over the previous layer causing the tear-out, that's why I mentioned the layer height. Perhaps it could also be an under-extrusion issue where not enough filament is laid down. Of course, now I'm guessing.
Unless you've gotten a bad roll of filament, I'm assume it was a printer setting(s), causing the issue. I've had no issues with Inland PETG in the three rolls I've printed from. Do you have any other filament that you can try?
RE: Problems Printing With Inland PETG
The max recommended temp was 240 on that filament, but printing at 250c seemed to improved the quality greatly, though it’s still no where near what I get when printing PLA. A new roll just arrived, will update later.
RE: Problems Printing With Inland PETG
Inland manufacture says 230 -250C set everything back to default and crank the heat up. I sometimes print with Overture PETG and they say 230 -250C also but I have to print it at 252C to get a decent result.
The Filament Whisperer
RE: Problems Printing With Inland PETG
I normally print at 240 degrees with good results. Resolution as good or better than I get with Prusa PLA. I've done a temperature tower on Inland PETG, up to 260 degrees and don't see much difference above 240-245. No more stringing, no noticeable reduction detail. I've been sticking at 240 because I've had good luck there, so why push it?
Nearly of my Inland PETG printing has been at the stock configs that Prusa slicer gives for Generic PETG and stock print settings for the MS3S. I've tweaked a perimeter, layer height, and infill settings a few times to up print strength when needed, but that's about all.
RE: Problems Printing With Inland PETG
@egar
"so why push it?"
Because the OP isn't experiencing your result, and has to work their way out of the problem, this means trying something different, and in this case since they are under extruding as shown in the images above, more heat could be the answer and is certainly worth pushing a bit to find out. Other possibilities may include a partial blockage which can sometimes also be remedied with high nozzle temperatures, cold pulls or nozzle replacement, "pushing it" is how you learn and figure things out. it in this case is a part of due process as we who are not sitting there with the OP try to help them work through the problem.
The Filament Whisperer
RE: Problems Printing With Inland PETG
Update: results with the Inland Clear PETG still not perfect but MUCH better. Went with .2mm layer height, 15 mm/s first layer, 250* nozzle, and a 90* bed. It seems to really struggle with a .15mm layer height. With that said, I picked up some Hatchbox Orange PETG, and it printed with far superior quality. I am going to toss the Inland in a dry box for a while and come back to it. Maybe it was just sitting on the shelf for too long at the store. Thank you everyone for your help!
RE: Problems Printing With Inland PETG
Here are some pictures with each.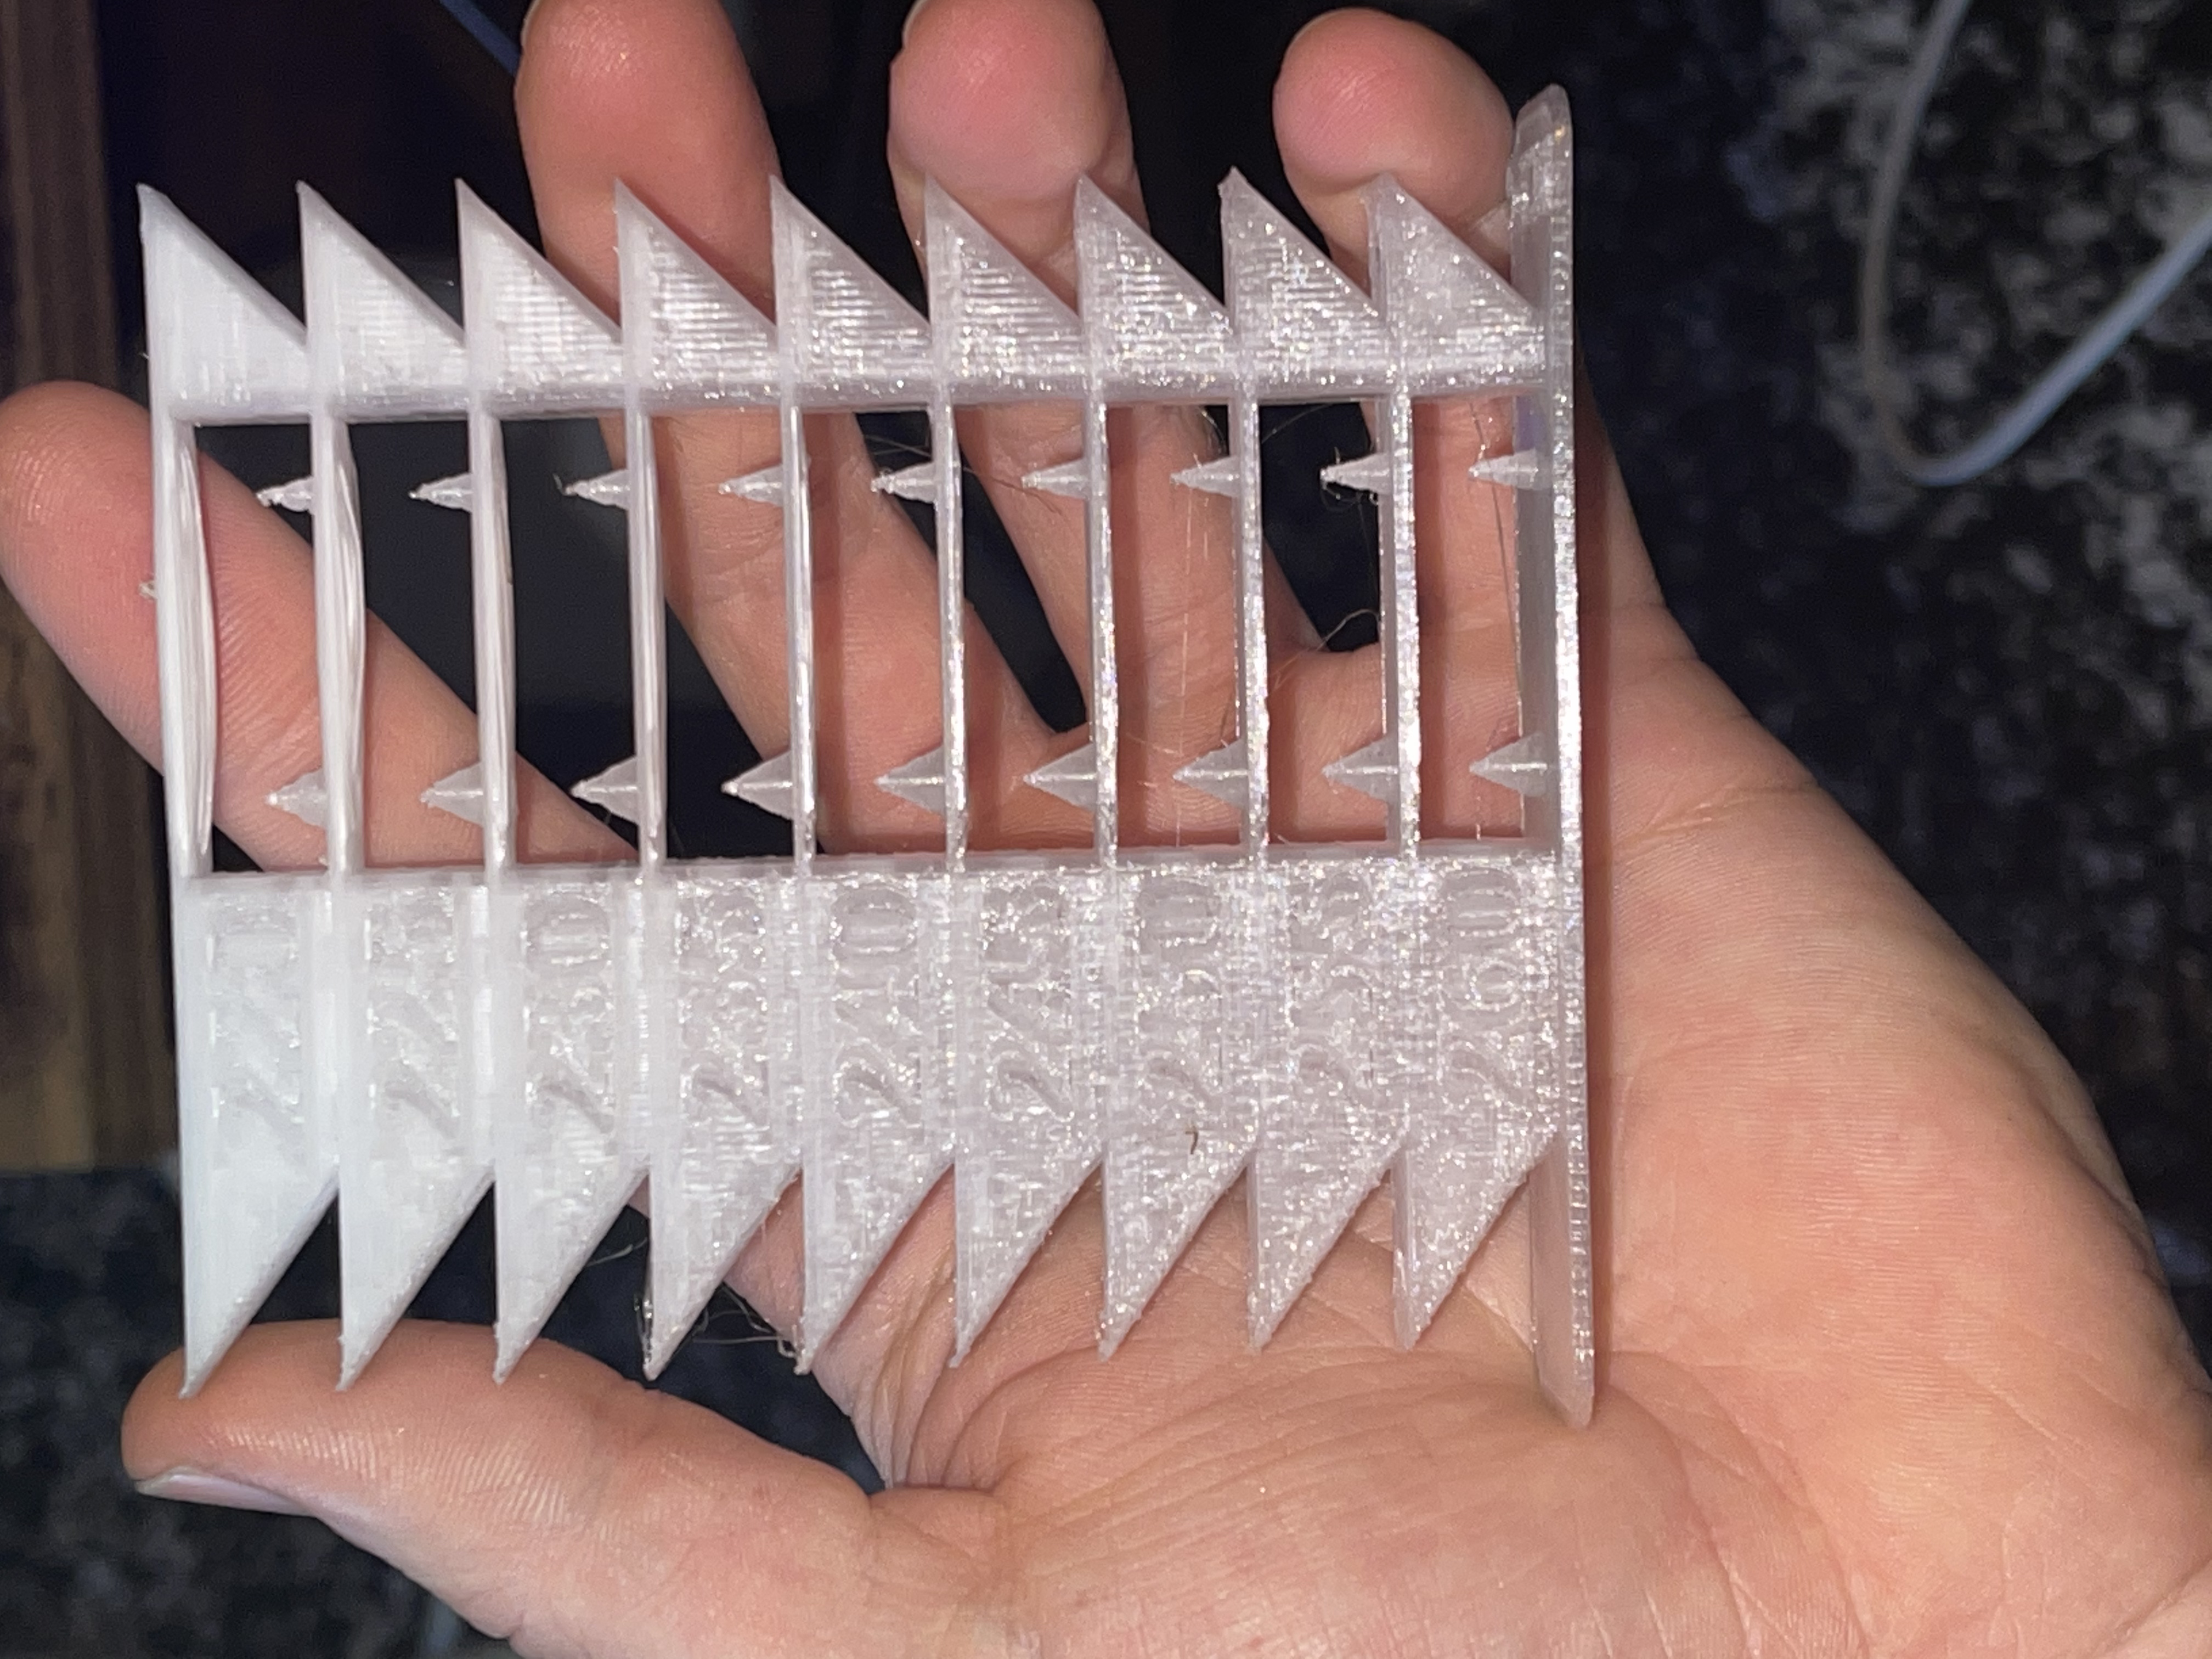

RE: Problems Printing With Inland PETG
@swiss_cheese
The “why push it” comment was about my experience. It was not a recommendation for the OP. I tested mine up to 260 and saw no benefit from running at a higher temp, so *I* chose not to push it.
Like the OP, I’m just a beginner too. I mentioned that earlier in the tread, hoping that more experienced users would weigh in. Other than you, no one else had any suggestions, so I’ve continued to share from my experience. Maybe it will help, maybe not, but all I can talk about is what I have done.
RE: Problems Printing With Inland PETG
@egar
I mistook what you were saying, apologies for the lecture.
@nanabas
first thing that you may find beneficial is to download that temp tower with the coolest settings on the bottom (printed first) and have it get hotter as it advances, there are several reasons for doing the test this way a couple of the main ones are:
1. If the cooler temp is going to cause an extruder skip or blockage you find it out early on, instead of the hard way after you have walked away from the machine since its a 4 hour print,
2. If the material is printing to hot, it's better for your results if your printing on top of less melted layers first, you may end up experiencing different test results printing this way, in my experience I get a better reading of the filaments.
Also on the back side of that temp tower are samples meant to be evaluated, for gap spacing, curved overhang, turning a corner on an overhang. coming off an overhang bridging, etc,, etc,, you may notice that you will see different results for each of these as the temp increases. what you may not be thinking about is how the details on whatever model you happen to be printing at a given time may react to the different results on that tower, the temp for less stringing may not be the temp you want for a model that has lots of overhanging details, if you see what I'm saying.
Another thing you can do with the temp tower, as you gain more experience, is print it at different speeds, for example same filament printed at (Max volumetric speed) of 4 instead of 8 and see what your details look like with the temp differences, giving you yet another way to evaluate your filament for usage relative to the details of the model you want to print.
As to throwing the filament in a dry box, a dry box will not dry your filament out, it will only keep filament from adsorbing moisture, assuming you are keeping your desiccant fresh. In order to actually remove the absorbed moisture from the filament it must be actively heated and in dryer air. A filament dehydrator for example.
Good luck
The Filament Whisperer