Poor print quality after using 0.25mm nozzle for the first time.
https://www.prusaprinters.org/prints/77937-lid-tightener
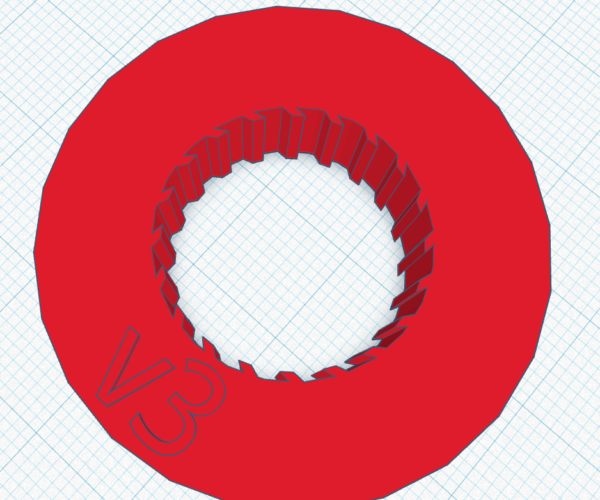
I'm making a lid tightener for these lids to allow the use of a torque measurement wrench.

The ridges are 0.25mm tall protruding from the lid and and 0.5mm wide, so I figured I needed a very high detail print. I switched out the 0.4mm nozzle for 0.25mm using this video.
Unfortunately the print didn't come out very well. You can see there are some bad imperfections inside. The prototype I did with 0.4mm nozzle didn't have this problem.

Additionally, I tried to run a live Z adjust print and I could see stringing
Can anyone make any suggestions about what might be wrong, how I could detect it in future before printing and how I can fix it?
Thank you
extra
I can't edit the last post, the stringing picture got eaten by the BBcode. You can see all the pics here: https://www.prusaprinters.org/prints/77937-lid-tightener
go back to .4mm
.25 mm nozzle and layer height is about vertical detail. Your detail is all horizontal on the X and Y plane. The 4MM nozzle is perfect for that, and won't have the finicky .25 mm nozzle issues. You also can get a perfectly good mechanical part by switching back to .3mm draft mode - none of your detail requires any vertical finesse.
reply
How come the wider nozzle doesn't make the stream of filament wider?
In any case, it turns out that the problem was moist filament. I've had the printer for 1 week and during that time it has been printing regularly, with the filament on the rack on top. It had absorbed enough moisture to be causing these problems, in just that short time. I have dried it in the oven (45-70*C) and it's recovered nicely.
It's wider, but the slicer's job is to fit the shape
It's wider - but it only means the slicer will have to make twice as many (approx, 2.5 is not exactly half) passes around the shape. I'd recommend also not trying to mate the top to the lids. You can get a tightener with just a few triangular touch points with say - 3 to 6 touch points - instead of the 50 to 100 you are planning on. You won't be able to torque that very much anyway and still have it be removable by human hands. Me, i'd try a conical entry into your hex shape that has 6 scallops fluted into the cone. The cone would meet the ridges near the top, but not engage the entire surface. After all, you probably don't want a friction fit for your hex tightner if you plan on making this part of an assembly line.
reply
Yes, it's true that with this design it is possible for a human hand to over-tighten. The goal of this is to make it so that my hands become less sore when I am making the lids tight. I based the design on my old system, which was pressing a lid into polycaprolactone (shapelock) to make a mould and then using that.
That's a really interesting suggestion about the simpler design. I was trapped by thinking about converting my previous mould method into a 3D model, when I could have considered a totally different style. Do you mean like this?
Yes!
Such a a design will be easier and faster for tightening a batch of bottle lids for sure. Think about how a crescent wrench can engage a six sided bolt without having to grip all 6 sides. A 12 point socket is easier to use than a 6 point socket on a hex nut. Similar concepts - you only need a quick grab, not a press fit.
reply
The problem is that with no flexibility in the tool, it relies on a fairly close fit. Couple that with the fact that I want this to be reusable 1000 times before it needs replacing, I think it needs to not be prone to slipping, which will increase wear.
As an additional challenge, the lids themselves taper slightly (about 0.2mm from the top of the ridges to the bottom)
I ended up having an ingenious idea. I print it and the fit is OK, then I spray a lid with acetone and push the tool on. This softens the grooves in the tool to mate perfectly with the lid, fixing it in place.
Separately, I have also printed this to try. The first attempt was too large so I will update with the outcome of the final version.

You could reduce the # of flutes by 3 and it would still work.
So - you glued the tool onto the first cap .. now what?
RE: reply
No glue, you just hold the bottle in one hand and this tool in the other. Tighten the lid, then move on to the next bottle.
The bottles already have the lids on loosely, this is to give more grip and therefore reduce blisters!