Need help - need a clean surface
hi,
i printed this with prusa petg filament. But i ve got every time this ugly lines at my surface.
Can anybody help?
thx
alex
RE: Need help - need a clean surface
hi,
i printed this with prusa petg filament. But i ve got every time this ugly lines at my surface.
Can anybody help?
thx
alex
That looks like overextrusion. The bed does not seem to be completely clean because you can see streaks. I would also rework the first layer.
https://help.prusa3d.com/en/article/extrusion-multiplier-calibration_2257
Statt zu klagen, dass wir nicht alles haben, was wir wollen, sollten wir lieber dankbar sein, dass wir nicht alles bekommen, was wir verdienen.
RE: Need help - need a clean surface
@karl-herbert
Thank u for your answer.
the bed is clean! The first layer looks perfect. So maybe I have to play with this value - Extrusion Multiplier.
What do u think ...should I set it first To 0.90?
RE: Need help - need a clean surface
@contact-8
i would reduce in 0.05 steps. It is best to clean the print bed with a grease-dissolving detergent and rinse with plenty of water. If necessary, wipe with IPA for a short time.
good luck!
Statt zu klagen, dass wir nicht alles haben, was wir wollen, sollten wir lieber dankbar sein, dass wir nicht alles bekommen, was wir verdienen.
RE: Need help - need a clean surface
@karl-herbert
i ll try... and will report...
thx for now
RE: Need help - need a clean surface
Hi,
thx for the hint... works better..
two more questions:
Why there are color differences?
and around the holes it not so nice !?
any suggestions?
Thx
alex
RE: Need help - need a clean surface
One more image ...
RE: Need help - need a clean surface
@contact-8
This depends on the filament. I think these are just refractions of light. At least that's how it looks in the photos.
At what multiplier value are you now? What about nozzle temperature, feed values and layer height? Which filament do you use (Prusament PETG black)?
Statt zu klagen, dass wir nicht alles haben, was wir wollen, sollten wir lieber dankbar sein, dass wir nicht alles bekommen, was wir verdienen.
RE: Need help - need a clean surface
@karl-herbert
Prusament PETG jet black
0.90
first 230/95
All other 235/90
layer height 0.2
RE: Need help - need a clean surface
I've seen this before, when the slicer sets the path to lay down a layer as first here, then there, laying down opposite sides of obstructions and holes at different times.
I haven't had any serious issues with it other than minor cosmetic inconsistencies.
I would think that an option to lay down a layer in order, simply raising and traveling over the obstructions or holes, would help with this, but I have not investigated the various slicers to see if they have a similar option.
RE: Need help - need a clean surface
Any idea?
RE: Need help - need a clean surface
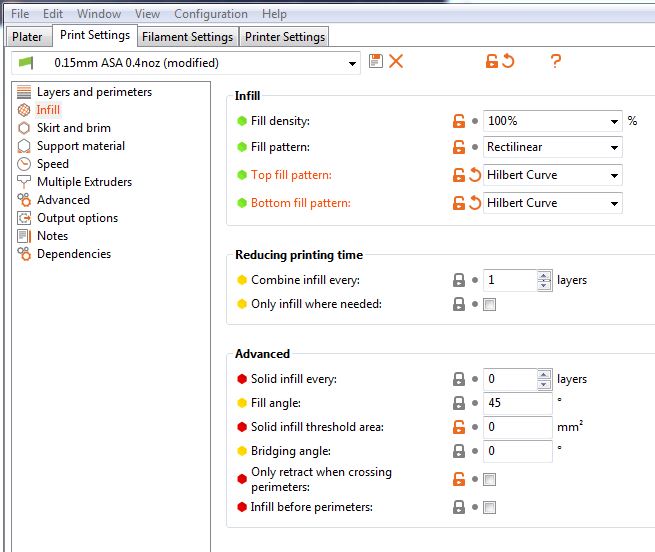
Be aware that significant improvements are coming to the way PrusaSlicer handles top solid infill surfaces like this. In addition to the much-requested "ironing" feature (heated smoothing), they've also developed a new "monotonous" infill pattern that should eliminate those "lawn mower" effects when adjacent extrusions shift direction of print.
RE: Need help - need a clean surface
@contact-8
Try different fill pattern. I often use "Hilbert Curve".
Statt zu klagen, dass wir nicht alles haben, was wir wollen, sollten wir lieber dankbar sein, dass wir nicht alles bekommen, was wir verdienen.
RE: Need help - need a clean surface
okay ... will try it
thx for now
RE: Need help - need a clean surface
I reduced the speed and now it’s getting better... not perfect but better.
RE: Need help - need a clean surface
At warum up my filament runs out of the nozzle and at the purging line the nozzle will not cleans up enough...
How can I stop this ?
RE: Need help - need a clean surface
Implement a 2 stage warm up routine in your start gcode. Prusa have made this technique part of the mini startup procedure as standard but some of us have been using it before the mini was released on our mk3 and other printers.
Bobs link in his signature will take you to his website with lots of useful info but the direct link is this http://projects.ttlexceeded.com/3dprinting_prusaslicer_gcode.html
Basically you warm up to 160-170 on the nozzle , then do the mesh levelling etc and then after that heat up to full printing temps. That gets rid of the filament leaking due to print temps being reached while doing the levelling. The notes on the startup routine are good and should give you a step by step explanation of why each section is there.
RE: Need help - need a clean surface
i already have this,...
Start Code:
; Last updated 20200215
M300 S40 P10 ; chirp
M862.3 P "[printer_model]" ; printer model check
M862.1 P[nozzle_diameter] ; nozzle diameter check
M115 U3.7.2 ; tell printer latest fw version
M117 Initializing
; Set coordinate modes
G90 ; use absolute coordinates
M83 ; extruder relative mode
; Reset speed and extrusion rates
M200 D0 ; disable volumetric e
M220 S100 ; reset speed
M221 S{if layer_height >= 0.32}90{else}100{endif} ; compensate for thick layer heights
; Set initial warmup temps
M117 Nozzle preheat
M104 S160 ; set extruder no-ooze temp
M140 S{max(first_layer_bed_temperature[0],80)} ; set bed PINDA warmup temp
; Nozzle warmup before home to avoid driving hardened ooze into PEI surface
M109 S160 ; wait for extruder no-ooze warmup temp before mesh bed leveling, 😎 hot PINDA
M300 S40 P10 ; chirp
; Home
M117 Homing
G28 W ; home all without mesh bed level
; Present bed for final cleaning
G0 Z3; Raise nozzle before move
G0 X125 Y180 F10200; Move nozzle to PINDA warming position
G0 Z0.15 F10200; Lower nozzle to PINDA warming position
; Wait for PINDA warmup
M117 PINDA warmup
M860 S35 ; wait for PINDA temp to stabilize
M140 S[first_layer_bed_temperature] ; set target bed temp
G0 Z3; Raise nozzle before move
M300 S40 P10 ; chirp
; Mesh bed leveling
M117 Mesh bed leveling
G80 ; mesh bed leveling
M117 Saving results
G81 ; save mesh leveling results
; Final warmup routine
M117 Final warmup
G0 Z5; Raise nozzle to avoid denting bed while nozzle heats
M140 S[first_layer_bed_temperature] ; set bed final temp
M104 S[first_layer_temperature] ; set extruder final temp
M109 S[first_layer_temperature] ; wait for extruder final temp
M190 S[first_layer_bed_temperature] ; wait for bed final temp
M300 S40 P10 ; chirp
; Prime line routine
M117 Printing prime line
G0 Z0.15 ; Restore nozzle position - (thanks tim.m30)
M900 K0; Disable Linear Advance for prime line
G92 E0.0 ; reset extrusion distance
;go outside print area
G1 Y-3.0 F1000.0 ; Move the extruder to Y=-3.0, move at speed 1000mm/minute.
G1 Z0.4 F1000.0 ;Move the extruder to 0.4mm above the print surface
; select extruder
Tc
; purge line
G1 X55.0 F2000.0 ; Move the extruder to X=55mm
G1 Z0.3 F1000.0; Move the extruder to Z=0.3mm
G92 E0.0; set current extruder position to 0. Does not extrude.
G1 X240.0 E25.0 F2200.0 ; move the extruder to X=240mm, while extruding 25mm of filament
G1 Y-2.0 F1000.0; move the extruder to Y=-2.0mm
G1 X55.0 E25 F1400.0 ;move to X=55 while extruding 25mm of filament.
G1 Z0.20 F1000.0; move to Z=0.2mm.
G1 X5.0 E4.0 F1000.0; move to X=5mm, while extruding 4mm of filament.
M221 S{if layer_height<0.075}100{else}95{endif}
G92 E0.0
; Final print adjustments
M117 Preparing to print
M300 S40 P10 ; chirp
M117 Print in progress
End Code:
; Last updated 20200215
G4 ; wait
; Raise nozzle and present bed
M117 Printing complete
G4 ; wait
G92 E0 ; prepare to retract
G1 E-0.8 F3000; retract to avoid stringing
; Anti-stringing end wiggle
G91 ; use relative coordinates
G1 X-0.5 Y-0.5 F1200
G1 X1 Y1 F1200
G90 ; use absolute coordinates
{if layer_z < max_print_height}G1 Z{z_offset+min(layer_z+60, max_print_height)}{endif} ; Move print head up
G0 X0 Y210 F10200; present bed
; Reset print setting overrides
M200 D0 ; disable volumetric e
M220 S100 ; reset speed factor to 100%
M221 S100 ; reset extruder factor to 100%
M900 K0 ; reset linear acceleration
; Shut down printer
M104 S0 ; turn off temperature
M140 S0 ; turn off heatbed
M107 ; turn off fan
M84 ; disable motors
M300 S40 P10 ; chirp
Before layer changing:
;BEFORE_LAYER_CHANGE
; layer_z is height of current layer in mm
G92 E0.0
;[layer_z]
{if layer_z <= 10}M104 S235
{elsif layer_z <= 20}M104 S230
{elsif layer_z <= 30}M104 S225
{elsif layer_z <= 40}M104 S220
{elsif layer_z <= 50}M104 S215
{elsif layer_z <= 60}M104 S210
{elsif layer_z <= 70}M104 S205
{elsif layer_z <= 80}M104 S200
{elsif layer_z <= 90}M104 S195
{elsif layer_z <= 100}M104 S190
{elsif layer_z <= 110}M104 S185
{endif}