Missing Layers, Unprintable Error
Howdy folks,
When I try to slice the attached file it tells me there's an error with the file missing layers. I've printed these before on my old Creality CR10s so I know they print well. Can someone point out if I'm missing something obvious?
Thanks!
EDIT: Hmm. My attached .3mf seems to keep falling off the post. Can I not attach those?
Best Answer by Swiss_Cheese:
@navajas
your welcome, and yes.
In this case I did it in slicer. when you or whomever made the model, they made it with individual parts and put them together to form the desired outcome. When the parts were exported form the 3D program they exported as a single object, slicer recognizes this, and offers two built in ways to separate parts from one another should it become necessary (this is an extremely handy feature in ways that I will not cover here).

In Slicer when you select an object that is made of multiple parts these two buttons will become active, where (O) will split the object into different parts dropping them to the bed and removing any coordinate relationship they might have between each other, (P) will split them apart maintaining their coordinate relationships (keeping them as one part) but allowing for the movement of the parts relative to each other, you will notice in the object menu that a sub directory is created for each of the objects associated with the part, as shown in the image below.

There are many advantages to each of these two methods, but I won't get into them here.
In this case used (P) to split the part and grabbed the disc and in the "Part manipulation" pane subtracted 0.01mm from the Z Position.
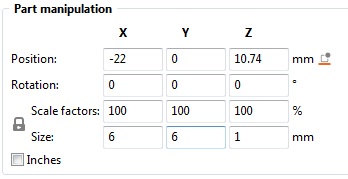
I hope this Helps.
Enjoy
Swiss_Cheese
@navajas
You have to zip up your .3mf files before the server will allow them to be posted
Regards
Swiss_Cheese
The Filament Whisperer
Gotcha
Thanks. Let's try this.
You have small, central, bosses that are not actually connected to the bases beneath ... effectively short cylinders floating in mid-air. If you split to objects they drop to the bed and the file slices perfectly - with the bosses in the wrong place.
Cheerio,
Oh weird
Ok, I see that now in PrusaSlicer. Odd though because I also see the ones I had printed a few years ago sitting on my desk just fine. I also can't see that gap on my screen, though, when I split them, sure enough, that little disc falls through to the buildplate. :-/ Is there a way to remedy this in the Slicer or do I need to figure out with a 3D tool?
Thanks!
navajas
Fixed in Slicer
@navajas
Slicer used to allow this behavior, to have parts floating in air, personally I preferred it that way because it allowed me to do certain "important" things that I had to develop work around's to do now, I don't even thing they (Prusa) know they screwed it up, they removed several very important features to try and dumb the program down for new users and didn't give an option for expert. Any thats the short story which is all i have time for right now.
I split your objects into there constituent parts and lowered the (offending) tiny disks 0.01 on the Z. 5min job, it's all printable now.
Pedestal_Assembly_Fixed Swiss.Zip
Enjoy
Swiss_Cheese
The Filament Whisperer
Hey thanks!
Can I ask what software you used to lower those little discs?
Thanks again!
navajas
@navajas
your welcome, and yes.
In this case I did it in slicer. when you or whomever made the model, they made it with individual parts and put them together to form the desired outcome. When the parts were exported form the 3D program they exported as a single object, slicer recognizes this, and offers two built in ways to separate parts from one another should it become necessary (this is an extremely handy feature in ways that I will not cover here).
In Slicer when you select an object that is made of multiple parts these two buttons will become active, where (O) will split the object into different parts dropping them to the bed and removing any coordinate relationship they might have between each other, (P) will split them apart maintaining their coordinate relationships (keeping them as one part) but allowing for the movement of the parts relative to each other, you will notice in the object menu that a sub directory is created for each of the objects associated with the part, as shown in the image below.
There are many advantages to each of these two methods, but I won't get into them here.
In this case used (P) to split the part and grabbed the disc and in the "Part manipulation" pane subtracted 0.01mm from the Z Position.
I hope this Helps.
Enjoy
Swiss_Cheese
The Filament Whisperer
Perfect
Wow, thanks for taking the time, not only to make that repair, but post the above explanation. I really appreciate it!
navajas