Layer separation on large print
I print landscapes, started doing mountain regions and have encountered layer separation when I use the full dimensions of the printer. I've attached a photo that shows the cracks of the separation and the 3mf file. The problem is I don't know what parameters to adjust. More perimeters? More or less or different infill? Switch from PLA to PETG?
Separately the corners at the bottom pull up slightly - but it takes many layers before it happens. I am using a wide brim and tape it down after 15 layers or so and this has worked well - the rise is not enough to affect the sculpture.
Thank you
Vakil
RE: Layer separation on large print - Update
I discovered I can not upload the 3MF file so here are the parameters I am using. Generally they are the Original Prusa i3Mk3S & MK3s+ 0.6 nozzle. Layer height .35 mm First layer 0.,25 mm m Perimeters 2 Horizontal shells top and bottom 3
Infill 10% Gyroid No Ironing Combine infill every 1 layer Fill Angle 45
Brim 10mm
Infill perimeter overlap 20%
Elephant foot compensation 0
Nozzle temps 200 Bed temps 60
Vakil
RE: Layer separation on large print - the 3MF file
Zipped the 3MF file which is a valid upload format.
Vakil
RE: Layer separation on large print
Nothing is jumping out as a big problem. You're using a 0.6mm nozzle, your layer height of 0.35mm should not be a problem with a perimeter extrusion width of 0.65mm. You're only cooling on layers that print faster than 60 seconds. Your speeds aren't too fast at 30-35mm for perimeters. A couple of thoughts:
- A lot depends on your filament. Inter-layer adhesion usually benefits from additional heat. You're not over-cooling. Have you tried printing at 205-210C?
- You're using a brim, but large parts can warp if you have a lot of temperature variation. If you're printing in a room that is overly cool, perhaps a temporary enclosure to hold in some of the heat and avoid drafts would help.
- That's a complicated print. Are the splits only happening in jagged areas? You're using 2 perimeters (0.65mm X 2) with 10% infill. An extra perimeter might give a bit more adhesion, or try slightly wider extrusions so layer have more to adhere to.
- Finally, it will slow down the print, but you might try a lower layer height, at least for a test. There's nothing wrong with your settings that I can see, but it's worth a shot.
RE: Layer separation on large print
@bobstro
Thanks for the suggestions. The overall sculpture is four prints that I assemble into one sculpture piece - can't wait until there the XL printer is in production. So the layer separations are all at the corners and do not extend more than a third of the way horizontally - so it is not in the jagged areas. Each print is 10 - 16 hours so not that easy to try different things out. I'll definitely try the nozzle temperature increase and an enclosure of some kind is on my list before I try another. My house gets cold at night so these long prints do get temp variations.
An extra perimeter (from 2 to 3) would substantially increase the print time but also worth a shot. I'll look into wider extrusions as well.
Thank you for the review.
Vakil
RE: Layer separation on large print
Those sure look like stress shears from layers above shrinking. First off, you can glue them - so that's not so bad. But to eliminate the shrinking during the print, or increase adhesion - as bobstro points out. Or cut them into even smaller parts for later assembly. Large long and thin and tall - not a good recipe.
Settings that increase inter-layer adhesion include nozzle temp (increase until you see stringing and you're just about maxed that out), fill ratio (increase fill to get those layer splitting under control), and increase print chamber temp if the prints are causing the print to crash. hard to tell if your splits happened during the cool down just from sheer laws of physics (stress).
If using PLA - which is brittle, think about PETG - which is flexible and much stronger.
RE: Layer separation on large print
Oh, and looking at that picture - download the little belt tension PETG print that Prusa and company posted on the prints library - your belts look to need some attention looking at those pictures (wavy layer shifting)
RE: Layer separation on large print
@Dan Rogers - Agreed on PETG. I've had good luck printing big chonky things with PETG, and it doesn't mind heat, so adhesion is excellent.
@vakil - Your print speeds are low enough that adding wider perimeters shouldn't add significant time. You'll get 2 wider extrusions that upper layers can better adhere to, both during the print and after cooling. As Dan notes, denser infill will give perimeters more to adhere to as well. You might try support cubic infill to see how it compares with a higher density.
RE: Layer separation on large print
The one standing warning if you are thinking about PETG and aren't used to PETG - Always after you clean your bed, spritz on some windex and then wipe it off with a paper towel before you print PETG on the smooth sheet 😉
RE: Layer separation on large print
@dan-rogers
Thanks - I have a fair amount of experience with PETG. Each of these segments takes a bit more than 500 gms of filament so I need at least three spools of filament for the four segments. I had it in white PLA so that's what I used - I'm sure you know the filament situation was pretty bad for awhile but it's improved so I can probably get enough PETG. That seems like agood option and I'll look into the three perimeters as well.
Re glue - not possible. I thought about it but it would need a lot pressure to force it together and I am pretty sure it would crack the top and /or the glue would hold but the PLA would crack at the next layer. I did try filling it using a PLA heat pen but it looks terrible. I had to paint the PLA and it pretty much hid the cracks. I've attached a photo of the finished piece.
RE: Layer separation on large print
[...] An extra perimeter (from 2 to 3) would substantially increase the print time but also worth a shot. I'll look into wider extrusions as well.
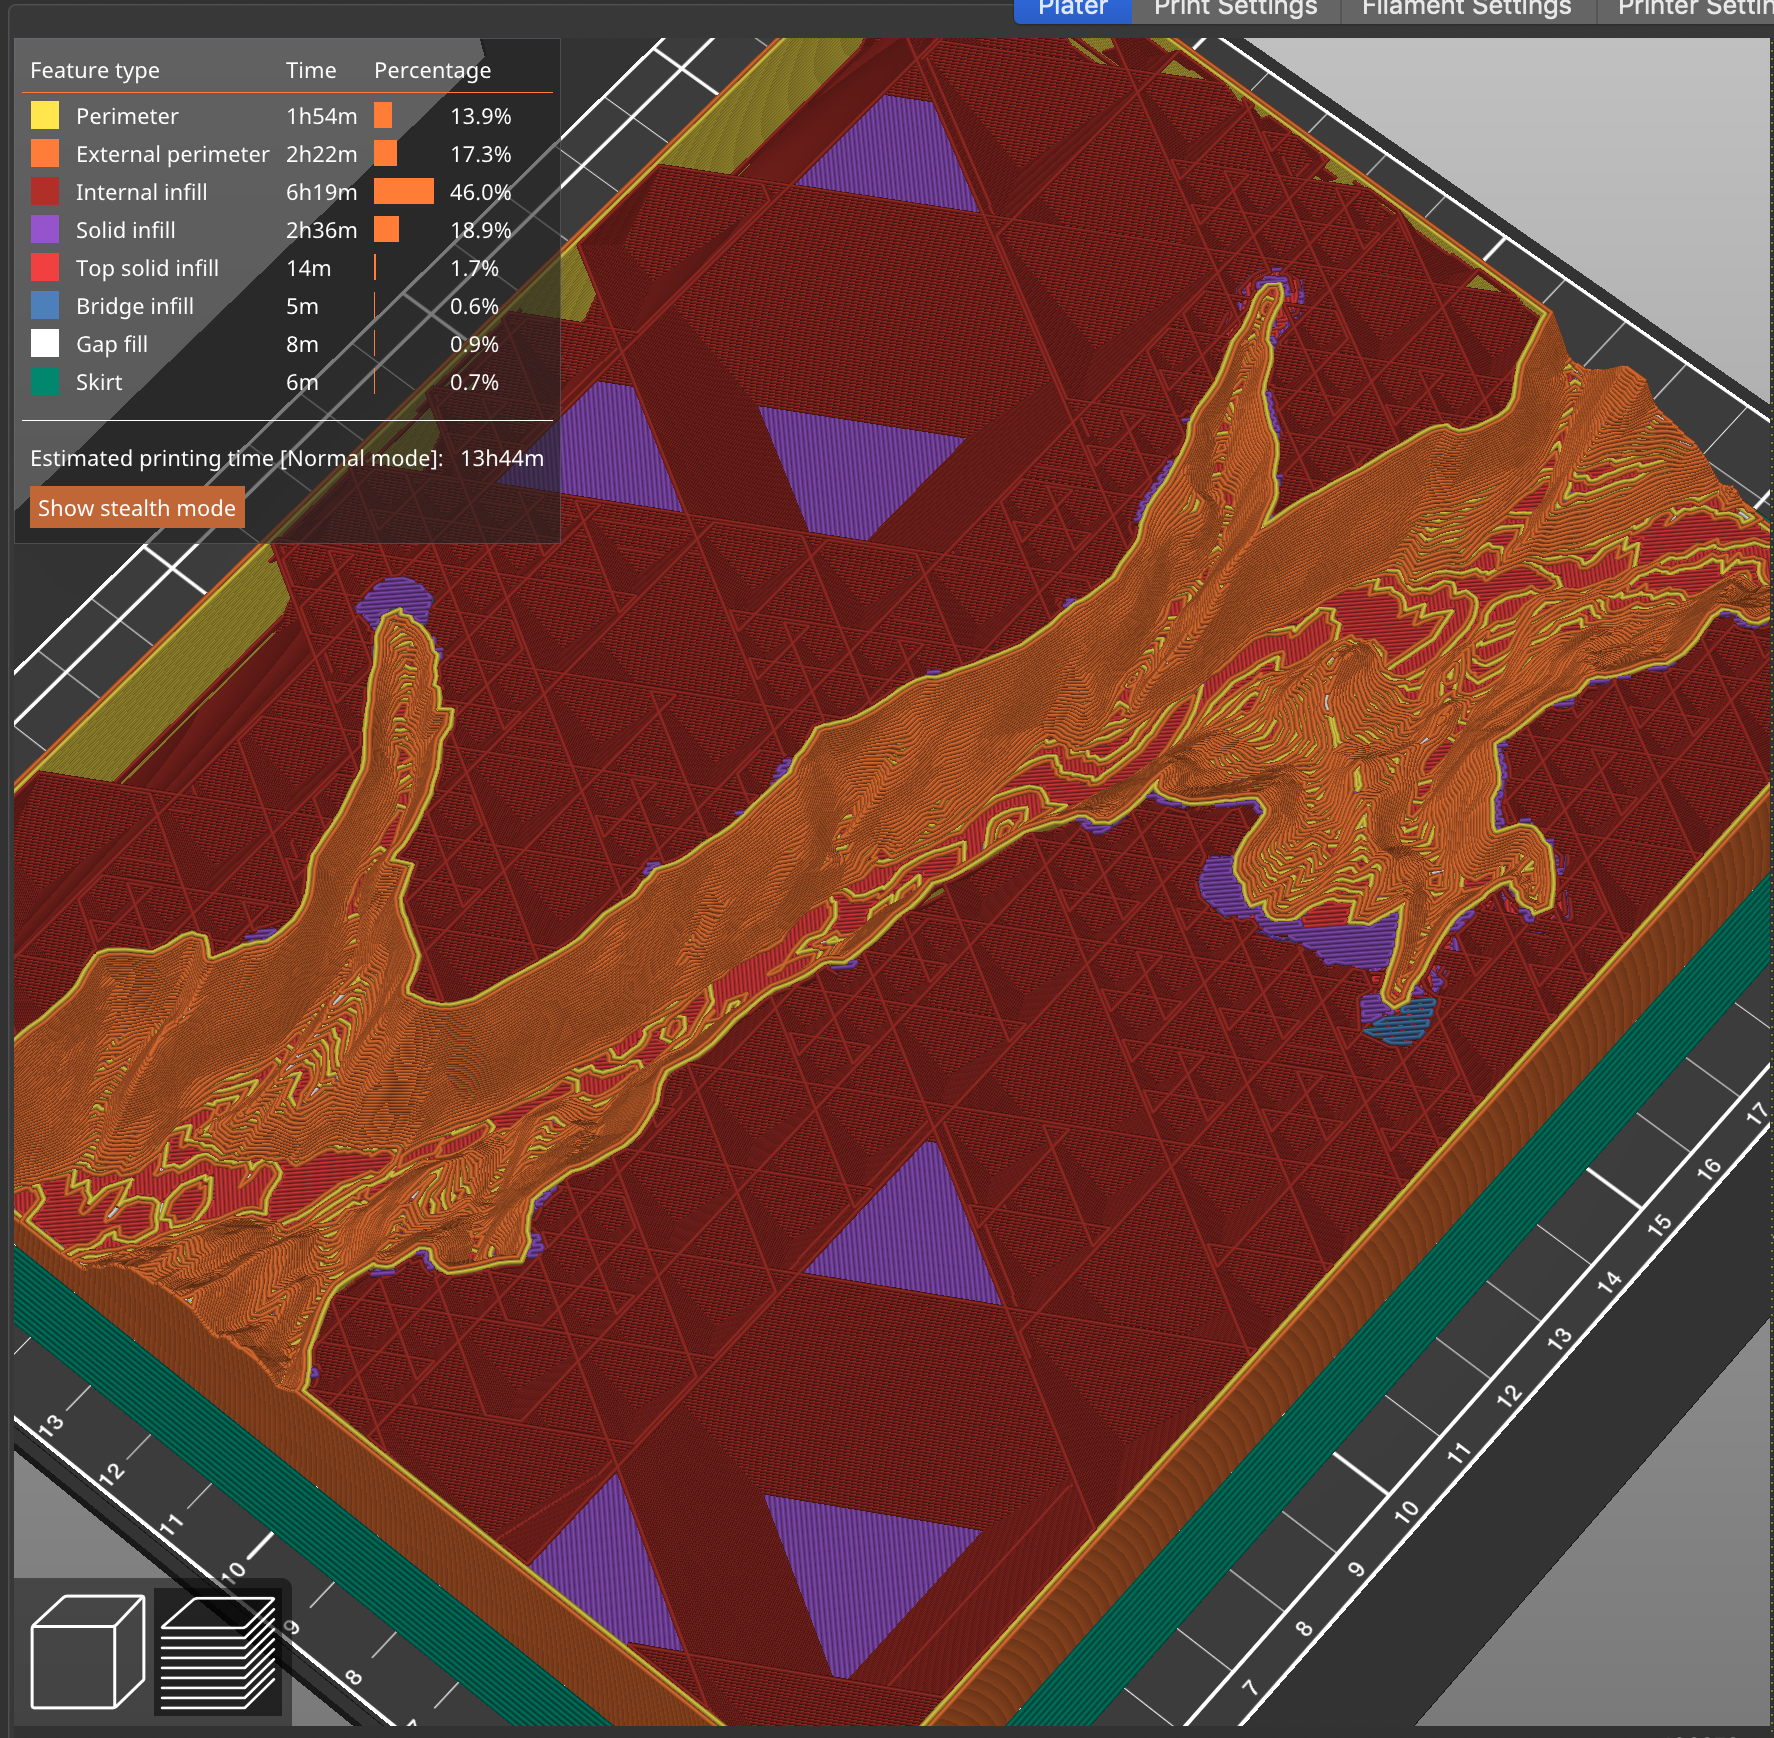
I loaded your 3MF and sliced it without modification. The print estimate shows 18h1m in normal mode. Here's what the results looked like in preview mode:

I then made a few adjustments:
- Changed the layer height to 0.24mm.
- Changed infill density to 40%.
- Changed fill pattern to Support Cubic.
- Disabled Only infill where needed.
- Set combine infill to every 2 layers.
- Changed perimeter and external perimeters to 0.7mm for a bit more width without increasing perimeter count.
After these changes, the print time estimate dropped to 13h44m. Of course, this is only an estimate, so you'll need to confirm with an actual print. A few observations:
- The lower layer heights provide better vertical detail and should also improve perimeter inter-layer adhesion.
- The wider extrusions should also improve inter-layer adhesion. Increasing too much reduces detail, but you are probably OK with using 0.8mm wide extrusions for this sort of print.
- The use of higher infill density increases support and overall strength of the print.
- The use of Cubic Support infill pattern increases infill near the top, while using less density near the bottom.
- The new infill pattern, increased infill density, and removing "only where needed" made infill printing much smoother, consistent, and faster.
- Combining every 2 infill layers only prints infill every other layer, so at 0.48mm layers. Still below 80% of your nozzle height, so you will get well-formed extrusions (esp. with wider extrusion widths). Higher than your previous 0.35mm height, so faster printing. You can do this because you're using a lower layer height with a larger nozzle.
Here's the slicer preview. Notice the much more consistent infill:
I've attached a 3MF file with the revised settings so you can compare.
RE: Layer separation on large print
Just for comparison, switching to Adaptive Cubic infill increase print time to 15h13m (still faster than your original), but better supports the sides:

RE: Layer separation on large print
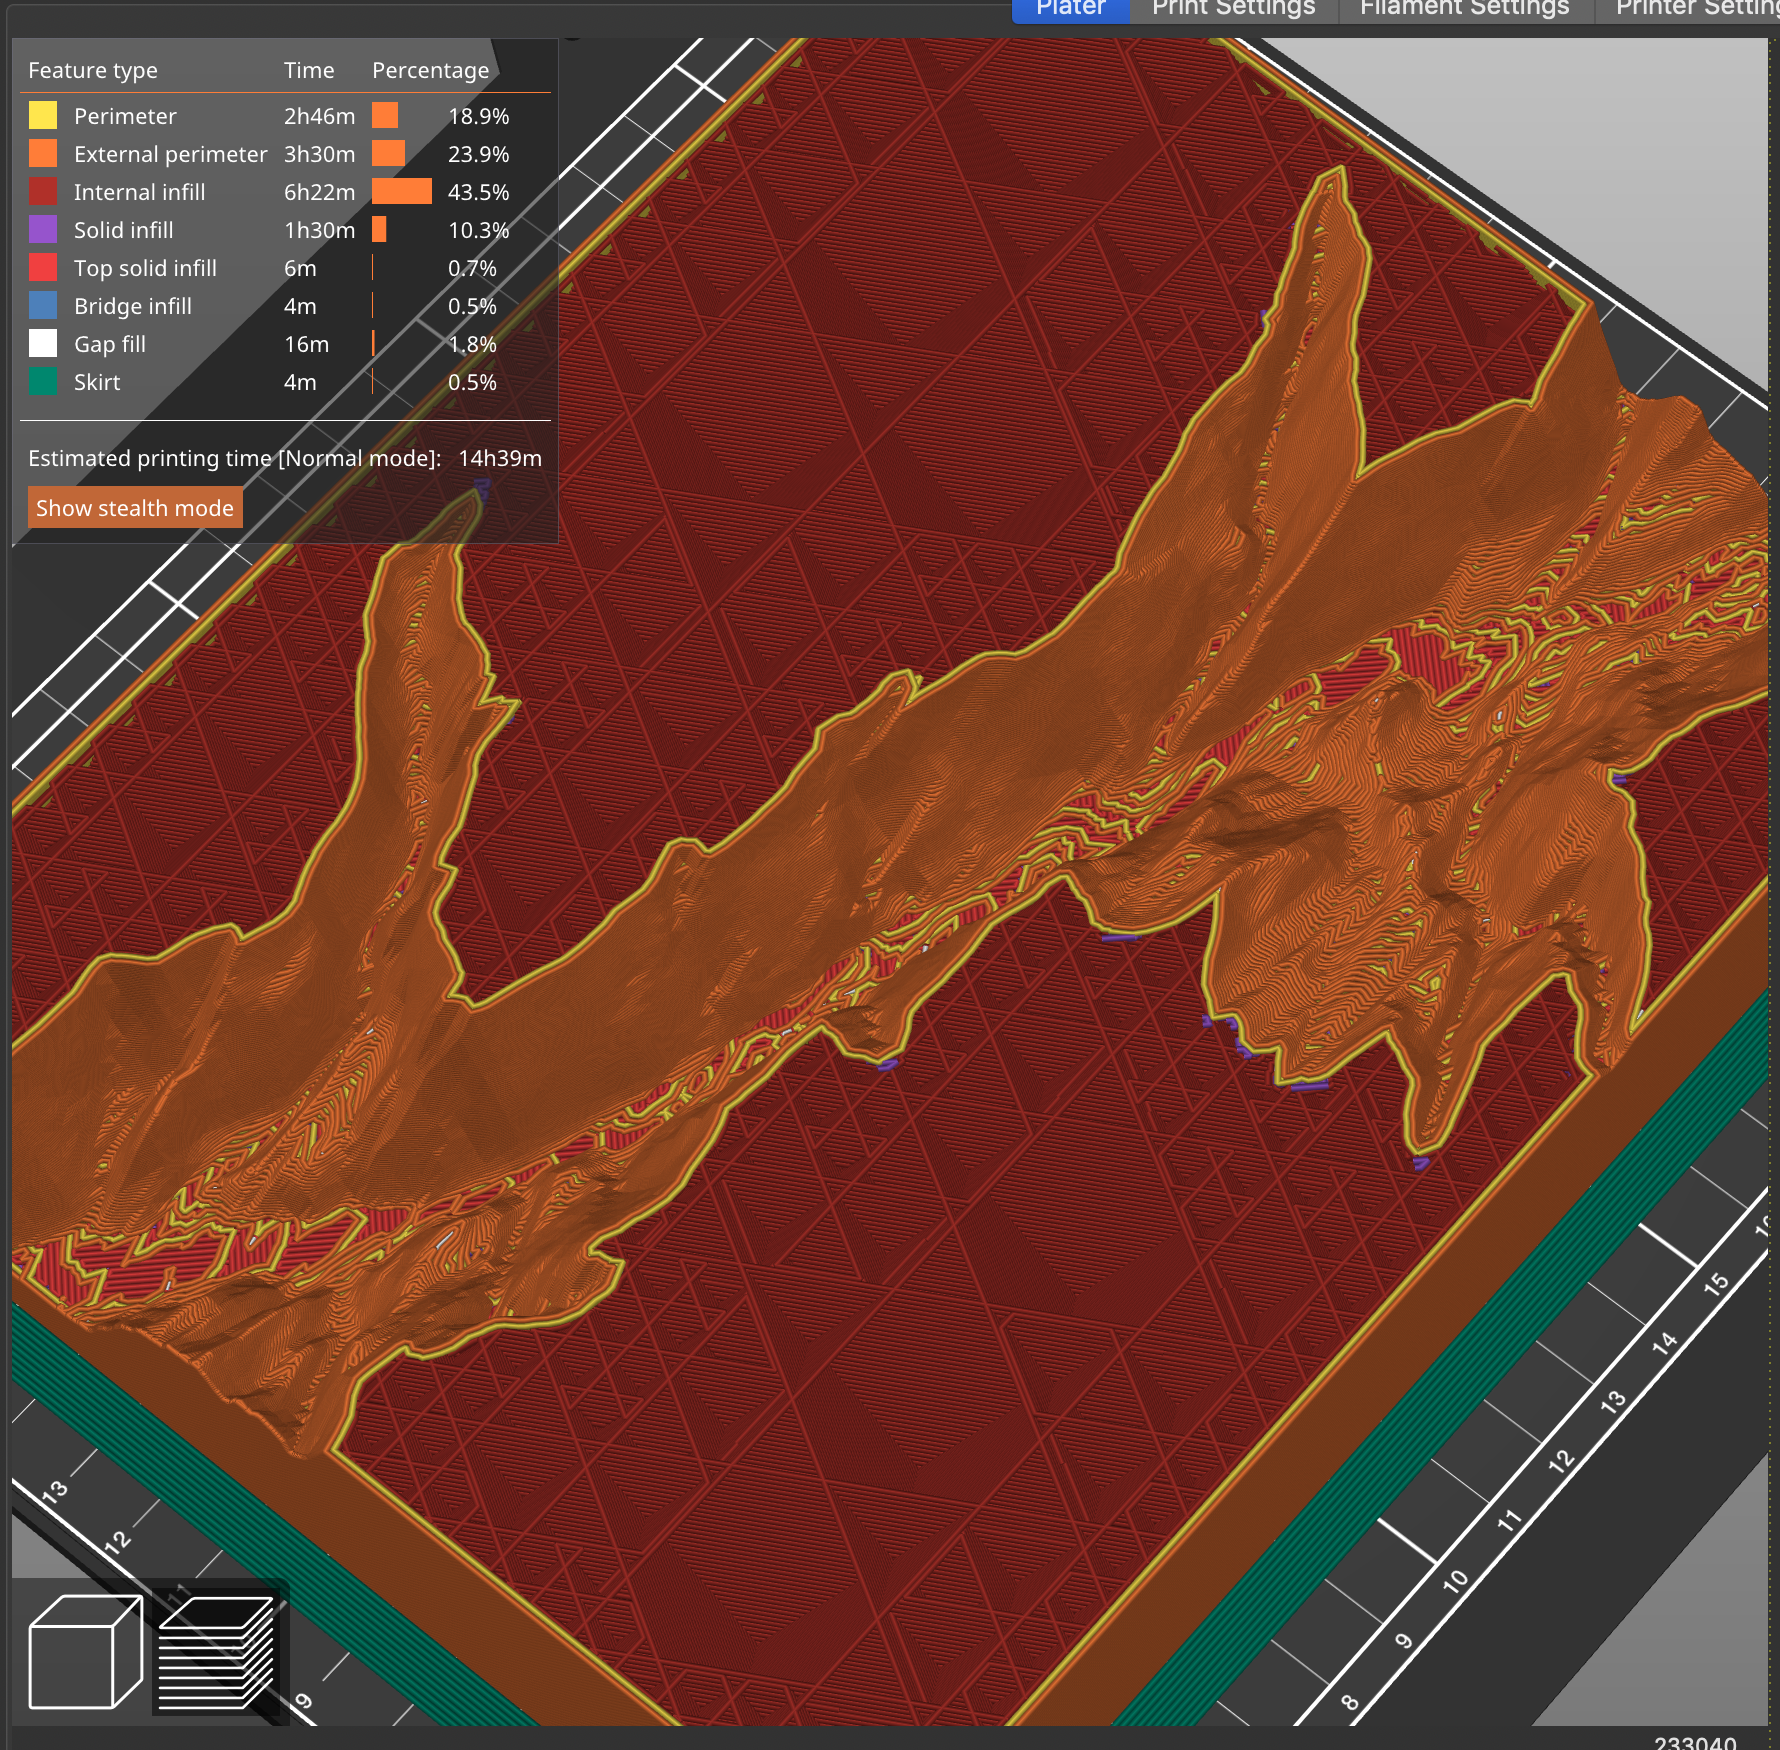
One last one, promise. I changed all extrusion widths to 0.8mm. Print time is estimated at 14h39m. I really like the infill support for the exterior walls. Thinking about your original issue and looking at the preview, there was very little supporting your vertical walls. Did the walls flex? PLA is not very strong for tall, thin walls. I think this will be much stronger:
RE: Layer separation on large print
@bobstro
This info is great - I haven't changed most of these parameters because I don't understand exactly what they do. My questions in bold.
- The lower layer heights provide better vertical detail and should also improve perimeter inter-layer adhesion. I thought the thicker layer height was one of the advantages of a .6mm nozzle - because there are fewer layers. Still overall you've reduced print time and I do understand it should improve adhesion.
- The wider extrusions should also improve inter-layer adhesion. Increasing too much reduces detail, but you are probably OK with using 0.8mm wide extrusions for this sort of print. Reducing detail may be OK - essentially this kind of art (like photography) starts with something realistic and then is abstracted or modified. In 3d sculpture I often reduce the number of STL's so the triangle are visible.
- The use of higher infill density increases support and overall strength of the print. My concern in increasing it was that it would contribute to higher thermal stress.
- The use of Cubic Support infill pattern increases infill near the top, while using less density near the bottom.
- The new infill pattern, increased infill density, and removing "only where needed" made infill printing much smoother, consistent, and faster.
- Combining every 2 infill layers only prints infill every other layer, so at 0.48mm layers. Still below 80% of your nozzle height, so you will get well-formed extrusions (esp. with wider extrusion widths). Higher than your previous 0.35mm height, so faster printing. You can do this because you're using a lower layer height with a larger nozzle. I don't understand combining infill - I thought combining every layer would give the greatest strength. Have to read up on this to understand it better.
Again thank you for your comments and suggestions. I've been printing for over 3 years and there is still lots to learn!
RE: Layer separation on large print
@bobstro
Re your last comment: the walls are very solid. I've had great success using Gyroid for infill. It's very solid in all dimensions -- I've done some as low as 5% with PLA. 10% is my default unless there is a reason for particular strength.
Vakil
RE: Layer separation on large print
Warping with cold weather that is possible the problem.
Heat up your room where you print,
let printer heat up before you print, put a temperature meter in the printer(I have a enclosure) to see what temps it is, and if it could be temperate problem.
If you are printing in a cold room, put a box around the printer to keep cold air/wind of the printer.
The enclosure, normally with pla I leave the door open, but wen it' s cold a leave it only open a little(first few minutes I leave door closed to let it heat up).
Could be the pla , try different brand.
Better sticking to bed is important:
Clean bed with dish soap, and use glue stick, and adjust first layer to be 100%(very important for sticking).
RE: Layer separation on large print
For a enclosure you can also use a photo tent.
RE: Layer separation on large print
[...]
- The lower layer heights provide better vertical detail and should also improve perimeter inter-layer adhesion. I thought the thicker layer height was one of the advantages of a .6mm nozzle - because there are fewer layers. Still overall you've reduced print time and I do understand it should improve adhesion.
Yes, the ability to use higher layer heights for faster prints is a decided benefit to a larger nozzle, along with the ability to use wider extrusion widths and eliminate printing a perimeter. The downsize to larger layer heights is reduced vertical detail. I noticed you were using a layer height of 0.35mm, so you were staying below the maximum you'd usually want for a 0.6mm nozzle of 0.48mm. I assume that was for print quality. Higher layers can also make inter-layer adhesion trickier. Using a lower layer height for perimeters but printing 2 support layers at once is a way to balance all of this. Perimeters will print lower and slower, but infill -- which you've got a LOT of -- will print at 0.48mm instead of 0.35mm, so will print faster. Better resolution and a faster print!
- The wider extrusions should also improve inter-layer adhesion. Increasing too much reduces detail, but you are probably OK with using 0.8mm wide extrusions for this sort of print. Reducing detail may be OK - essentially this kind of art (like photography) starts with something realistic and then is abstracted or modified. In 3d sculpture I often reduce the number of STL's so the triangle are visible.
You might try a 0.8mm nozzle then. I find anything larger than 0.8mm is a bit of a waste on a Mk3, but 0.8mm is great for big prints like this. You can use extrusion widths at up to roughly 200% of your nozzle size if you're using good quality nozzles. Just for fun, try a 0.8mm nozzle with a 1.3mm or wider perimeter width and only one perimeter. I've been doing this for tabletop scenery pieces and it's working well. One very wide perimeter is very strong.
- The use of higher infill density increases support and overall strength of the print. My concern in increasing it was that it would contribute to higher thermal stress.
This is one I haven't experimented with. The adaptive infill patterns are very sparse at the bottom, so may not add much overall. A lot will depend on your environmental conditions.
- [...] Combining every 2 infill layers only prints infill every other layer, so at 0.48mm layers. Still below 80% of your nozzle height, so you will get well-formed extrusions (esp. with wider extrusion widths). Higher than your previous 0.35mm height, so faster printing. You can do this because you're using a lower layer height with a larger nozzle. I don't understand combining infill - I thought combining every layer would give the greatest strength. Have to read up on this to understand it better.
As long as your extrusions are wider than tall, you'll get a good "squish" for adhesion. You want that oval extrusion cross-section so there's lots of contact between layers. So long as I can combine infill layers and stay below 80% of the nozzle size, it should still be strong. Keep in mind, infill doesn't contribute as much to strength as perimeters, so I don't count on infill for anything more than support for top layers.
Again thank you for your comments and suggestions. I've been printing for over 3 years and there is still lots to learn!
Definitely experiment. I've been able to cut 24+ hour scenery prints down to 7-10.
I've got notes on nozzle sizes here, and maximizing print output herethat might be interesting.