Improving outer (inner) part of a print
Today I decided to print https://www.thingiverse.com/thing:1294085 which overall took 8 hours or so for all 4 parts.
I printed it with filament-pm PLA+, using the PLA profile and 0.2mm quality setting in Prusaslicer - all prints so far I've done with this combo have come out perfectly fine.
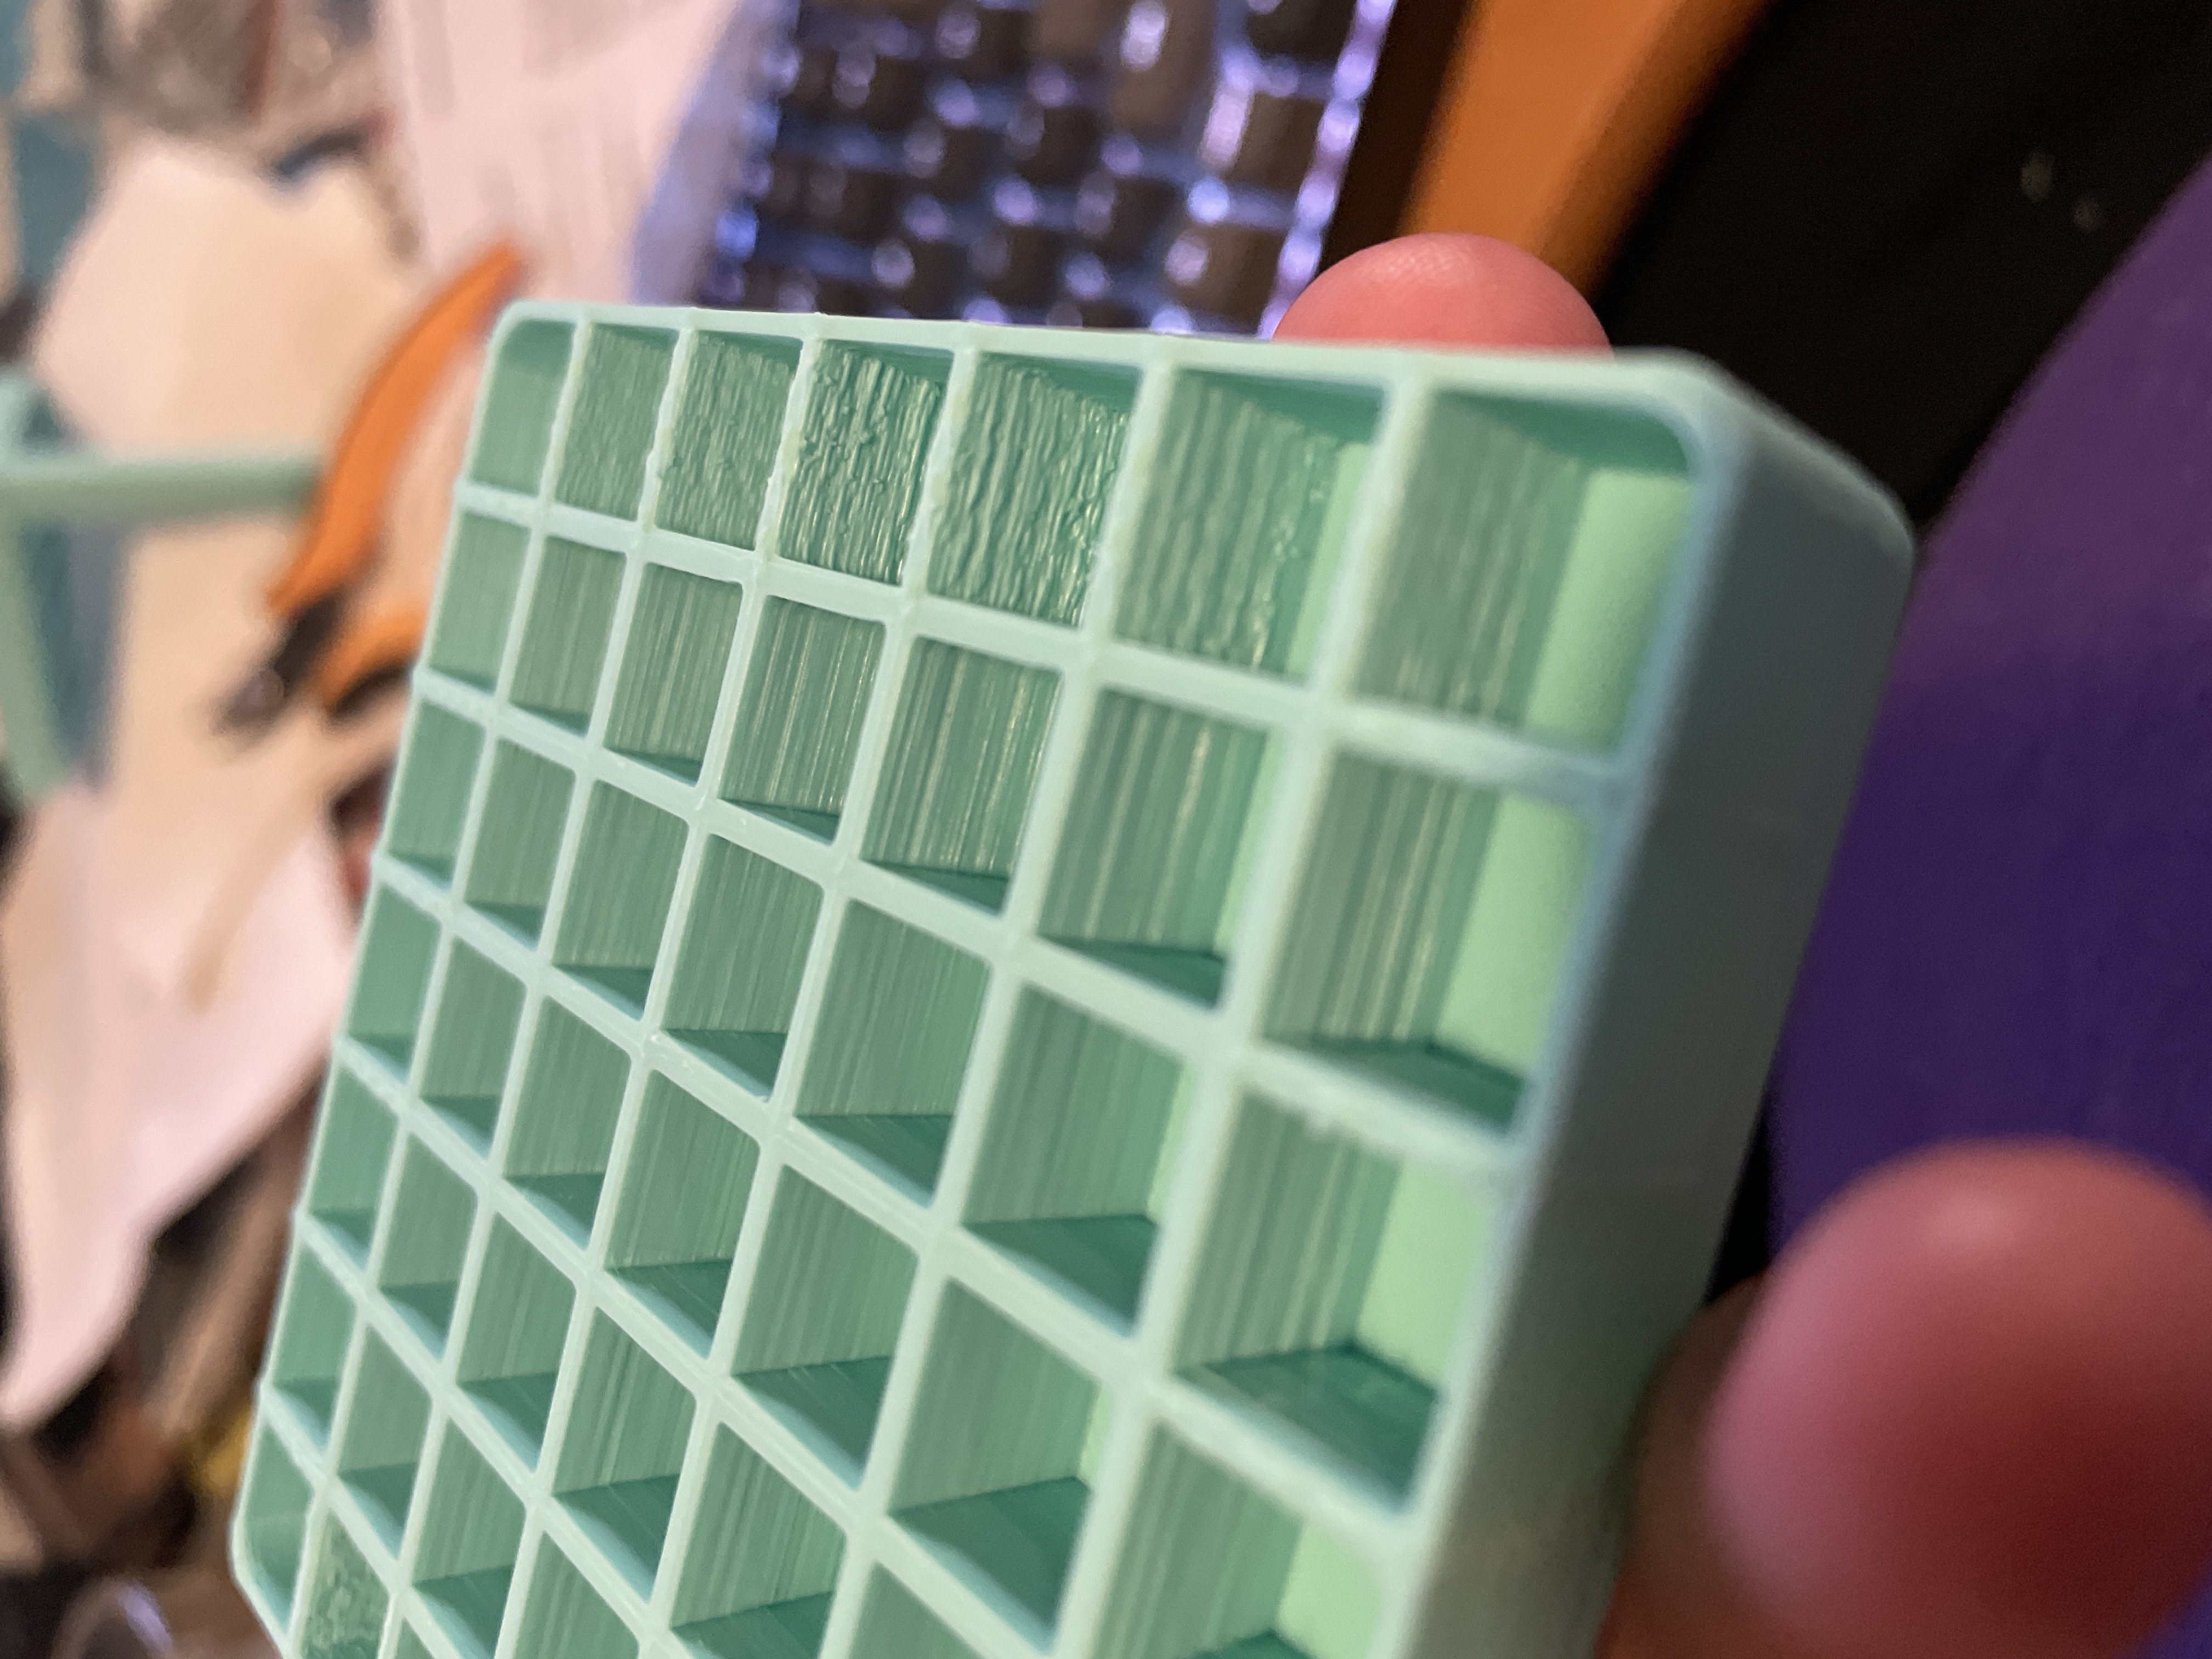
However, I saw today that the outer "layer" of boxes, the perimeters don't really look that good, they become "wobbly", as you see in the picture.
Is there any way to avoid this, without prolonging the print extensively? What I realized during the print is that the inner squares are printed in a quite different sequence than the outer "layer", and the boxes in the outer layer seem "quicker" (in terms of moves) than the inner ones.
It happened on both the pieces (bottom and upper part), and while everything fits nicely together, it just doesn't look as good as I had hoped for.
Do anyone have any suggestion to what can be done, to keep the outer layer lines as nice as the inner ones, are there any settings I can use where the movements will result in maybe a "smoother" finish?
I first thought it could have to do with temperature, so mid print I lowered the nozzle temps from 215C to 200C, and quality did not change (for better or worse).
As shown in the image, the inner boxes look quite okay, and then gradually becoming worse (to being really bad) in the outer layer, the same is the case for most boxes.
What I can see in the slicer preview, is the fact when the nozzle does the perimeter back and forth on the same line right after each other (instead of a square), then it seems to cause the bad quality.
What I mean is when it does this:

Image of the result:
Thanks in advance!
RE: Improving outer (inner) part of a print
sure looks to me like you either have a belt tension issue, or possibly a wobbly pulley (not tight on axis motor shaft). If you want it to trace external perimeters first, you can certainly ask for that in the slicer.
RE: Improving outer (inner) part of a print
sure looks to me like you either have a belt tension issue, or possibly a wobbly pulley (not tight on axis motor shaft). If you want it to trace external perimeters first, you can certainly ask for that in the slicer.
Running the belt test comes out with the numbers:
X: 232 -> 233
Y: 269 -> 268
Additionally, the pulleys are tight and not wobbly.
(This is a pre-assembled printer, less than a week old).
With that said, wouldn't it be an issue with all prints then? Even larger prints than this (with a large square surface) turned out perfectly fine. It's *only* happening when the nozzle does the very specific movements as in the gif above.
RE: Improving outer (inner) part of a print
It looks like it is laying down Fill infill - if you don't like the way the slicing came out, or want to change the perimeters - you can try increasing perimeters, or setting fill infill speed to zero - which disables that line ever being added (will leave a hollow instead).
There's a physical belt tension tool from Prusa that you can download - it's on the print library.
The specific lines (grid) above consist of two things (as shown in the gif as well, but again below):
- External perimeters (1 line on each side)
- Perimeter (1 line)

I don't think "Fill infill" is in use for perimeters or external perimeters, or would make any difference in this case.
The belt tension numbers to me, look alright - the X-axis, is slightly tighter than Prusa's documentation, but I assume when the system comes pre-calibrated and with the right tension from Prusa, that the value of 232-233 is seen as "OK".
The Y-axis is 268-269, which is within the documentation Prusa put on their site (That it should be somewhere between 240 and 300). The tension thus should be pretty much on point.
So what would the physical belt tensioner be good for, when the tension is as it should be according to Prusa's documentation (and pre-calibration)?
RE: Improving outer (inner) part of a print
[...] However, I saw today that the outer "layer" of boxes, the perimeters don't really look that good, they become "wobbly", as you see in the picture.
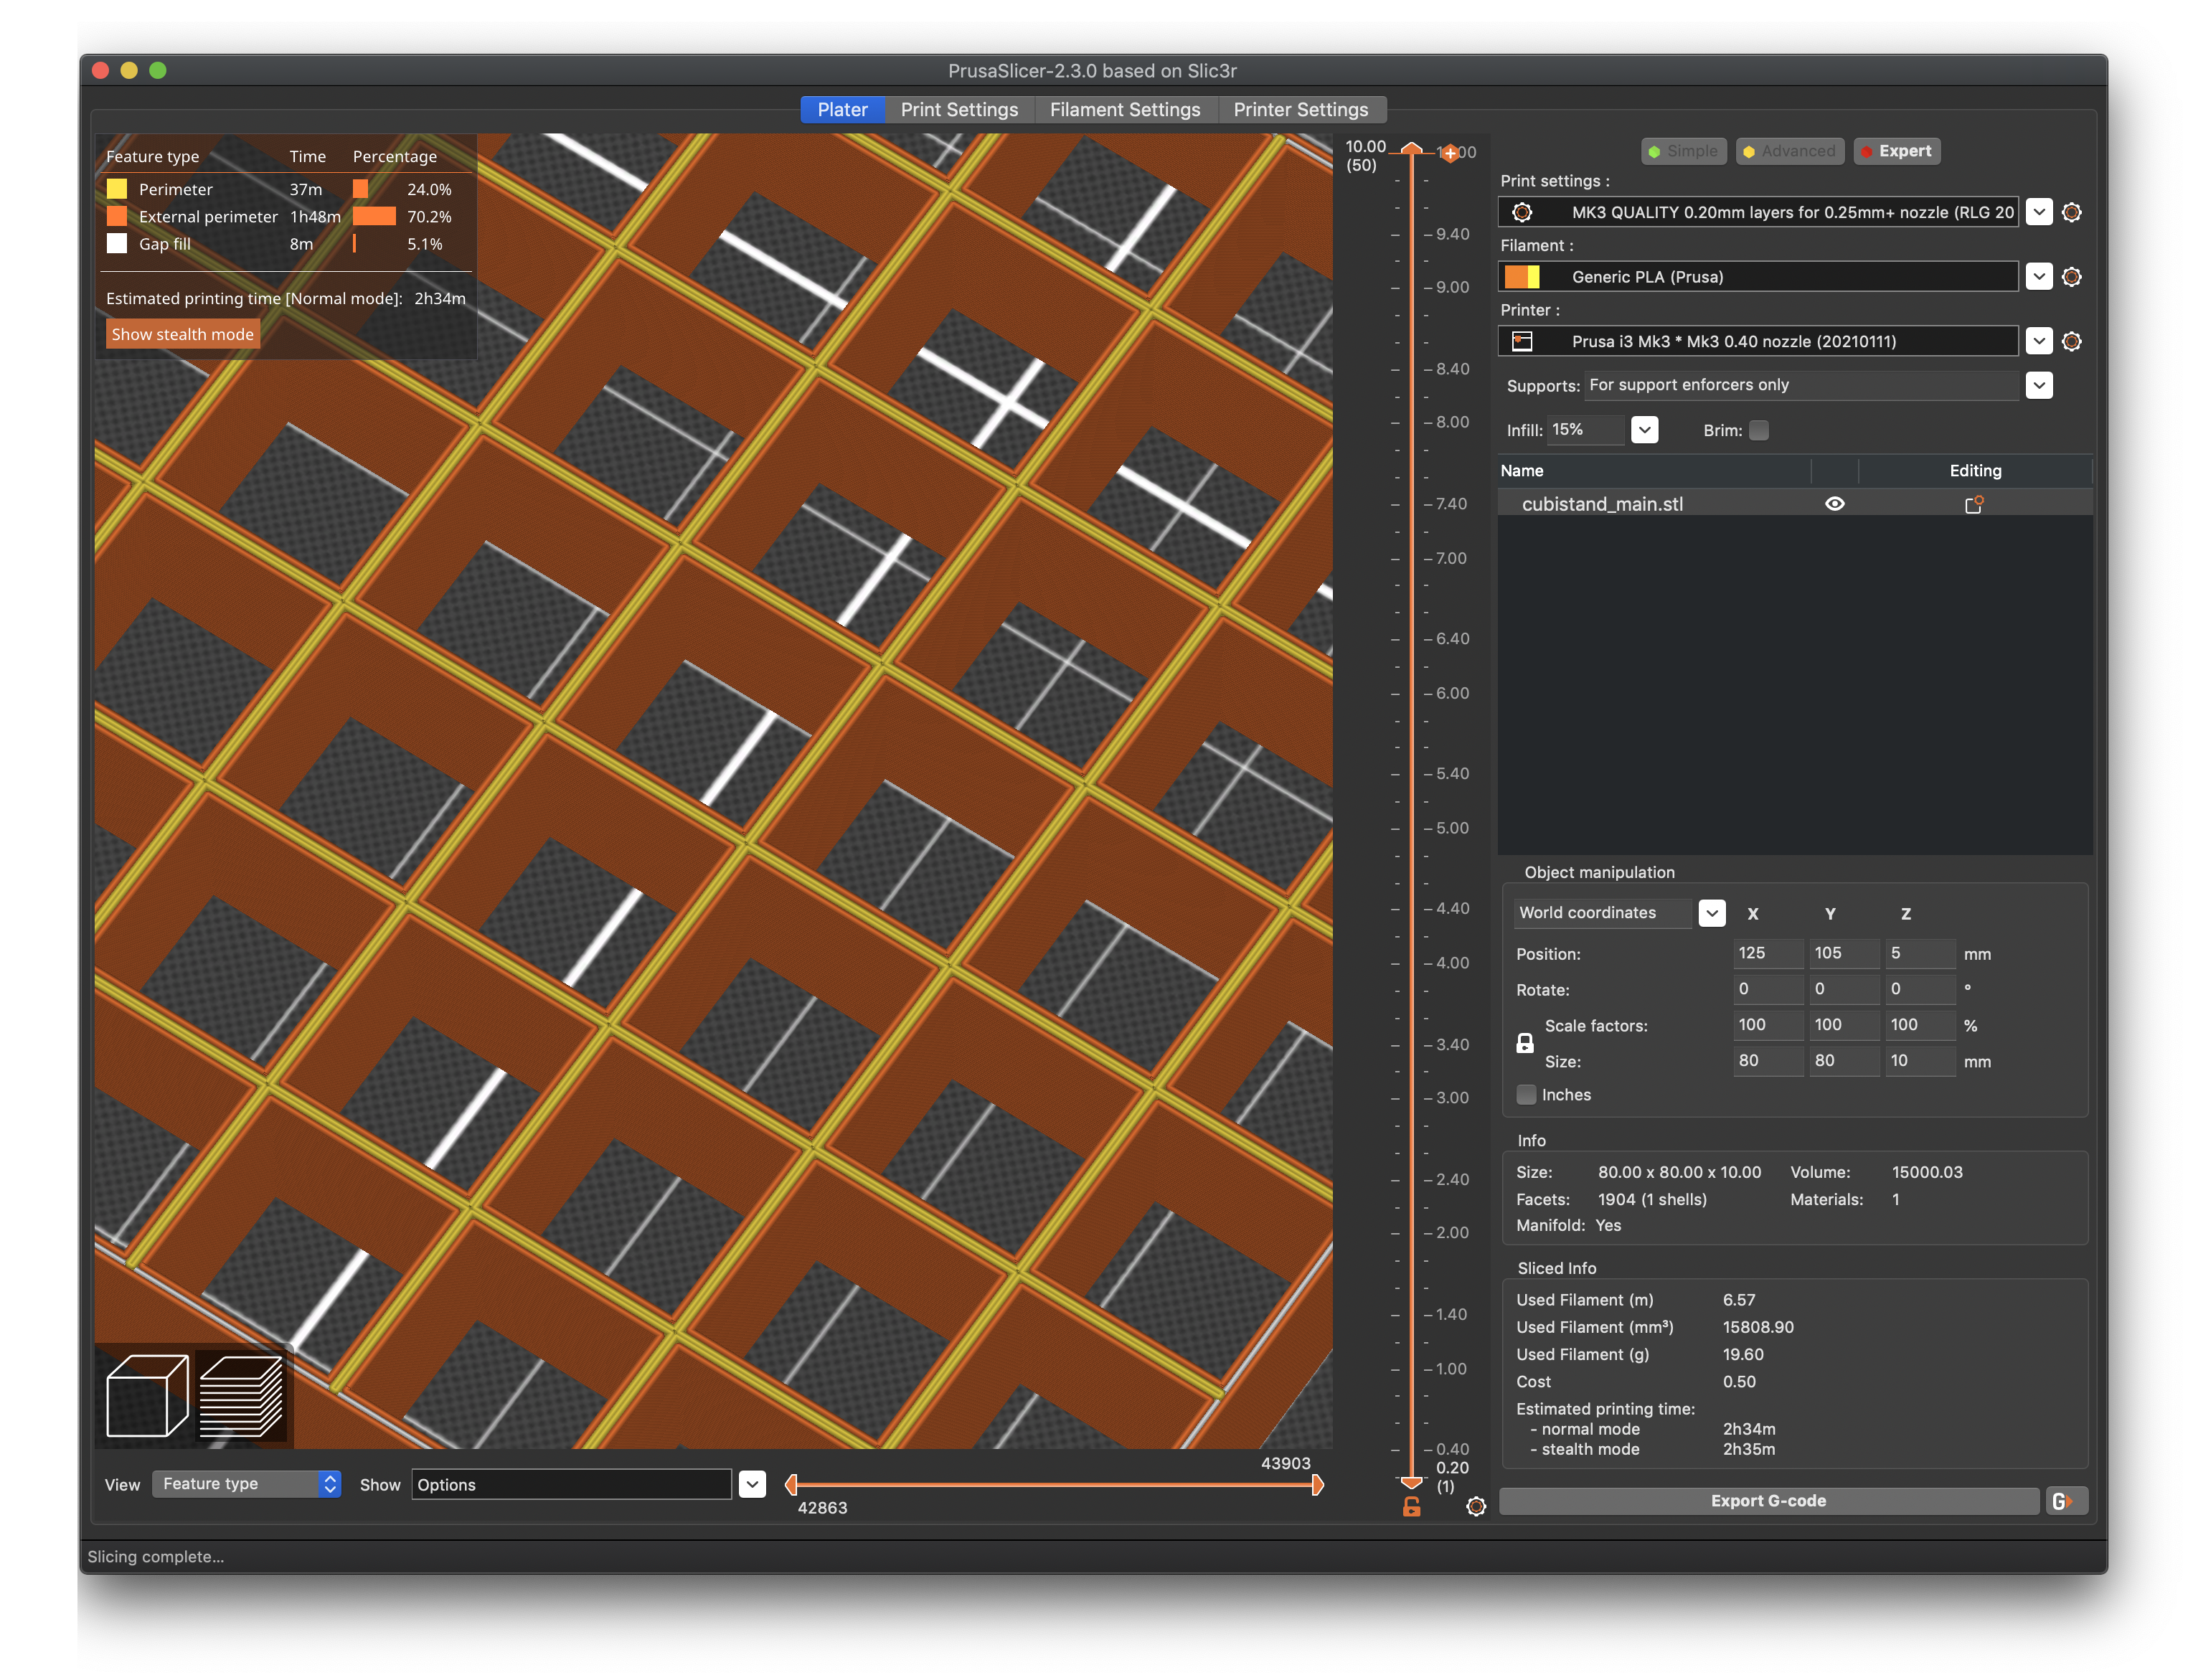
What you are seeing is the perimeters being printed first, with the orange lines representing external perimeters (normally printed last) and yellow lines representing internal perimeters (normally printed first -- none in this example). The white lines represent gap infill that is printed after all perimetrs to fill remaining space if enabled. The reason the outer walls probably appear to print faster is that perimeters print faster than external perimeters, and external perimeters may print faster than gap fill. The internal part of that print is all external perimeters and gap fill. Here's what I get slicing that part.

A few notes:
- Normally, you want prints to proceed inside-out to provide stability as perimeters are added. In this example, the perimeters and outer perimeters are being printed first, but since there's a gap between them due to extrusion size, gap fill is used after the perimeters print. There's not really a setting to control this order.
- I've used 4 perimeters with this example, so increasing them further won't help.
- Removing gap fill will leave us with fragile walls and compound our problems.
Is there any way to avoid this, without prolonging the print extensively? What I realized during the print is that the inner squares are printed in a quite different sequence than the outer "layer", and the boxes in the outer layer seem "quicker" (in terms of moves) than the inner ones.
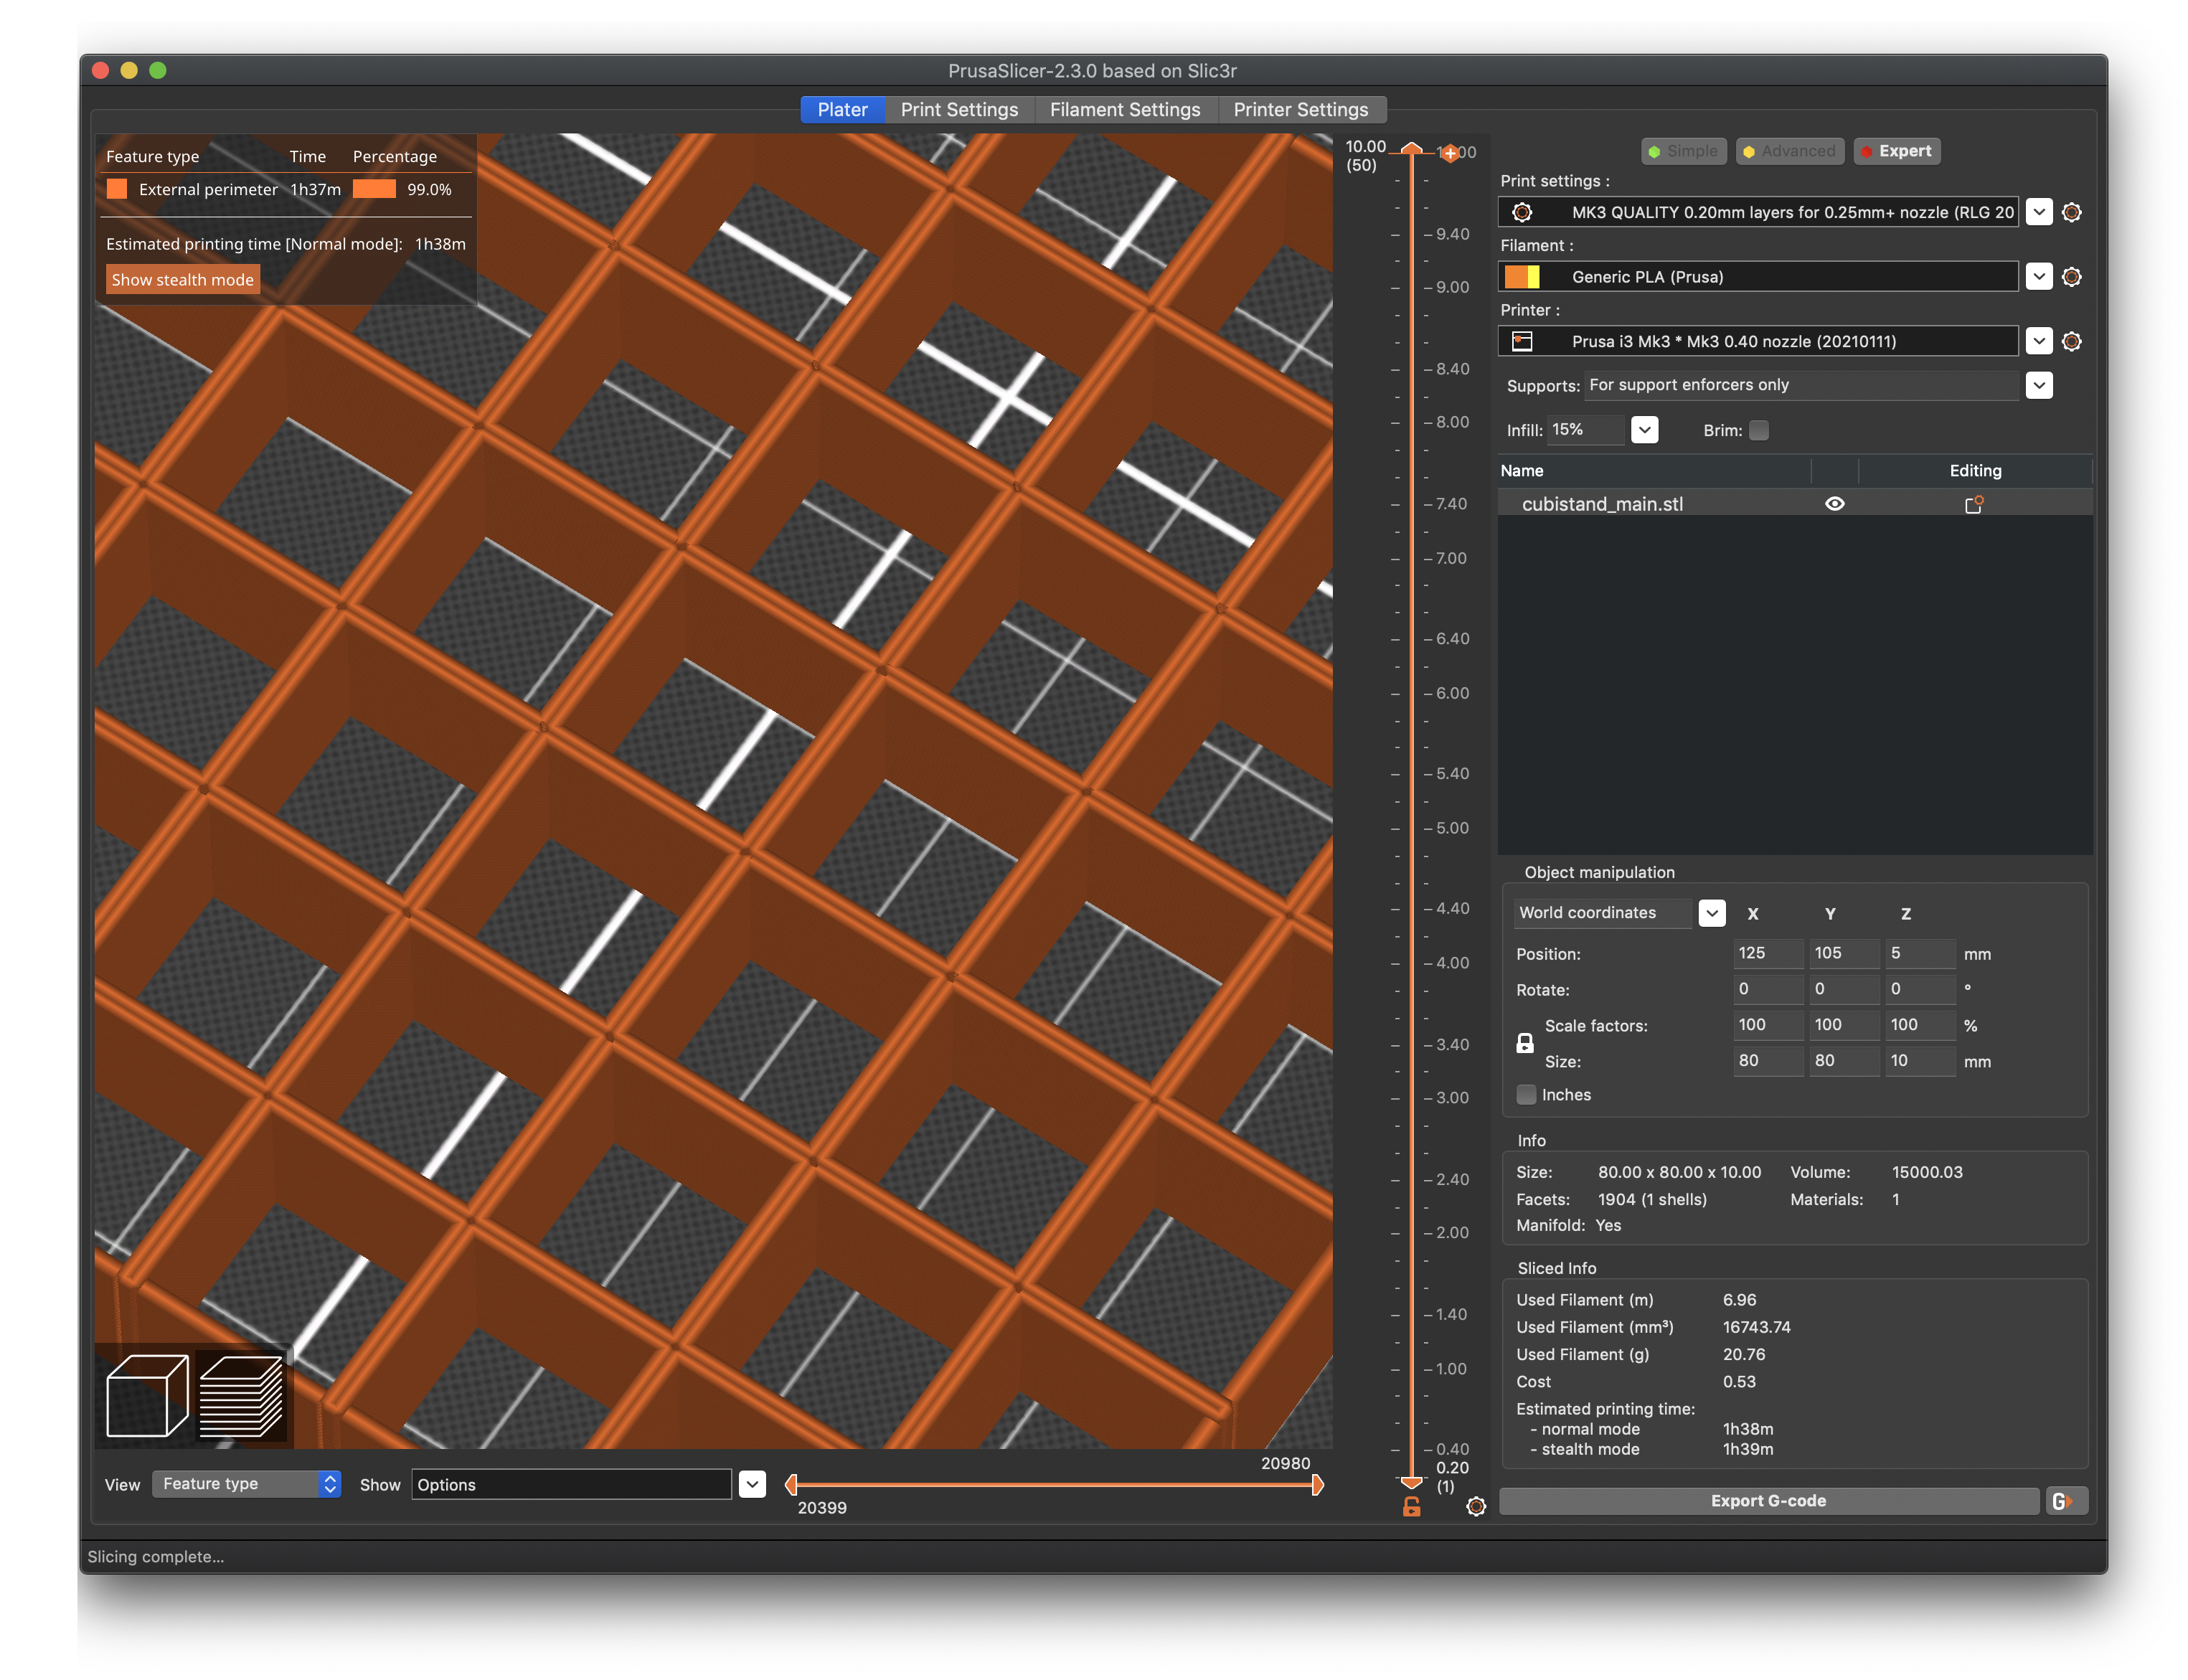
A lot will depend on the specific print. In this case, a simple tweak to adjust the perimeter and external perimeter widths to 0.4mm fixes the problem.
The inner walls all consist entirely of perimeters and external perimeters, so should be strong and print with better quality.
In this case, going smaller with extrusion widths helped, but you do wind up with 4 extrusions per wall, which is going to take longer than 2 perimeters plus gap fill. You can go the other way, and use chonky external perimeter widths. Here I used 0.8mm. (You can usually go up to 200% of nozzle width and get decent results provided you use quality nozzles.)
At some point, you may want to quit messing around and go with larger nozzles. Here's a 0.8mm nozzle printing at 1.5mm extrusion widths.

Whether this gives you the aesthetic finish you want is up to you. Combined with larger layer heights, a larger nozzle moving at slower speeds will still complete a print more quickly than a smaller nozzle at faster speeds printing 2-4X the number of perimeters.
Much of this depends on the design of the part you're printing. If you're designing your own parts, consider your print parameters to optimize speeds instead of the other way around.
RE: Improving outer (inner) part of a print
@bobstro
Thanks! What a detailed reply! I'll give the above things a try - I just found it overall odd, that the inner boxes all look fine, except the majority of the other ones (depending on the nozzle movement), and it made me a bit disappointed - it was my first longer print (lasting more than 4 hours), and all prints so far with my Prusa MK3S+ has all been stellar.
There's for sure a lot to learn, and every day learning something new!
RE: Improving outer (inner) part of a print
Glad it's helpful. Many of the STLs posted aren't fully optimized for 3D printing or may have been designed with different parameters in mind. I always like to study the print when printing big things and see how to tweak print times and quality before committing time and filament to a big job. You can often find a good solution by tweaking a few common settings. Have fun with it!