Cant seem to get this right - Tesla Cybertruck print
Hi there! I am quite new to 3D Printing, just a couple of months. Now I am trying to print this Cybertruck.
I am using 3D Jake Eco PLA on my Prusa MK3S with the smooth sheet. I am cleaning the sheet very well with pure alcohol and some pads that leave no residue.
I already tried to print one of the parts (the bottom two black parts). Both failed, the first fail ended up in a spaghetti mess, the second was printing quite well and suddenly one of the parts got lose and then I had to cancel the print 🙁
First Fail:

Second Fail: The print was going quite well, and then I heard the first element to start being lose.

Then I tried again: And Noticed that the Brim quality was really bad and it was lifting.

So I decided to print a 3x3 inches square I use for calibrating the Z level:
Based on this test I chose to adjust the config from 700 to 710. But same horrible results of a poor brim quality happened. Even tried to make a bigger brim 15mm as I read in the forums that this would increase adhesion for the pieces.

I am really not getting what the problem might be. I am using everything by default in Prusa Slicer 2.2.0.
0.20 mm speed. Generic PLA, 8% Infill and Brim.
I post some config screenshots if it helps:


Thanks a lot for your guidance to understand the issue and how to fix it 😉
RE: Cant seem to get this right - Tesla Cybertruck print
Another update, third try also failed, this time even more advanced in the progress, this is VERY annoying.
I am wasting so much time and filament that its ridiculous. 😓
I dont get it why this thing gets detached from the bed even with a 15 mm brim.
Check the video here: https://photos.app.goo.gl/3MgjecB2tDexHZ226
RE: Cant seem to get this right - Tesla Cybertruck print
From your pics I can still see steaks on the bed. That means it’s not clean.
Take your build plate to the sink and wash it with unscented dish soap, such as dawn or fairy and Very hot water. Scrub it with a paper towel and rinse well with lots more hot water. Then dry it off with more clean paper towel. Don’t do anything else, no ipa etc. Avoid touching the bed once clean to stop getting any more finger oils on it. Some filaments can over time also leave a residue on the pei making it less effective. When that happens many of use will use the green side of a new dish scourer and lightly scrub with that occasionally at the same time as the detergent.
Then print making sure your first layer z height is correct. Pla will stick believe me.
Ipa and other alcohols will dissolve any grease and spread it around in a thinner layer. Some will go on the towel but a lot will stay on the bed. A detergent will remove all grease and oils leaving it really clean.
RE: Cant seem to get this right - Tesla Cybertruck print
Bring the nozzle down. You're still way too high (Live Z, first layer).
Often linked posts:
Going small with MMU2
Real Multi Material
My prints on Instagram
RE: Cant seem to get this right - Tesla Cybertruck print
Thanks for the tips folks! I am adjusting Z and I was definitely too high. I am making another test to print only one of the parts. I will keep you posted.
RE: Cant seem to get this right - Tesla Cybertruck print
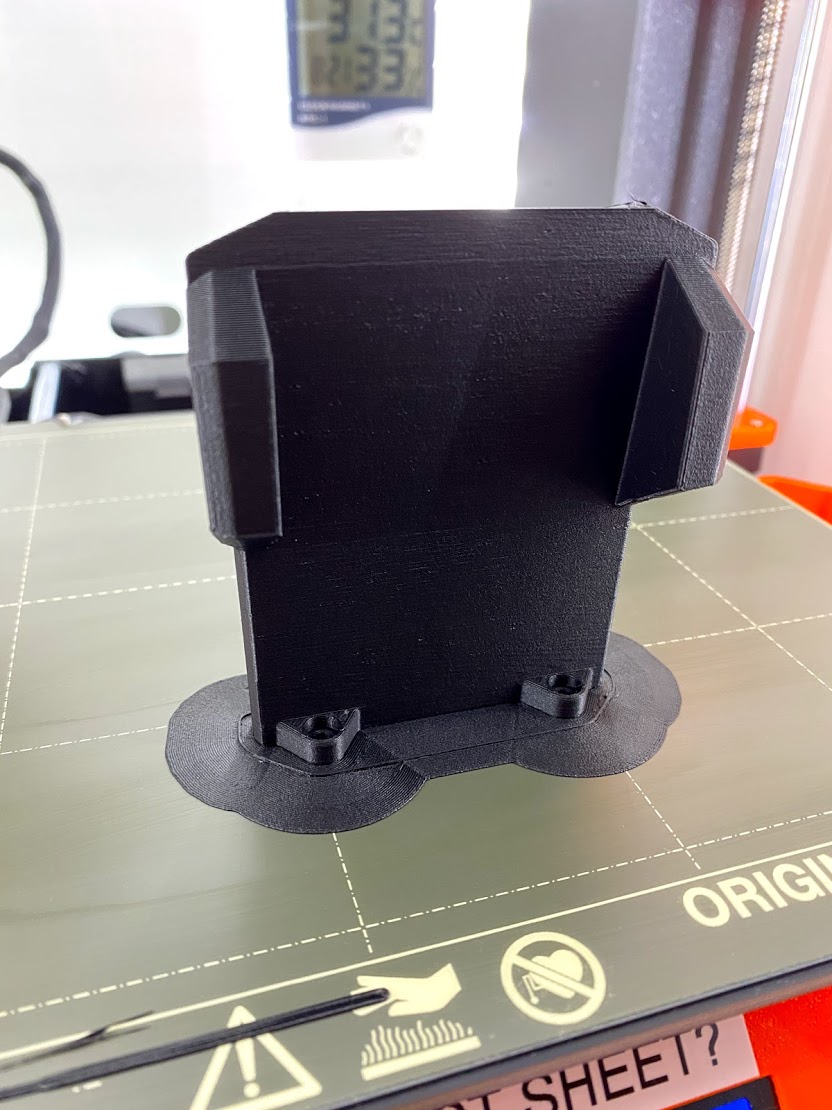
Folks, wanted to report back that the print finished very nicely compared to before.
It was all about adjusting properly the Z Level.
What intrigued me is that on the 3x3 alignment test I used, the layers look much better than on the Brim of the model. But now everything is super tight together which is what I was supposed to expect. The day Prusa figures out how to do the Z Level calibration 100% Automatic, 3D printing will become way more easy for many people 🙂
Thank you for your support!
Below a picture of the model and here a video with the time lapse if you are interested 🙂
PS: If you think I still need to do some adjustments please feel free to suggest.
RE: Cant seem to get this right - Tesla Cybertruck print
Thats looking good 👍
What method did you use to do your z height ? The built in method is a bit rubbish. The method a lot of us use is this one https://forum.prusa3d.com/forum/original-prusa-i3-mk3s-mk3-assembly-and-first-prints-troubleshooting/life-adjust-z-my-way/
Basically you print a 1 layer thick 75mm square and adjust it as its printing back and forth. If you can peel it off afterwards and its a single sheet of plastic with the strands fused together and with no ripples/waves in the top (which means you are too low) then its good to go. Once you get the hang of it its very easy to do.
RE: Cant seem to get this right - Tesla Cybertruck print
Hi there, thank you for sharing, yes, I used a similar method with this file. He also has a nice YouTube video there showing how this works, which is good for newbies like me to better understand the expected result.