RE: Buldge when print reaches "solid" layers
I think the default LA settings are mostly right for my PETG. The corners are neither over or under extruded, unless going extremely slow. However, I've observed that setting Printer Settings -> Extruder Settings -> Extra length on restart to 0.2mm greatly improved the quality of seams when using External perimeters first.
I have a hunch that Linear Advance doesn't take retracts into account properly and miscalculates the nozzle pressure right after an unretract assuming it's bigger than it is. In fact, some of the early Linear Advance documents seem to recommend disabling retracts altogether assuming that LA will take care of not extruding filament on moves by itself. It should, if it worked fully as advertised.
RE: Buldge when print reaches "solid" layers
Hi
I have arrived here after a search. I'm having this exact same issue outlined in this thread - (ie external bulge when there is a solid internal platform), and a factory built and very little used MK3. I cant see clearly what settings i need to change in either the Slicer Slic3r PE ver 2 or the printer to eliminate this issue - and i'm not lazy i have read the thread - could anyone point me in the direction of the settings or a config file etc ?? Please. I am printing a 'valetine's' coaster with a internal solid base about 50mm from the bottom of the print and smooth curved sides. These show a slight ridge on the smooth curved sides where the solid internal layer occours. Its the same issue as discussed here. Thanks in advance.
Robert
The options with most impact are:
- Speed (the lower the better, down to 15mm/sec)
- Detect thin walls (enable, may result in extra seams on super thin walls)
- External perimeters first (enable, will result in worse looking seams)
- Infill/perimeter overlap (lower helps, but may result in gaps)
- Linear advance coefficient (tweaking, tuning, but usually the default is right)
Try to add them from top to bottom, #1 is safe, everything below has increasing possible negative side effects. #2 is probably what's going to fix it for you.
RE: Buldge when print reaches "solid" layers
Thank you sir, that is very kind of you to summarise for me and much appreciated. I will make those changes in order you suggest in the slicer and re-run the print and let you know how it proceeds.
Robert.
RE: Buldge when print reaches "solid" layers
Hi, tried option 2 as suggested, at normal speed, artifact still exists. I will try again tomorrow at a slower speed and advise on the results. Thank You
RE: Buldge when print reaches "solid" layers
If you go slowing the print down, also disable the variable speed in Flament->Cooling.
RE: Buldge when print reaches "solid" layers
Normal speed it too fast ...
One factor is when printing changes from a large surface area to a small area. The slicer has an automatic print speed slow down to allow intra-layer cooling. Turning this setting to 1 second from 20 helps in some cases. It also helps have a consistent sheen on the part perimeters. Also, in my tests slowing perimeters down to very slow print speeds helped most. 20 mm/s or less, and almost eliminated the artifact.
Also - go back and read through Bob's comments. He did a rather thorough job investigating and has a solution that works in even more conditions. His website also has all the detail.
RE: Buldge when print reaches "solid" layers


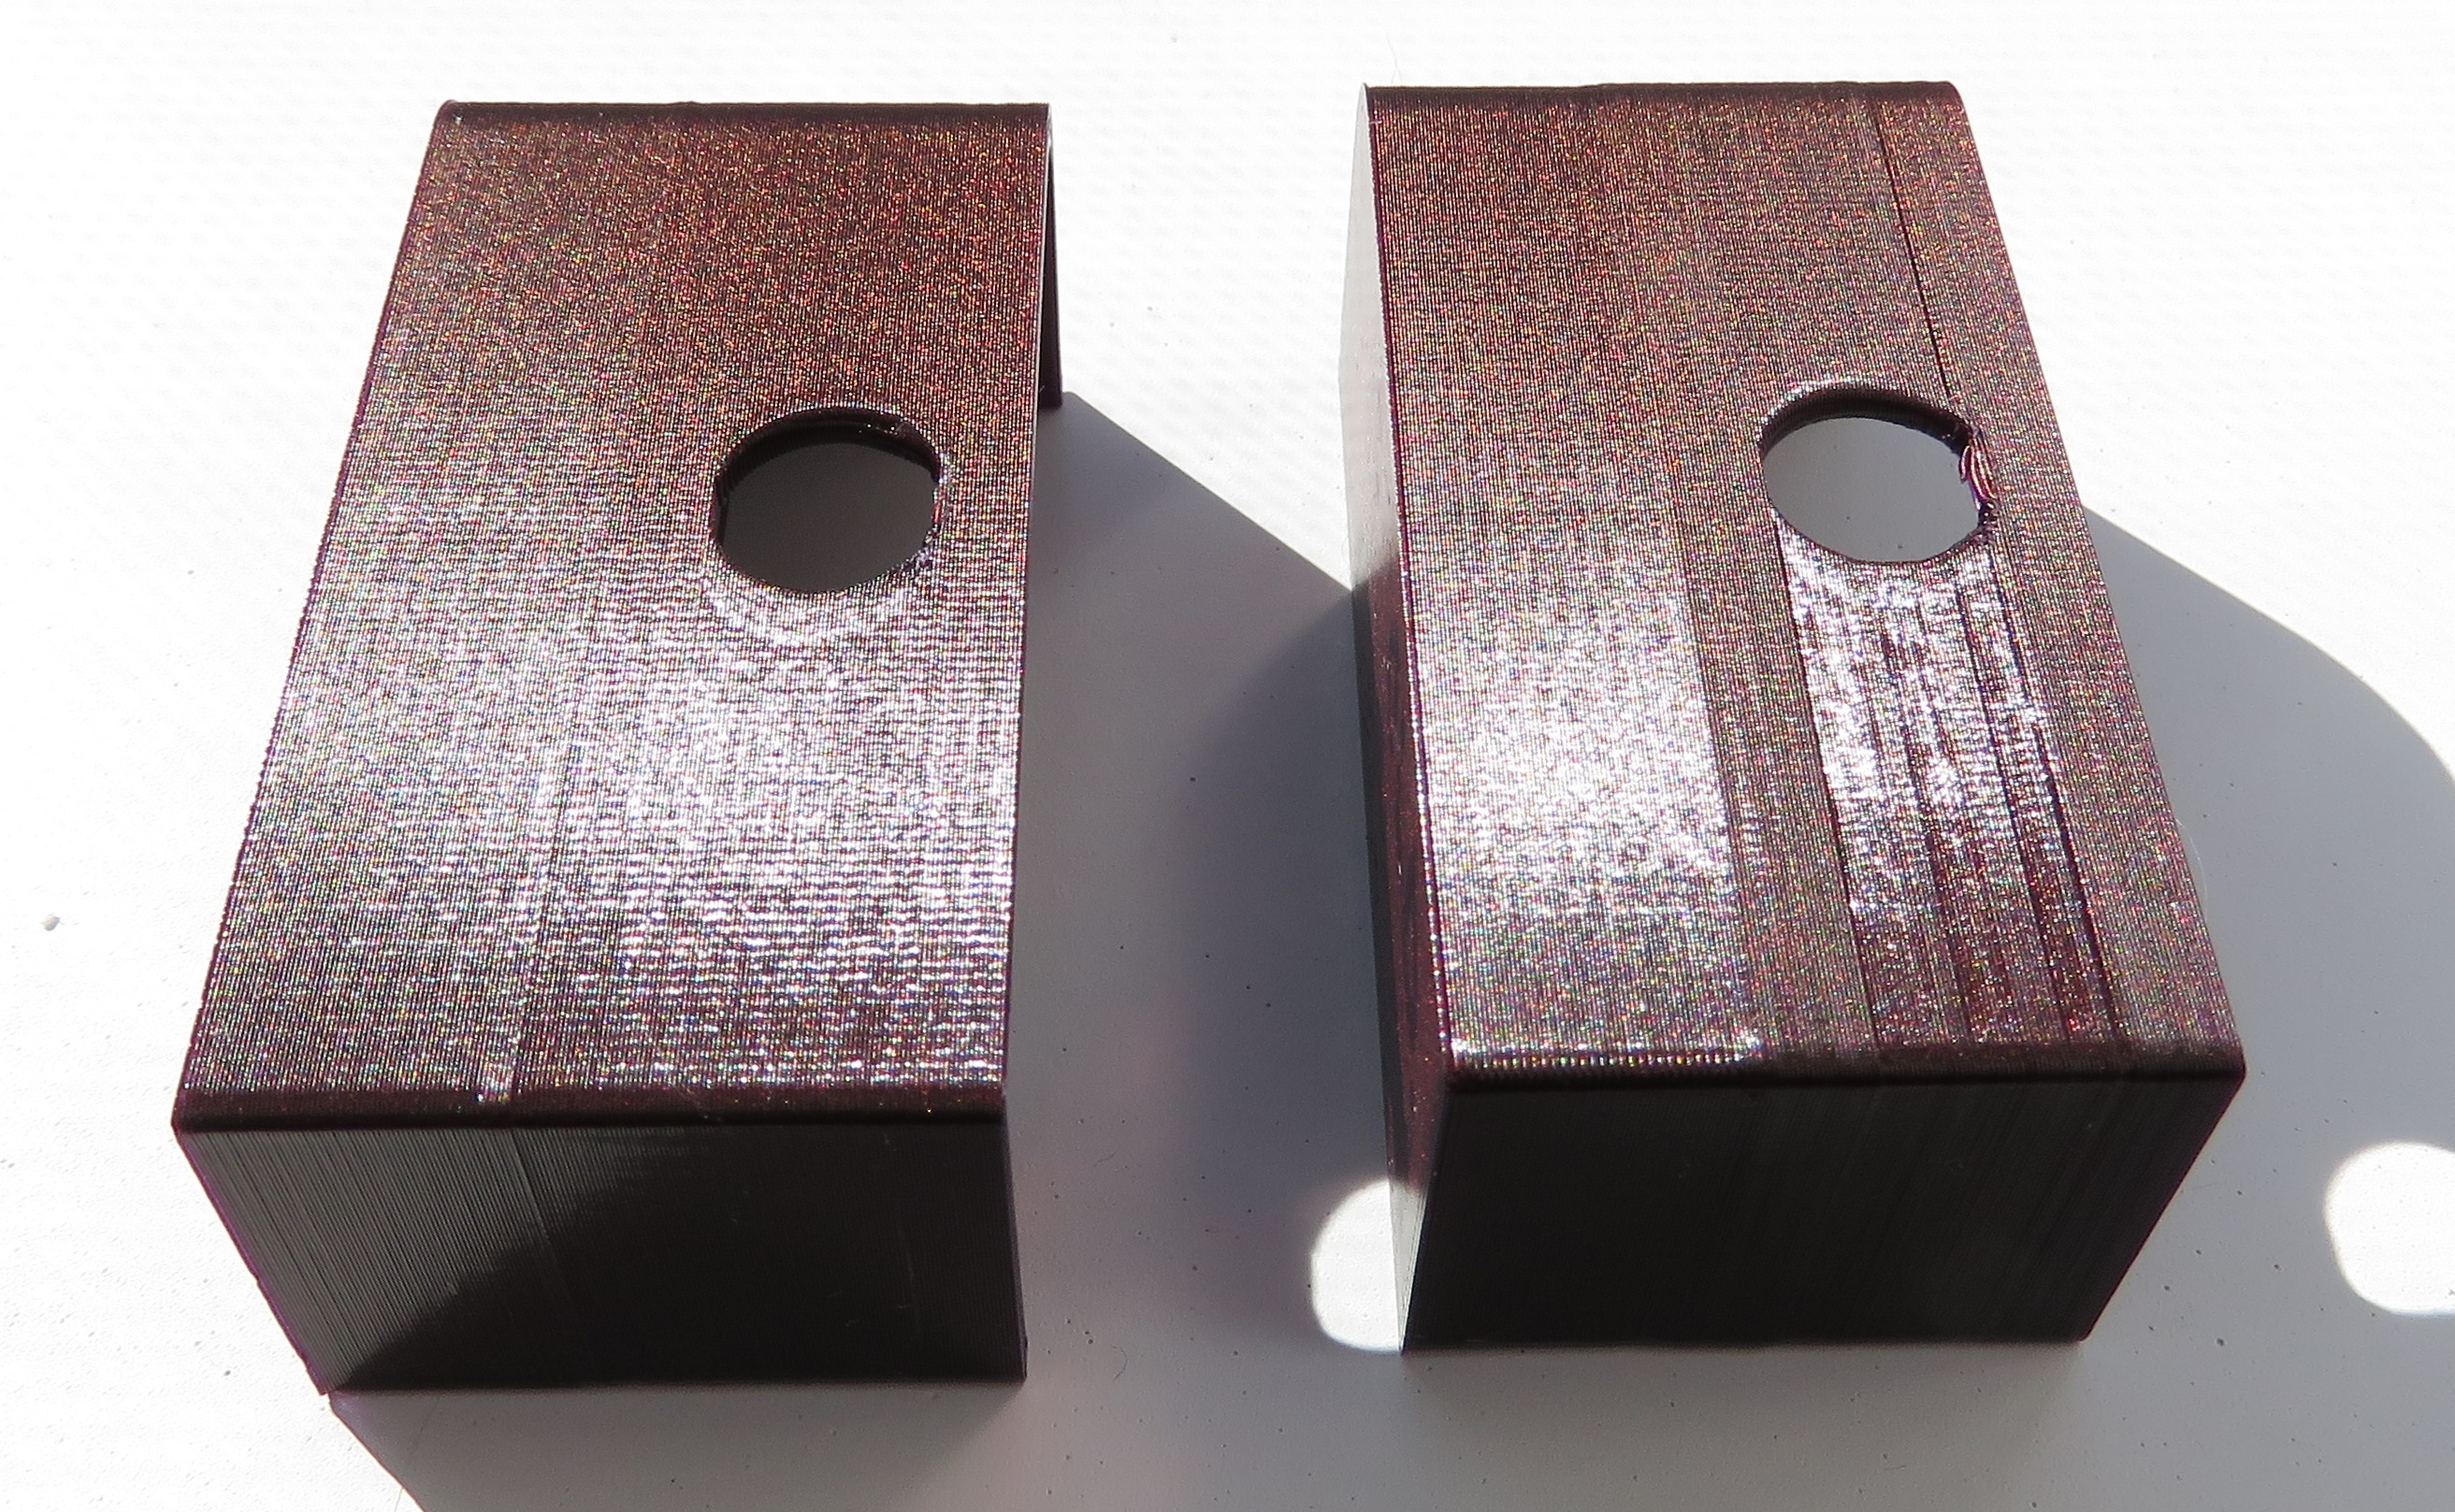
I also have the bulge going on at the top solid layers.
I've used generic PLA 0.15 with 15% gyroid infill. I do believe my generic PLA spool is affecting how large the buldge becomes.
My belt tension is X 231 and Y 268. Can you guys publish yours? In fact, I had problems with layer shifting which prompted me to tighten the belts. I can produce a really good 3D Benchy (provided by Prusa). Much better than the one posted above.
However, the bulge seems to persist in the top solid layers and as you can see, it is a thin wall as well... (1.5 mm)
RE: Buldge when print reaches "solid" layers
295 +/- And I know the belt tension is correct (by measurement of the deflection stretch). The numbers displayed on the LCD are meaningless for belt tension. You'll break the printer using them as a reference.
The bulge is all about print speed changes and print direction. Slowing down perimeter print speeds, disabling the "slow down for small layers" cooling override, and sometimes adding a third perimeter will help significantly.
RE: Buldge when print reaches "solid" layers
I've used generic PLA 0.15 with 15% gyroid infill. I do believe my generic PLA spool is affecting how large the buldge becomes.
Well, the 1st suggestion in this thread is to slow it down. Slow down to 50% speed using the front knob and see if that helps. If so, you've got most of your answer. As Tim notes, speed, temps and adding an external perimeter usually help. I've attached a config for 0.20mm layers with a 0.40mm nozzle that you can try.
RE: Buldge when print reaches "solid" layers
External perimeters first?
Extrusion width? this in comparison with model wall thickness? smaller or bigger model is better/worse.
2 or more perimeters?
With the benchy i saw the floor on the outside, could get it a little better, but not good.
But raising temperatures 15 or 20 higher helpt, and the pla got very shiny.
RE: Buldge when print reaches "solid" layers
External perimeters first?
That can work with vertical surfaces, but may be problematic with overhanging surfaces like Benchy's bow.
Extrusion width? this in comparison with model wall thickness? smaller or bigger model is better/worse.
A thicker wall (modeled on the STL part) is easier to get consistent results with. If the part is of your design, try thickening the wall slightly. If not, tweaking the perimeter extrusion widths might help. Again, look through the other thread for examples.
2 or more perimeters?
I find 3 works well... if the wall is thick enough to use 3.
RE: Buldge when print reaches "solid" layers
This is causing me a lot of frustration as I print a lot of electronics enclosures, and they always have this issue. Changing Infill/perimeters overlap to 0% does resolve the issue. But it also causes just as serious issues w/ the print, where screw hole perimeters aren't mated w/ infill/perimeters.
One thing I'd add to this discussion is that it is very important to calibrate your filament settings. If the actual filament diameter doesn't match your slicer settings, or if the extrusion rate is putting out the incorrect amount of material, inner surfaces can cause bulges and imperfections in outer surfaces.
RE: Buldge when print reaches "solid" layers
I imagine no one else has had luck on this, as I certainly have not, despite changing a wide variety of settings. The only thing that seemed to minimize, but not correct it was rotating the item 45 degrees on the build plate.
The album shows what I get normally. It's almost like elephants foot starts again, for the first few layers after the top infill is complete. I've gotten it on multiple parts, however it seems to lessen on ones with a longer perimeter as it progresses. The rest of the layers seem to come out just fine, minus some elephants foot on the bottom, and the print is otherwise good.
Slicer doesnt seem to find any issues and I cannot detect anything mechanically wrong either. If I print a solid part, no issues at all. If imprint walled surface infill, I get the ridging. Oddly enough, looking at a part I printed when I first built my machine this didnt seem to occur in a similar walled surface model. Granted that was several years ago at this point.(MK2S)
RE: Buldge when print reaches "solid" layers
I imagine no one else has had luck on this, as I certainly have not, despite changing a wide variety of settings. The only thing that seemed to minimize, but not correct it was rotating the item 45 degrees on the build plate.
On the contrary, it's largely a solved issue. There can be issues if you are bridging between thin walls that are difficult to overcome, but most enclosure-type prints can be printed with relatively good finish.
[...] Slicer doesnt seem to find any issues and I cannot detect anything mechanically wrong either. If I print a solid part, no issues at all. If imprint walled surface infill, I get the ridging. Oddly enough, looking at a part I printed when I first built my machine this didnt seem to occur in a similar walled surface model. Granted that was several years ago at this point.(MK2S)
The big factors that come into play are:
- Print speeds
- Filament calibration (extrusion multiplier)
- External perimeter count (more is better)
- Wall thickness
- Linear Advance calibration
- Placement of z-seam
For any specific part, it's helpful if you upload a zipped copy of the STL and/or a 3MF project file containing the part and your settings. Otherwise we can only make suggestions based on what we experience printing our own parts. At minimum at least summarize your settings. I was preparing to upload a config to try, but you have given us no details on the filament you're using, the extrusion widths and layer heights you're printing with or any other useful information. More info please!
In the meantime, I've attached a config using 0.20mm layers with a 0.40mm nozzle printing generic PLA you can try and compare.
RE: Buldge when print reaches "solid" layers
@bobstro
I would have to respectfully disagree on considering it solved. I've read through all 8 pages and there does not seem to be a solid answer on the cause and an applicable solution. Please feel free to correct me if I am mistaken. Different settings gave different results to everyone. However the same overall issue seemed to be consistent. Having a wall around a large area of flat surface seems to result in a bulge of the layers directly adjacent to the solid layers.
Through intensive Google sleuthing I've come across others with the same proble. And spoken to a few of them with no solution unfortunately.
As for settings, here are my standard and what I've tried
Inland PLA+ @ 210(190C-215c)
Bed temp 45c(0-60c)
Speed 60mms(5mms-60mms)
Layer height .2(.1-.3)
2 walls/.8mm (1-4 walls)
3Bottom/5Top
20% infill(5%-40%) with a variety of infill types
Min layer time 20s(20-120)
Print cooling on after the 2nd layer, and LA setup and calibrated. Extrusion has been calibrated as has the filament dimensions.
Printer is within 1 degree of the Prusa Calibrations for x/y. Bed Z is set well, if a smidge too low. Printer sits on a heavy concrete paver to absorb movement/vibration. Belts tight and screws tightened snugly.
I've tries the previously mentioned 5 steps earlier in the thread with no difference. And this effect has shown on several prints. Both my own designs and several from thingiverse where the situation explained above is present. This is the first I've noticed it, due to this being the first part in a long while that required a good visual look and post processing not quite an option.
So far the only change that has made any impact was to rotate the part 45 degrees on the bed. It then printed with a minimized effect.
It almost seems to me to be temperature related as it's only present for the first few layers following the solid infill. And as seen in the photos, the other layers(aside from elephants foot on the bottom) are consistent and clean of issue. If I print a solid part with my normal settings there are no defects that I can visibly present.
I am not near a computer to provide the .stl or model files unfortunately and will have to do so at a later time.
If there is something obvious I am missing here, I would love to know.
RE: Buldge when print reaches "solid" layers
I would have to respectfully disagree on considering it solved. I've read through all 8 pages and there does not seem to be a solid answer on the cause and an applicable solution. Please feel free to correct me if I am mistaken. Different settings gave different results to everyone. However the same overall issue seemed to be consistent. Having a wall around a large area of flat surface seems to result in a bulge of the layers directly adjacent to the solid layers.
It will depend on who you ask and what mood they're in. In this and several similar discussions, I've been able to eliminate or at least significantly reduce that finish blemish using the settings I provided in the config I attached to my previous message. I'd suggest trying my config to see what, if anything, changes and that will give a basis for further discussion. I can only say that I've gotten to the point that I can print flat external walls that are consistent regardless of openings in that wall, or the start/stop points of internal surfaces.
- A free-standing wall consisting of a thin surface with nothing behind it may be tricky. Perimeter extrusion widths can help.
- Two free-standing walls with a bridge between them can be tricky. Speed and calibration of extrusion multiplier can help.
You have yet to provide your project file or STL so we can't compare to our own results. (I'm in a hotel this morning, so won't be able to try a test print until this evening in any case.) The fact that printing at an angle helps indicates something mechanical differs between X and Y orientation. Speed is an obvious consideration, as the bed has to be slung around on the Y axis. You mentioned 60mm/s. I find that excessive for quality external wall consistency and have far better luck using 25mm/s for external perimeters. Also check into your jerk & acceleration settings as they'll mater (A LOT) on the Y.
I can only summarize noting that slicer settings make a big difference:

RE: Buldge when print reaches "solid" layers
On my printer rotation parts seems to help. But I never deduced why. I attributed it to Y slop since that is where the highest mass is (walls parallel to the Y axis don't show the effect as much).
Slowing down the perimeter moves and actively controlling speed, including jerk and acceleration is how I solved it. But my thoughts after walking away from the testing was I probably could have kept speeds up by simply managing speed changes.
The one thing other slicers tend to do is better manage motion directionality, which also complicates using Slic3r.
ps: as the image shows, I was able to reduce the effects, but not eliminate them entirely. There is still a visible step at the interface - but the light has to be right to catch it.
RE: Buldge when print reaches "solid" layers
And it is worth relinking this discussion: https://github.com/prusa3d/PrusaSlicer/issues/991