RE: Any tips to get rid of the bulge?
Cheers for your help... I will try.. I am just printing my test piece again.. I havn't liked the look of the end of the unloaded filament for a while, so I wondered if I had a slight blockage.. Figured it was a good time to fix it... So I just cleaened the nozzle and after my print, I will play with Detect Thin Walls and Gap Fill.
RE: Any tips to get rid of the bulge?
Can I play too 🙂
I printed the original bullet file for the MK3, although I did select my printer and pla filament profile for the start gcode and temps I use (nozzle x). Its the one on the left and does exhibit the bul(d)ge above the rim. Middle one is the same but sliced with Super Slicer. It handles gap fill differently, you can set a minimum length for printing (but thats not a factor on this print) but it seems to use a much more varying amount of gapfill compared to Prusa Slicer even though its built on the same core codebase. Right hand one is the original wall test piece. Also sliced in super slicer. While there is some very slight variation as it changes the top 2 sections are sliced without gapfill and only that very top thin wall prints wider for some reason. You can see it does that in the preview though so the printer is doing exactly what it was told to. Super Slicer also handles thin walls differently and imo better than PS. (oh the 2 sliced with SS use rear seam but I dont think that has any effect on these tests).

RE: Any tips to get rid of the bulge?
Print Settings->Perimeters & Shell->Quality->Ensure vertical shell thickness is disabled in SuperSlicer. Try enabling that and compare. Right now, gap fill is my strongest suspect. SuperSlicer's unique Print Settings->Perimeters & Shell->Quality->Overlapping perimeters might come into play. I'm not sold on that feature without more testing though.
RE: Any tips to get rid of the bulge?
@bobstro
The overlapping perimeters setting is apparently the default hidden behind the scenes value of ON in Prusa Slicer.
The one I did had that turned off on Super Slicer. I'm currently printing your test piece will gapfill on, thin wall on and overlapping perimeter off, sliced with Super Slicer, and queued up after that is with gapfill on but thin wall off and overlapping perimeters turned on (which should make it more like Prusa Slicer defaults).
RE: Any tips to get rid of the bulge?
[...] The overlapping perimeters setting is apparently the default hidden behind the scenes value of ON in Prusa Slicer.
Interesting. I thought thin wall detection handled that.
The one I did had that turned off on Super Slicer. I'm currently printing your test piece will gapfill on, thin wall on and overlapping perimeter off, sliced with Super Slicer, and queued up after that is with gapfill on but thin wall off and overlapping perimeters turned on (which should make it more like Prusa Slicer defaults).
I'm going the other way, printing with PS defaults now and will shortly try another with detect thin walls disabled and a 3rd with gap fill off.
RE: Any tips to get rid of the bulge?
I am gradually working through your comments and have already tried my test cylinder with "Detect Thin Walls" enabled and the output is MUCH better.. Not perfect, but a lot better than it was with no obvious steps.
So it looks like this might be a slicer thing.. But what I don't understand is why the prints are perfect on the Mini with the same 'default' settings?
RE: Any tips to get rid of the bulge?
I revised the test part for quicker printing (2.5mm layers, thinner base):

You can see a bit of the effect on the short wall with 2mm and 1mm thickness highlighted:
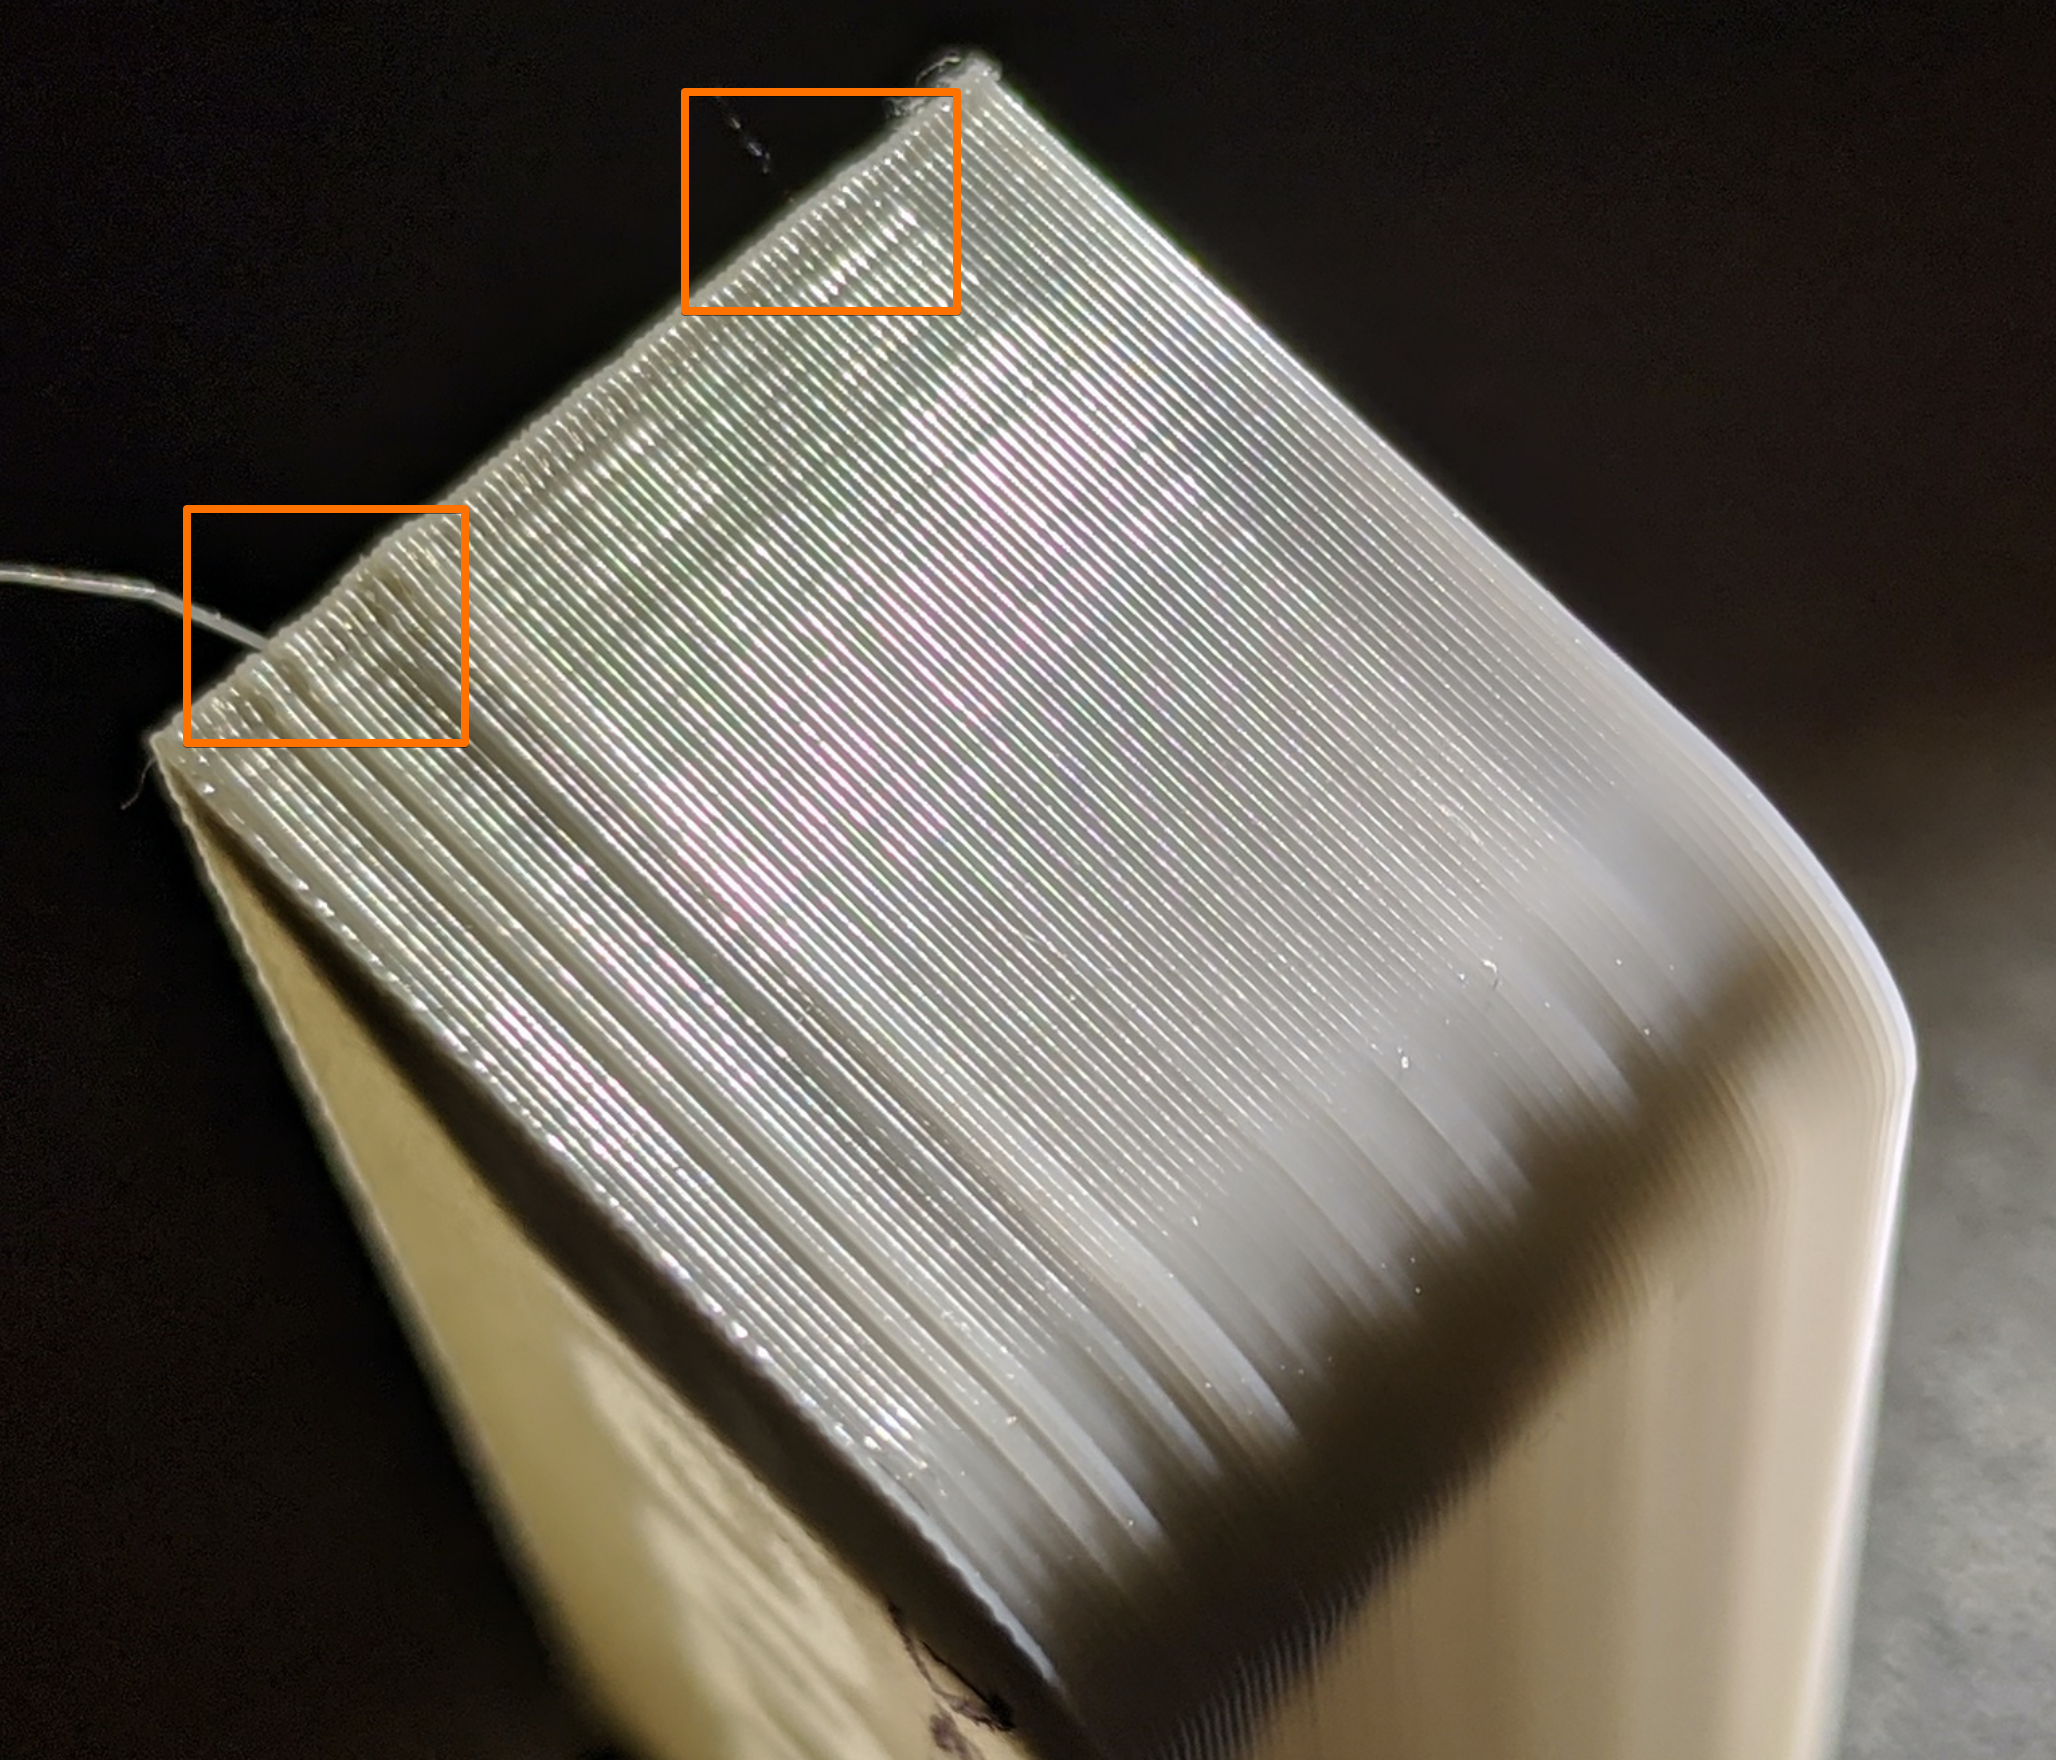
The bulge is more apparent at the 2mm (bottom highlight) and 1mm (top highlight) layers, thought there is some variation at each transition:

I've got the print with PS detect thin walls going now.
I've attached the revised faster (3om) print part.
RE: Any tips to get rid of the bulge?
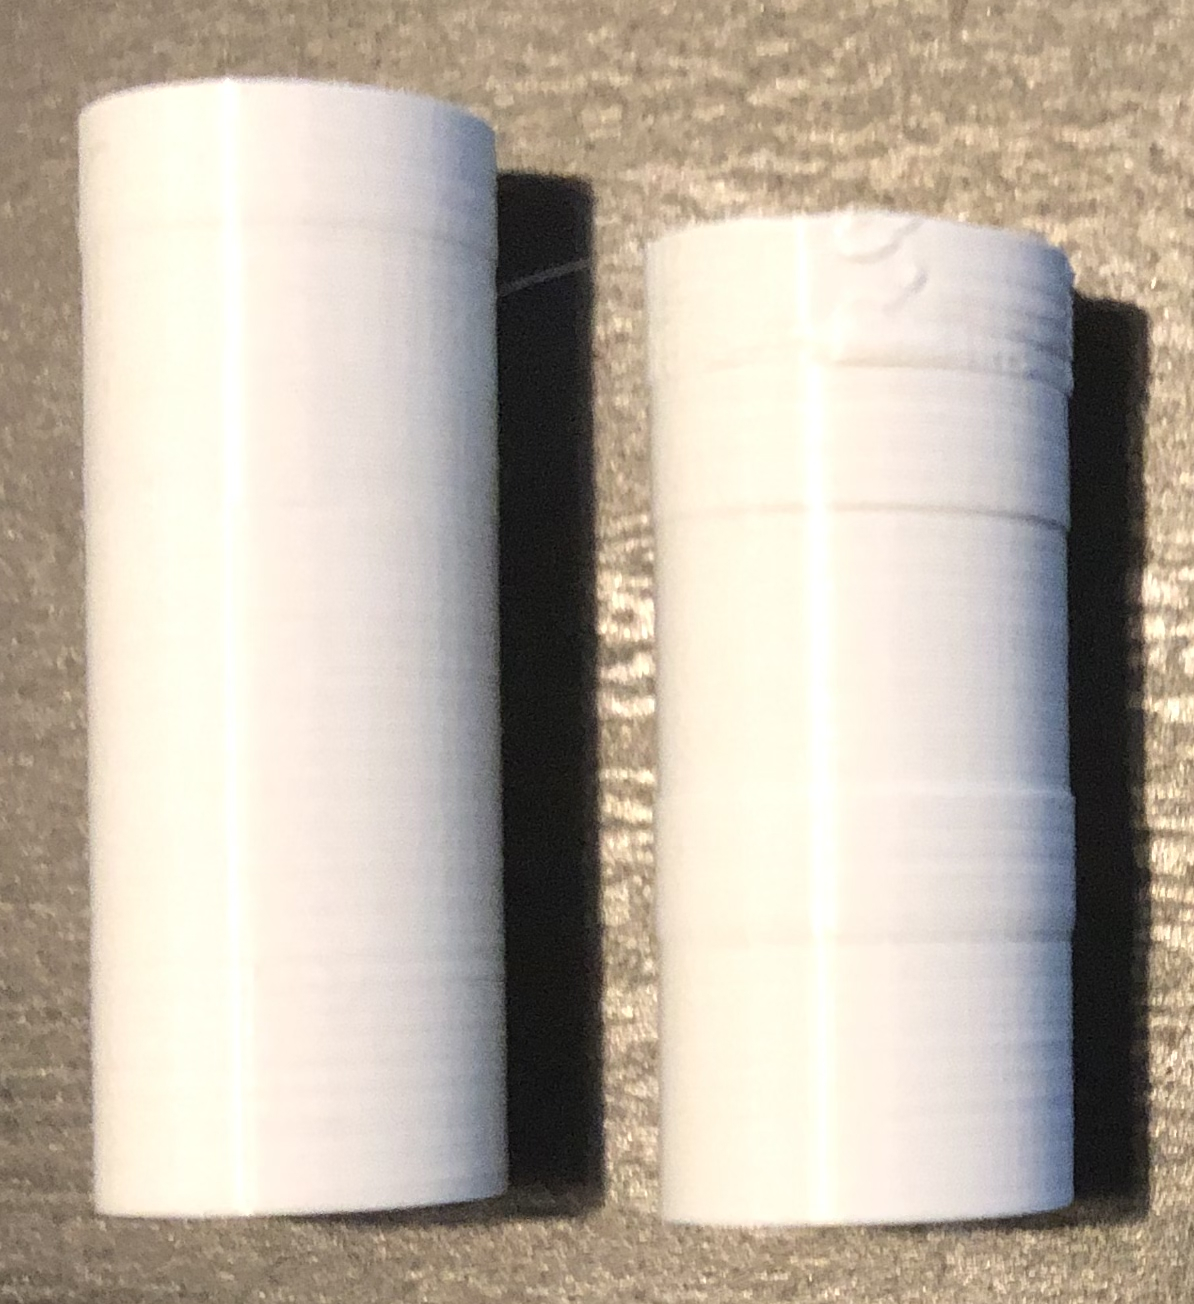
Both parts sliced with Super Slicer. Left part gapfill = on, thin walls = on, overlapping perimeters =off (what I generally use on my parts when slicing.
Right hand part is with gapfill = on, thin walls = off and overlapping perimeters = on (so more like the prusa slicer default settings)
Quite a noticeable difference I think you'll agree.
RE: Any tips to get rid of the bulge?
Both parts sliced with Super Slicer. Left part gapfill = on, thin walls = on, overlapping perimeters =off (what I generally use on my parts when slicing.
Right hand part is with gapfill = on, thin walls = off and overlapping perimeters = on (so more like the prusa slicer default settings)
Quite a noticeable difference I think you'll agree.
Looks like you have cracked it.... but still don't understand why the mini can handle this with no issues....
Can you turn overlapping perimeters off on PrusaSlicer or only SuperSlicer?
RE: Any tips to get rid of the bulge?
Both parts sliced with Super Slicer. Left part gapfill = on, thin walls = on, overlapping perimeters =off (what I generally use on my parts when slicing.
Right hand part is with gapfill = on, thin walls = off and overlapping perimeters = on (so more like the prusa slicer default settings)
Quite a noticeable difference I think you'll agree.
Interesting. My test with detect thin walls disabled wasn't markedly different, so that looks like the issue. It makes sense that it affects layers with no gap fill. There's room for perimeters *not* to overlap on those layers.
Definitely post these results on the PrusaSlicer Github! I wonder if this will apply to the sloped prints that others have posted about. It's great that SuperSlicer can disable the troublesome feature, but it would be better overall if they fixed the underlying issue.
RE: Any tips to get rid of the bulge?
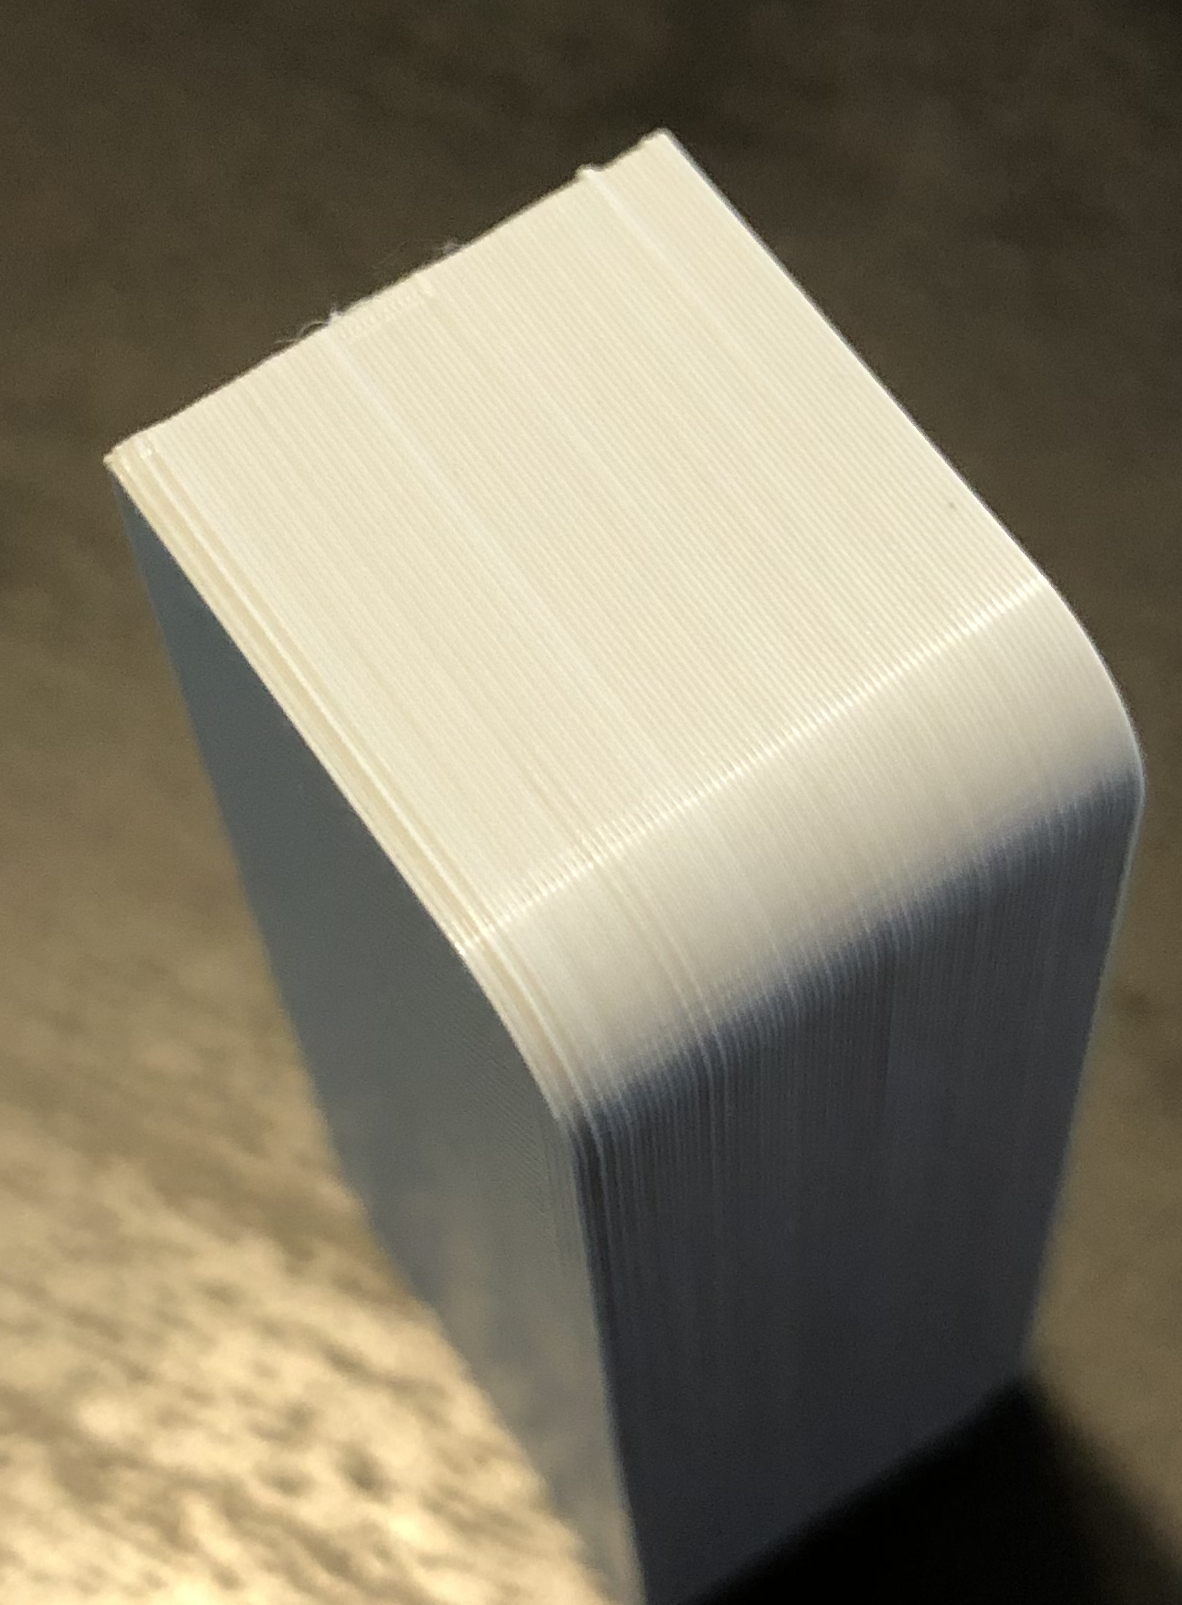
Ok final print before bed time 🙂 This is with Super Slicer with the gap fill on and thin wall on and overlapping perimeters = off.
I tried to use the same angles you did Bob. fyi filament is some light grey Spectrum pla, printed at 215/55 my usual pla profile for that due to the nozzle x. Edit, as far as I know the overlapping perimeters settings is purely in Super Slicer and not available in Prusa Slicer.
The only reason I know its 'on' in PS is that I reported a bug in Super Slicer a few versions ago where I was getting some gaps in single walled cylinders and Merill told me to enable overlapping perimeters as that would make it behave like prusa slicer does. It did fix the gaps on that slice but thankfully the issue has been fixed since then.
Anyway heres the pics of Bobs latest bulge test model.

RE: Any tips to get rid of the bulge?
Ok final print before bed time 🙂 This is with Super Slicer with the gap fill on and thin wall on and overlapping perimeters = off.
That definitely looks better than any of my PrusaSlicer iterations. I'm surprised at what a difference it's making across the entire vertical surface regardless of wall thickness. That'll be an important bug for the Prusa devs to squash. We see a lot of "buldge" variant complaints. I wonder if that will improve overhang issues as well.
Finding good models to consistently replicate a problem is always a challenge. I'm going to print a few more variations in PrusaSlicer to verify the "Buldge" test print shows the problem consistently.
Nice bug hunt, @neophyl!
RE: Any tips to get rid of the bulge?
Thanks for your help with this... Ignore what I said about the Mini.. its not quite as bad as the Mk3, but the 'bulge' is there. In exactly the same places.
So this clearly is a slicer issue after all.. Is someone able to report this on GitHub? I am not sure I understand the problem (And solution) well enough to describe it.
RE: Any tips to get rid of the bulge?
[...] So this clearly is a slicer issue after all.. Is someone able to report this on GitHub? I am not sure I understand the problem (And solution) well enough to describe it.
I'm going to play around with it a bit more, but it appears (to me at least) that thin walls without gap fill will be slightly thicker than those with gap fill, but that the "hidden" overlapping perimeters option exposed by SuperSlicer eliminates the problem. In previous discussion, we spent a lot of time on sloping and angled surfaces, so this didn't jump out. I'm going to try to find some good, reproducible results.
Meanwhile, I'm really wondering what the original logic behind overlapping perimeters is. That just sounds like it's asking for problems. I wonder if it's an inherited feature of Slic3r or something new.
RE: Any tips to get rid of the bulge?
I'm not sure I understand the technical reasons for it either. I know that all perimeters have to overlap to some extent otherwise we wouldn't get any bonding, especially as its not a flat sided extrusion but I dont know what that setting is actually doing. I know there are a couple of other new overlap % settings for external and internal outer perimeters that were recently added but when I sliced with those they didn't make any difference to the test model, I think because there weren't really any normal perimeters, its mainly just external ones. Super Slicer seems to use much wider gapfill where it can rather than trying to squeeze in extra perimeters, at least that's the way it looks on the preview.
If you want to play around with another interesting Super Slicer setting then try the bridge fill %. By default its 100% same as PS but if you up it to around 130-150% and then print a bridging overhang onto support (support under all of it not just the perimeters) you can get bottom surfaces like this in some cases :-

RE: Any tips to get rid of the bulge?
I think what is happening is that those layers where the thin wall is printed without gap fill and thus overlap on more perimeters. This over-extrudes both in and outward. The overlap causes more squeeze in a tight place creating that bulge (in and out variations) effect. Where there's gap fill, only the perimeter walls (2-3) press against each other. The small gap is filled in a final pass.
This would explain the previous results indicating wall thickness and extrusion width were a fix. So long as you can ensure some gap fill, I don't expect the bulge effect. This is the work-around, such as it is. (I think.)
Your timely experience with SuperSlicer filled in some missing info. That, plus some good test pieces should clearly show the issue. I'd be happy to compile notes and post the issue to GitHub if you'd like.
RE: Any tips to get rid of the bulge?
[...] If you want to play around with another interesting Super Slicer setting then try the bridge fill %. By default its 100% same as PS but if you up it to around 130-150% and then print a bridging overhang onto support (support under all of it not just the perimeters) you can get bottom surfaces like this in some cases :-
Also interesting! I've played around with SS a bit, but I'm hesitant to convert all my configs to it and break backwards compatibility with PrusaSlicer. It does look very useful for prints with specific issues.
RE: Any tips to get rid of the bulge?
So going full circle.. How am I going to print these "bullets" without the 'bulge'? Do I have to use SS? Or is there a way to do it in PS?
The reason its important is that they are designed for a gas powered Winchester rifle and even with the bulge they work just fine.. But they should also fit a Peacemaker pistol, which is a revolver and has a tight Cylinder, and the "bulge" stops them going in all the way.
So whats going to be the best way to print them, so that the walls are straight?
I would rather not use SS if I can help it.. But I guess I might have too if there is no other option...
Jon
RE: Any tips to get rid of the bulge?
So going full circle.. How am I going to print these "bullets" without the 'bulge'? Do I have to use SS? Or is there a way to do it in PS?
Quick & easy -- for now at least -- is "use SuperSlicer". It's straightforward to install and can run happily alongside PrusaSlicer.
If using PrusaSlicer, try adjusting extrusion widths and examine the print in preview mode. You ideally want all layers to either use gap fill (white lines) or not.
The usual vertical wall quality recommendations still apply regardless of what slicer you use:
- Slow down external perimeter speeds.
- Add external perimeter(s).
- Calibrate filament extrusion multiplier for your filament.
- Calibrate Linear Advance for your filament.
- If designing parts, use thicker walls if possible.
RE: Any tips to get rid of the bulge?
Cheers.. I already have SS installed, but I have avoided using it as there are too many options that I don't understand and I have my PS settings how I like them.
But I have tested it (mainly to try out the Ironing features) so it wouldn't take much effort to use it.. I must admit, I started using it a bit, but it crashed on me once and I lost faith and never went back.
I can't redesign this part... I have to put a TPU insert into the hole at the bottom (to hold the projectile) and I have made the walls as thick as possible as the TPU needs to have a 4.5mm hole and still have a wall thick enough to support itself.
So I will give SS a try for this project.. What settings do I need to change such that I get straight walls?