Help with End G-code
Hello folks,
I am somewhat unhappy with the situation that at the end of a print, the z-axis remains at the height of the last layer.
Of course, one can push the button and then wheel up the z-axis, no sweat...
But - why does a human have to do this work when the machine has provisions to execute exactly such tasks...?
I know, I'm a lazy guy... 😉
Yes, I know, I could supplement the line of the original code "G1 X200 Y200 ; home x and y axis" by adding Z210.
That works fine as such.
...but...
If you're having a full spool on the printer, the filament will jump from the spool and tangle around the spool-holder, creating a creative mess to be cleaned up. Or if you're having the printer and filament in two seperate enclosures, the filament does not feed back into the filament-compartment, thus flinging around in the printer-compartment, adding again manual labour to fix the mess. Did I mention that I'm a lazy guy? 😉
Lifting the extruder by 30 or 40mm is already enough to remove the steel-sheet with the print on it. You would also loose some time at the begin of the print, if the extruder first has to travel down from 210 to the bed...
So, from my old times when I was in the apprenticeship and CNC-mills and -lathes were just getting the latest shiznit, still full of wonders and wizardry... I was able to produce two version of an end g-code, of which both should produce the desired result:
Version 1 - switching to relative coordinates, but does the printer respect the maximum travel in that mode?
M140 S0 ; turn off heatbed
M107 ; turn off fan
G1 X0 Y200 ; home x and y axis
G91 ; switch to relative positioning
G1 Z30 ; lift extruder by 30
G90 ; switch back to absolute positioning
M84 ; disable motors
M300 S440 P100 ; play Fanfare
G4 P50
M300 S554 P100
G4 P50
M300 S659 P100
G4 P50
M300 S880 P250
G4 P50
M300 S659 P75
G4 P75
M300 S880 P450
Version 2 - using if-statements, but are those respected in the Reprap-dialect?
M140 S0 ; turn off heatbed
M107 ; turn off fan
G1 X0 Y200 ; home x and y axis
if [#5203LT50]GOTO100 ; if z is below 50 goto Line 100
if [#5203LT100]GOTO100 ; if z is below 100 goto Line 200
if [#5203LT160]GOTO100 ; if z is below 160 goto Line 300
G1 Z210 ; move z to 210
GOTO999 ; goto Line 999
N100 G1 Z80 ; move z to 80
GOTO999 ; goto Line 999
N200 G1 Z130 ; move z to 130
GOTO999 ; goto Line 999
N300 G1 Z190 ; move z to 190
GOTO999 ; goto Line 999
N999 M84 ; disable motors
M300 S440 P100 ; play Fanfare
G4 P50
M300 S554 P100
G4 P50
M300 S659 P100
G4 P50
M300 S880 P250
G4 P50
M300 S659 P75
G4 P75
M300 S880 P450
And yes, I copied the idea of a little fanfare at the end of the print. The printer is REALLY silent. And on top, it's quite cool to hear that melody going while being somewhere else in the flat, knowing the print is finished... 🙂
Now I did some testing yet...
The version with switching to relative coordinate system does not appear to work - the extruder seemed to stay at the height of the last layer...
Though the relative coordinate-system is documented to be operational and useable with Reprap according to the Reprap-Wiki...?
If it's a problem with the syntax I used, we need to know if the maximum travel for the z-axis is respected when in relative-mode. If so, then this would be the way to go for... If not - there might be some noise and rattling when the extruder was already at 200 and now tries to lift another 30. A solution quite amiss, not my style...
Maybe someone has some insight why this does not produce the desired result?
I did not yet test the version with the if-statements and goto-commands. Too much printing going on... 😉
I need confirmation that Reprap handles the Line-commands right.
Also I need confirmation that variable 5203 is indeed the value of the z-axis of the G53-coordinate-system and thus the actual position of z.
Maybe someone has already done some testing in this area and can comment?
Cheeers from switzerland,
Daniel
Re: Help with End G-code
I really think you are vastly overthinking this. For most prints I can just slide the build plate out without having to adjust the z height at all, because the build plate sides all the way forward on the Y axis leaving the head at the back of the plate. On the rare occasion that doesn't work I just press in the knob and roll up the Z a bit.
Re: Help with End G-code
Version 1 should work fine. I believe you need to add FXXXX to the G1 Z30 command to tell it the speed to move. Also I recommend moving up then homing so that the nozzle is up and out of the way when moving across the bed.
Here's mine for reference that works.
M106 S0 ; turn off cooling fan

M104 S0 ; turn off extruder

M140 S0 ; turn off bed

G1 F1000.0 ; set feed rate

G1 E-3 ; retract 3mm

G91; Set to relative mode

G1 Z10 F7200; Move up 10mm

G90; Set back to absolute mode

G1 X0 Y200 F7200 ; home XY axis

M84 ; disable motors

;victory song

M300 S2349 P53

M300 S0 P53

M300 S2349 P53

M300 S0 P53

M300 S2349 P53

M300 S0 P53

M300 S2349 P428

M300 S932 P428

M300 S2093 P428

M300 S2349 P107

M300 S0 P214

M300 S2093 P107

M300 S2349 P857
Re: Help with End G-code
This is what I use after a print finishes or is aborted (via OctoPrint).
I have it move to Z 205 (I usually don't print above 200mm so its not an issue for me.
G90;  Set to Absolute position

G0 Z205; move z axis up to 205

G28 X; home X axis

G1 Y150 F5000; move part out for inspection

M104 S0 ; turn off extruder heat

M140 S0 ; turn off heated bed

M106 S0 ; Turn off fan

M18; Move Freely
- 1st "printer" TIKO 3D
- 2nd PRUSA i3 MK2S with MMU v1
- 3rd PRUSA i3 MK2S
- 4th PRUSA i3 MK3 with MMU v2- 5th?? PRUSA i3 MK4 (upgraded from MK3) with MMU v3 (waiting for…
Re: Help with End G-code
Hello All,
I need to ammend my previous statement...
I just finished another print with Version 1 and it works flawless...
It's important to remember to which g-code you already applied some changes... 😉
To some it might be surprising but to look for a behaviour when it isn't in the code ends up in a negative result... 😀
Thank you Bytor,
This was exactly the solution I used before.
The reason why I thought this is not good enough is the ABS from renkforce: The spools are quite full and when the extruder moves in example from 30mm up to 210mm, it flips over the rims of the spool, getting messy.
Thank you Nolan,
EXCELLENT suggestion!
Though I never thought about it as the original code also has the head moving only laterally, but definitely a change that I will implement!
THANK YOU!
Hello Neil,
I might concur if I was printing objects that are higher than 100mm.
But I do not, which is why I do not.
With items of 20mm height, lifting the steel-bed has it banging against the extruder.
And I don't like the idea of Just sliding it forward due danger of scraping.
And quite frankly, from my point of view, the statement "vastly overthinking" is not applicable at all...
Changing the code is peanuts, and I'm definitely not afraid to do so as it takes about ten seconds but - to use your words - 'vastly improves' the behaviour of the machine... But if one is not proficient with g-code, then I can understand the point you're coming from.
Again I'm asking - why does a human have to push a button, rotate it and push it again, when the machine could do it on its own and automatically...?
The Mk3 is supposed to be smart, right...? 😉 Let's help it evolve... 🙂
I will test the now changed code (again, thanks Nolan!) and then publish it here.
Also the start g-code was ammended and I will also publish that with a later post...
Cheers,
Daniel
Re: Help with End G-code
Ok, here we go...
I tested the start and the end g-code with another print, and I'm happy with it... 🙂
Reason for the change with the start g-code is that both the nozzle and the bed are getting the command to heat at the same time. But the bed takes 6 minutes to get to 100°C, while the nozzle has reached 255°C in about one minute. Which leaves the filament cooking in the nozzle for five minutes. While the obvious effect in my specific case was extensive oozing, the cooking is definitely not something we should look for. So I switched the command-lines around a little: It now commands the bed to heat first, then waits for it to reach temperature, and only then commands the nozzle to heat and wait for it to reach temperature. But wait, the nozzle temperature must first stabilise before the print can commence! Yes, it has perfectly time to do so while calibrating, between point 7 and 8 the nozzle has always nicely stabilised - just in time to print the intro-line. 🙂
So here's the start g-code:
M115 U3.1.1-RC5 ; tell printer latest fw version

M201 X1000 Y1000 Z200 E5000 ; sets maximum accelerations, mm/sec^2

M203 X200 Y200 Z12 E120 ; sets maximum feedrates, mm/sec

M204 S1250 T1250 ; sets acceleration (S) and retract acceleration (T)

M205 X10 Y10 Z0.4 E2.5 ; sets the jerk limits, mm/sec

M205 S0 T0 ; sets the minimum extruding and travel feed rate, mm/sec

M83 ; extruder relative mode

M140 S[first_layer_bed_temperature] ; set bed temp

M190 S[first_layer_bed_temperature] ; wait for bed temp

M104 S[first_layer_temperature] ; set extruder temp

M109 S[first_layer_temperature] ; wait for extruder temp

G28 W ; home all without mesh bed level

G80 ; mesh bed leveling

G1 Y-3.0 F1000.0 ; go outside print area

G92 E0.0 ; reset extruder position

G1 X60.0 E9.0  F1000.0 ; intro line

G1 X100.0 E12.5  F1000.0 ; intro line

G92 E0.0 ; reset extruder position

M221 S{if layer_height<0.075}100{else}95{endif} ; extruder factor to 95 if layer is bigger than 0,57mm
And with the end g-code, I did not like that I had to manually lift the extruder after finishing a smaller print, in order to be able to lift the steel-sheet of the bed with colliding with anything. Going all the way up to the max of the z-axis is not really an option, as the filament often jumps off the spool. Also, since the printer is quite silent, I added the fanfare to hear the finish while being in another room.
So here's the end g-code:
G4 ; wait

M221 S100 ; extruder factor to 100%

M104 S0 ; turn off temperature

M140 S0 ; turn off heatbed

M107 ; turn off fan

G91 ; switch to relative positioning

G1 Z30 ; lift extruder by 30

G90 ; switch back to absolute positioning

G1 X0 Y200 ; home x and y axis

M84 ; disable motors

M300 S440 P100 ; play Fanfare

G4 P50

M300 S554 P100

G4 P50

M300 S659 P100

G4 P50

M300 S880 P250

G4 P50

M300 S659 P75

G4 P75

M300 S880 P450
If someone has suggestions or more ideas - please feel free to chime in!
Cheers,
Daniel
PS: Joseph, of course you're welcome to use this in future releases! 🙂
Re: Help with End G-code
Hi Daniel,
have you tried using a filament guide to reduce the chances of filament popping oer the edge of the reel?
regards Joan
I try to make safe suggestions,You should understand the context and ensure you are happy that they are safe before attempting to apply my suggestions, what you do, is YOUR responsibility. Location Halifax UK
Re: Help with End G-code
I also have to manually raise the Z after each print to safely remove the build sheet. This spool Bowden tube setup might help you with the unspooling problem.
I was unhappy with the spool jiggling the frame and nozzle height during printing so I finally finished my spool Bowden tube adapter. I found the spool holder out on Thingiverse and modified the LH TOP Z-axis bracket to incorporate the tube holder and adapter(A). I used a section of what I believe to be Polyurethane tubing 1/4 inch O.D. - .160" I.D. (leftover from a RO drinking water filter install, McMaster Carr 5648K25) which seems to be slippery enough for the filament to slide thru or get some larger I.D. Bowden tubing. I designed another adapter(B) for the top of the extruder to hold the tubing that is a easy slip fit so it can be pulled off to load or unload the filament. Very happy with the operation.
When I get time I will UPLOAD parts to Thingiverse and create another thread for it.
I assembled the spool roller using #4 x 3/8" Philips head sheet metal screws --- perfect! and available at the local hardware. I also used the 8mm I.D. 608 series skateboard bearings that were SEALED so as to provide a tiny bit of rolling resistance at the spool --- perfect!
I have been having good luck with my MK3 kit since mid February. I'm using S3D slicer and have never used any other.
Hope this helps out. -------- Great forum!
MK3 Kit, Designed, built 4x4 CNC Plasma Cutting Table, Motorcycles Bigdogbro's Adventures
http://www.youtube.com/channel/UC5djrxBeeOKB9_6rHnn6G8A
Re: Help with End G-code
Hello Joan,
A filament guide does not really help - the spool would need to be rotated to rewind the filament that was rolled of it before - after all, if a print was finished at 30mm height, there are 18cm of filament that need to go somewhere... Additionally, from a pure point-of-view from principles, I do not think it's the right way to print more parts to a machine, when a small change in the software fixes it... 😉 Maybe with a chinese knockoff that requires a lot of fiddling, but not with a machine that is claimed to be bloody smart... 🙂
Wow, Bigdogbro1!
This is quite a work of art...! Awesome!
I did consider something similar like this, as it would definitely do away with all the problems I spoke of.
Definitely a valuable addition to the community if you could publish the design! 🙂
But I did shy away from it as I planned to put the printer in the "ikea-enclosure" - that would have ment to produce this solution only to remove it one month later... 🙁
In the mean-time, the printer is in the ikea-enclosure and the problem is solved. 🙂
Same here - printing since end of february and no issues what-so-ever...
Only once a semi-blocked nozzle and then a super-steep learning curve when I washed the PEI-sheet with handsoap and nothing would stick to it afterwards... 😀
UPDATE:
There was the issue of not being certain whether the machine would respect the maximum travel when switched from absolute to relative coordinates.
I just finished a print two days ago, that had the last layer at 185mm - perfect opportunity to observe the behaviour... 🙂
Long story made short:
Uneventful finish of the print - it respected the maximum travel of 210mm.
So I definitely can recommend this tuning to everyone...
Even for low parts with a height of 20mm the lifting of 30mm is enough.
Re: Help with End G-code
Thanks Daniel,
The parts and additional info are out on Thingiverse https://www.thingiverse.com/thing:2855594
The release forum post is here: https://shop.prusa3d.com/forum/user-mods-octoprint-enclosures-nozzles--f65/mk3-filament-spool-bowden-tube-feeder-t15550.html
MK3 Kit, Designed, built 4x4 CNC Plasma Cutting Table, Motorcycles Bigdogbro's Adventures
http://www.youtube.com/channel/UC5djrxBeeOKB9_6rHnn6G8A
Re: Help with End G-code
Greetings,
I Tried to setup the start en end G-code in the cura slicer programm (version 3.3.1) , but I think I am doing something wrong. When I tried to rpint something , nothing happened, no heating of the bed and nozzle . It wanted it to cool down to 0 degrees.
Anyway , these codes:
M115 U3.1.1-RC5 ; tell printer latest fw version

M201 X1000 Y1000 Z200 E5000 ; sets maximum accelerations, mm/sec^2

M203 X200 Y200 Z12 E120 ; sets maximum feedrates, mm/sec

M204 S1250 T1250 ; sets acceleration (S) and retract acceleration (T)

M205 X10 Y10 Z0.4 E2.5 ; sets the jerk limits, mm/sec

M205 S0 T0 ; sets the minimum extruding and travel feed rate, mm/sec

M83 ; extruder relative mode

M140 S[first_layer_bed_temperature] ; set bed temp

M190 S[first_layer_bed_temperature] ; wait for bed temp

M104 S[first_layer_temperature] ; set extruder temp

M109 S[first_layer_temperature] ; wait for extruder temp

G28 W ; home all without mesh bed level

G80 ; mesh bed leveling

G1 Y-3.0 F1000.0 ; go outside print area

G92 E0.0 ; reset extruder position

G1 X60.0 E9.0  F1000.0 ; intro line

G1 X100.0 E12.5  F1000.0 ; intro line

G92 E0.0 ; reset extruder position

M221 S{if layer_height<0.075}100{else}95{endif} ; extruder factor to 95 if layer is bigger than 0,57mm
G4 ; wait

M221 S100 ; extruder factor to 100%

M104 S0 ; turn off temperature

M140 S0 ; turn off heatbed

M107 ; turn off fan

G91 ; switch to relative positioning

G1 Z30 ; lift extruder by 30

G90 ; switch back to absolute positioning

G1 X0 Y200 ; home x and y axis

M84 ; disable motors

M300 S440 P100 ; play Fanfare

G4 P50

M300 S554 P100

G4 P50

M300 S659 P100

G4 P50

M300 S880 P250

G4 P50

M300 S659 P75

G4 P75

M300 S880 P450
I inserted like this:
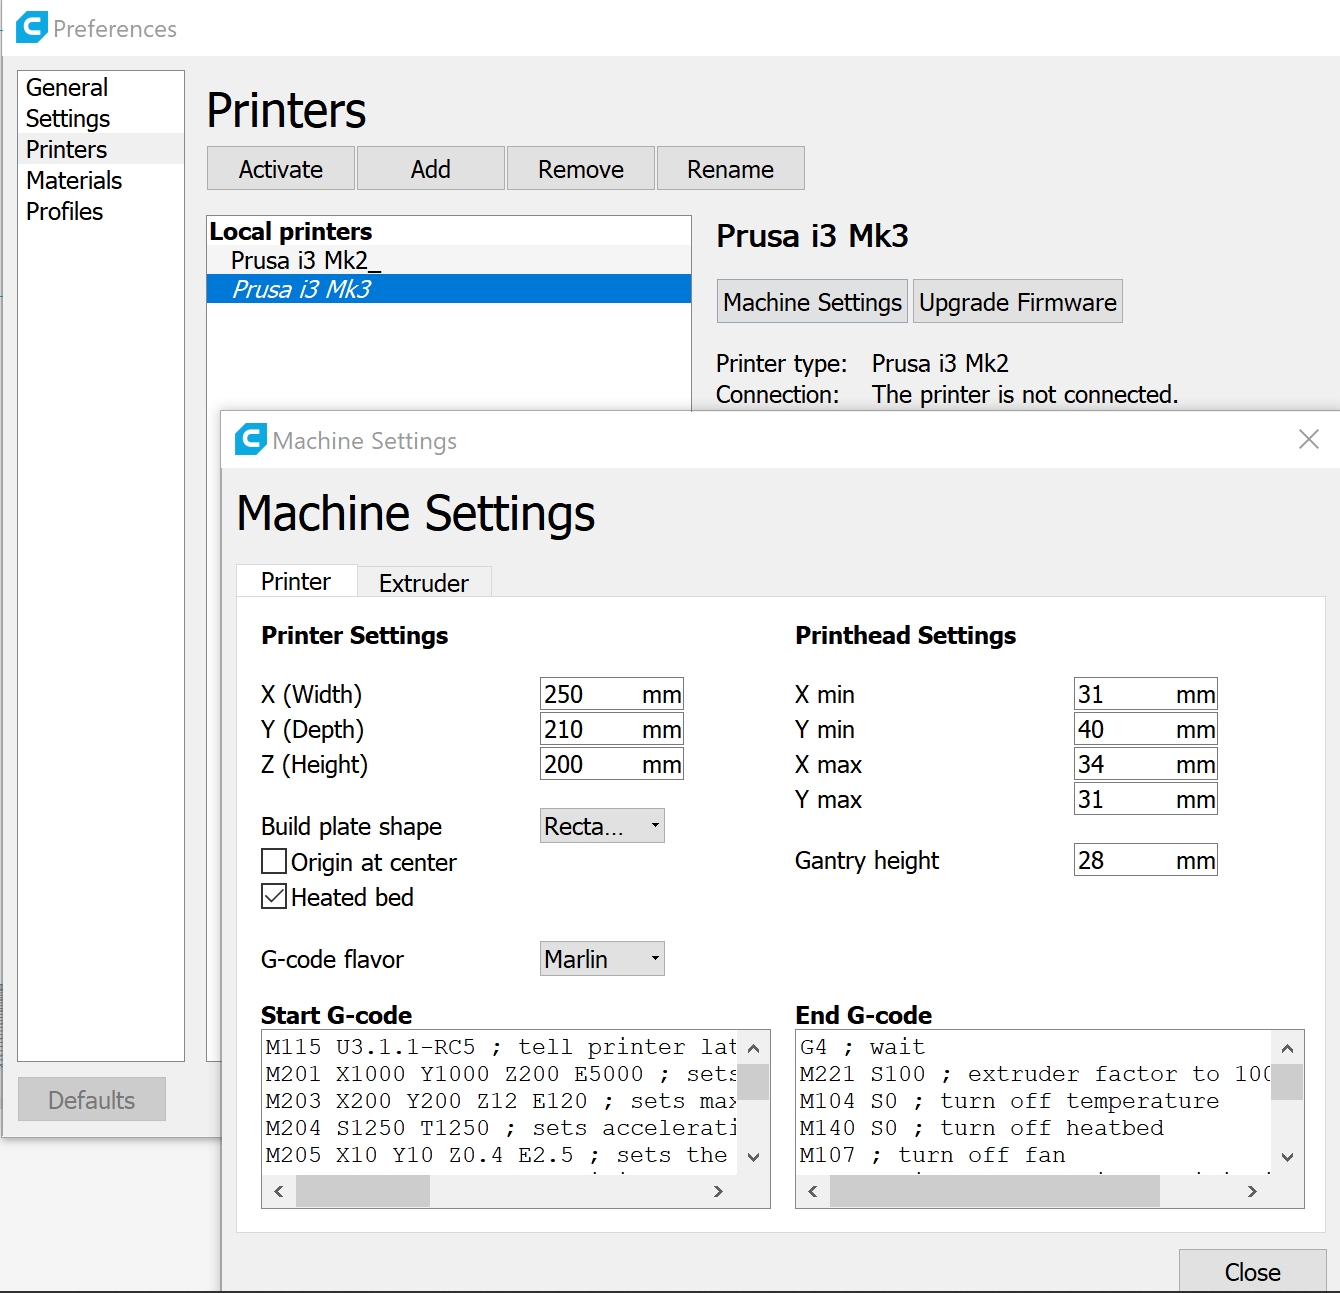
pressed "close" and tried to print something.
I am doing something wrong?
Many thanks,
Cor
Re: Help with End G-code
You are using Slic3r start and end gcode. It needs the variables and conditional changed to a format that Curia uses.
For example the lines:-M140 S[first_layer_bed_temperature] ; set bed temp
M190 S[first_layer_bed_temperature] ; wait for bed temp
M104 S[first_layer_temperature] ; set extruder temp
M109 S[first_layer_temperature] ; wait for extruder temp
need to be replaced withM140 S[material_bed_temperature_layer_0] ; set bed temp
M190 S[material_bed_temperature_layer_0] ; wait for bed temp
M104 S[material_print_temperature_layer_0] ; set extruder temp
M109 S[material_print_temperature_layer_0] ; wait for extruder temp
Regards,
Martin
Martin Wolfe
Re: Help with End G-code
If someone has suggestions or more ideas - please feel free to chime in!
I like your ending g-code. I'd suggest a further addition to it, which is what I do:
G92 E0 ; prepare to retract

G1 E-20 F1800 ;  retract 20mm
This retracts the filament by 20mm, and generally speaking it eliminates the oozing at the end, which, if left stuck to the nozzle, can interfere with bed-leveling the next time you print.
Thus, I propose the following as the revised ending g-code:
G92 E0 ; prepare to retract

G1 E-20 F1800 ;  retract 20mm

G4 ; wait

M221 S100 ; extruder factor to 100%

M104 S0 ; turn off temperature

M140 S0 ; turn off heatbed

M107 ; turn off fan

G91 ; switch to relative positioning

G1 Z30 ; lift extruder by 30

G90 ; switch back to absolute positioning

G1 X0 Y200 ; home x and y axis

M84 ; disable motors

M300 S440 P100 ; play Fanfare

G4 P50

M300 S554 P100

G4 P50

M300 S659 P100

G4 P50

M300 S880 P250

G4 P50

M300 S659 P75

G4 P75

M300 S880 P450
Of course, if anyone is aware of a better way to conduct ooze control, please do post to this thread, even if it's in the distant future!
Re: Help with End G-code
You are using Slic3r start and end gcode. It needs the variables and conditional changed to a format that Curia uses.
For example the lines:-M140 S[first_layer_bed_temperature] ; set bed temp
M190 S[first_layer_bed_temperature] ; wait for bed temp
M104 S[first_layer_temperature] ; set extruder temp
M109 S[first_layer_temperature] ; wait for extruder temp
need to be replaced withM140 S[material_bed_temperature_layer_0] ; set bed temp
M190 S[material_bed_temperature_layer_0] ; wait for bed temp
M104 S[material_print_temperature_layer_0] ; set extruder temp
M109 S[material_print_temperature_layer_0] ; wait for extruder temp
Regards,
Martin
ohhhhh , crap , I though this could be used for Cura as well...... are those the only thing which need to be changed , or does more need to change?
thanks,
Cor