Re: Calibration Failure. Final take.
While I am waiting for my Swiss heatbreak and more PTFE I read just about every post on the Mk3 forum. I wish I had been so smart earlier.
Here is my final take on the situation. My original problem was one that a lot of people complain about in a couple of threads about extruder clogging way into a print. I suggest that you read them. There is a congenital deformity of some Prusa custom heatbreaks which leads to this. (Autocorrect changes the word to heartbreaks. I felt like leaving it so.) I replaced the nozzle and the PTFE, which is when everything came to a halt, and you all tried to help me. The solution can be guessed from other posts about Z calibration. The XYZ calibration routine does Z first. The error message “ check axes and try again”, undocumented by Prusa, means that the Z rods ar either not vertical, or not parallel, or both. it is hypersensitive to this situation. The stuff I did in frustration was actually the right solution. Loosen the screws holding the Z axis rods, bottom and top, and the ones on top of the trapezoid nut. Just slightly. Then move the z axis to the bottom, tighten the bottom screws , move it to the top, and tighten the rest.
I hope this is true and can help someone.
(from my brother’s stand up comedy routine . Use Generic foreign accent)
My people they believe this story.
They believe it because they are backward and ignorant.
And I believe it too.
Retired doc, should have been an engineer.
Re: Calibration Failure
the extruder nozzle seems to be a long way out.
whilst this will not change the overall length of the assembly it will move the heat block closer to the extruder housing, causing the potential for melting the plastic, and reducing the effectiveness of the heat break by trapping hot air in that area.
the nozzle should be screwed fully into the heat block, then unscrewed half a turn, then the heatbreak tube should be tightened against the nozzle whilst hot, to ensure a leak free assembly
regards Joan
I'm wondering if this might relate to the problem I'm having with calibration, but I'm also wondering why. I ordered a new hot end assembly after I broke my thermistor after a blob. On the replacement, the nozzle sticks out as in the photo previously posted, while the one that came with my kit was much more "screwed in". The problem is, it doesn't seem possible to screw it in even more. It seems that it is installed that way because the assemblers at Prusa couldn't get it in further. At the same time, pre-flight is all about putting the nozzle just to the heat bed, and then setting the pinda probe. I would imagine this is due to the fact that the nozzle can be more or less screwed into the hot end, and still have a fully functional printer.
I'll store this one in my "things to try" list, while waiting for other suggestions.
Re: Calibration Failure
at all times be careful with hot parts,
starting from a load of spare parts, the process would be :
1, take the heat block, and nozzle, screw the nozzle all the way in, then unscrew 1/2 turn
2, take the heatblock and screw the 6mm short screw thread end, firmly into the other side of the heatblock until it butts firmly against the end of the nozzle,
3, using non setting heat transfer paste, lightly coat the heatbreak 7mm thread and screw the heatbreak into the cold end heatsink, wipe off excess heat paste.
4, install the Ceramic Heater cartridge into the heat block, and use the rounded cap head screw to clamp in place.
5, install the thermistor cartridge and hold in place with grub screw to complete assembly of E3D v6 extruder
6, install extruder assembly inside Pusa Printed parts, as per Prusa instructions,
7, connect cables as per Prusa instructions
8, when ready to test printer, heat extruder assembly to say 250 Centigrade, Using a 7mm socket spanner, and suitable spanner or adjustable wrench, tighten the nozzle into the heatblock, remember that the nozzle is hollow brass, so tighten gently
starting from an assembled extruder,
1, Heat the extruder to say 250 Centigrade
2, loosen the nozzel using a 7mm socket spanner and suitable size open ended spanner or adjustable wrench to hold the heat lock steady.
3, loosen the heat block two turns, off the heatbreak(being careful not to damage the cabling!
4, screw nozzle fully into heat block and unscrew 1/2 turn
5, tighten the heatblock and nozzle against the heatbreak,
6, heat extruder to 250C and tighten nozzle against heatbreak using socket and spanner.
in either case, check relationship between nozzle and pinda probe...
complete full calibration routines
enjoy printng...
reards Joan
I try to make safe suggestions,You should understand the context and ensure you are happy that they are safe before attempting to apply my suggestions, what you do, is YOUR responsibility. Location Halifax UK
Re: Calibration Failure
I appreciate the instructions, Joan.
I certainly hope this isn't the appropriate solution for a calibration problem. Not only do the instructions seem dangerous from a potential burn perspective, but also from a damaging the parts perspective. It also implies that the factory is shipping these assemblies incorrectly assembled. Based on the instructions, the heatbreak and the nozzle are more or less up against each other inside the heat block. It's apparently more important for the nozzle to the closer to the heatblock than the heatbreak should be, however, the end result will be the same as far as the total length of the hot end assembly is concerned. Those instructions seem to be little more than moving the heatblock down a little bit by unscrewing the heatbreak, and screwing in the nozzle, then making them meet up again inside the heat block. Considering all the ways this can go wrong, I think I'll hold off on this particular "fix" for now, but certainly keep it in mind.
Now I understand why the kit came with an entire pack of zip ties when relatively few are needed for initial assembly. 😉
Re: Calibration Failure
Mr Flippant,
you are indeed correct.
my original comments related to Henry's posted picture,
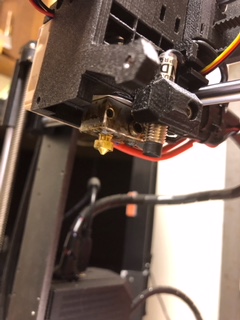
which seems to show a used heat block, with a new looking nozzle
the second line of that comment concurred with your latter observation that what I was suggesting would not change the overall length but did explain that the configuration as shown, may lead to poor performance...
Your 4:58 post says,
"On the replacement, the nozzle sticks out as in the photo previously posted, while the one that came with my kit was much more "screwed in". The problem is, it doesn't seem possible to screw it in even more."
My response of 6:50am includes a warning that concurs with your latter observation that there is a burn perspective,
however we do not concur on the risk of damage to the relevant parts. I suggested processes that would allow assembly or corrective re distribution of component spacing in a safe manner, to improve the thermal dynamics of the parts in a picture that you identified as being similar to your setup.
you have elected not to accept my suggestions, which is entirely your right,
however if your heat block is in fact assembled closer to your extruder housing, than designed, (which is what the picture we have both referred to, suggests,) then there is a risk of overheating those plastic components.
again it is entirely your right to continue using your printer in that configuration.
you might wish to consider printing spare extruder housing parts, in case the ones you have, melt.
I don't believe I suggested at any point that the factory are shipping incorrectly assembled components.
it is likely that your second hot end assembly was actually built by E3D, rather than Prusa.
Henry took my advice, and then re calibrated his printer and is now printing again,
after my more detailed information in response to your query, I did say that you should then check the relationship of the Pinda Probe and the nozzle, and then complete the calibration process.
so we also concur that the information I provided merely results in the heatblock being moved closer to the nozzle and further away from the Extruder housing, (more in line with the original Prusa design intent!)
and additionally we concur that what I have suggested, will not, in isolation, cure a calibration issue.
I appreciate that what I have suggested is a bit fiddly, and that you find it unnecessary at this time. that also is your privilege.
I sincerely hope that your chosen path leads to reliable, good quality printing and damages fewer parts than my suggested options.
Regards Joan
I try to make safe suggestions,You should understand the context and ensure you are happy that they are safe before attempting to apply my suggestions, what you do, is YOUR responsibility. Location Halifax UK
Re: Calibration Failure
Thank you for the additional information, Joan. That makes a lot of sense, and I will check how close the heat block on my hot end is to the plastic parts. I'll also practice the instructions on my original hot end before doing anything to my new one. I figure if I'm going to go through the trouble of tearing it down enough to make these changes, I might as well remove the heat element and thermistor probe and use a heat gun to warm things up, nice and far away from my printer. 🙂
If I ever get past the calibration issue, I'll keep a close eye on the plastic parts for heat damage.
Re: Calibration Failure
Thanks Mr Flippant,
there are a lot of interacting elements on a 3D printer, and it can be demoralising to go from one fail to another.
a misplaced heat block can lead to poor heat transfer from the heatblock, through the nozzle, into the filament, that changes performance as the speed of printing changes. as flow increases the filament will be more difficult to melt, because the nozzle cools and is not reheated efficiently.
and there is the issue on the other side of the heatblock, if the heat block covers part of the thin section of the heatbreak, there will be reduced temperature differential between the hot end and the cold end, which will promote Heat Creep... ang filament jamming!
regards Joan
I try to make safe suggestions,You should understand the context and ensure you are happy that they are safe before attempting to apply my suggestions, what you do, is YOUR responsibility. Location Halifax UK
Back printing
All is now ok. It is immensely reassuring to have such an active group helping.
I bought a Swiss Micro. thanks SashaZ.
I learned a lot from sean8.
I installed it, with new Teflon, following Joan’s instructions carefully. Thanks Joan.
I tapered the inside of the lower end of the Teflon with a clockmakers broach that I found in an old toolbox. Not too aggressively, as I was nervous.
I now know the printer in much more detail. Put it on the educational budget.
Filastruder, the US e3d suppliers and micro Swiss, and the Us postal service we’re all efficient.
Retired doc, should have been an engineer.
RE: Calibration Failure
@henry-casson
I have read all of the replies to your post and based on what I'm hearing I think it might be time to Retire your Printer 🙁