RE: After upgrade MK3 -> MK3S: Calibration failed. Check axes and run again.
While I doubt the screw is the limiting factor, it might be, a guy had mounted a 2 mm thick fan grill and started failing xyz cal.
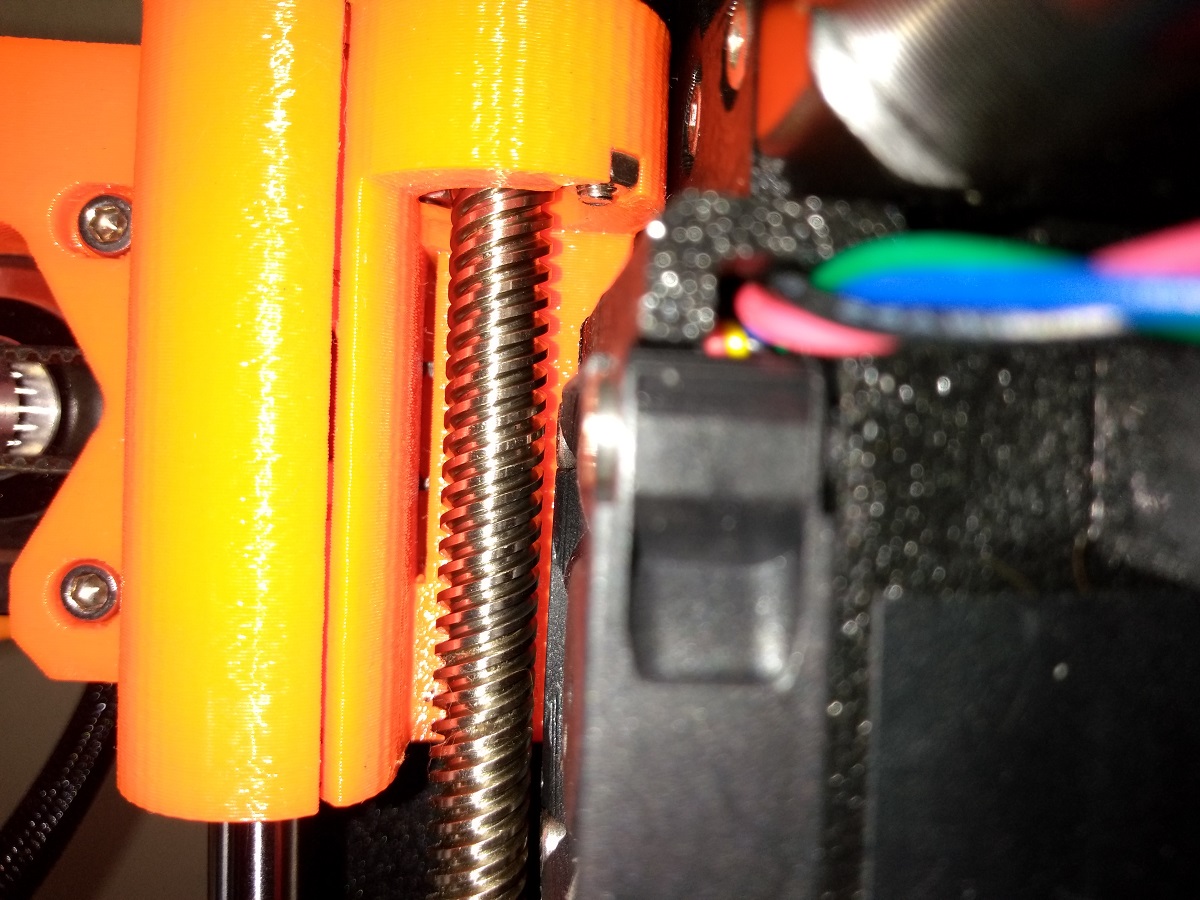
Both upper and lower screws on my Mk3 (non-S) clear the lead screw by a full mm. The important thing is the extruder black plastic firmly hits the orange X bracket - no gap whatsoever.
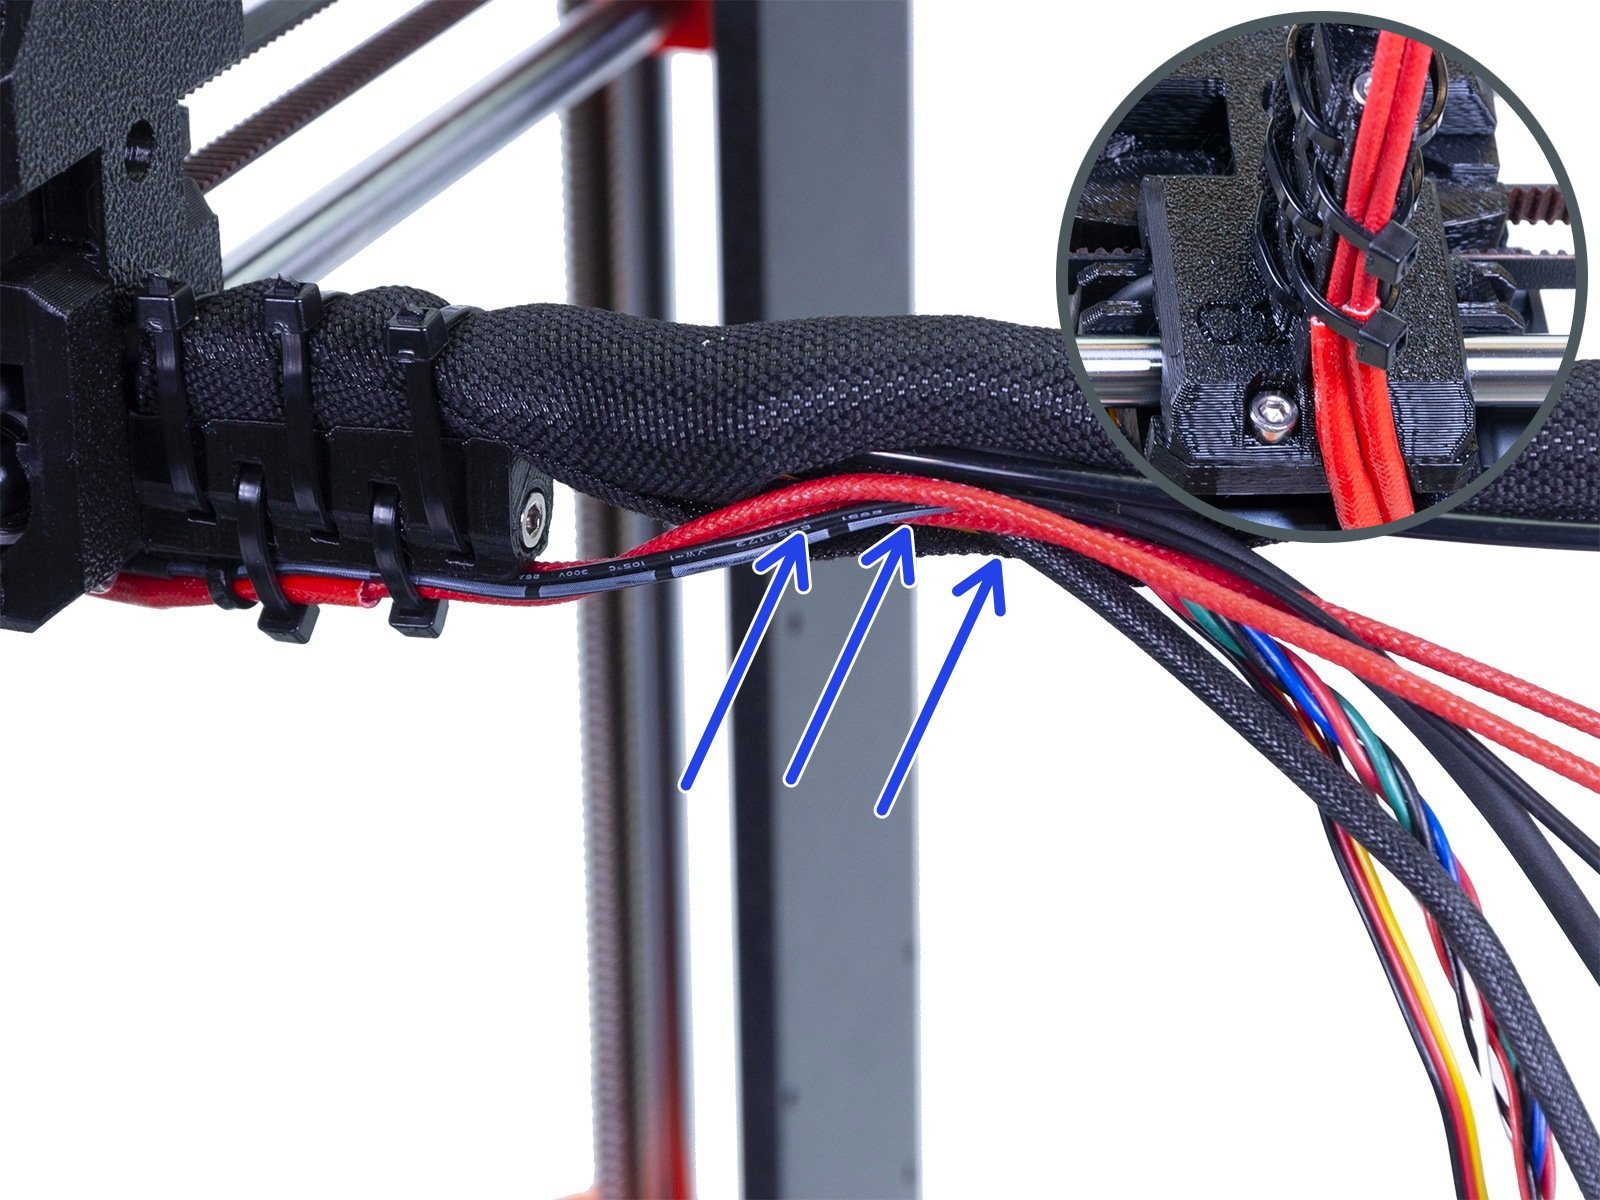
From your earlier photos - you had cable ties where the heads are not on top or bottom of the rat tail support. These ends must not be on the sides since they add a couple mm to the tail width. There is zero tolerance extra on the tail. If you push the extruder far right or far left, the tail must not touch anything, Einsy case on the left, or power supply on the right. See my post : 08/11/2020 12:28 pm - those ends marked in blue can cause a failure.
The other thing is friction. The extruder should slide easily left to right and back left. Any snags will need addressing.
And, you'll also need to "align" Z but rotating both lead screws -- use Move Axis Z up until the X-Axis hammers against both top Z stops. Both sides of the X-axis must hit. This aligns X to the bed. Make sure nothing is hitting the frame as the extruder moves up - like the filament sensor cable. And the S upgrade does change the Y belt adjuster. Make sure nothing on the bed is limiting motion. The left front and rear bed bearings should touch the front and back rod holders.
You might want to take the time to contact support using the web-store chat feature. Maybe I'm overlooking something simple.
RE: After upgrade MK3 -> MK3S: Calibration failed. Check axes and run again.
RE: After upgrade MK3 -> MK3S: Calibration failed. Check axes and run again.
I just looked at the video and the failure appears to me with the PINDA and the Z-axis, not the X. Try to redo the PINDA Adjustment routine again. Check That the LED lights briefly as it reaches the bed. I've never had this specific problem; however, I'd be looking more towards this part of the alignment.
Stay safe and healthy, Phil
RE: After upgrade MK3 -> MK3S: Calibration failed. Check axes and run again.
The issue with the error is any problem before that step will be reported there.
The PINDA is detecting the four cal points, homing in on them as expected. It is at this point where I assume the firmware is setting the X Y and Z steps per millimeter factors, and finding something out of range.
It could be a stall in the X, a stall in the Y, both friction related; or something off about the Z - interference of a cable, the rod holders not seated, or even the screws in the T-nuts not properly seated or the T-nuts upside down.
ps: It might be worth - after this error - if you can move an axis - to raise the extruder to the top of Z and see what the number reads: is Z range anywhere close to 210 mm. Or do an autohome, check is the PINDA is centered in teh cal circle; and what the X, Y, and Z ranges are.
RE: After upgrade MK3 -> MK3S: Calibration failed. Check axes and run again.
I don't know if all you are aware, but enabling the diagnostic feature in the firmware and connecting the USB serial, the XYZ Calibration explains what it is going up, and what are the data and failures it finds. Here is what my firmware finds:
calculate machine skew and offset LS
X vector, initial: 0.00000, 0.00000
Y vector, initial: 0.00000, 0.00000
center, initial: 0.00000, 0.00000
point #0 measured: (10.09940, 6.66004); target: (12.00000, 6.00000), error: 2.01194
point #1 measured: (216.80914, 6.98807); target: (220.00000, 6.00000), error: 3.34034
point #2 measured: (216.75944, 197.71371); target: (220.00000, 198.00000), error: 3.25318
point #3 measured: (10.00000, 197.85289); target: (12.00000, 198.00000), error: 2.00540iteration ....correction vector...
Error after correction:Difference after correction:
point #0measured: (10.09940, 6.66004); measured-corrected: (9.45459, 6.25629); target: (12.00000, 6.00000), error: 0.76
point #1measured: (216.80914, 6.98807); measured-corrected: (217.45458, 6.35107); target: (220.00000, 6.00000), error: 0.91
point #2measured: (216.75944, 197.71371); measured-corrected: (217.37937, 198.35105); target: (220.00000, 198.00000), error: 0.89
point #3measured: (10.00000, 197.85289); measured-corrected: (9.37938, 198.25627); target: (12.00000, 198.00000), error: 0.74Calculate offset and skew returning result: XYZ Calibration Failure (-2)
Taking as example the first calibration circle, the firmware expects to find it at 12mm,6mm. Instead, it finds it at 9.45mm, 6.25mm 😭
You can see that the PINDA feels the first target circle at 9.45cm right from home position while it SHOULD BE 12mm, and the same for the other X positions of the calibration circles, too near.
Since some error delta are to high: 0.89 and 0.91 the firmware establish that if they are higher than 0.80 the calibration should fail, and so I get the error.
Now is clear that the PINDA should move 12 mm from home and find the circle. If it finds it at 9.45 or 10.0 (before the adjustment) it means.
I don't know what else to do. I rechecked everything, taking other photos, and there are no contacts at all.
Unfortunately taking the last pictures, after moving the head to home (even slowly), my Prusa decided to die. 😱 😰
Now turning it on, just give the message "Original Prusa i3 - Prusa Research ..." on the LCD and nothing else.
RE: After upgrade MK3 -> MK3S: Calibration failed. Check axes and run again.
Unfortunately taking the last pictures, after moving the head to home (even slowly), my Prusa decided to die. 😱 😰
Now turning it on, just give the message "Original Prusa i3 - Prusa Research ..." on the LCD and nothing else.
Possibly a cable is squeezed or causes a short circuit in the area of the extruder at the cable harness to the Einsy. I had this problem once in this area too:

The fault was hardly visible optically. Only a measurement with the multimeter brought clarity.
Statt zu klagen, dass wir nicht alles haben, was wir wollen, sollten wir lieber dankbar sein, dass wir nicht alles bekommen, was wir verdienen.
RE: After upgrade MK3 -> MK3S: Calibration failed. Check axes and run again.
My printer did exactly that yesterday. Might be a bug going around. Powering down for a minute, then powering back on resolved it. 3.9.1 isn't as stable as earlier versions.
If a power cycle doesn't fix it, you might want to check the fuses. Older fuses can simply fail for no reason.
Back to the verbose errors - the 9 vs 12 offset means your X axis is not homing properly, that something IS keeping the X 4 mm away from where it should be getting to. 4 mm is a lot. Take some good bright clean photos of the extruder from all angles. Including the side against the left stop, and the rear tail against and away from the Einsy.
RE: After upgrade MK3 -> MK3S: Calibration failed. Check axes and run again.
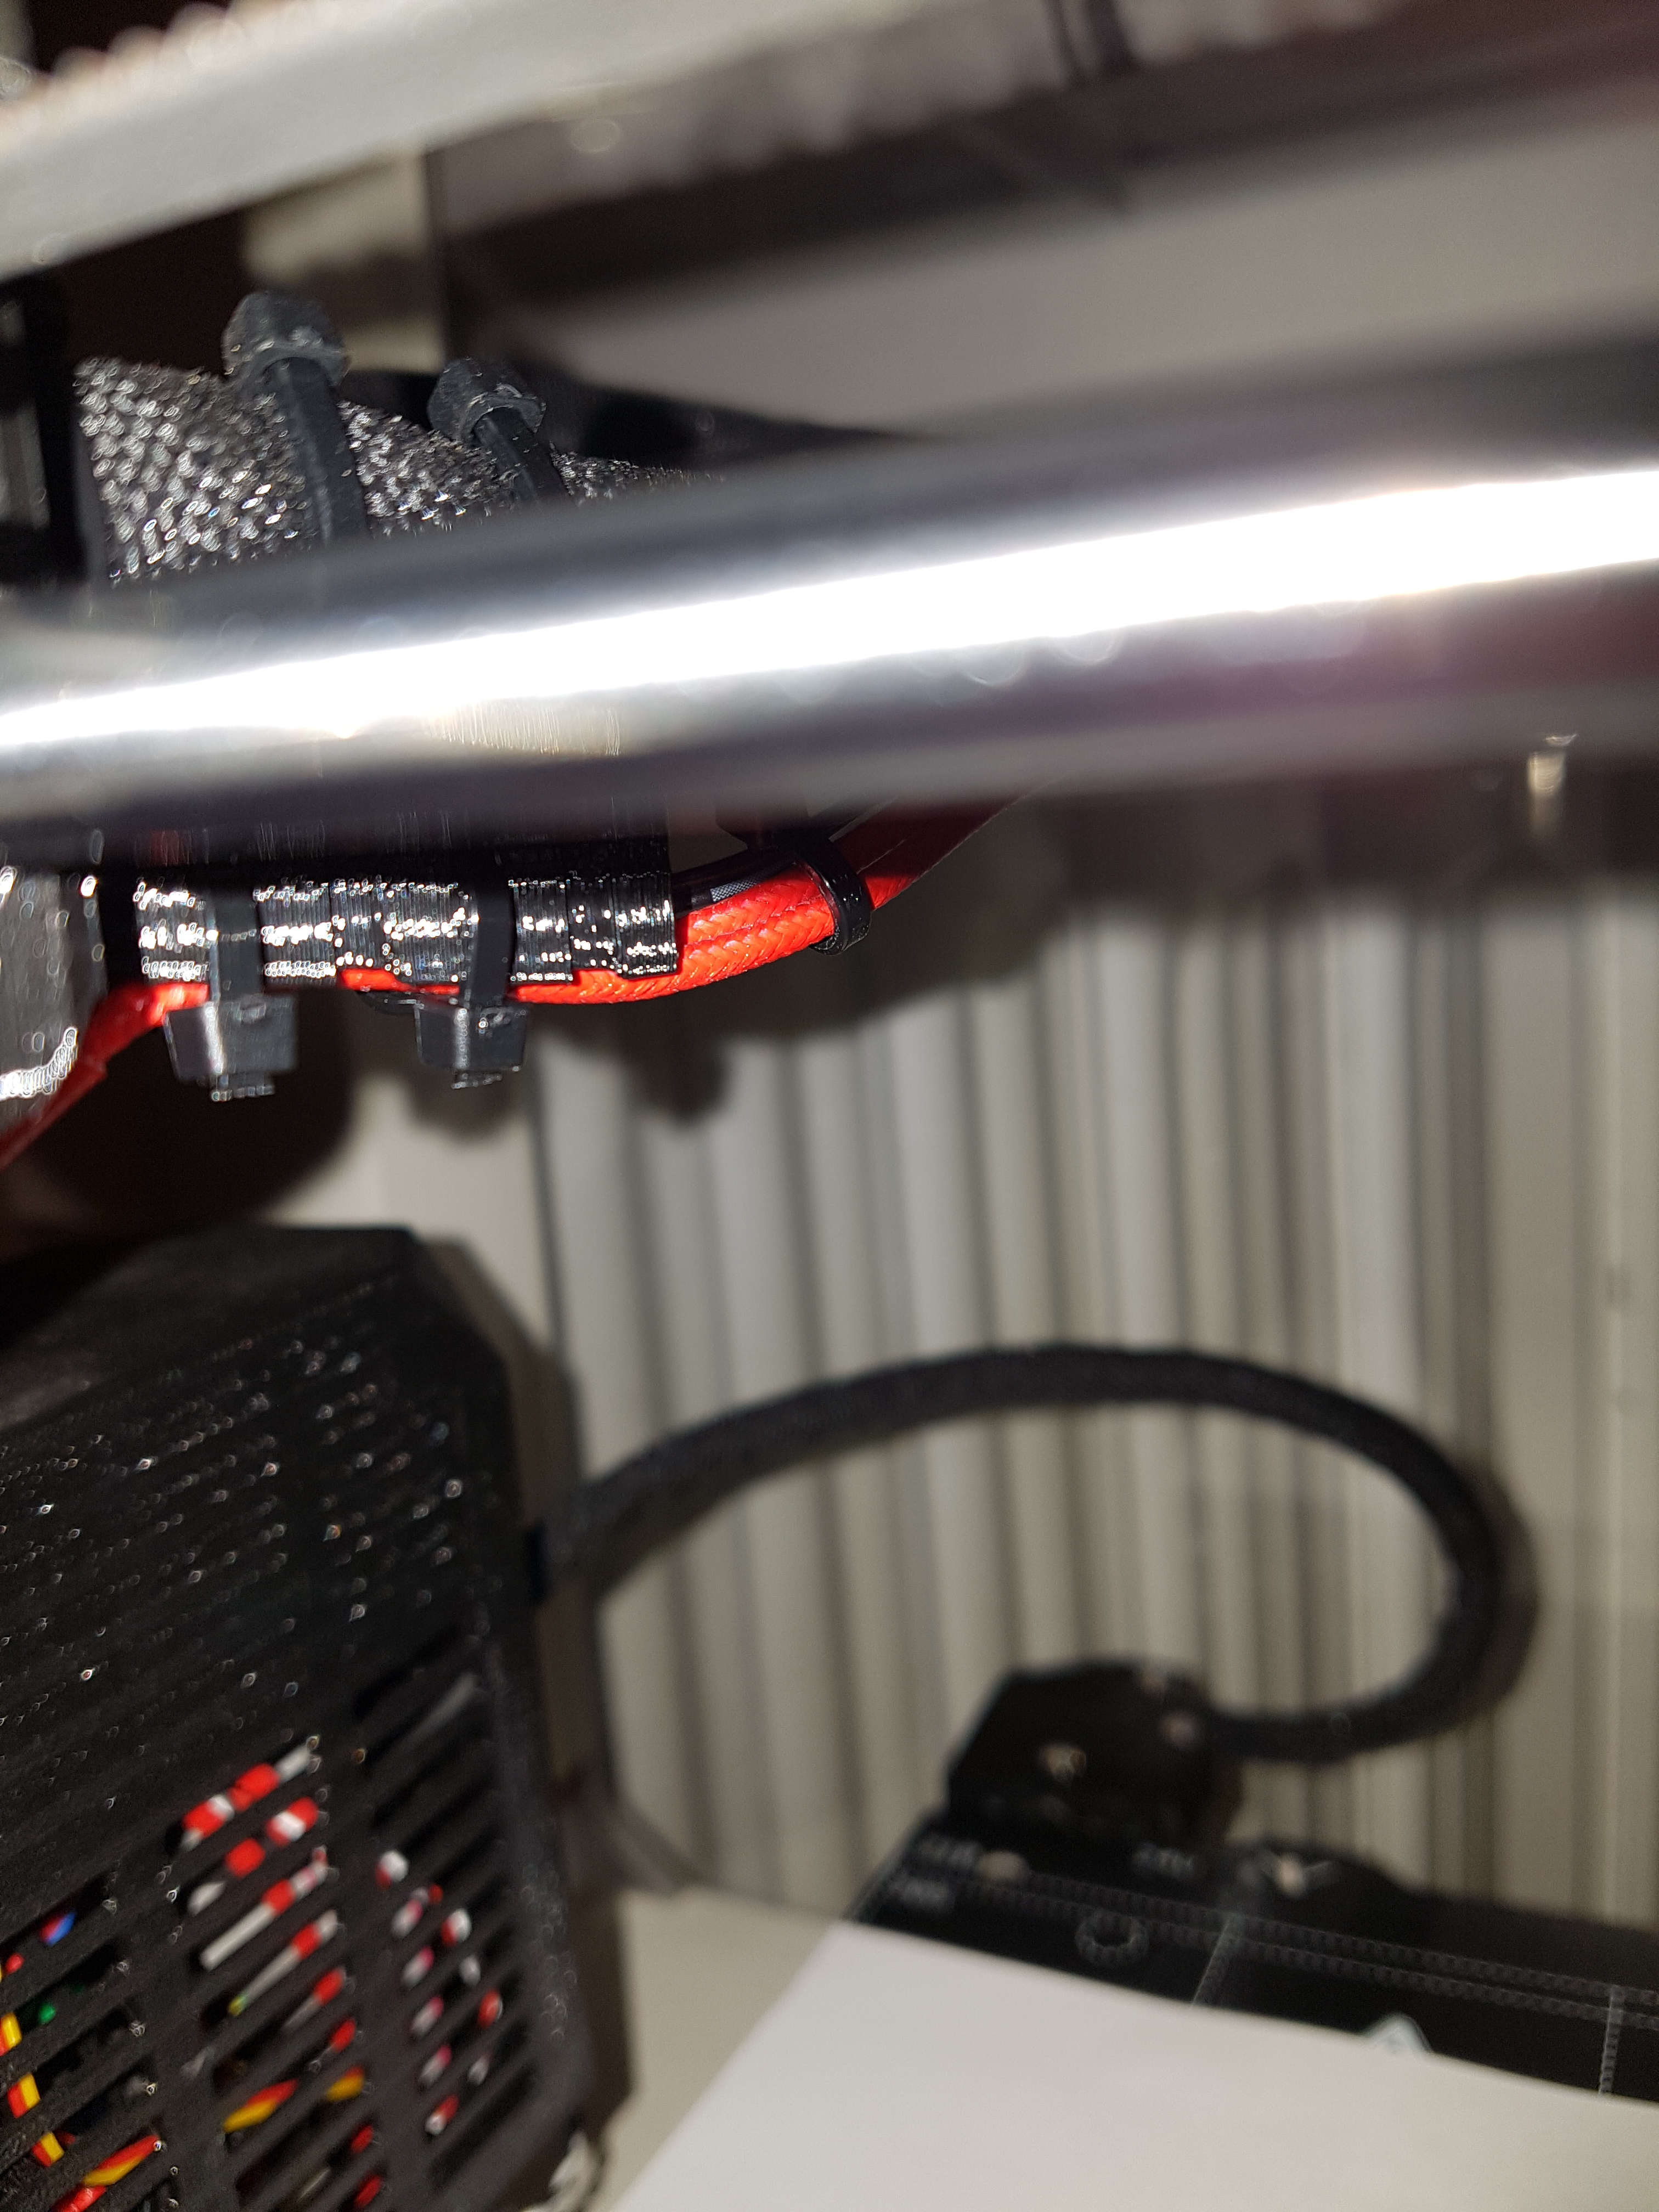
This image is crucial: notice that NONE of the cable tie ends are on the side of the tail, the ends are on top or the bottom of the tail. This is very important.
RE: After upgrade MK3 -> MK3S: Calibration failed. Check axes and run again.
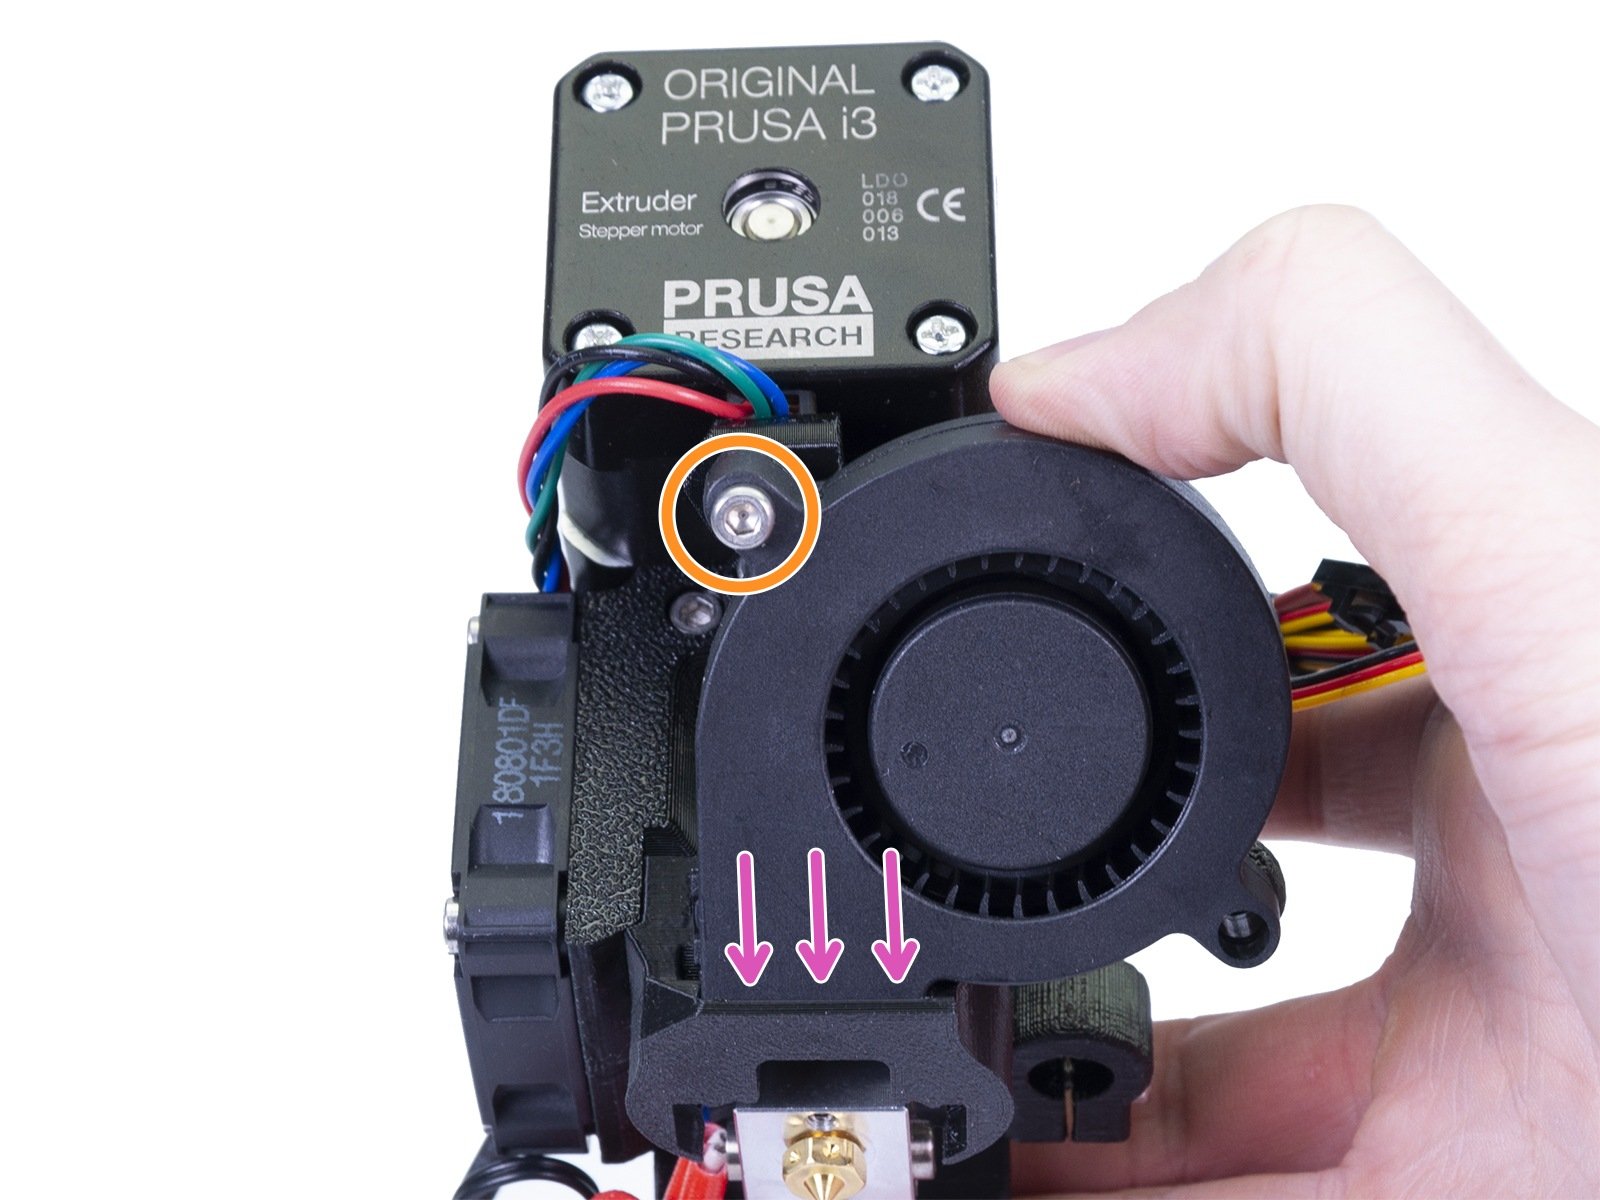
The fan should be held firmly against the extruder case, no gaps; the fan screws should not be above the fan housing more than a fraction of a millimeter, nearly flush.
RE: After upgrade MK3 -> MK3S: Calibration failed. Check axes and run again.
@tim-m30
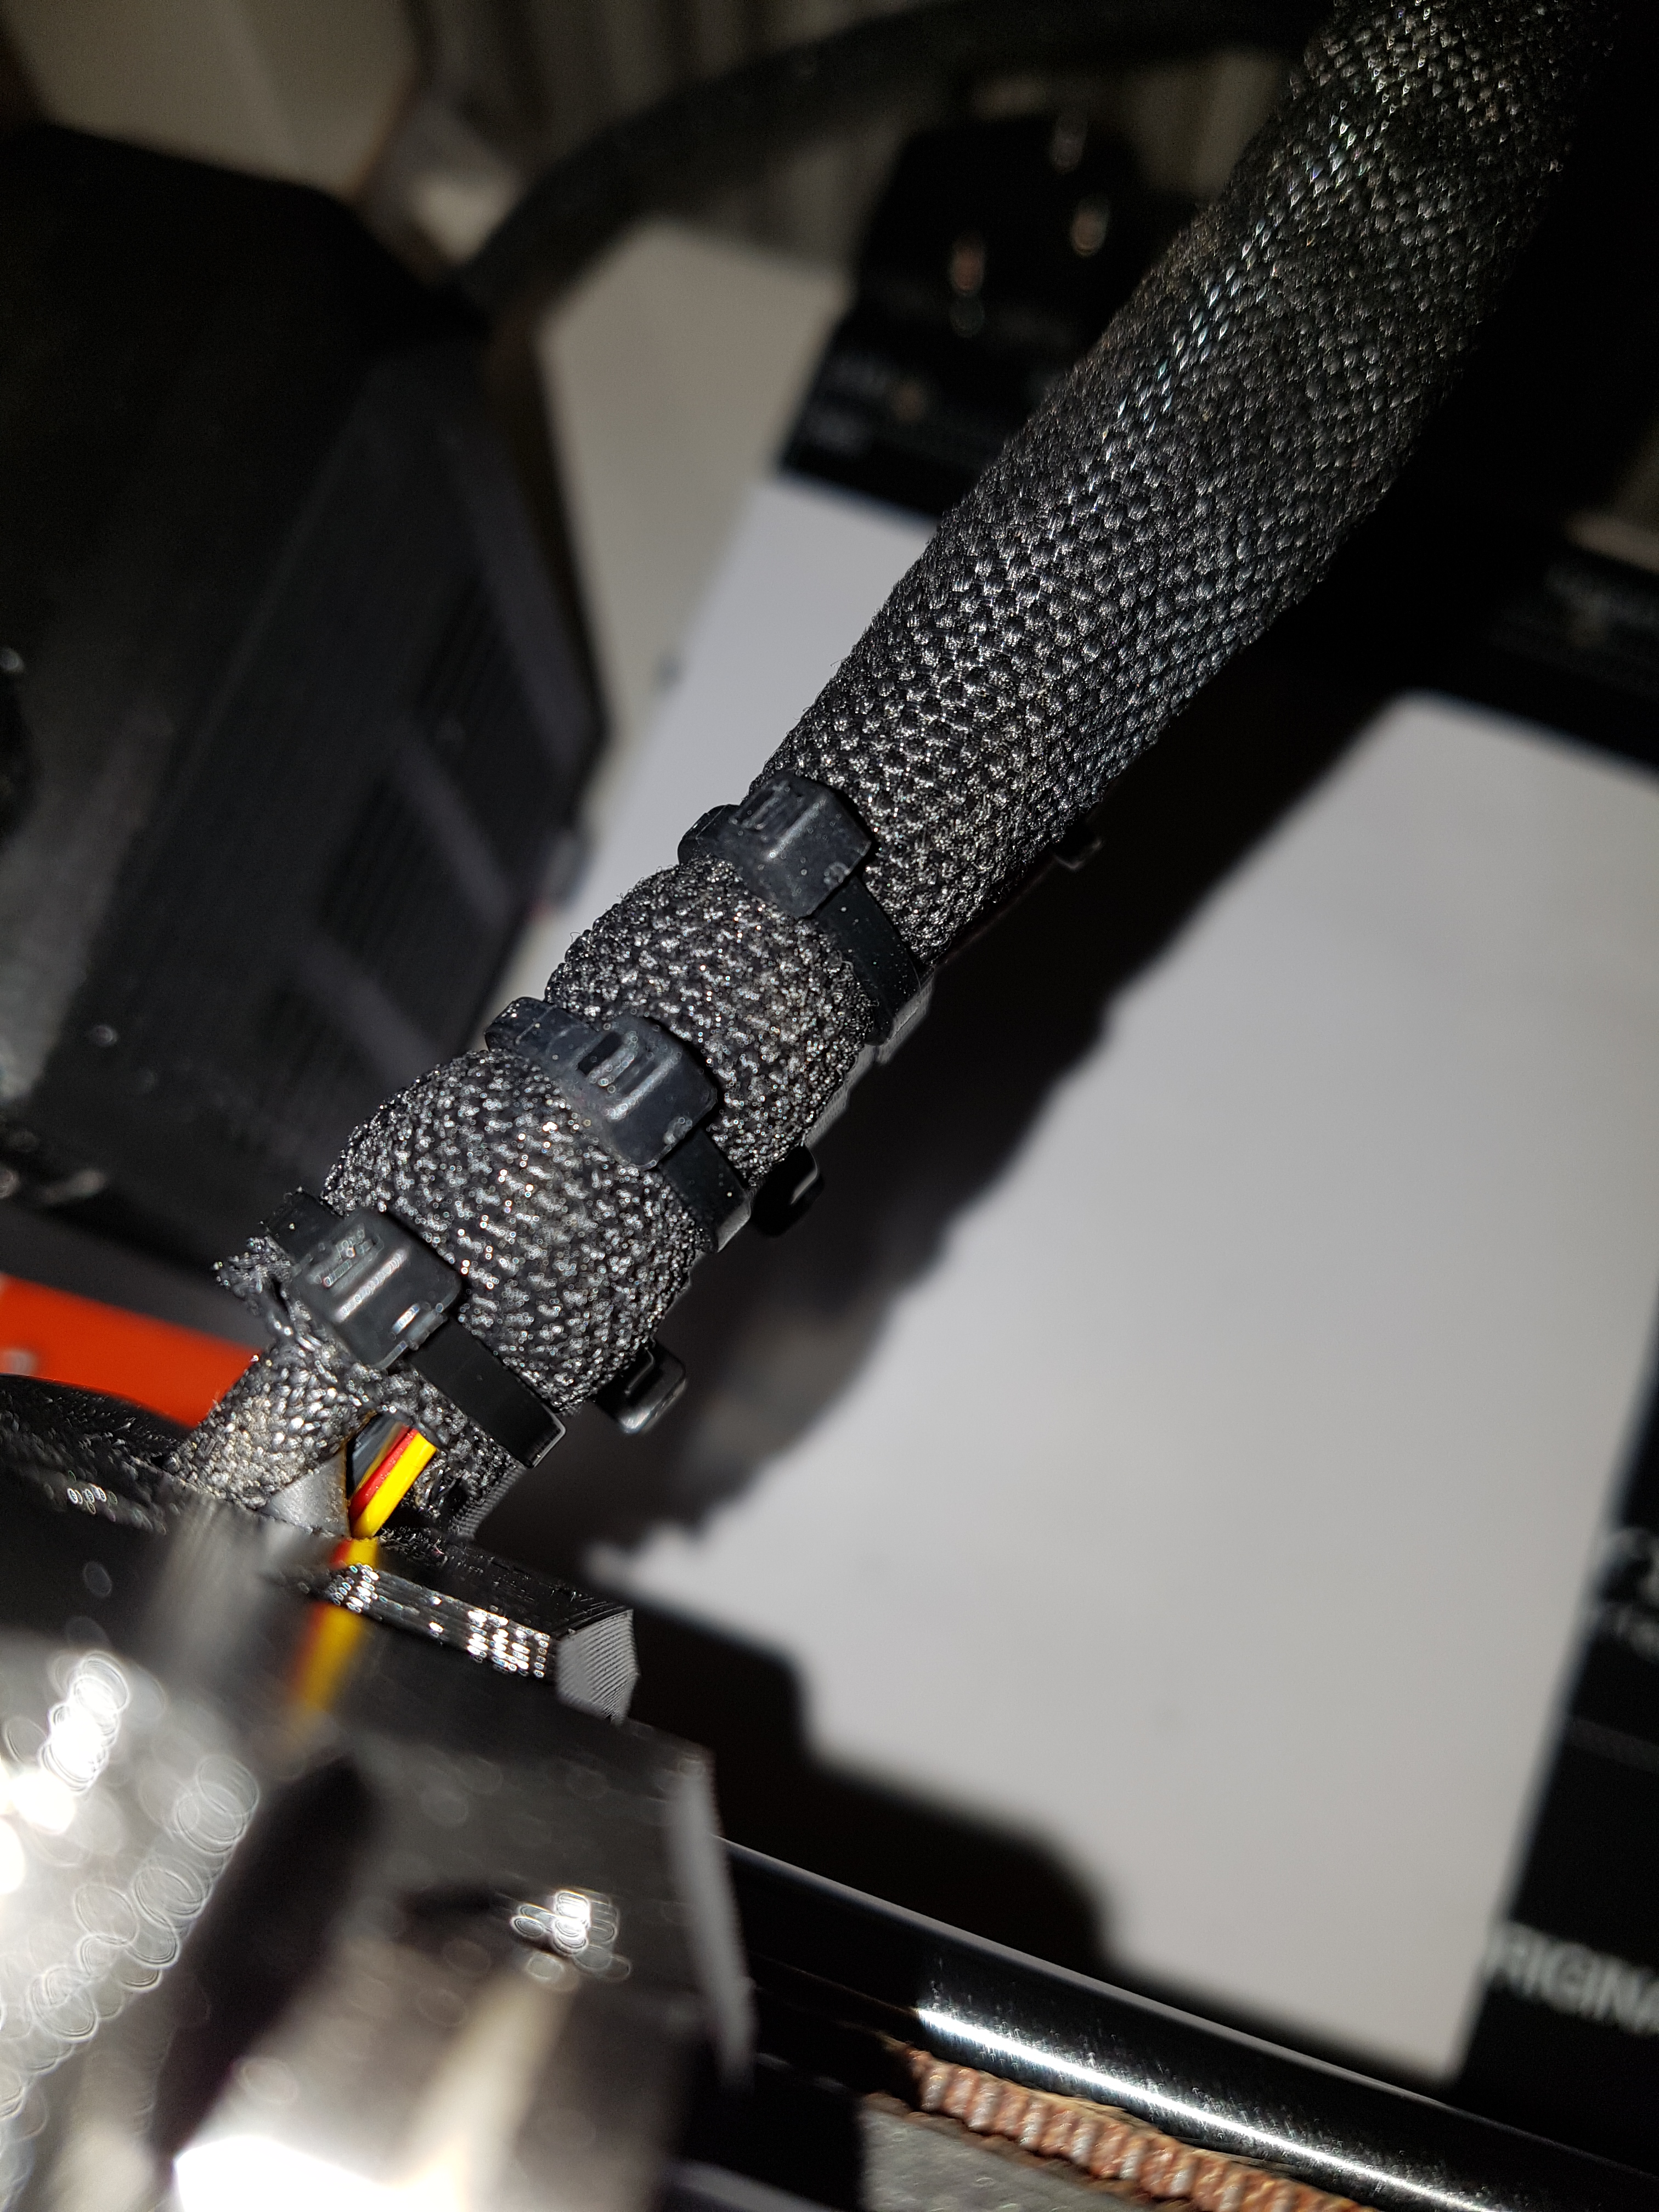
Exactly! This is a very sensitive area. Due to the constant movement dynamics, the cable ties can damage the cable insulation over time. I replaced this area with extremely robust sheathed silicone cables and additionally slid this tape under the cable ties:
may be a bit overkill, but I was tired of malfunctions due to rubbed out cable insulation.
Statt zu klagen, dass wir nicht alles haben, was wir wollen, sollten wir lieber dankbar sein, dass wir nicht alles bekommen, was wir verdienen.
RE: After upgrade MK3 -> MK3S: Calibration failed. Check axes and run again.
Hello,
good news. I called Prusa for help, and they suggested to start with Firmware re-flash.
So I moved away the printer to put also the laptop on the table, and when I turned on the printer to start flashing IT WAS JUST WORKING !!!!! Incredible. I spent half an hour trying everything when it was blocked, and now just worked. Surely moving it, affected something.
I re-flashed with 3.9.1, and just after the reboot, it died again 😣 But turning just off and on, resumed to work again.
Then I performed several XYZ Calibration and videos for PRUSA support (I have them on youtube). All failed as usual. ☹️
I also dismounted the X motor to ensure the belt pulley screws were firmly installed, and re-tensioned the belt not too tied this time.
That did not changed the result. I have done an interesting test:
- HOME TEST
- MOVE X right ---> 253mm
- MOVE X 1mm ---> BANG ! it hits the right bar, and the LCD write 254
- MOVE X 1mm ---> BANG ! it hits the right bar, and the LCD write 255
- MOVE X 1mm ---> nothing happens, the LCD stays on 255
- MOVE X left <--- 253mm the LCD write 3
- MOVE X left <--- 1 mm the LCD write 2
- MOVE X left <--- 1 mm ... BANG! it hits the left bar, and the LCD write 1
- MOVE X left <--- 1 mm ... BANG! it hits the left bar, and the LCD write 0
- MOVE X left <--- 1 mm ... nothing happens. The LCD stays on 0.
It seems like the printer shrinked 🤣 and it is about 253.5 instead of 255. 🙄
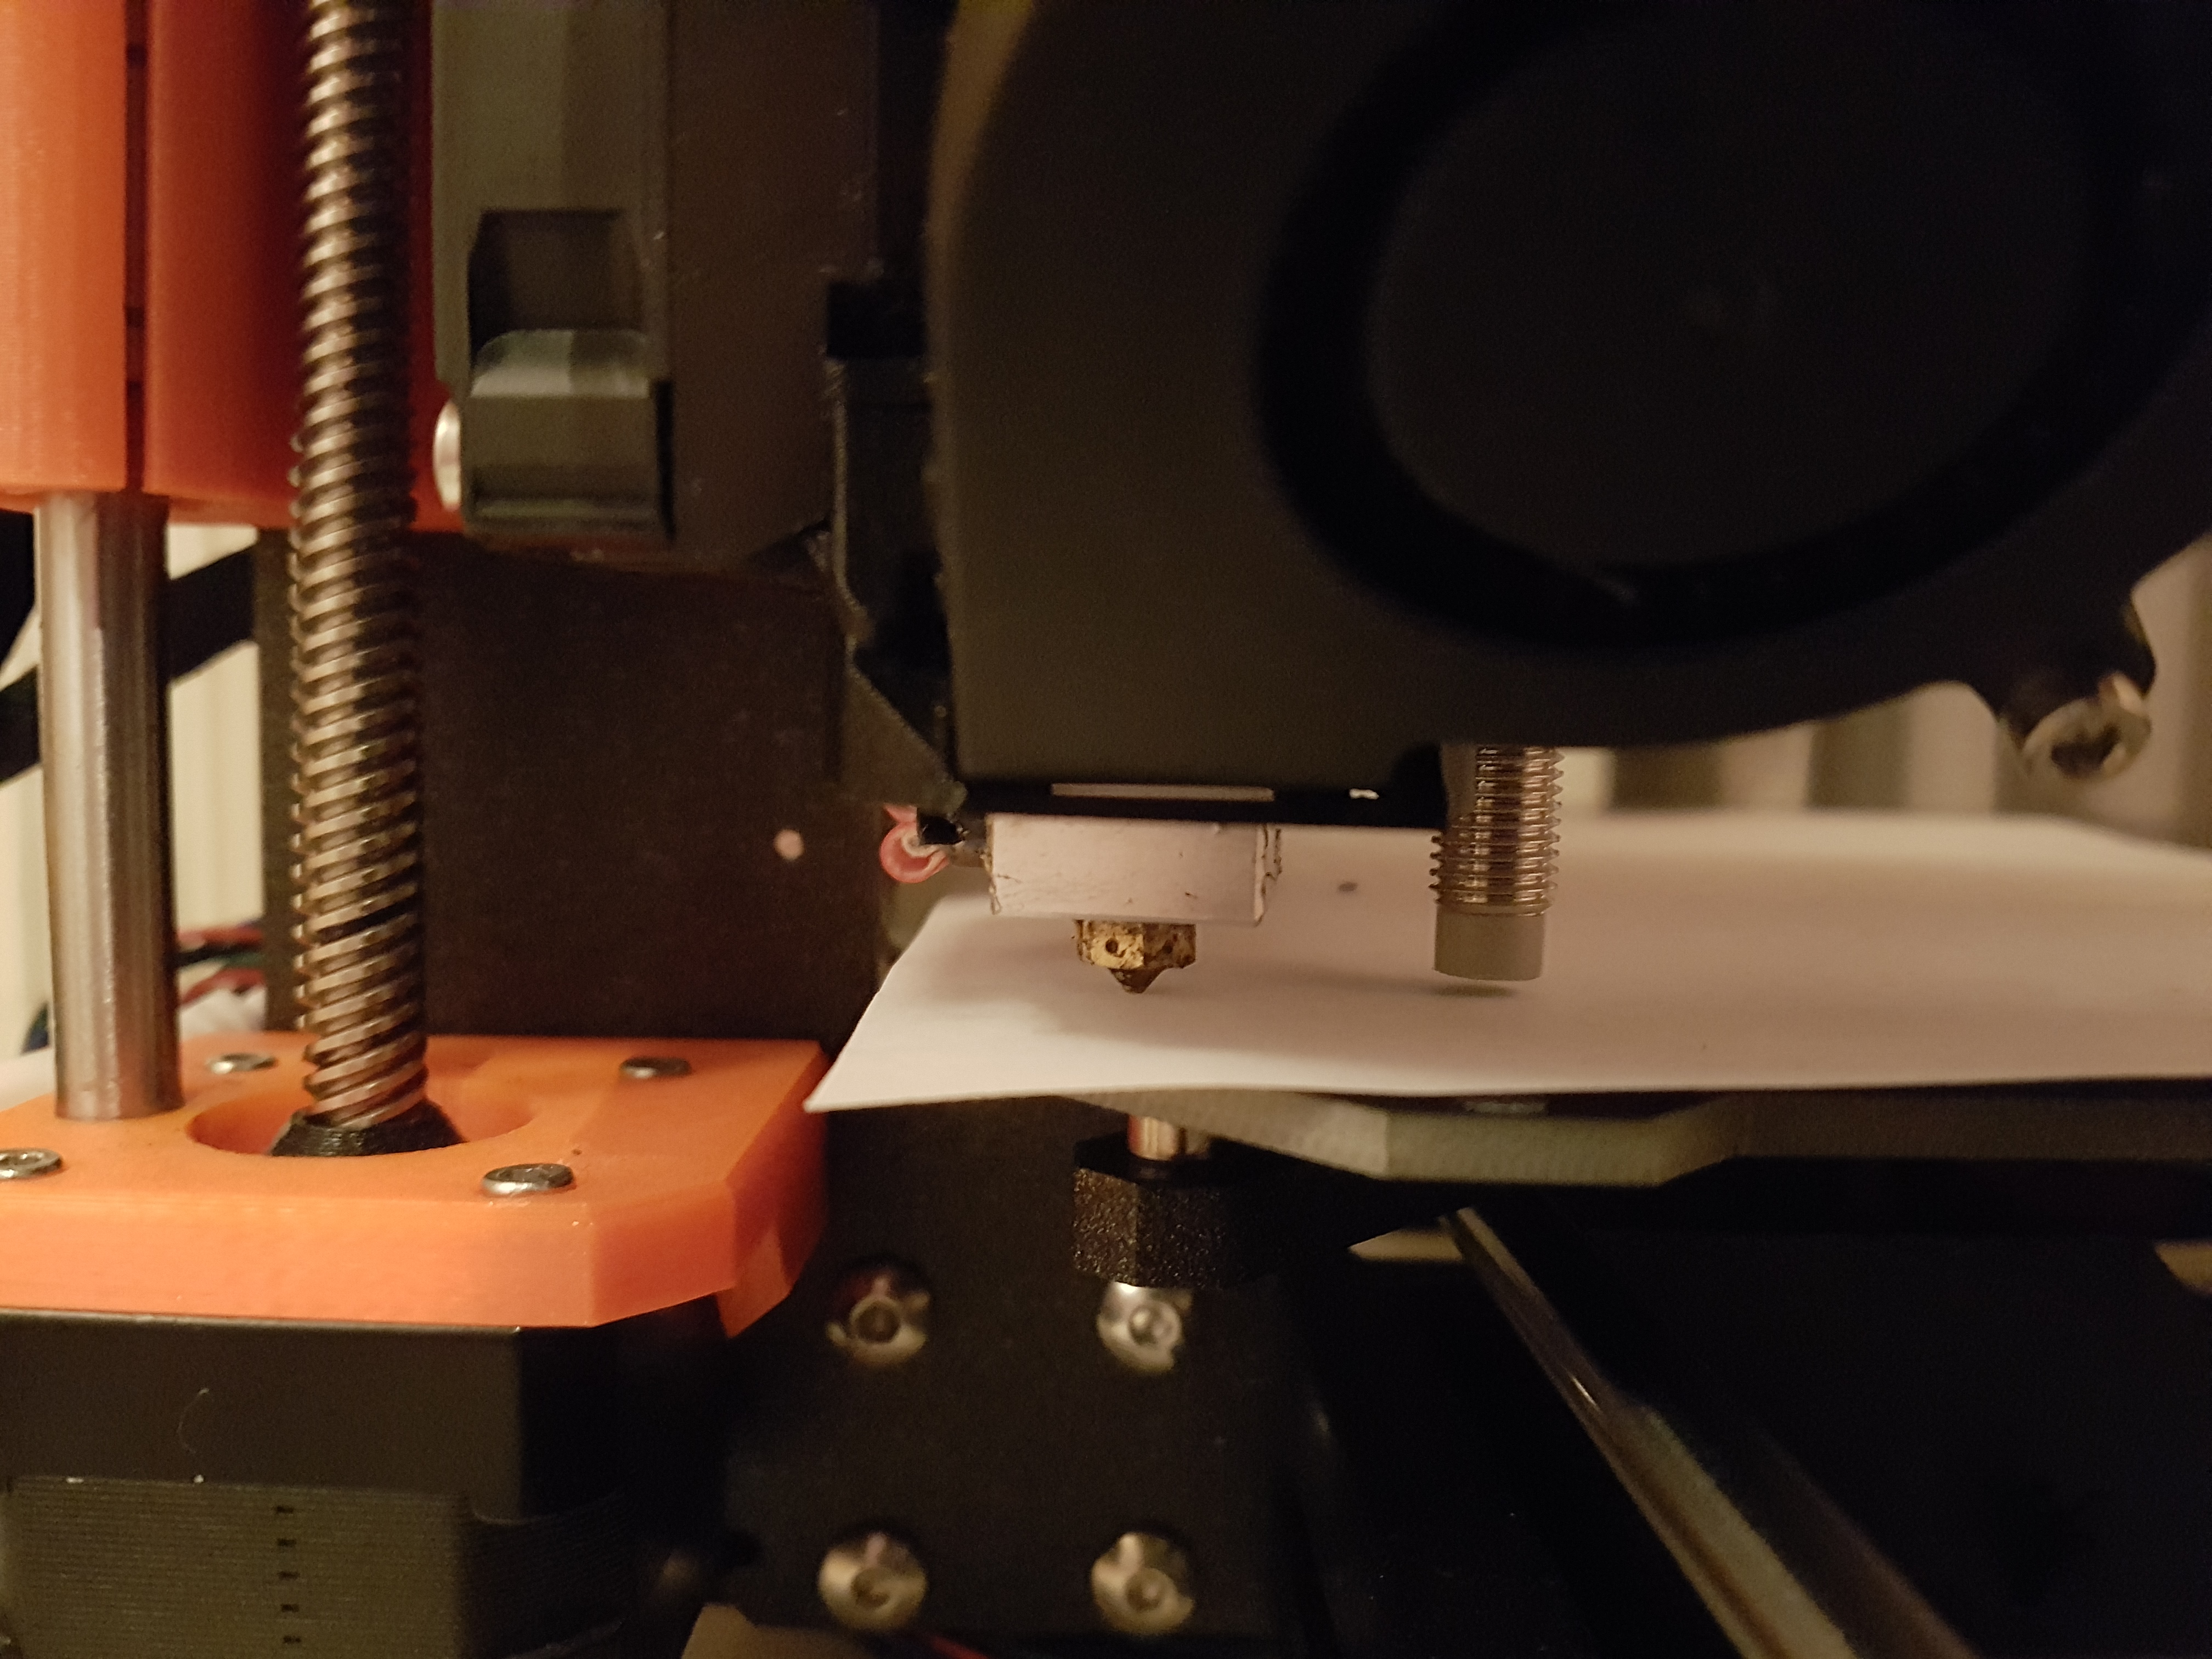
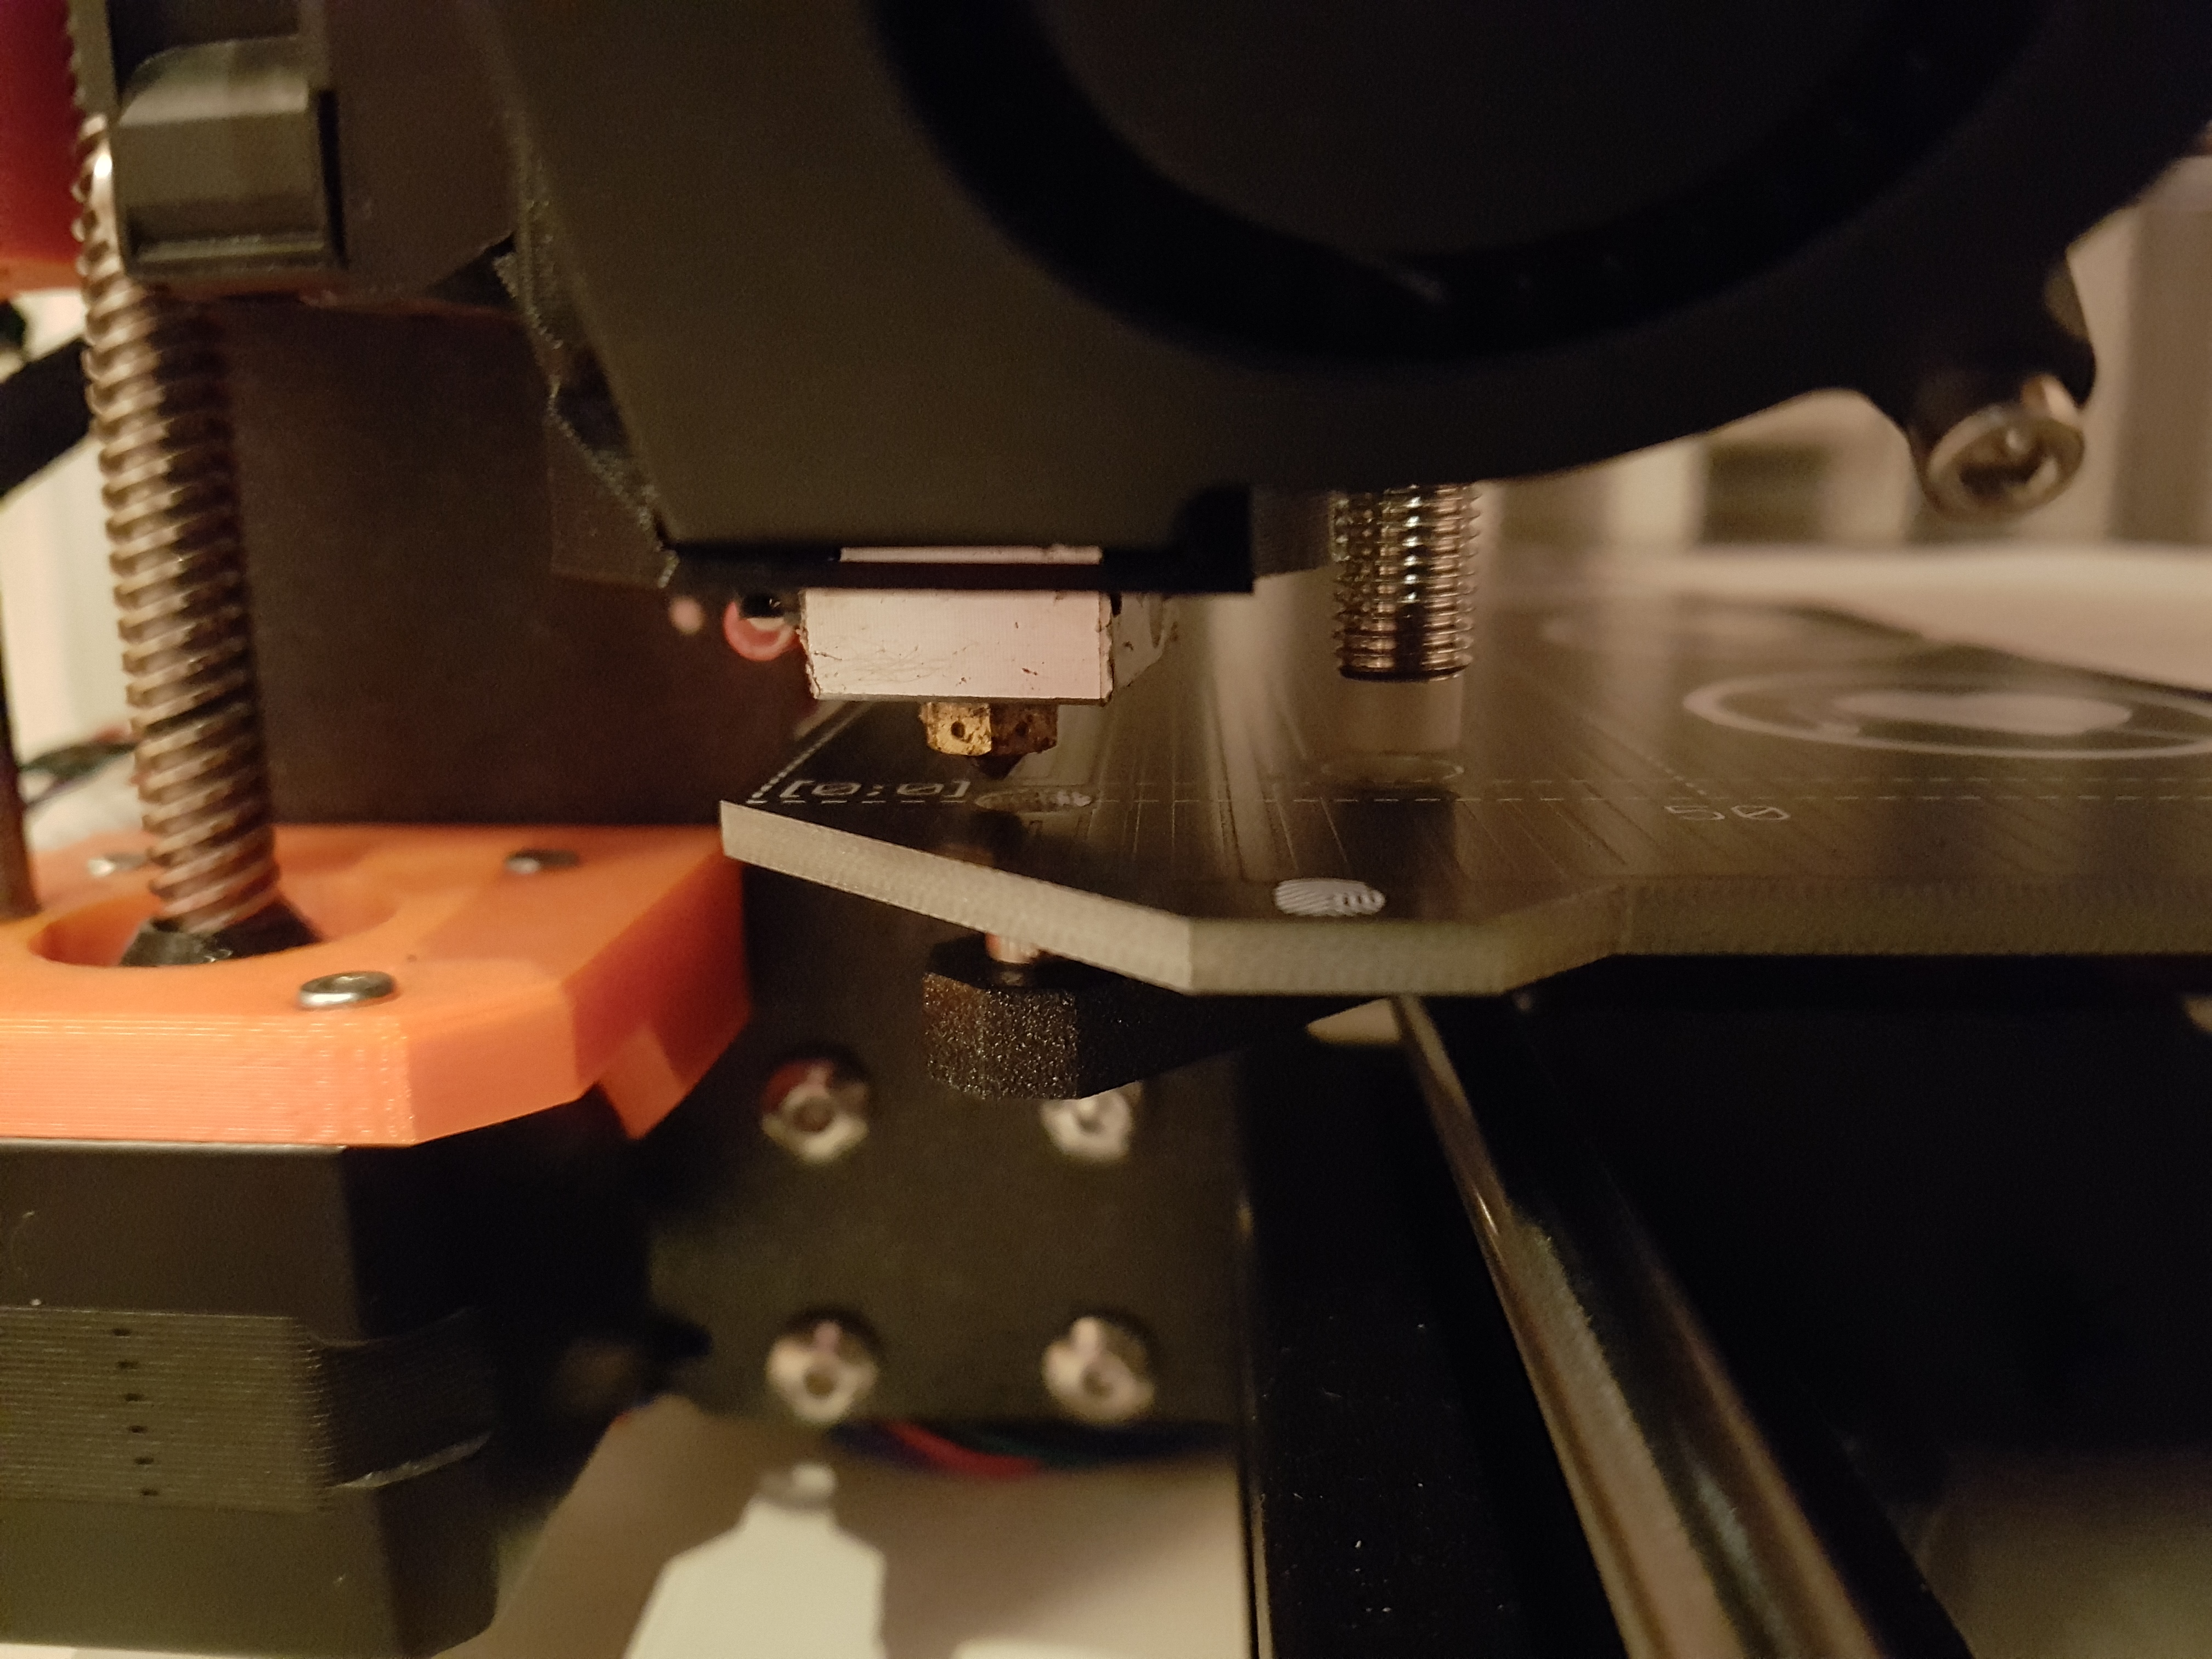
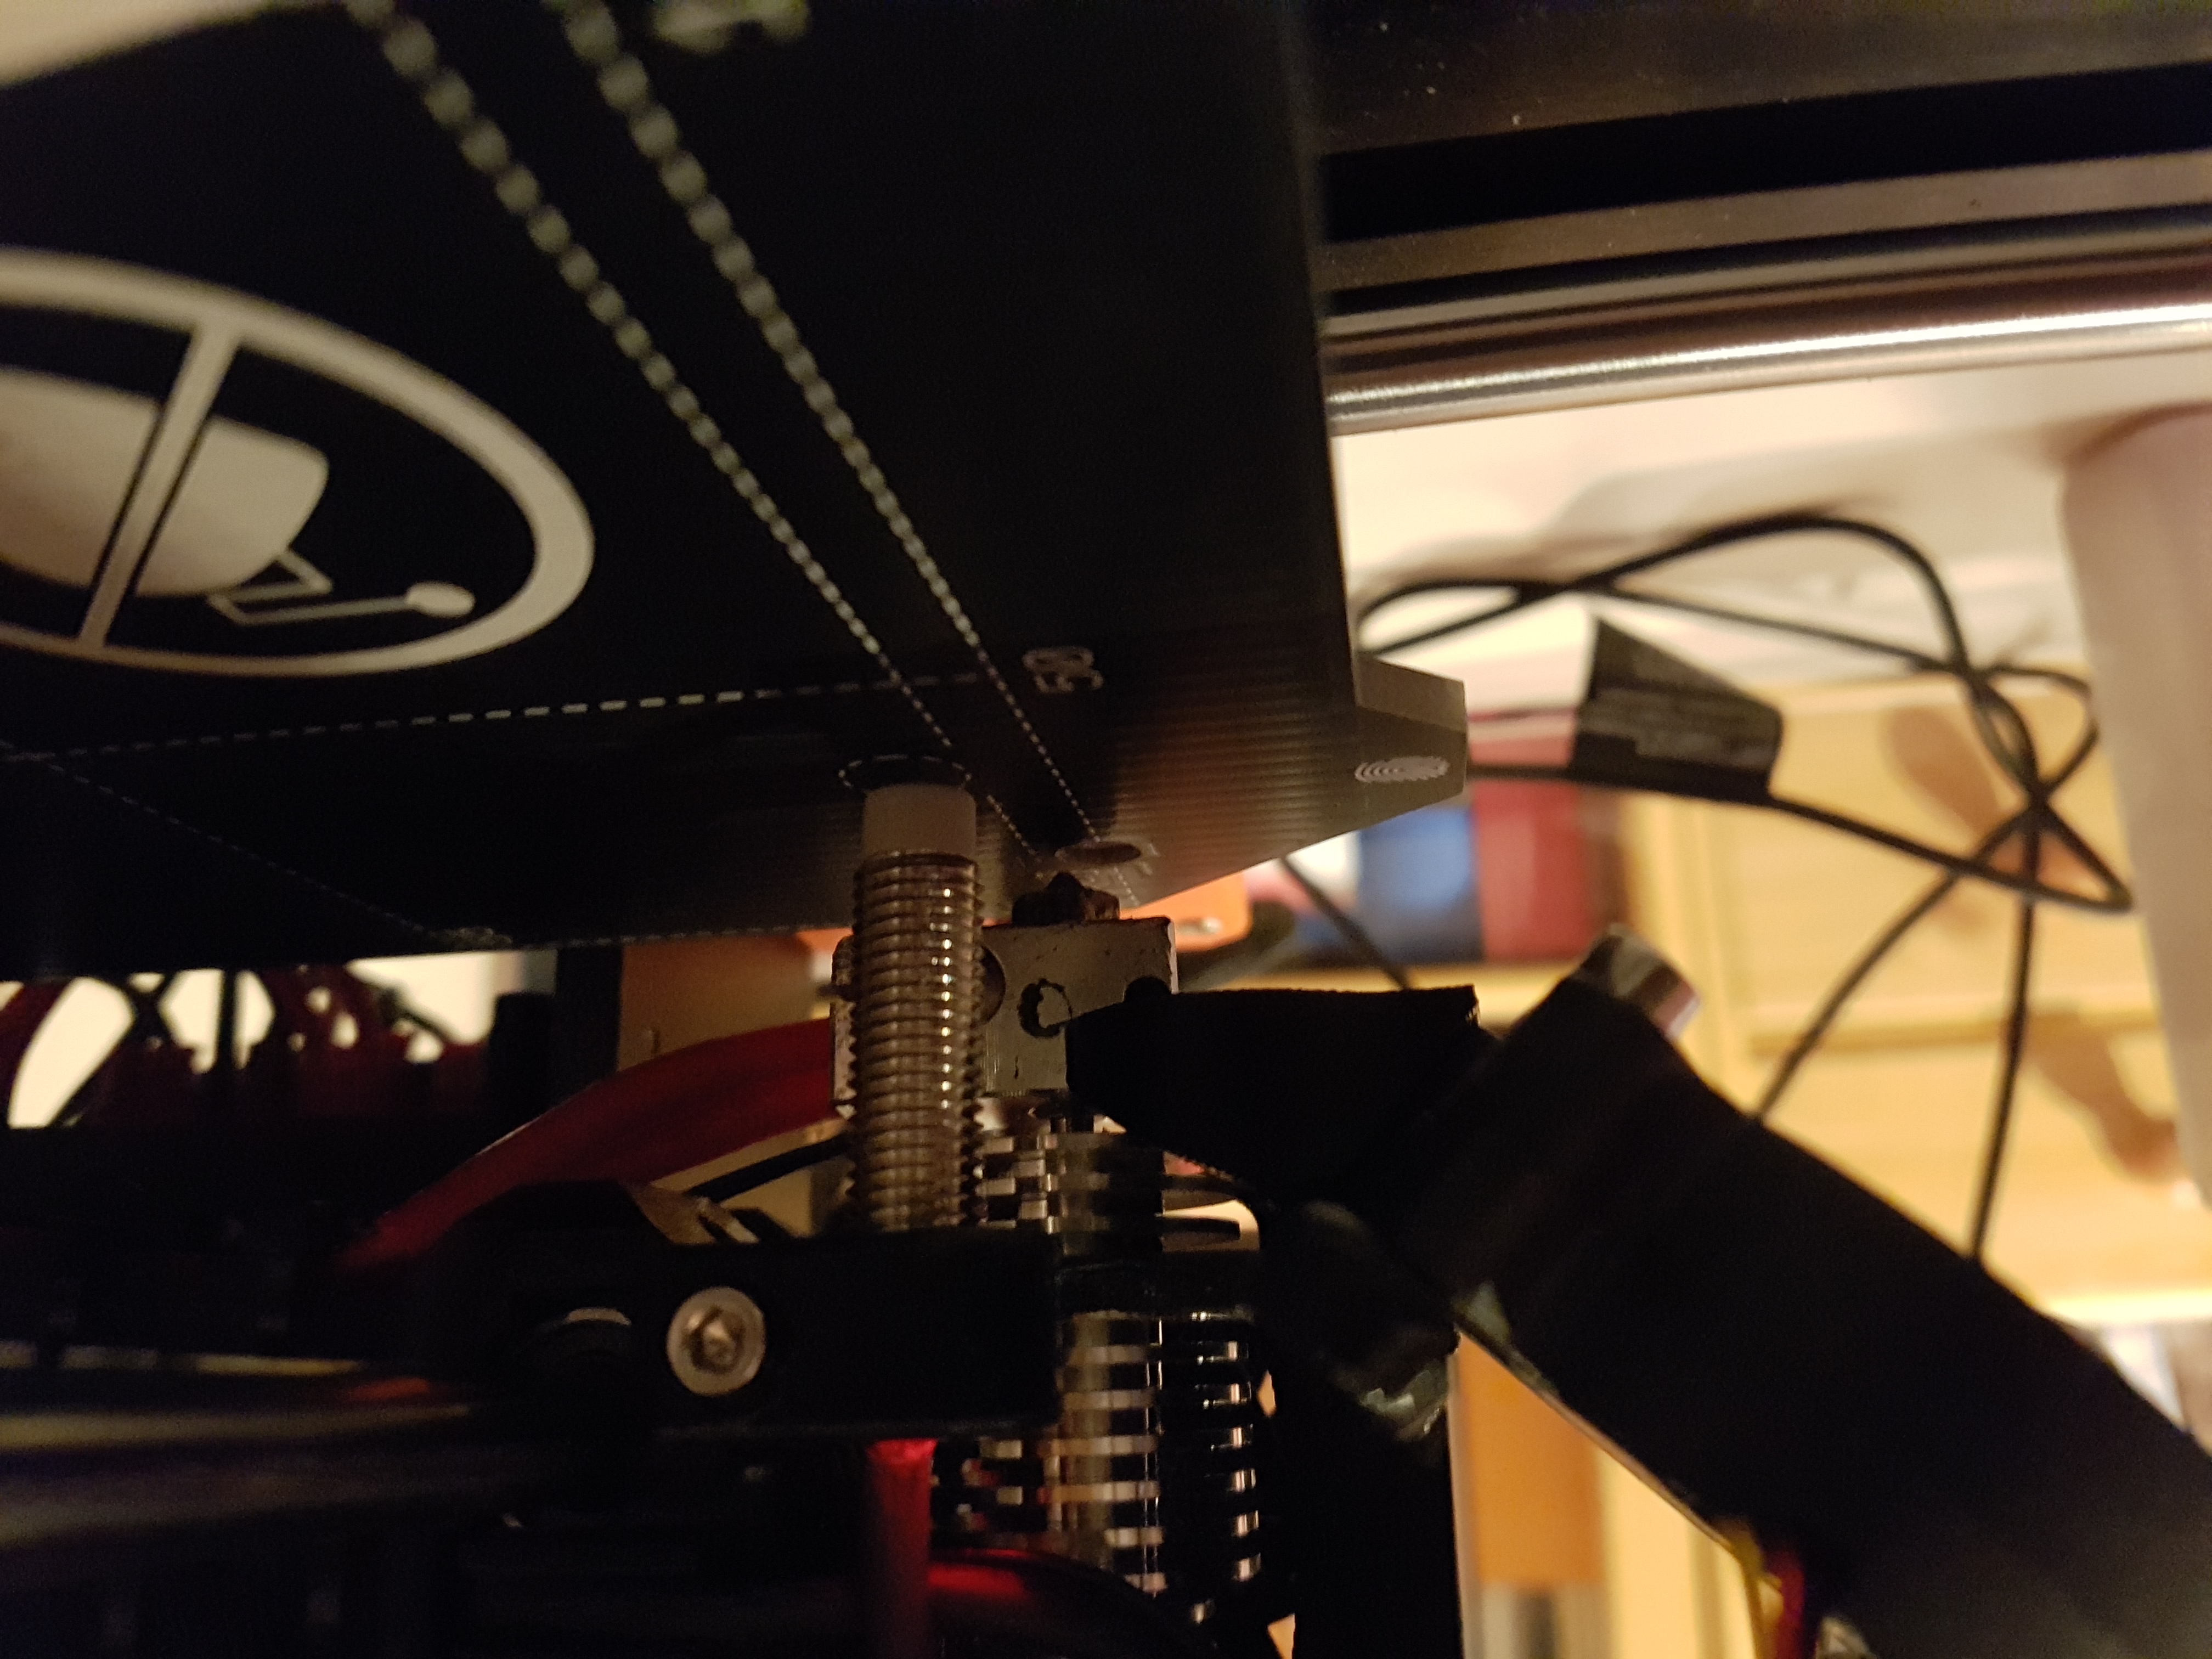
And now the XYZ Calibration failing. Note the close-up of the right bar completely touching the bar, there is no space for a sheet.
and the strange X excursion.... the video starts just after the printer performed the XYZ Calibration and Failed.
Note what is the starting position of X for the printer: the LCD displays 8 mm. 😑 But from the beginning of the video you can clearly see that the extruder is well far from being at 8mm, probably 15 or 18mm... and when it first hits the right side the LCD "thinks" to be at 240 !!! 😧
For this reason I am starting to think to a board failure, with TMCs not working any more correctly.
RE: After upgrade MK3 -> MK3S: Calibration failed. Check axes and run again.
First of all let me thank you guys for taking the time to help me with my problem. Haven't said that, yet...
Sorry if it sometimes takes me some time to respond, but I often have trouble finding the time to invest it in the printer (and meanwhile also the motivation because I'm starting consider repairing it with a sledgehammer). In the end the device has a versatile screen. The firmware could at least be a bit more precise.
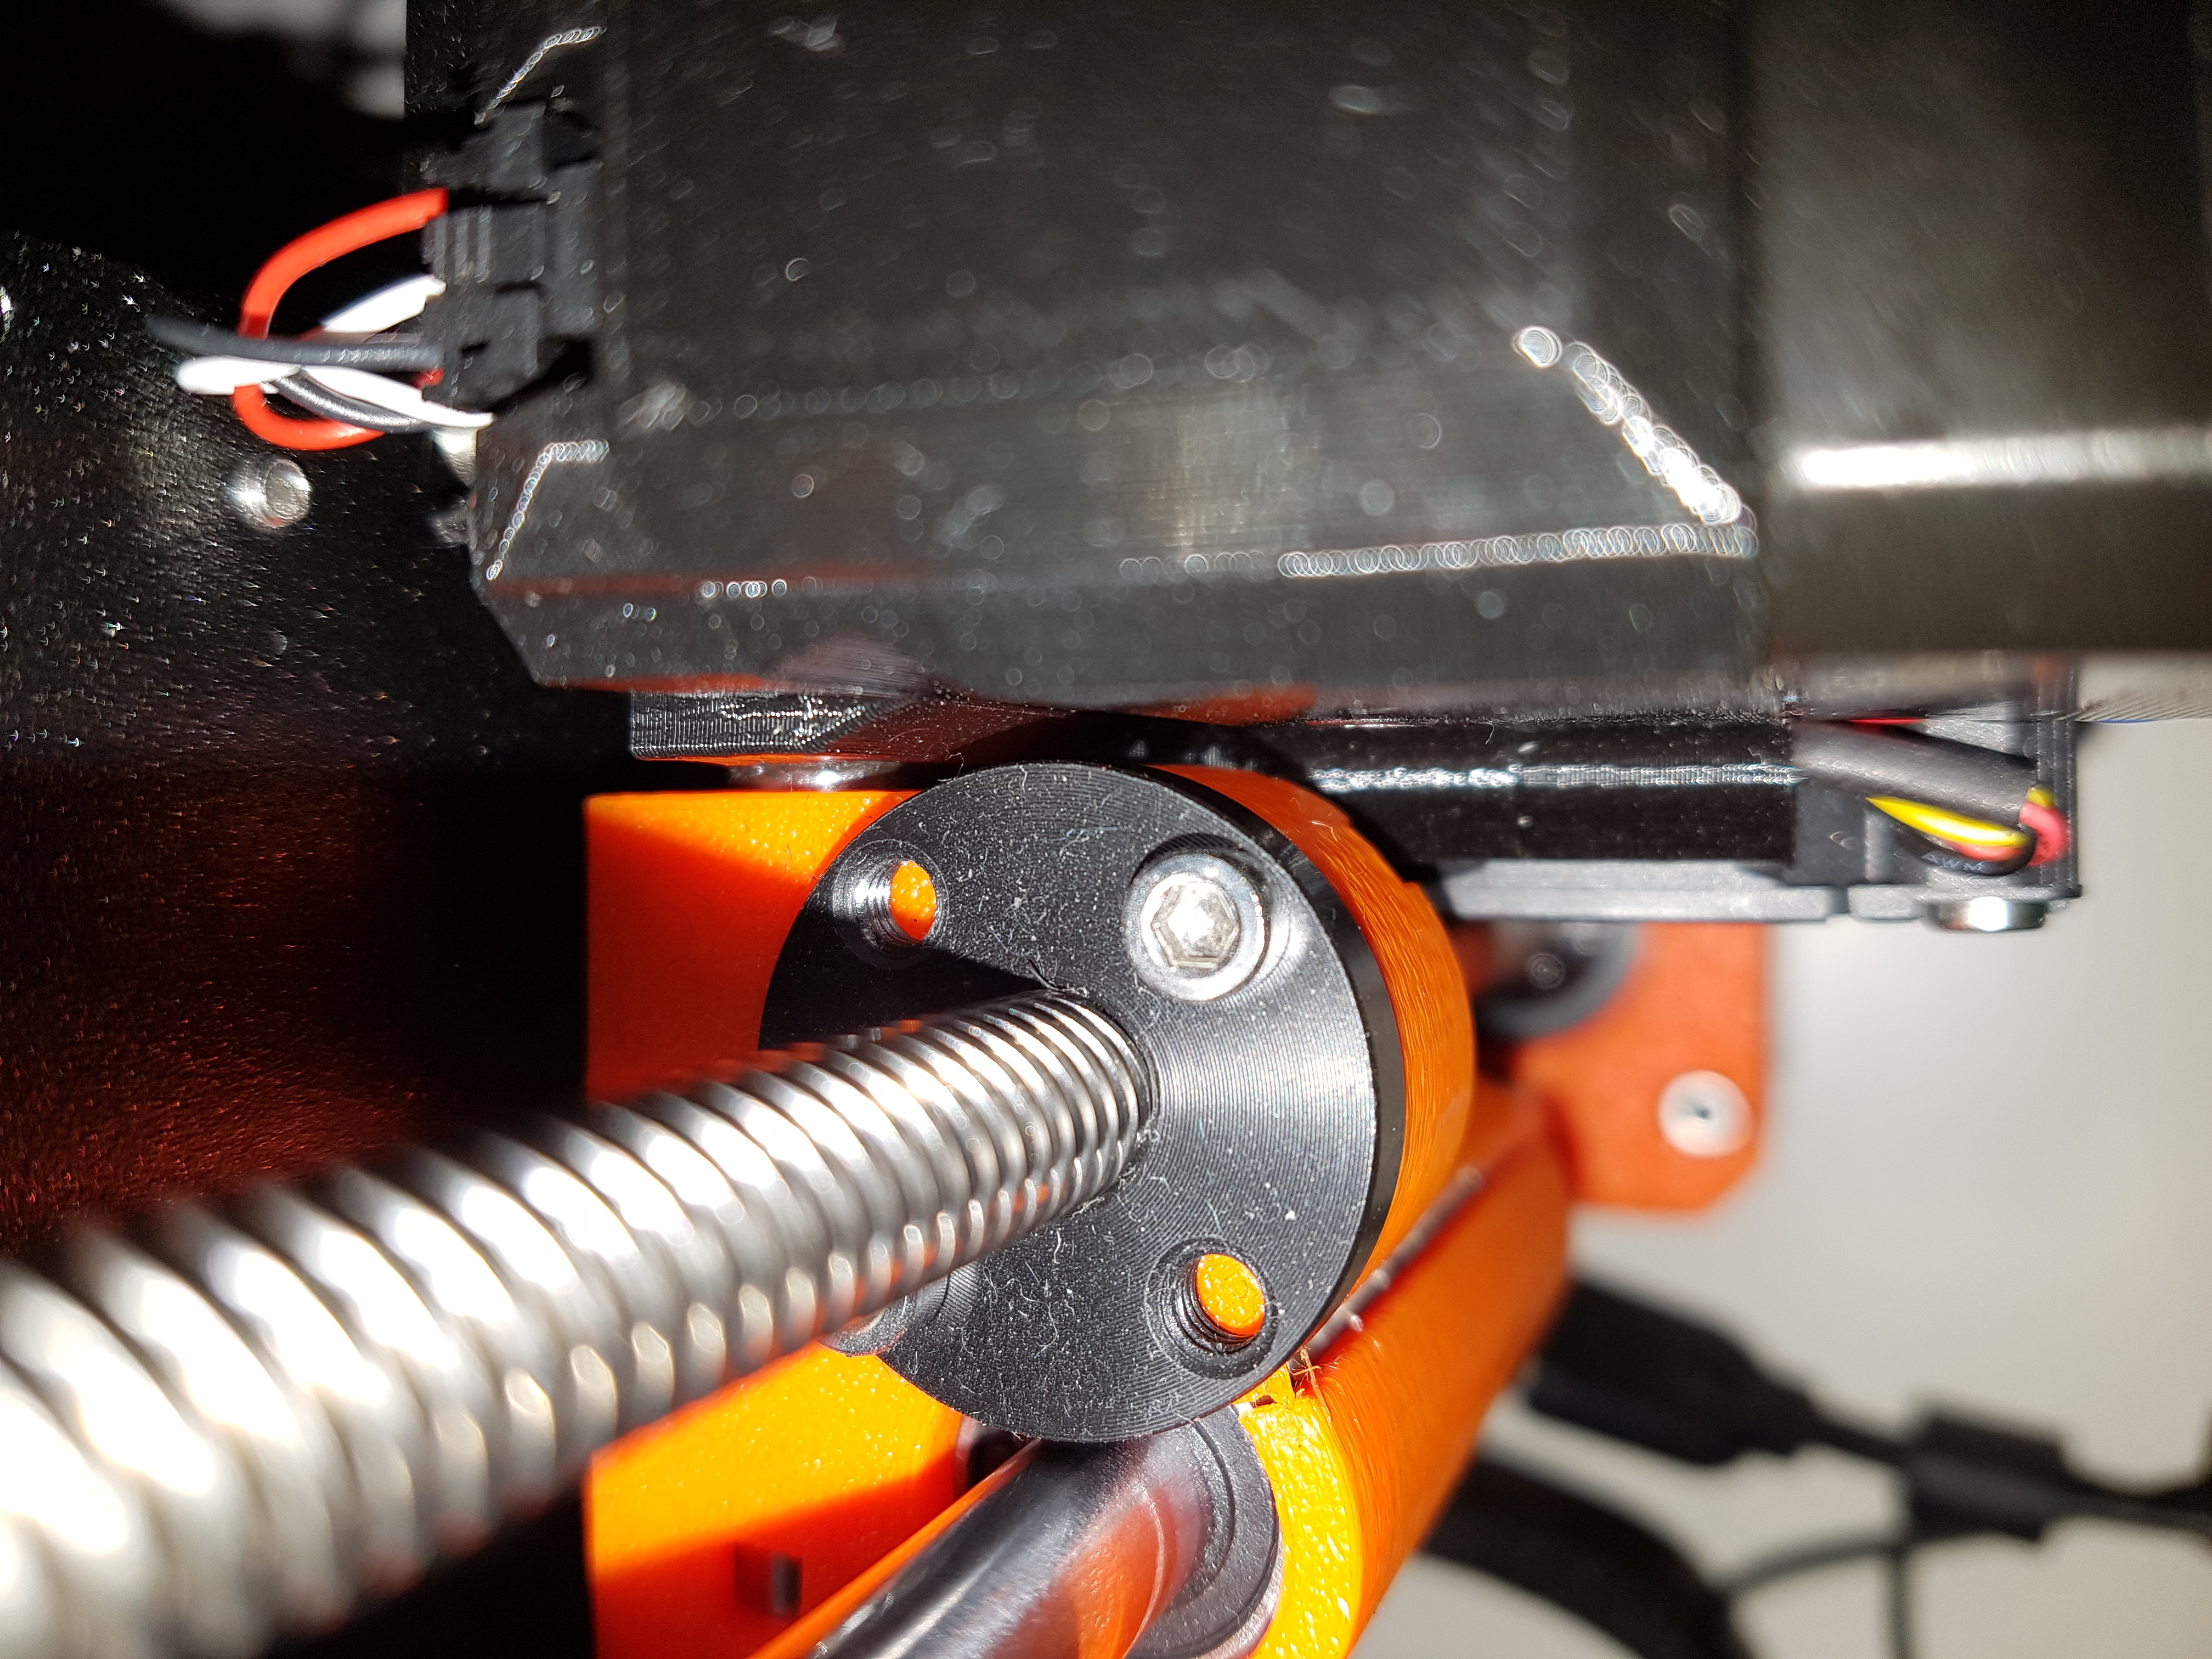
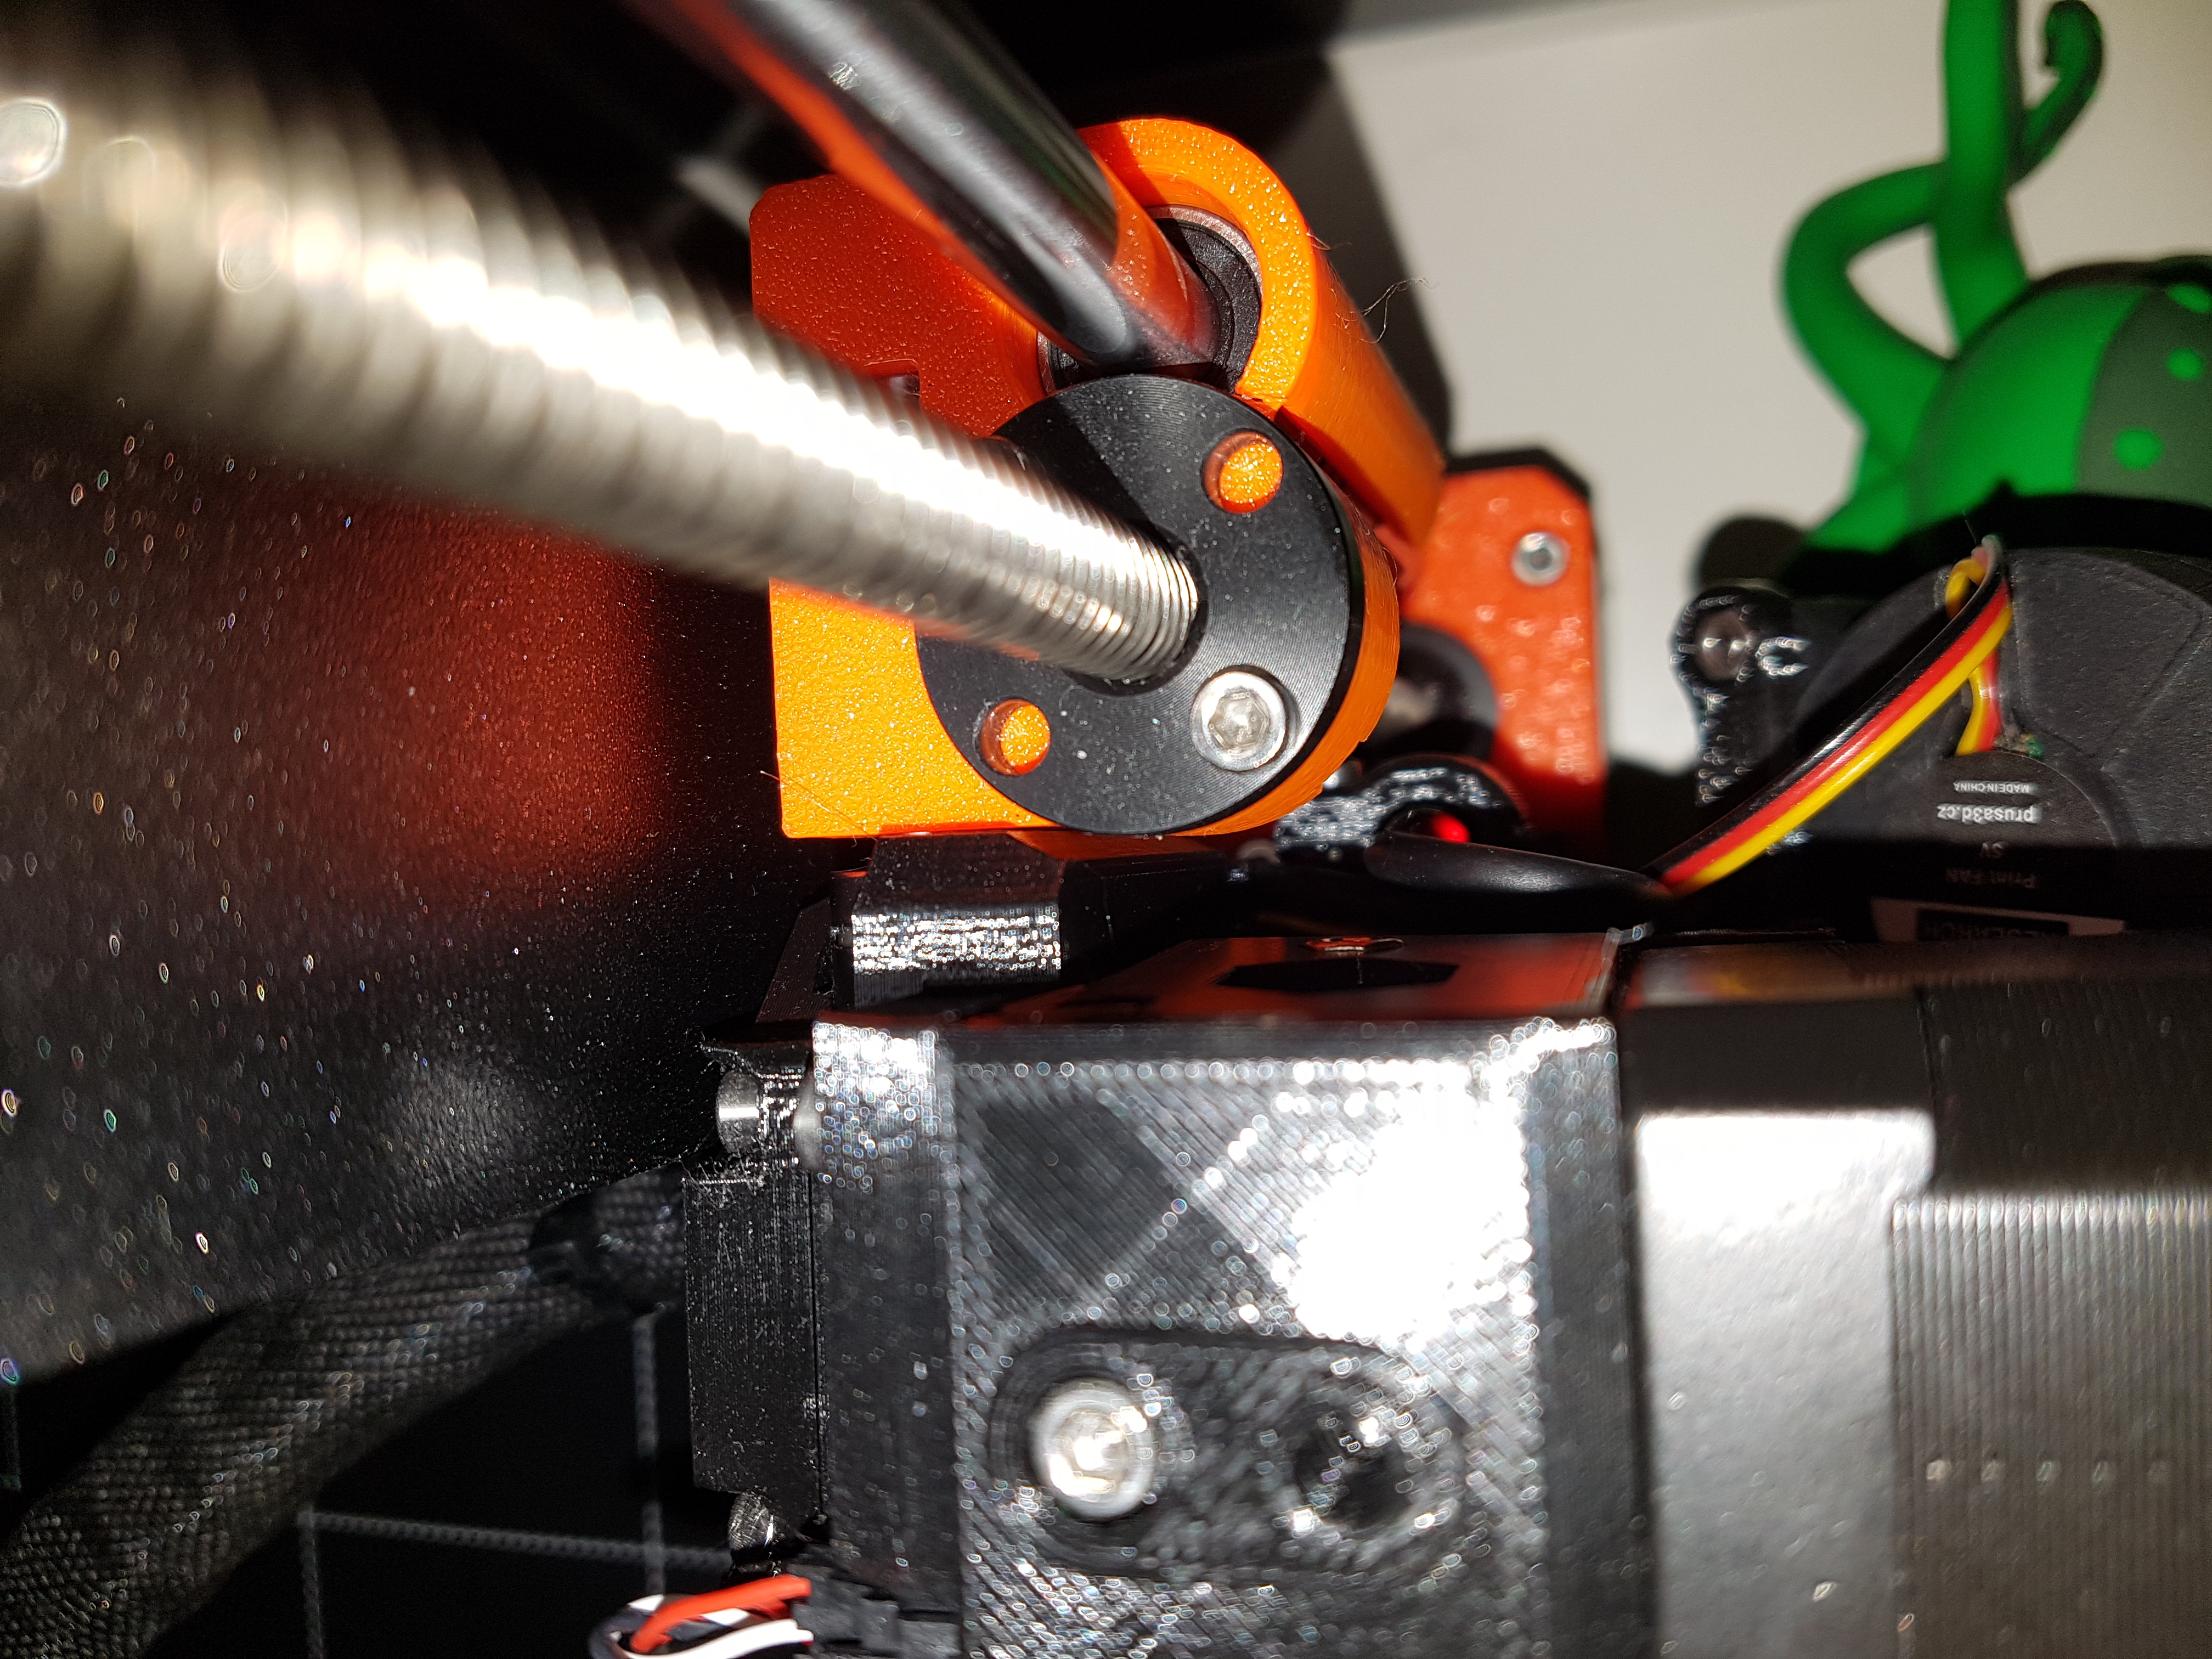
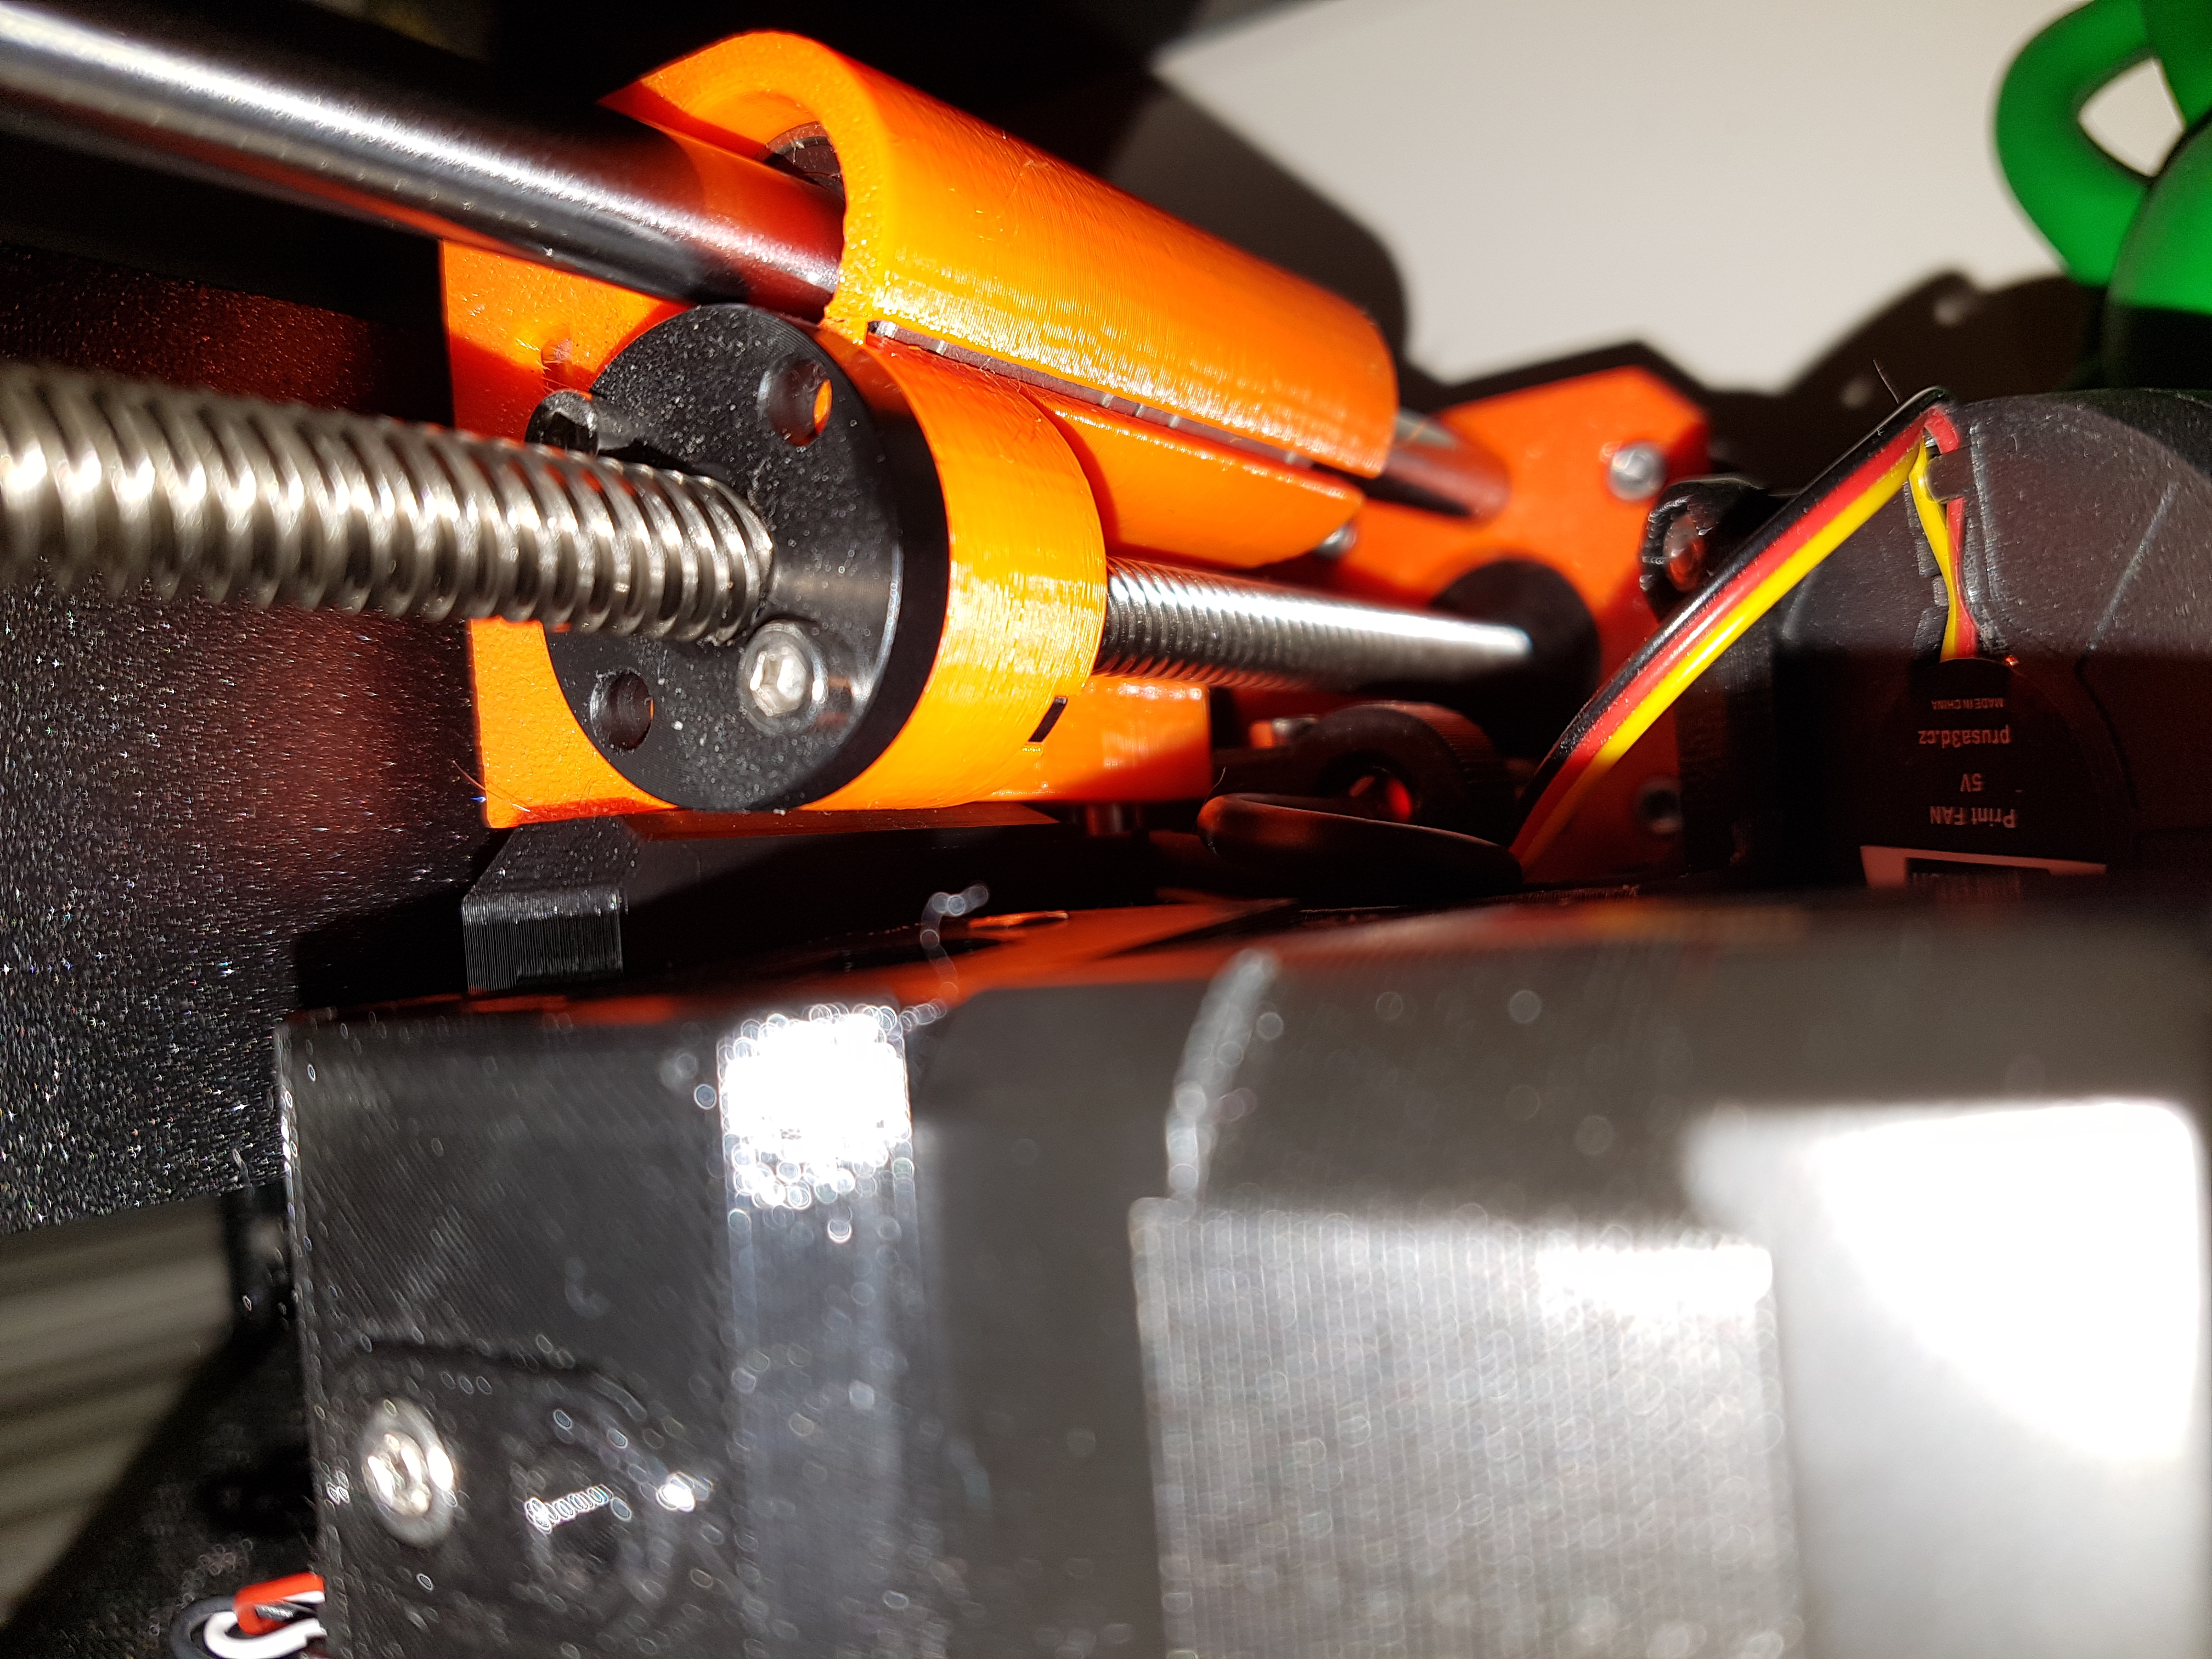
I've made sure all zip ties point either up- or downwards. Also my cabling looks ok to me, would you agree?
Also I cannot find any cable appear damaged.
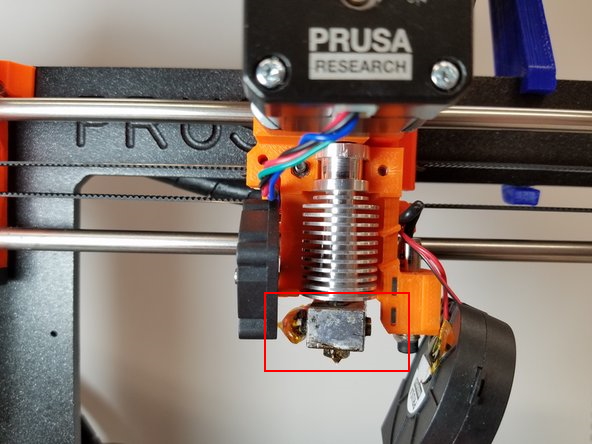
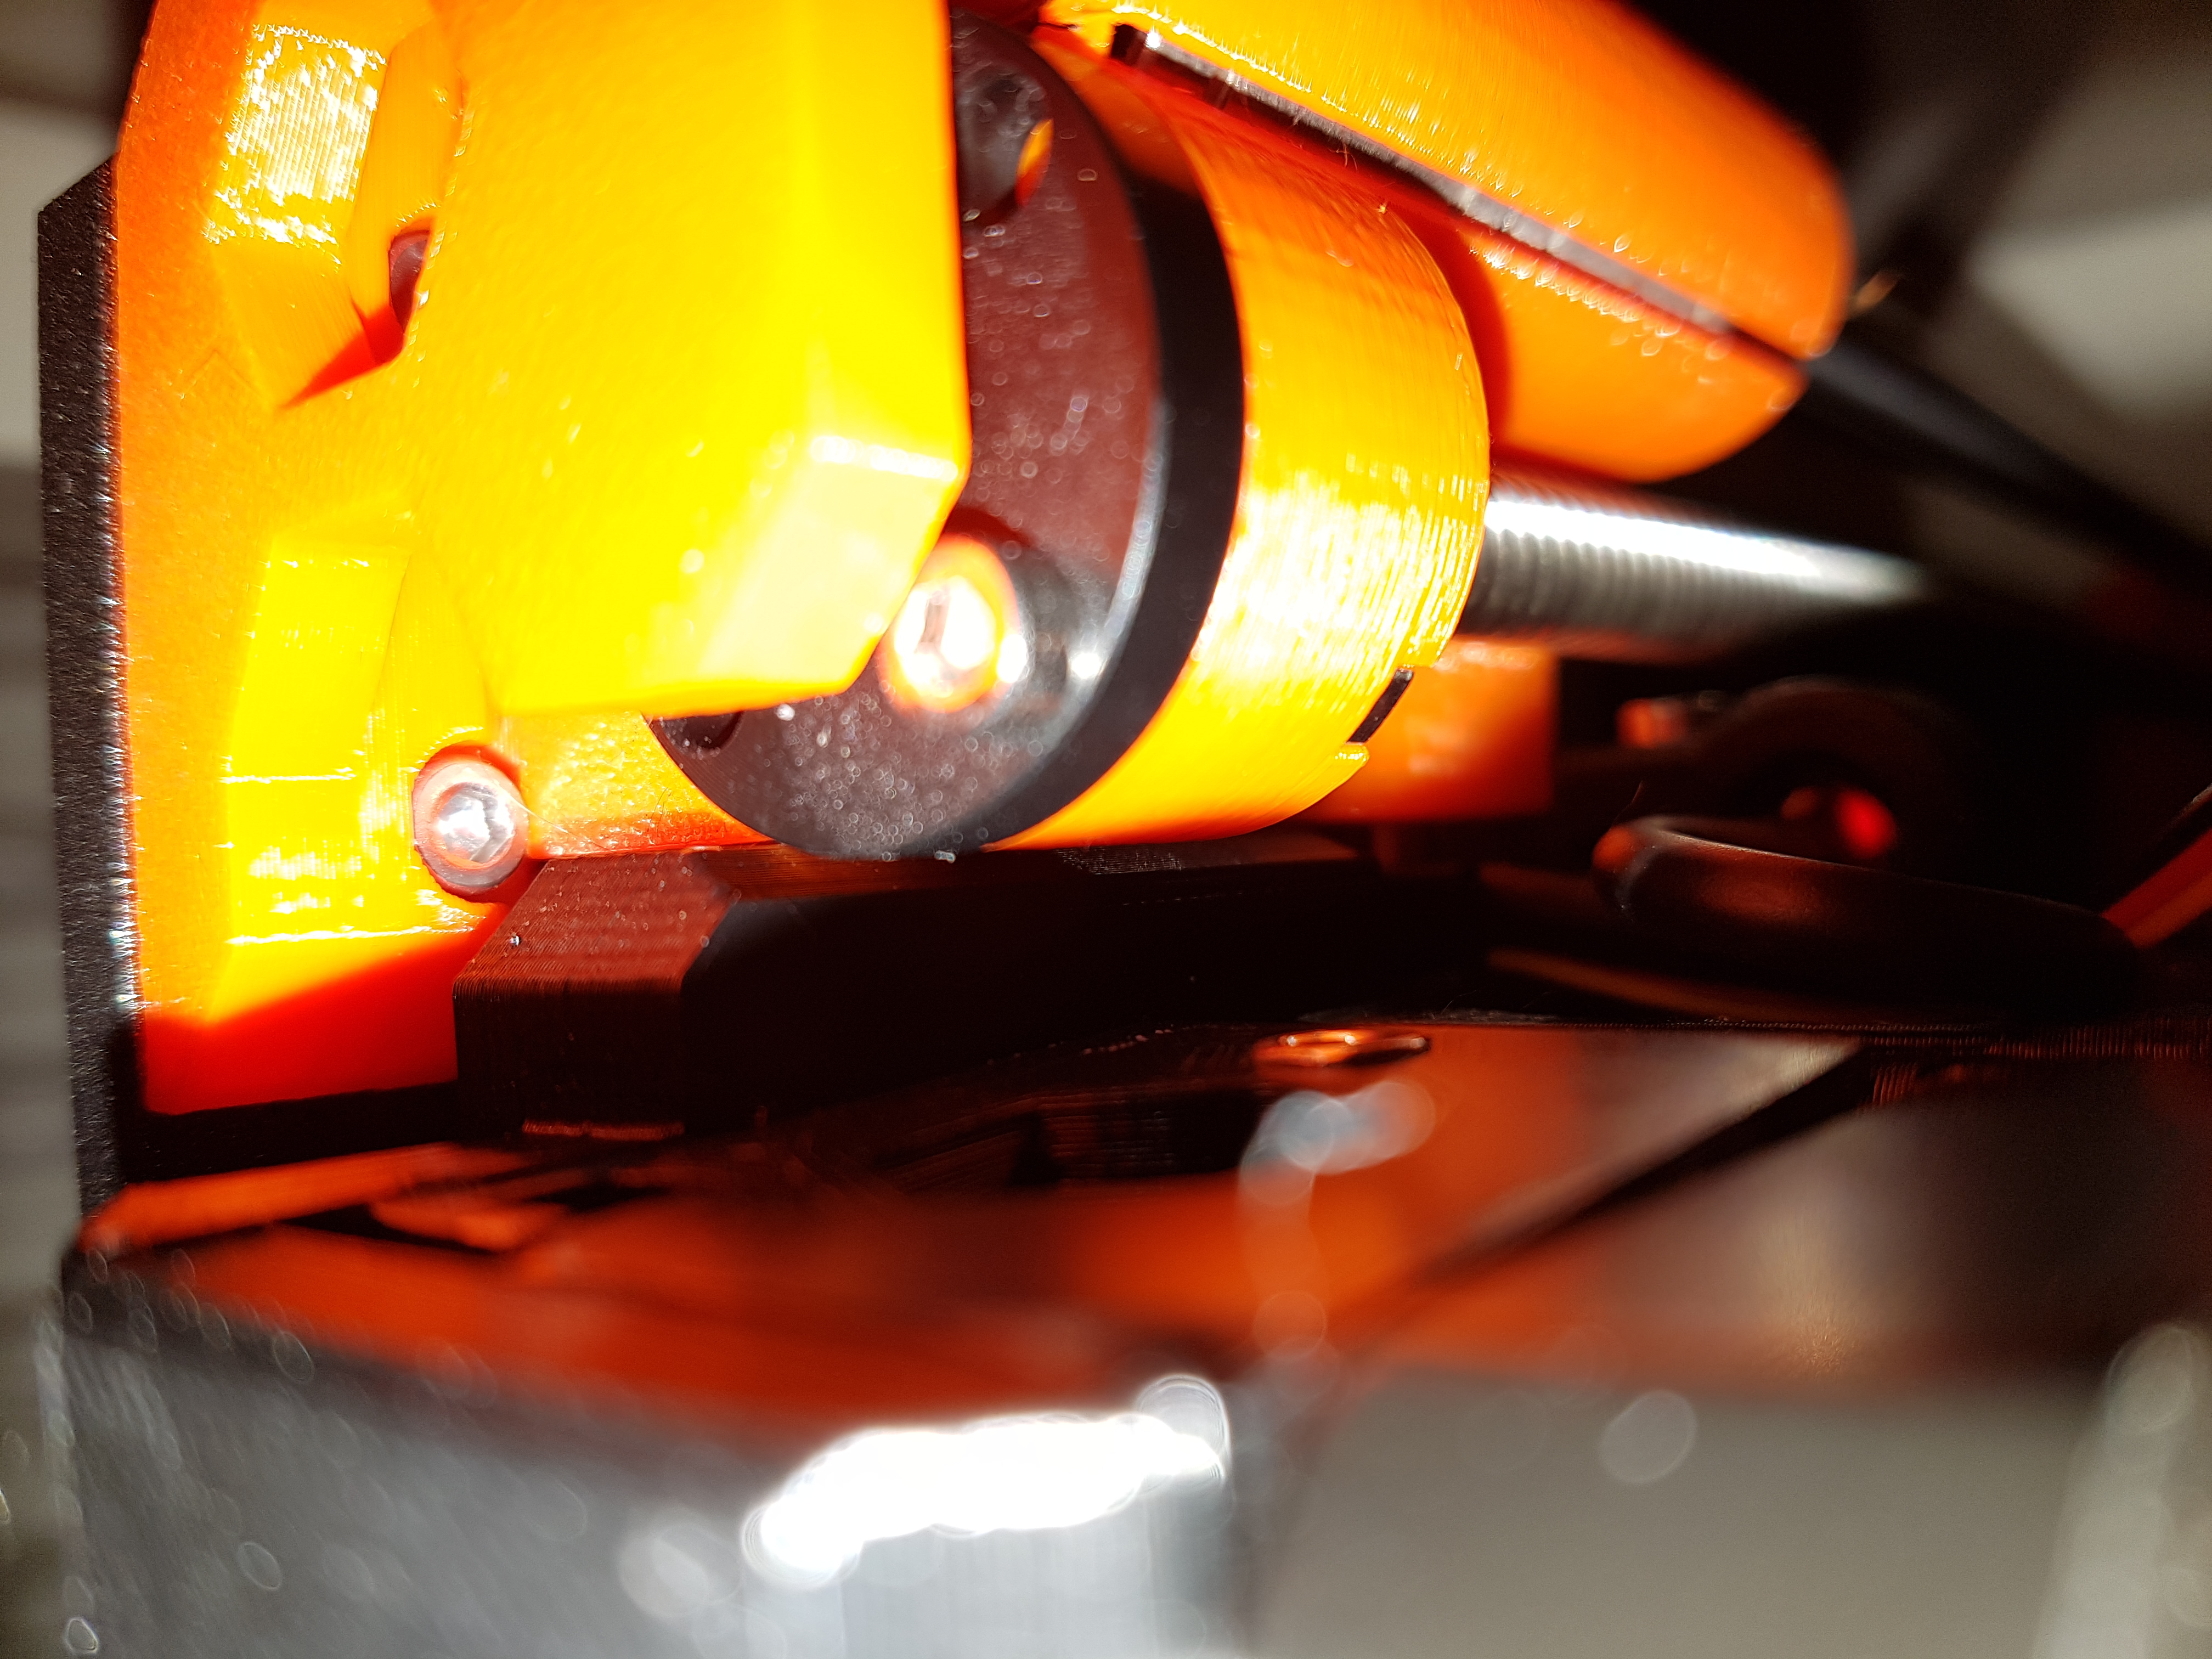
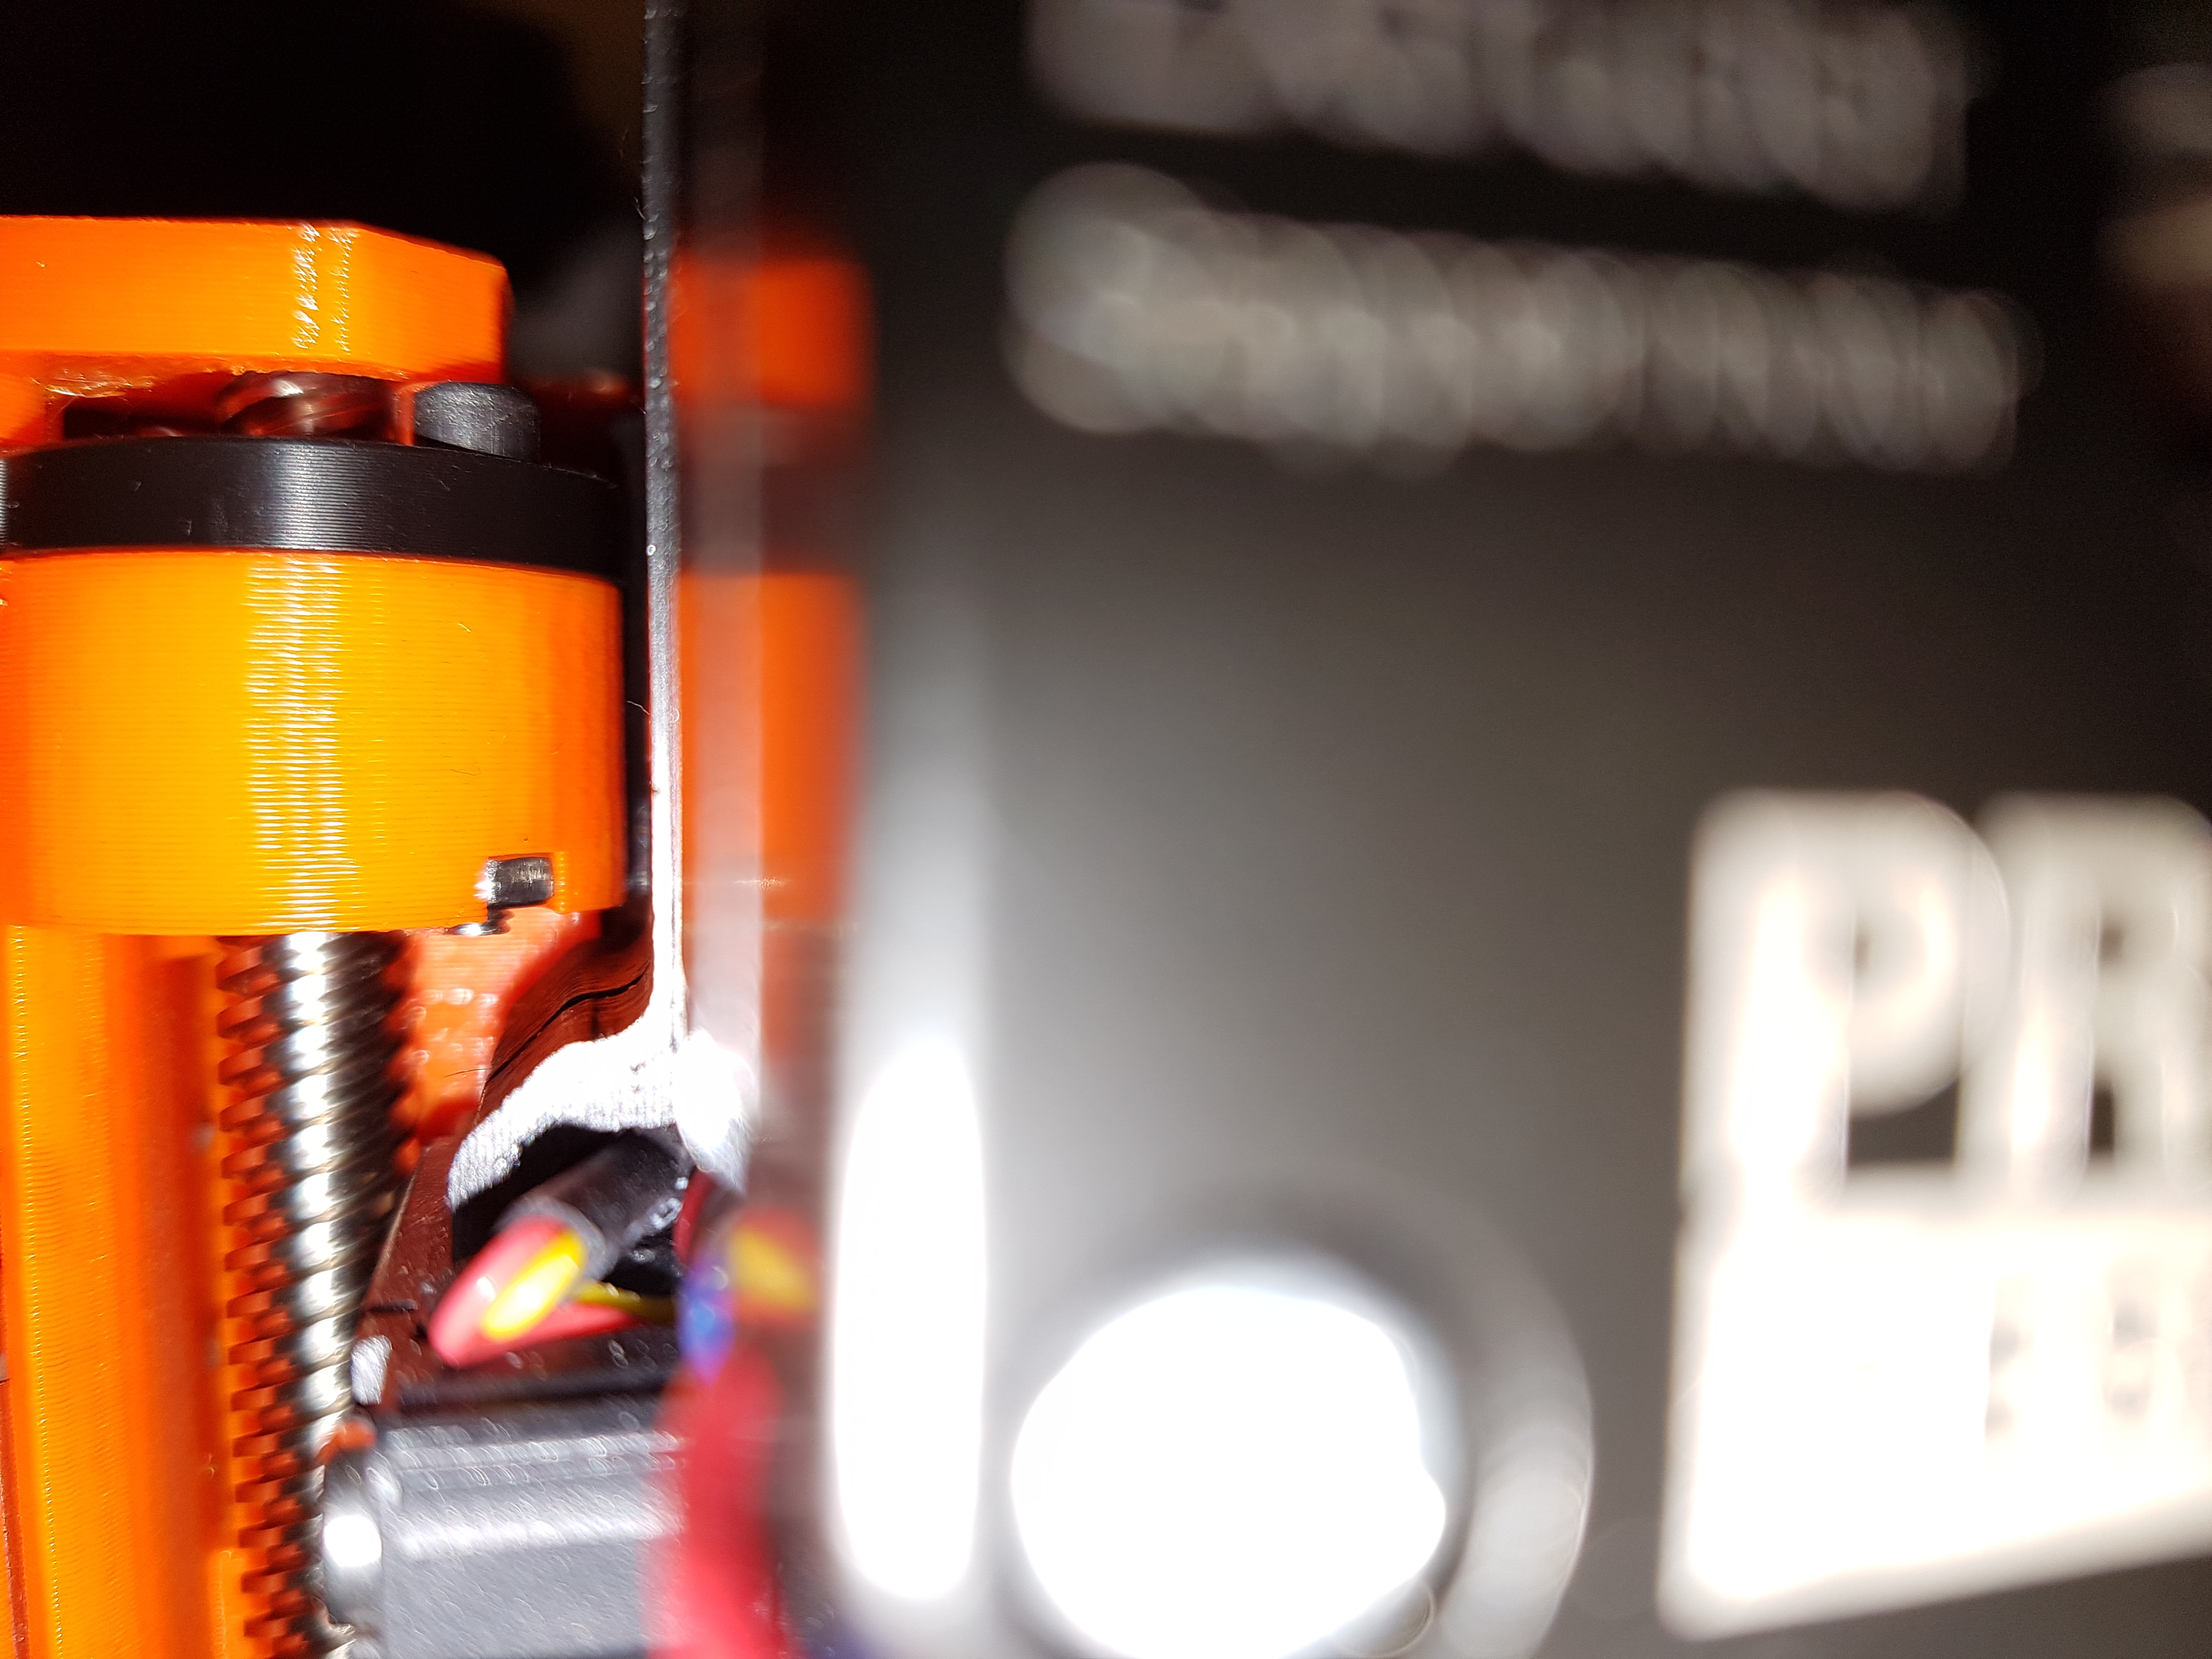
The block marked here is relatively loose, not sideways, but i can be rotated easily. This is normal, isn't it? Btw: Not my printer, just a sample picture.
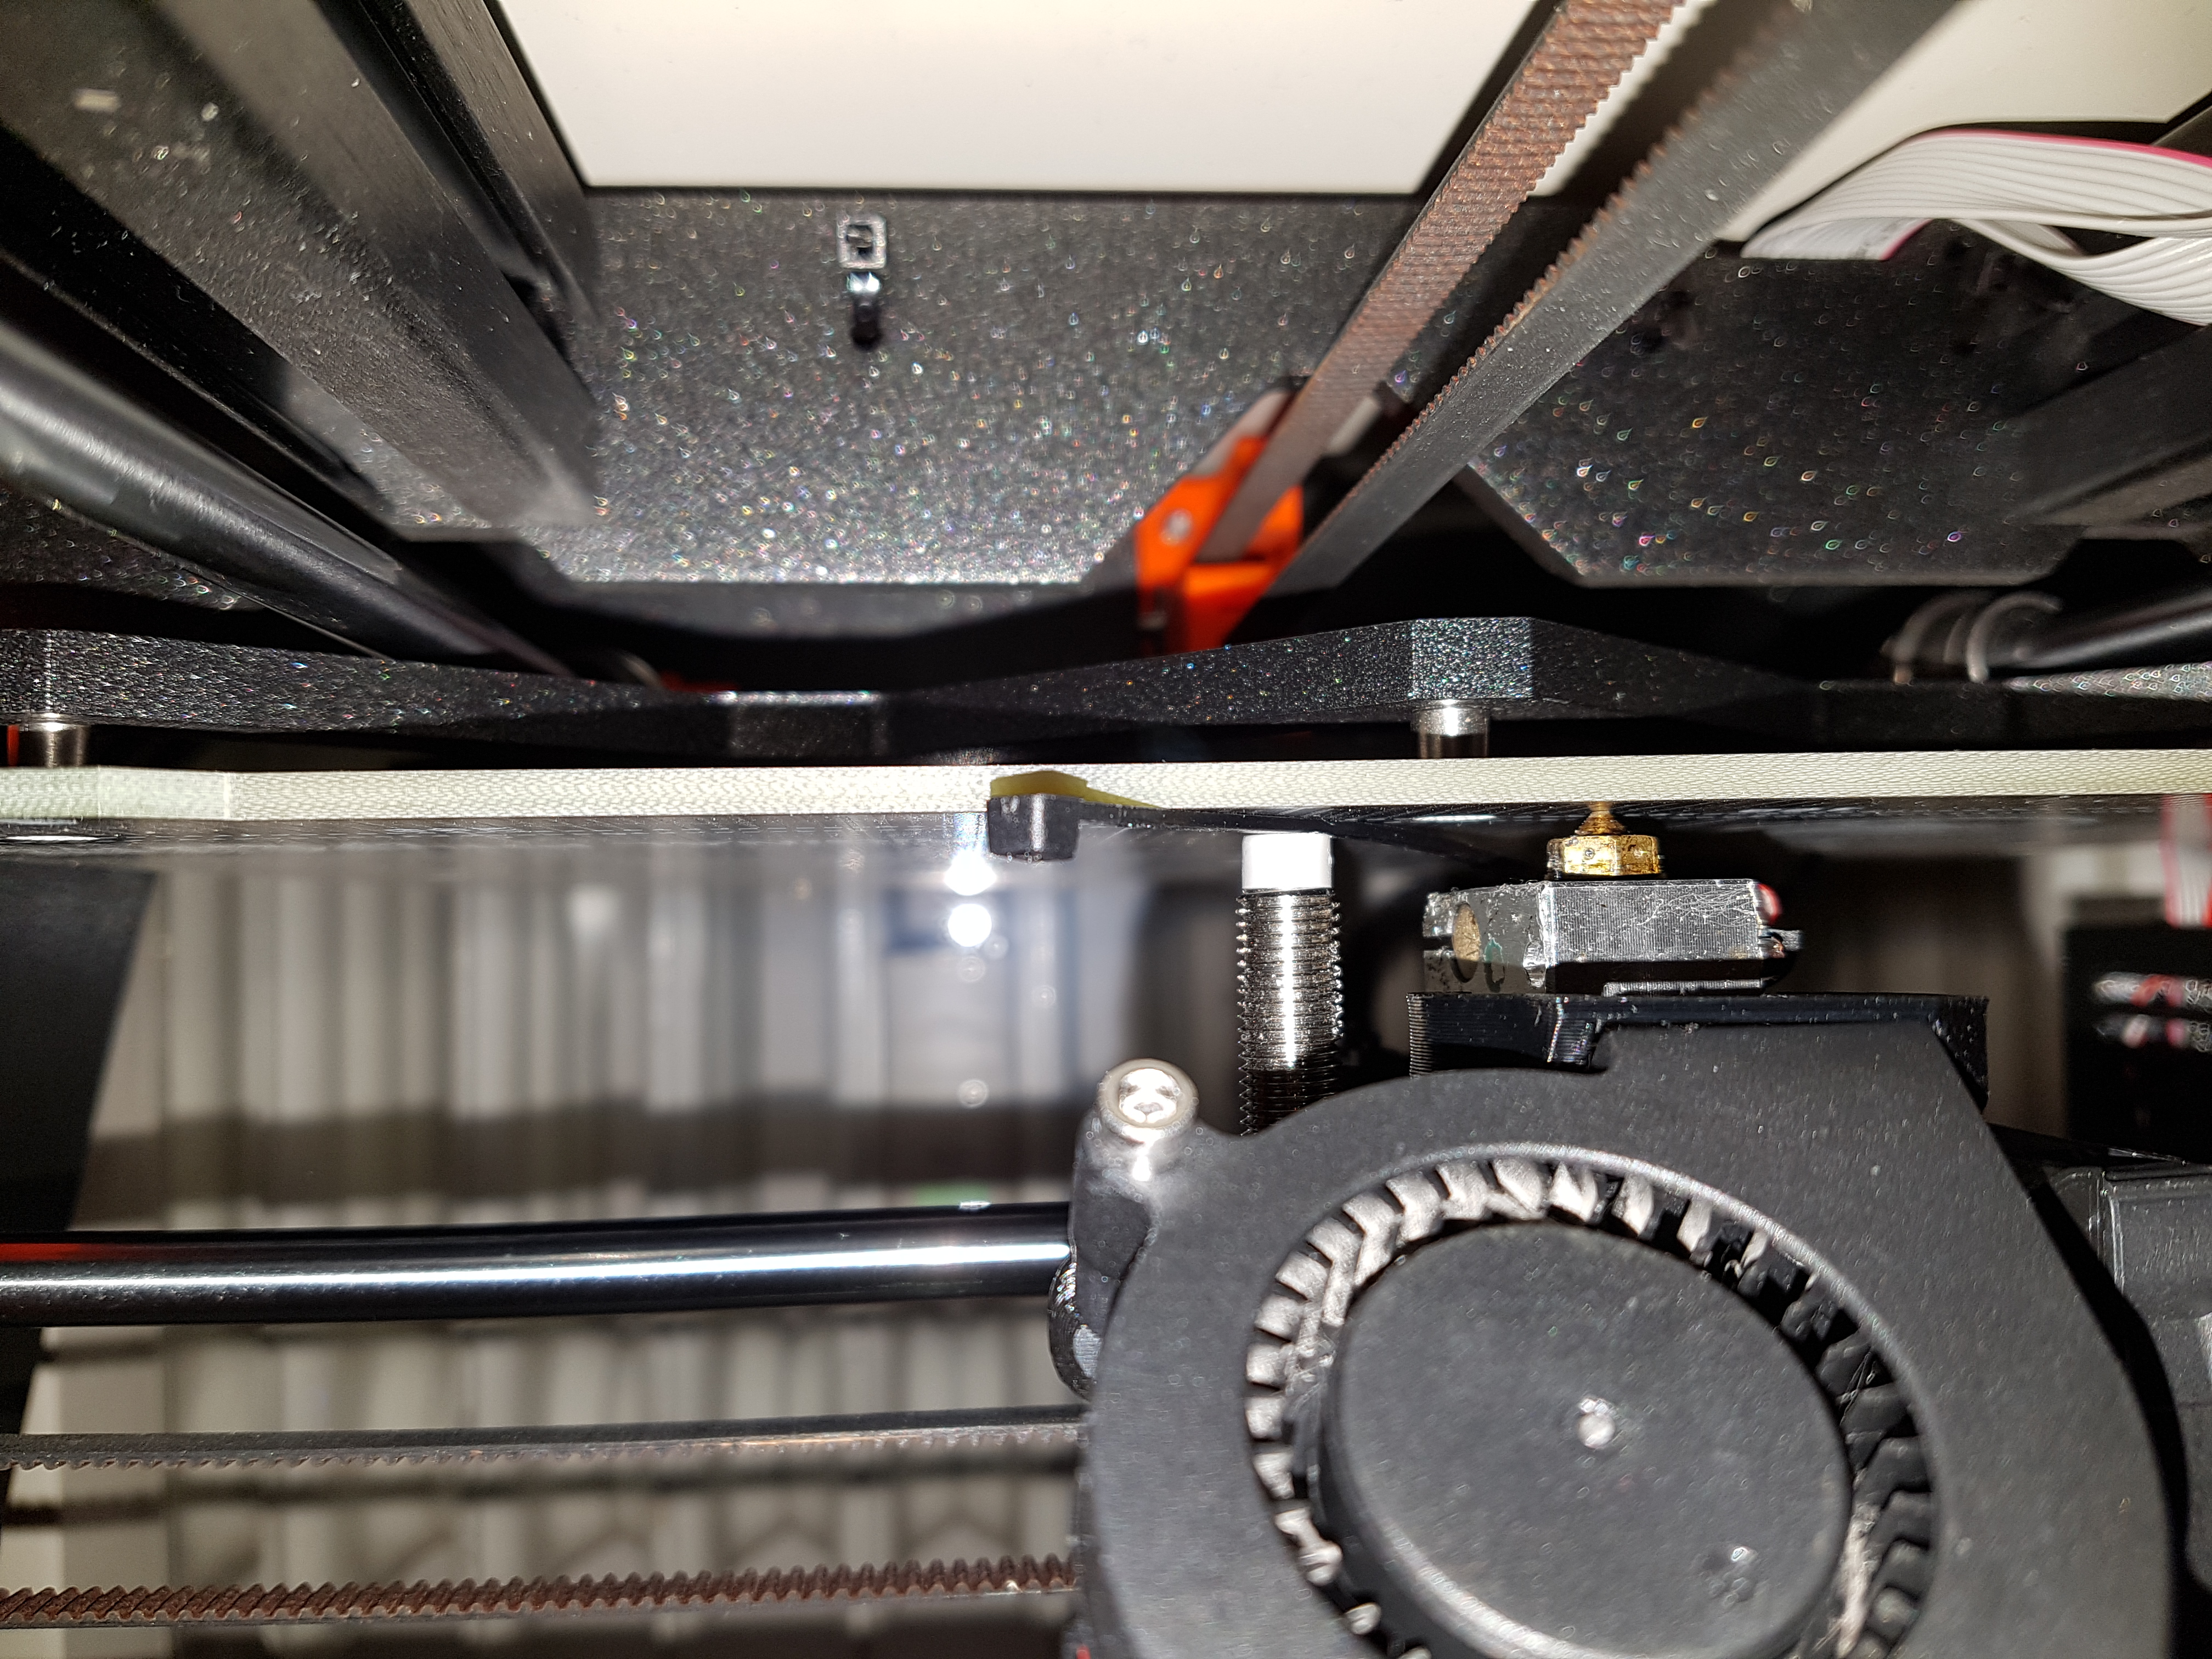
The fan is mounted firmly solid.
As I said before the PINDA's LED is while in the air and it goes off when directly over the heatbed. That's how it should be, should it not?
I can of course readjust the PINDA probe again, but I've tried the whole procedure about 2 dozen times now and also experimented with higher and lower positions. It was always the same result.
I've put some light machine oil on the rods and temporarily removed the zip ties we spoke about (just to rule that out). Strangely moving the carriage sideways has become only slightly easier than before.
Also I have loosened the screws on the extruder back to reduce possible force on the rods.
RE: After upgrade MK3 -> MK3S: Calibration failed. Check axes and run again.
@jens-s7
Remove the print sheet, place a piece of paper on the bed, perform an AUTOHOME from the menus, and take a photo of the position of the PINDA over the heat bed that shows the PINDA position relative to the white cal index.
Slide the extruder to the left stop, take a photo of the extruder fan and show how the extruder contacts the left X-axis bracket. Similar photos of how the extruder contacts the right hand side X-axis bracket, and how the X-axis brackets hit the top Z-Axis stops on both sides. And a photo of the extruder to show the nozzle in contact the bed and at the same time showing a cable tie end under the PINDA - between the PINDA and bed.
The slide the bed to the rear, take a photo of the contact between the left rear bearing and the rod holder, slide the bed forward to the stop and take a photo of the left front bearing in contact with the from left rod holder.
Once we have that set of photos, we can move forward.
RE: After upgrade MK3 -> MK3S: Calibration failed. Check axes and run again.
Here you go. I'm just not sure what you're asking for in your 3rd paragraph. Does moving the bed along the y-axis have any influence on what I'm supposed to photograph?
Here are the pictures of everything else:


RE: After upgrade MK3 -> MK3S: Calibration failed. Check axes and run again.
Hi guys,
have you had a chance to have a look at the pictures I uploaded?
I guess if you can't see anything wrong I'll turn to Prusa support. Too big and investment to end up as a brickstone.
RE: After upgrade MK3 -> MK3S: Calibration failed. Check axes and run again.
@antimix
Which diagnostic functions have you activated in the configuration_prusa.h?
By the way, I have deactivated the functions XYZ and Z Calibration (NEW_XYZCAL), because you don't need it in principle and because it never worked with my printer against all possible procedures (new PINDA, settings in the firmware, complete mechanics etc...) Instead, I adjusted the printer mechanically. The inclination and flatness of the printing bed is in the range of 0.05mm, which is sufficient for printing. The self-test runs perfectly.
Statt zu klagen, dass wir nicht alles haben, was wir wollen, sollten wir lieber dankbar sein, dass wir nicht alles bekommen, was wir verdienen.
RE: After upgrade MK3 -> MK3S: Calibration failed. Check axes and run again.
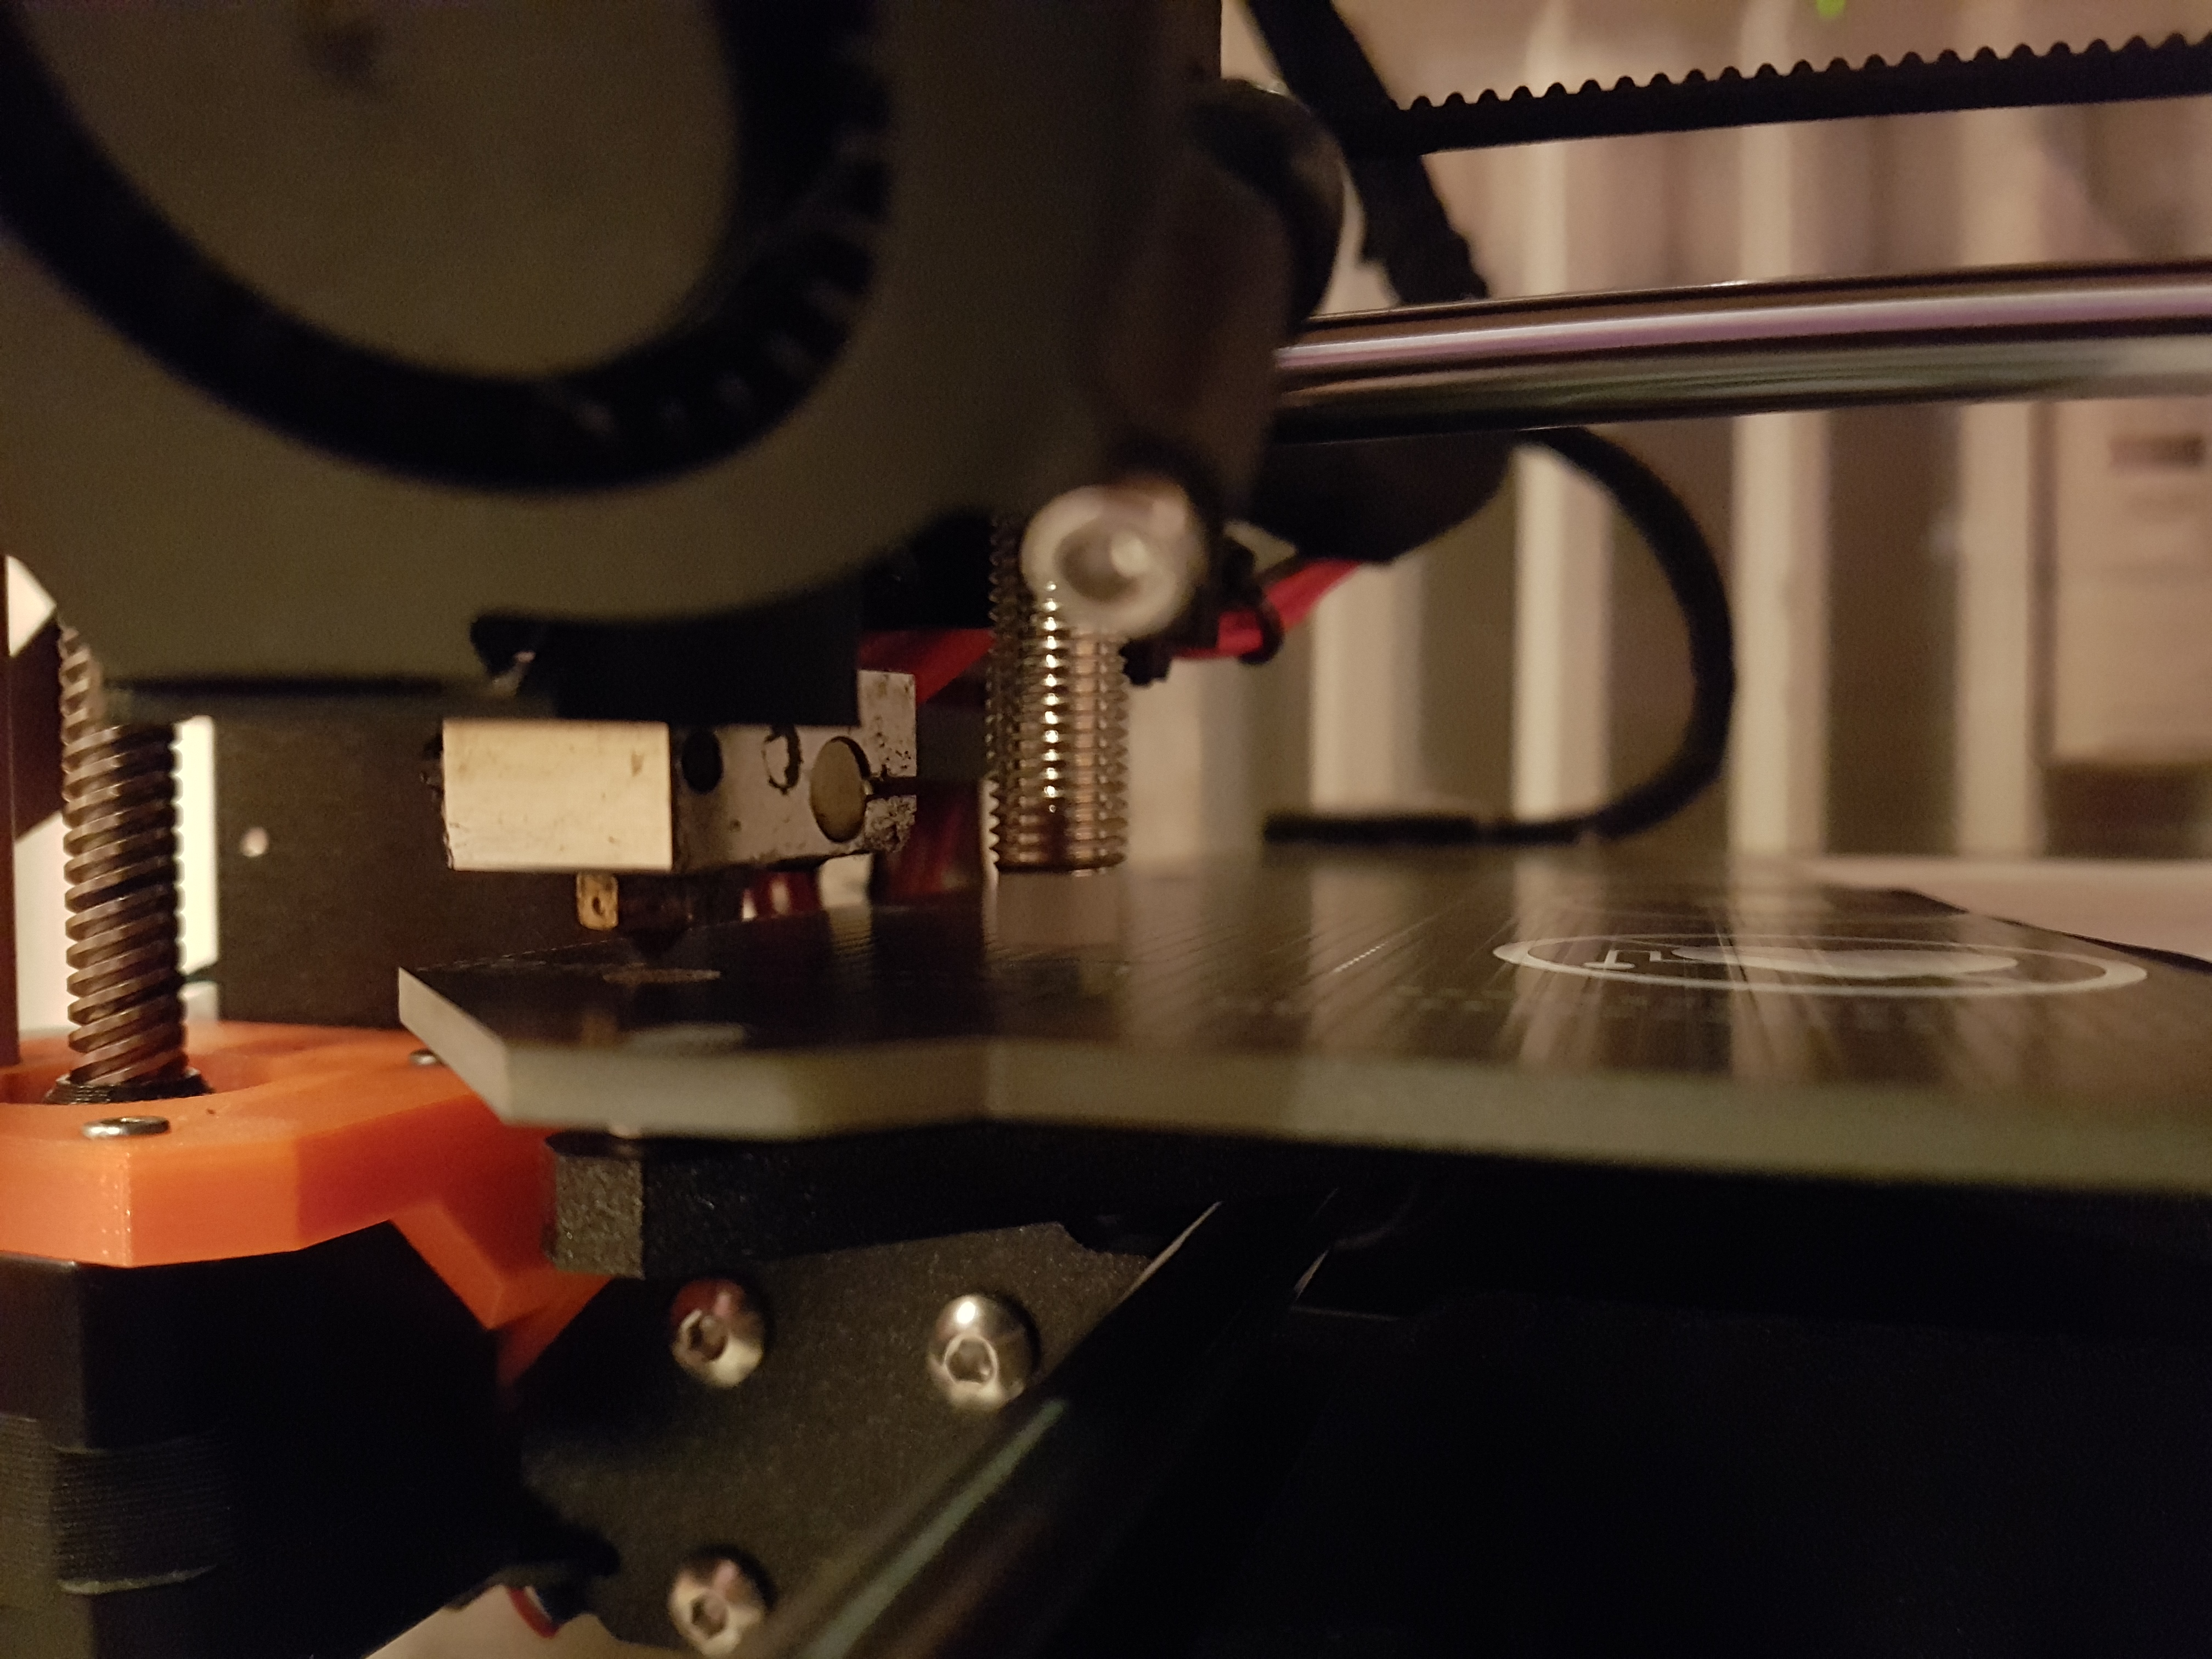
It looks like the E3Dv6 Extruder assembly is not fitted properly in the retaining collar inside the extruder housing, it is projecting way too far out of the extruder...
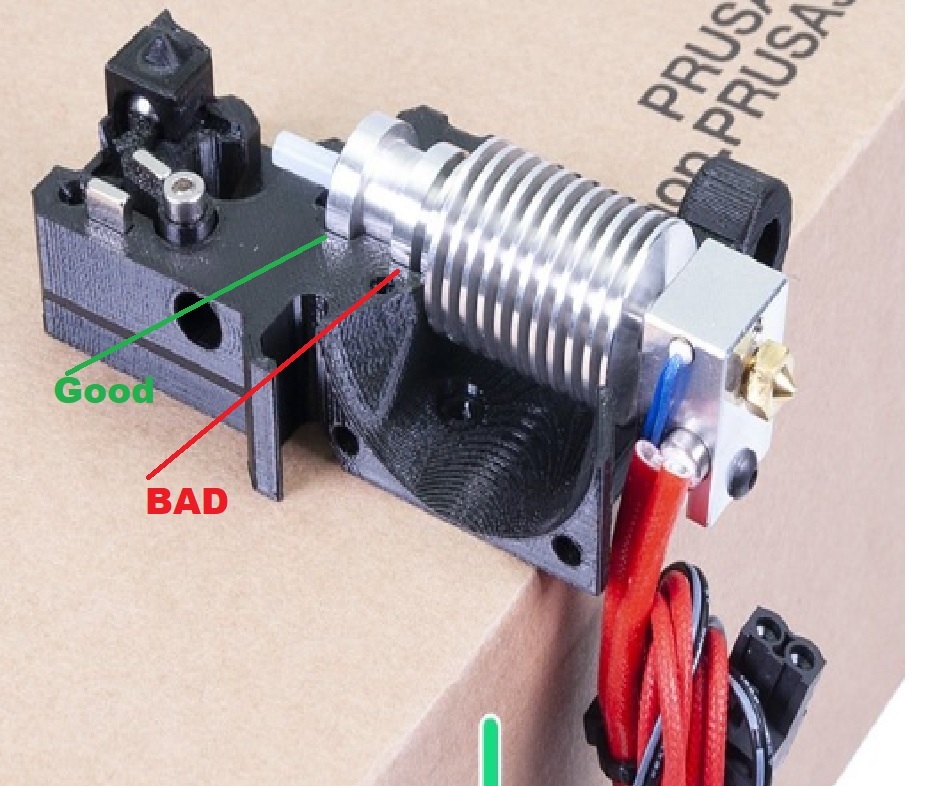
the top of the aluminium heatsink should locate in the collar labelled Good, in Green,
I think it is located in the area labelled BAD in red... this will reduce your available Z height
Your picture, below, shows the lower fins of the heatsink projecting below the Extruder housing where as the bottom of the bottom fin should be level with the bottom of the housing
Regards Joan
I try to make safe suggestions,You should understand the context and ensure you are happy that they are safe before attempting to apply my suggestions, what you do, is YOUR responsibility. Location Halifax UK
RE: After upgrade MK3 -> MK3S: Calibration failed. Check axes and run again.
I just recompiled the 3.9.2 Firmware adding the following line into the file Configuration_prusa.h
// Developer flag
#define DEVELOPER
#define SUPPORT_VERBOSITY
Then you can connect the printer to any logger (e.g. Arduino Serial Monitor) , and launch the alignment with the gcode command:
M45 V30
and the printer will start the XYZ Calibration logging on the serial monitor all events, distances, errors.
Regards
RE: After upgrade MK3 -> MK3S: Calibration failed. Check axes and run again.
@antimix
Thanks for the information. I think few people know this. I will test this on my MK3 👍
Statt zu klagen, dass wir nicht alles haben, was wir wollen, sollten wir lieber dankbar sein, dass wir nicht alles bekommen, was wir verdienen.
RE: After upgrade MK3 -> MK3S: Calibration failed. Check axes and run again.
with this log you can see things like the exact error cause of the calibration. In my case I can see why:
Error after correction:
point #0:
Point not on first row
measured: (12.04771, 6.39165); corrected: (12.66482, 6.35373); target: (12.00000, 6.00000)
error: 0.75, error X: 0.66, error Y: 0.35

point #1:
Point not on first row, error > max. error euclidian
measured: (218.71769, 6.78926); corrected: (219.33489, 6.66712); target: (220.00000, 6.00000)
error: 0.94, error X: 0.67, error Y: 0.67

point #2:
Point not on first row, error > max. error euclidian
measured: (218.68788, 197.45527); corrected: (219.36987, 197.33312); target: (220.00000, 198.00000)
error: 0.92, error X: 0.63, error Y: 0.67

point #3:
Point not on first row
measured: (11.94831, 197.68389); corrected: (12.63041, 197.64601); target: (12.00000, 198.00000)
error: 0.72, error X: 0.63, error Y: 0.35

Max. errors:
Max. error X:0.80
Max. error Y:1.50
Max. error euclidian:0.80

X vector, adjusted: 1.00000, 0.00041
Y vector, adjusted: -0.00034, 1.00000
center, adjusted: -0.61494, 0.03276
Difference after correction:
point #0measured: (12.04771, 6.39165); measured-corrected: (11.38302, 6.03765); target: (12.00000, 6.00000), error: 0.75
point #1measured: (218.71769, 6.78926); measured-corrected: (219.38301, 6.12241); target: (220.00000, 6.00000), error: 0.94
point #2measured: (218.68788, 197.45527); measured-corrected: (219.31777, 198.12240); target: (220.00000, 198.00000), error: 0.92
point #3measured: (11.94831, 197.68389); measured-corrected: (11.31778, 198.03762); target: (12.00000, 198.00000), error: 0.72

Calculate offset and skew returning result:
-2
you can see wrong X measures, that cause an euclidian error value > 0,80, that is considered by the firmware a FAILING TEST.
And you can see that the first circle is measured at X = 12.04 instead of 12.00 (0.4 may be ok) but the second at 218.71 instead of 220.00 (with 1.29mm lost) is really too far. It sound like the X motor step does not move correctly on the long distances, or looses steps.
I don't know what to think: the causes can be the X TMC2130 on the board that is not driving correctly the motor and the end-stop detection, the X motor damaged, a shifting belt gear (but the screws are tight), the belt tension (but I loosen it and nothing changed).
So this issue is actually still unsolved either by me and Prusa.
Regards