Re: Simplify3D settings for MK3
Sure, no problem.
But be aware, this is not my final profile, since I do have some issues left to perfect it completly.
Oh, and what I forgot to say, I changed the outline underspeed to 45%, to get close to around 35mm/s for the most outer perimeters for the external finish.
If you still need to improve the surface finish, slow it down even further.
The issue at the end of the loops "missing" filament can be due to too much retraction, underextrusion or both.
Thats what I still have to fix.
Depending on the filament you use, you have to up or lower the extrusion and play with retraction settings.
Except that, this profile should theoreticlly work well.
Have fun!
Re: Simplify3D settings for MK3
Apparently my first layer height was way off.
For small prints, thats no issue, but your big prints will have a pretty bad first layer if your live z adjust is perfectly adjusted.
For fixing that, I went down to 100% first layer height, bumped down my overall extrusion from 1.05 to 1.00 and readjusted my z a bit (from -970 to -960)
Now I have a perfect first layer, with no bumps, waves or curls and its perfeclty smooth.
I´ll try a benchy again with this setting to see, if I´ll reach the same benchy quality yet again and will release a V2 of my settings.
Re: Simplify3D settings for MK3
And here is the result, just disabled coasting and wiping in S3D, bumped up the first layer a bit and increased the extrusion slightly and set the end of the loops/retraction points at x:0 y:0 and disabled retraction on every layer.
The underextrusion issue at the retractionpoints/end of the loops aside, the benchy is darn near perfect.
There you go, pretty much perfect/fast printing with S3D again on the MK3.
I have my baby back again.... (took me a while to tune my MK2S to this point in S3D, sold it for the MK3).
Ok, holy smokes. I thought I had my cheap printer dialed into near perfection. Seeing this, puts my jaw on the floor.
Most people never "master" their printers to near "perfect" quality. I've seen so many videos and tutorials, and I always look at the end result and say "Meh. I can almost do that... Slowly"
Nope, not yours! Holy smokes!!! I've never come even close to that! Hurry up and ship my Mk3!!!!
Hi, I'm Sean. I used to work on CNC machines.
I try to not make mistakes, but the decision is YOURS.
Please feel free to donate to my filament/maintance fund.
Re: Simplify3D settings for MK3
Ok, holy smokes. I thought I had my cheap printer dialed into near perfection. Seeing this, puts my jaw on the floor.
Most people never "master" their printers to near "perfect" quality. I've seen so many videos and tutorials, and I always look at the end result and say "Meh. I can almost do that... Slowly"
Nope, not yours! Holy smokes!!! I've never come even close to that! Hurry up and ship my Mk3!!!!
Oh, hope your MK3 arrives soon.
Really good printer, what amazed me the most is how silent it is.
I dont need to use the silent mode at all, this thing is nearly unhearable in a working environment.
Only when I sleep I pause or stop the printer for the night, and I even slept one night with the printer on with no problems (was just slightly annoying, in a dead silent room at night, you can still hear that thing running 😆 )
Be aware, that the stock profiles in slic3r or s3d do not work for everyone perfectly out of the box.
You will have some tuning to do, like in my case.
Took me a quite a while to detect all problems, but I think Im done now.
If this big print succeeds without catching on the infill (like before), then Im done with dialing this printer in and I can finally start printing what I want 😆
I´ll release a V2 of my FFF profile later on.
Re: Simplify3D settings for MK3
I´ll release a V2 of my FFF profile later on.
I will look forward to the V2 Profile. A little testing with your earlier profile beat my Slic3r profiles hands down at least with PLA.
Re: Simplify3D settings for MK3
Well, apparently my V2 profile still needs some work.
Benchy came out perfect (except the chimney part again, I dont know how to fix that lol), and a big print part didnt fail this time and finished completly, which is nice.
Unfortunaly the top surface layer is incredibly rough and Im not happy with the top surface result, I still need to work on that.
I can still release a V1.5 for now if needed.
A completly perfect profile still needs some time, Im not satisfied enough to call this a V2.
Now how to beat rough surface layers... Maybe the extrusion rate is still too high? *mumble mumble*
Edit: By the way, this profile is only for PLA for now, if you want to use other filament, you have to make changes obviously.
For PETG it should suffice to up the temperatures a bit and play around with retraction to get stringing in check.
For other Filaments, I have no clue ¯\_(ツ)_/¯
Re: Simplify3D settings for MK3
Unfortunaly the top surface layer is incredibly rough and Im not happy with the top surface result, I still need to work on that.
...
Now how to beat rough surface layers... Maybe the extrusion rate is still too high? *mumble mumble*
Edit: By the way, this profile is only for PLA for now, if you want to use other filament, you have to make changes obviously.
For PETG it should suffice to up the temperatures a bit and play around with retraction to get stringing in check.
For other Filaments, I have no clue ¯\_(ツ)_/¯
Please do release your FFF profile if you feel like it's in a good place. It would be greatly appreciated I'm sure.
For the top surfaces. I've found that top finish ties into infill overlap - when playing with a profile for RC5 (sans LA) I found an overlap percentage of 25%, as Joe Prusa advertised, to be too high as it seemingly produced overextrusion on the edges of solid infill only.
Settled around the S3D default of 15% as it seemed to work well. You could try and experiment with it too and see if it helps.
Haven't gotten around to much testing myself since my last profile as I only just got the Mk3 back up and running after swapping in new hardened rods and Igus bearings.
Keep up the great work!
Re: Simplify3D settings for MK3
Unfortunaly due to work, I dont have much time at the moment to perfect my settings.
Since it could still take a few days till I improve my settings further, I´ll release a V1.5.
This time without a horribly overextruded first layer (which doesnt really show on small prints, but lets big prints fail) and less overextrusion in general.
Be aware, that your first layer must be perfectly calibrated for this to work right.
For this step, you can consult this thread https://shop.prusa3d.com/forum/-f0/life-adjust-z-my-way-t2981.html
Afterwards, dial in the extrusion rate and first layer height for your filament and mk3 till it works and looks right.
Problems that still stand:
Slightly rough top layers
Beginning and end of loops are sometimes really visible (can be seen on the chimney of my benchy posted a side back)
Otherwise im pretty close to a good profile.
Stay tuned!
Re: Simplify3D settings for MK3
I just started to print with my MK3 using S3D and I noticed that when I pause, then resume a print it seems to get stuck in a loop of some kind. When I pause it the extruder lifts like it is suppose to but then when I resume it the bed heats back up and then the extruder never heats back up even though the display says heating. it will never continue until I stop the print and then start it again. I only seemed to notice this with S3d but maybe it did happen with Slic3r i just don't pause my prints very often. has anyone else experienced this?
Re: Simplify3D settings for MK3
Problems that still stand:
Slightly rough top layers
Beginning and end of loops are sometimes really visible (can be seen on the chimney of my benchy posted a side back)
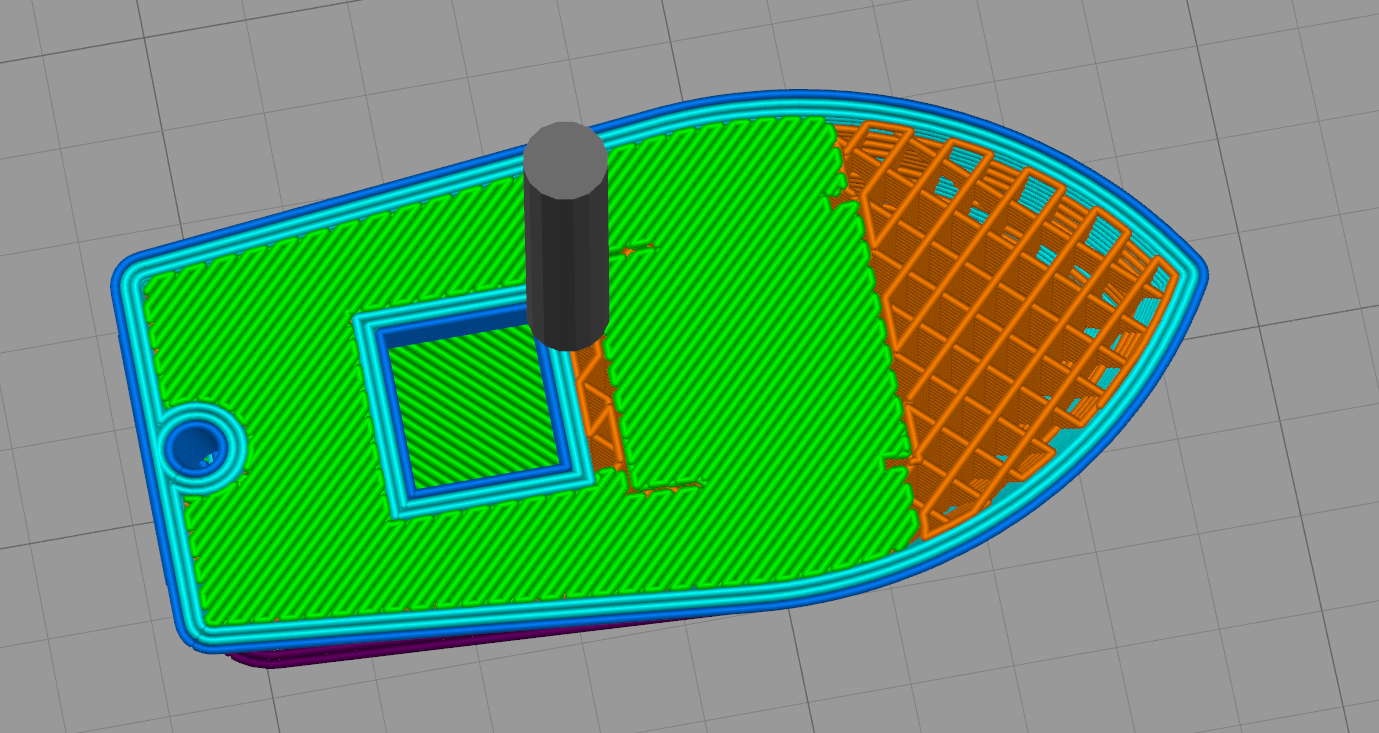
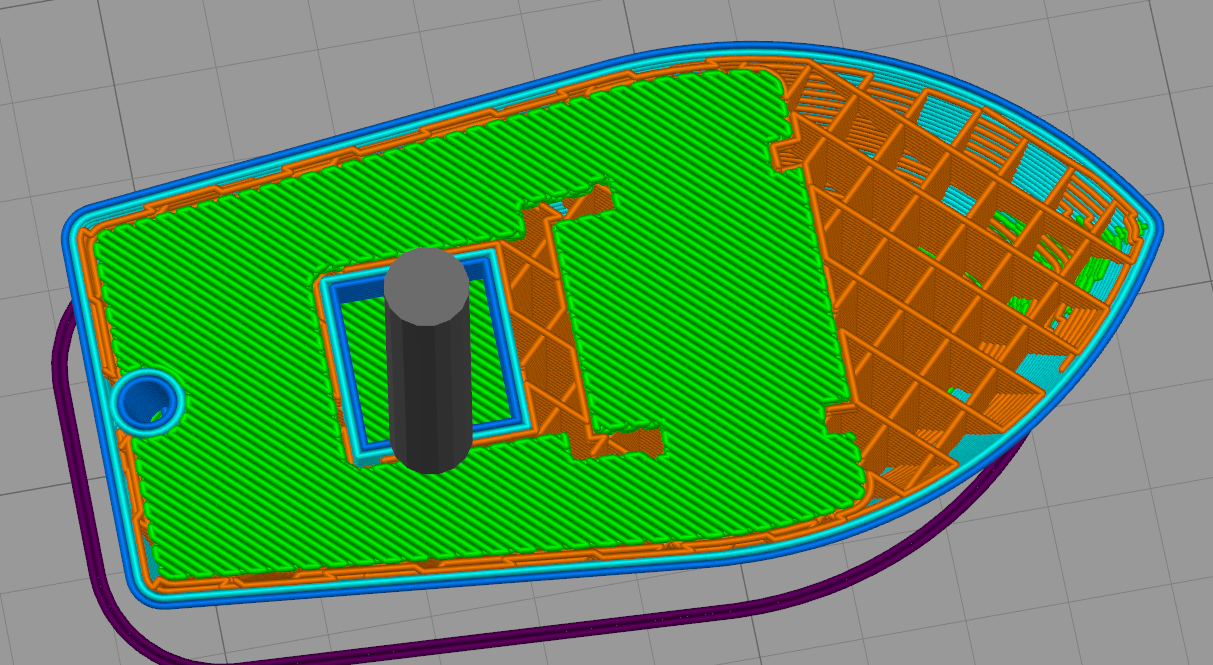
assuming I imported this right:
-that nozzle diameter wants to put some really weird tiny perimeters at the bow starting above layer 10. I don't think it will hurt much since its inside but I feel like I'd rather have a nice clean perimeter. Same goes for walls on the the stern of the boat above 51, a smooth perimeter might look better than that squiggly gap fill/top layer
-your bridges look okay (front window) but a threshold of 50 is too high for my comfort
-some scarring on the aft deck, may want to add some z hop on travels
-slight ringing on the bow - I always lower jerk and acceleration with M201 and M205 in my start script. Also quieter and less shaky on my desk
-personal preference: I stick G91 G1 Z40 in the end script to give me more room to get the plate off and clean
but it looks pretty good otherwise
When I pause it the extruder lifts like it is suppose to but then when I resume it the bed heats back up and then the extruder never heats back up even though the display says heating.
tethered or sd? You could just force it before resuming
Re: Simplify3D settings for MK3
Problems that still stand:
Slightly rough top layers
Beginning and end of loops are sometimes really visible (can be seen on the chimney of my benchy posted a side back)
assuming I imported this right:
-that nozzle diameter wants to put some really weird tiny perimeters at the bow starting above layer 10. I don't think it will hurt much since its inside but I feel like I'd rather have a nice clean perimeter. Same goes for walls on the the stern of the boat above 51, a smooth perimeter might look better than that squiggly gap fill/top layer
-your bridges look okay (front window) but a threshold of 50 is too high for my comfort
-some scarring on the aft deck, may want to add some z hop on travels
-slight ringing on the bow - I always lower jerk and acceleration with M201 and M205 in my start script. Also quieter and less shaky on my desk
-personal preference: I stick G91 G1 Z40 in the end script to give me more room to get the plate off and clean
but it looks pretty good otherwise
When I pause it the extruder lifts like it is suppose to but then when I resume it the bed heats back up and then the extruder never heats back up even though the display says heating.
tethered or sd? You could just force it before resuming
I only noticed this when copying to sd. I tried pausing once while tethered and it seemed to work fine.
Re: Simplify3D settings for MK3
Have had some time to tweak some settings, so am aiming to chime in again on the settings.
Problems that still stand:
Slightly rough top layers
To remedy this I turned down the speed of the top and buttom solid layers to match the outline. The UM2 crowd recommend about 30mm/s.
Beginning and end of loops are sometimes really visible (can be seen on the chimney of my benchy posted a side back)
For this I turned on coasting, since it occured only in the end of a line, when it contacted the starting point. A small value of 0.1 mm seems to have done the trick on the chimney, there's still a visible seem, but it's not bulging.
assuming I imported this right:
-that nozzle diameter wants to put some really weird tiny perimeters at the bow starting above layer 10. I don't think it will hurt much since its inside but I feel like I'd rather have a nice clean perimeter. Same goes for walls on the the stern of the boat above 51, a smooth perimeter might look better than that squiggly gap fill/top layer
The behavior in the bow is S3D's internal behavior to reinforce overhangs, you can see this if you turn down infil to 0% and look down inside the shell. The reinforced area is the same that used to suffer from 'overheating' in the first weeks of release.
The squiggly infill in walls can be remedied by either upping extrusion diameter or turning on 'Allow single extrusion fill' under 'Internal Thin Wall Type" this should then be controlled by the min and max parameters below. Personally I always enable this feature as those quick squiggles and the noise they make annoy the heck out of me. 🙂
-your bridges look okay (front window) but a threshold of 50 is too high for my comfort
This is S3D default value and might be too high. So am reducing this to 30mm^2 just to be safe.
-some scarring on the aft deck, may want to add some z hop on travels
Z-hop is usually mandatory as no machine can make perfectly flat to surfaces down to the mikron. Joe Prusa set a 'Retraction Vertical Lift' value of 0.6 mm but am still getting a bit of scarring on the aft. So upped this to 1.0mm.
-slight ringing on the bow - I always lower jerk and acceleration with M201 and M205 in my start script. Also quieter and less shaky on my desk
Acceleration doesn't really need to be touched except for outlines in my optics, because they are already rather conservative in firmware. But while Jerk was reduced in RC5 to 10mm/s there's still visible ringing on sharp corners by the doors.
Personally set X and Y jerk in M205 to 8mm/s and am getting good results on test cubes.
-personal preference: I stick G91 G1 Z40 in the end script to give me more room to get the plate off and clean
That is actually quite smart, thanks for the tip!
Was also getting some strining on the doorway and aft window, where S3D turns down the speed for layers below 15 seconds. So upped retractions to 1.2mm from Joe's 0.8mm and turned on Wipe at default value and 'Only wipe extruder for outer-most perimiters'. This seemed to get rid of them.
But in my optics this is just a bandaid of a deeper problem - Filament doesn't behave equally well at a set temperature for all speeds. Innofil produced this graph for their PRO1 modified PLA filament:
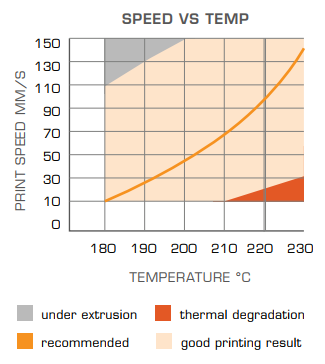
This type of modulation of temperature according to movement speed SHOULD be the model of temperature control. As it would reduce the need for retractions and make the filament behave more predictably for all movement speeds. For now we can only zone in on general settings that work for us.
Re: Simplify3D settings for MK3
The behavior in the bow is S3D's internal behavior to reinforce overhangs, you can see this if you turn down infil to 0% and look down inside the shell. The reinforced area is the same that used to suffer from 'overheating' in the first weeks of release.
The squiggly infill in walls can be remedied by either upping extrusion diameter or turning on 'Allow single extrusion fill' under 'Internal Thin Wall Type" this should then be controlled by the min and max parameters below. Personally I always enable this feature as those quick squiggles and the noise they make annoy the heck out of me. 🙂
What I was really getting at was that just using another perimeter solves all of that, and makes the whole thing cleaner. I'd much rather have 3 solid perimeters than 2 perimeters + single extrusion fill + wiggly 1mm gap fills all over the place.
Z-hop is usually mandatory as no machine can make perfectly flat to surfaces down to the mikron. Joe Prusa set a 'Retraction Vertical Lift' value of 0.6 mm but am still getting a bit of scarring on the aft. So upped this to 1.0mm.
This one baffles me, why should it need that much? I mean it works, but I've never had to use more than .2
Acceleration doesn't really need to be touched except for outlines in my optics, because they are already rather conservative in firmware. But while Jerk was reduced in RC5 to 10mm/s there's still visible ringing on sharp corners by the doors.
Personally set X and Y jerk in M205 to 8mm/s and am getting good results on test cubes.
I read they changed that, unfortunately RC5 is complete disaster for me. 143e is perfect right now.
Filament doesn't behave equally well at a set temperature for all speeds. Innofil produced this graph for their PRO1 modified PLA filament:
I wonder if thats why the default PLA temp is 215. I have always liked using higher temps, if for nothing other than layer adhesion.
Re: Simplify3D settings for MK3
please upload zip files instead of rar
Re: Simplify3D settings for MK3
What I was really getting at was that just using another perimeter solves all of that, and makes the whole thing cleaner. I'd much rather have 3 solid perimeters than 2 perimeters + single extrusion fill + wiggly 1mm gap fills all over the place.
Ah I see. Personally I always go for 3 perimeters myself also, and ideally 1.0mm of solid top and bottom layers. The thing with single extrusion fill is that it goes up to 200% width by default, so it negates about 90% of the need for those squiggly infill lines, at least for me. But I agree with you that a cleaner slice is a better slice, where only the minimum of features are utilized.
Z-hop is usually mandatory as no machine can make perfectly flat to surfaces down to the mikron. Joe Prusa set a 'Retraction Vertical Lift' value of 0.6 mm but am still getting a bit of scarring on the aft. So upped this to 1.0mm.
This one baffles me, why should it need that much? I mean it works, but I've never had to use more than .2
I go that high to clear curling edges of overhangs. Even with supports, overhangs over 55 degrees tend to curl up noticably and if the nozzle doesn't clear those it'll knock the print right off for me. Had a Benchy fail just last night because of this, one of the last overhangs on the door curled up and just caught the nozzle in travel, knocking the print off the bed. Z-hop doesn't add much to print time, so I go for it to be on the safe side.
I read they changed that, unfortunately RC5 is complete disaster for me. 143e is perfect right now.
I'm also back on 143, Linear advance is too powerful of a feature to go without in my mind.
I wonder if thats why the default PLA temp is 215. I have always liked using higher temps, if for nothing other than layer adhesion.
As it is now is a tradeoff in my view. Higher temps mean stronger parts, but lower temps mean finer detail. I've landed on the middle ground of 210 C for now. But it depends on the print. As I outlined above, molten plastic isn't just equal, it's very dependant on the application which speeds and temps are the most fitting, and getting this right seems to be a bit of an art. Ideally this is something the slicer should facilitate, to improve general performance and make printing easier for everyone.
Re: Simplify3D settings for MK3
I think the main reason this profile has such good results is primarily due to the fact that extrusion width is .40 and equal to the nozzle size. A Lot of people overlook this and select auto or a larger value. The smaller this value the better the resolution. Also, the extrusion multiplier is tuned down a bit and this will need to be adjusted per your own filament. .95 is actually what my currently loaded filament needs so it worked well for me. Got a very nice benchy out of this.
Re: Simplify3D settings for MK3
I have been slowly honing an S3D profile for my Makergeeks PETG spools. I've finally gotten to a profile that minimally strings and generates a pretty good looking result. I have attached it for feedback and suggestions. Please test it if you can. This is specifically for PETG at .2mm. I have not included any other materials. I am using firmware 3.1.1 b143 RC4 with this profile. I still have some work to do, but considering where I have been with PETG, this is a win.
Below is a print straight off the bed showing what I mean by minimal stringing :

Re: Simplify3D settings for MK3
I have attached it for feedback and suggestions. Please test it if you can.
I'm not clear if s3d counts solid top layers as infill, but that's exactly what it looks like since your outline overlap is 10%.
https://www.simplify3d.com/support/print-quality-troubleshooting/#gaps-between-infill-and-outline
You may be able to turn that fan down for better strength and compensate with other settings. I use a couple of things to quickly test retraction and ooze settings.
https://www.thingiverse.com/thing:22263
https://www.thingiverse.com/thing:1023717
I use esun PETG, and turning on wipe + z hop always gives me a lot of stringies, but your fan speed might be helping you out there.
Bumping the fan speed up is the last item I tried that reduced the stringing significantly. Right now I am trying to balance retraction, speed and heat to boost print quality and reduce stringing. I really think a little z-axis tuning will give the PETG a big more room to extrude.
I think I am under on outline overlap as you noted but I am trying to clean up the edge of thin parts and overhanging thin parts.
I will look again at the fan setting to see if I can reduce them after I test the parts for strength.
Re: Simplify3D settings for MK3
Experiments Part 1.
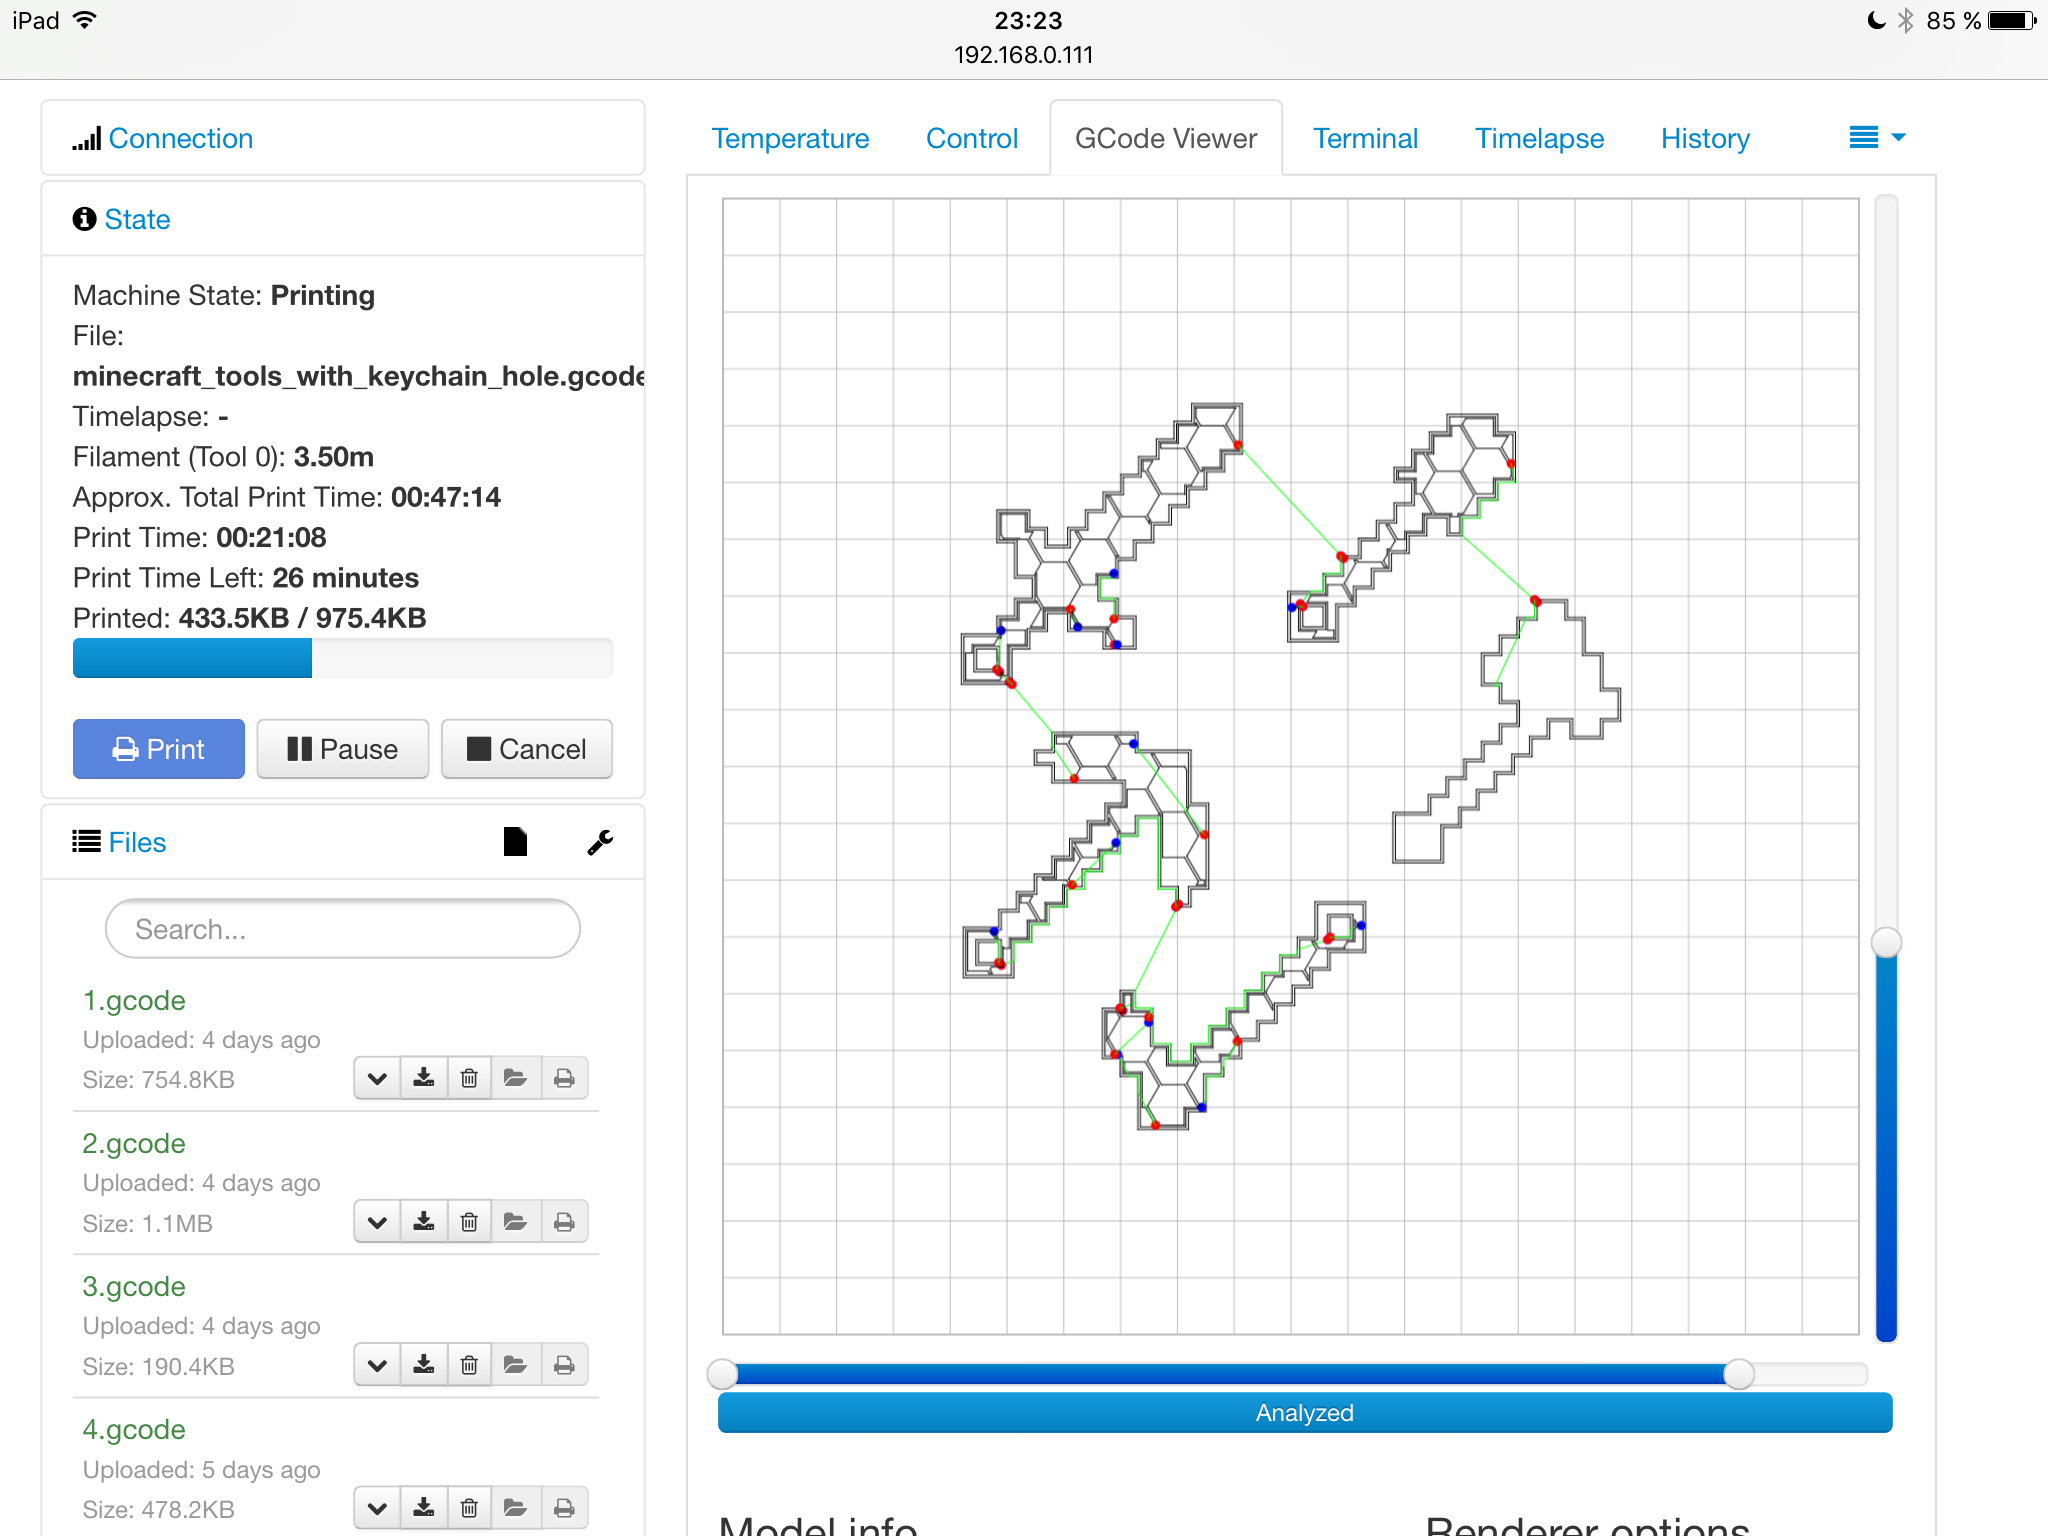
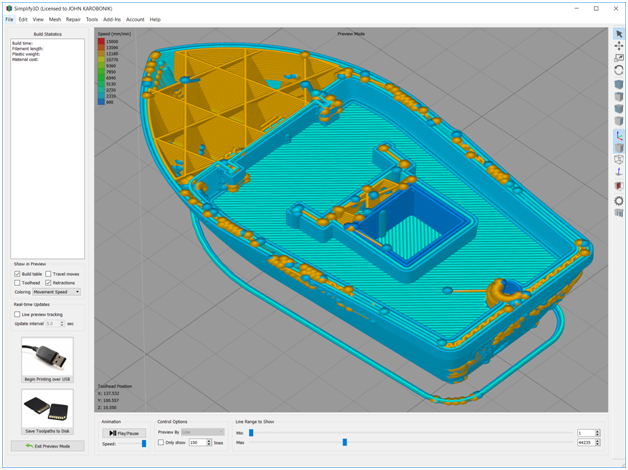
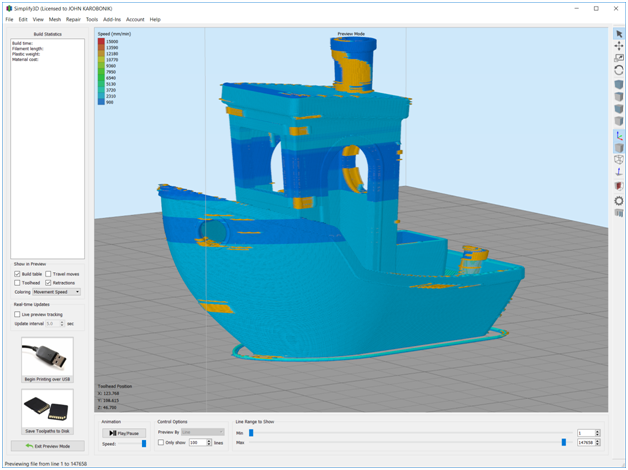
Hope you all find this interesting, I started printing some test printer. The benchy was OK but not as good as I hope see picture below. So I decided to look at the gcode with S3D(this ia a great way to review Slic3r gcode in more detail). I was thinking the Bow was a cooling problem but after look at the gcode it may be all those Retraction in the bow that is the problem? The profile is a bit bipolar very fast inside and slow outside.
Prusa Sd card MK3_PLA_3DBenchy_150um_2H
As I tend to use S3D I then move on to it. Seems to have hit the limit for attached images so more in next Post