First layer height measurement with feeler gauge
Can anyone tell how to set the nozzle so that I can use a feeler gauge to measure the actual z height?
I found this, but wanted to see if there's a better way.
https://www.reddit.com/r/3Dprinting/comments/9l7r4k/how_to_layer_height_calibration_by_gcode_and/
Thanks!
What exactly is the intent?
I'm not exactly sure I understand what the goal is. Obviously, if you specify a 1st layer height of 0.2mm you'd like for the result to be close to 0.2mm. I just don't see how this approach helps. This procedure:
- Does automatic mesh bed leveling.
- Moves the nozzle to the center X position.
- Lowers the nozzle to the 0.2mm position.
- You then use your feeler gauge (a slim piece of metal, nothing to adjust on it) to 0.2mm to determine if the nozzle is higher or lower than 0.2mm.
This is a nice verification, but you then throw this away when you do Live-Z calibration which will make minor adjustments between test points. That ultra-precise 0.2mm gap you just measured is ignored and adjusted at test points in the interest of getting good first layer adhesion. The goal is to get a good 1st layer height that adheres well.
I can see the importance of this procedure if you're using another printer without automatic or manual mesh bed leveling and particularly without live-z/babystepping corrections. This procedure ensures that, at least at that one point, the nozzle is a good distance from the bed and "should" result in good 1st layer bed adhesion. I just don't see any benefit in verifying the nozzle is exactly 0.2mm above the bed in the front-center X position if you then make adjustments for adhesion. Am I missing something?
I wasted time early on worrying about 0.2mm instead of focusing on good Live-Z adjustment and bed adhesion.
Look at this
So with automatic bed leveling, we don't need to know the principles in this video?-
The reason I even thought about it is when doing the z calibration, it ends up with a postage stamp area that we are supposed to inspect and judge in order to assess whether or not the z height is proper. I'm an engineer and machinist, and I don't rely on my eyes for measurements.
RE: Do what you like, just pointing out limitations of the procedure
So with automatic bed leveling, we don't need to know the principles in this video?-
We do, but that video is from 2016 when a lot of basic information was not readily available and things like automatic bed leveling were not available. We see a lot of posts here from people searching for "lost wisdom" and "discovering" old methods like blue painter's tape on the bed and manual bed leveling methods that simply aren't needed on a modern printer.
Everything described in that video is handled through the Live-Z calibration process. The goal is to wind up with not only that precise 0.2mm 1st layer height, but also good adhesion across the entire bed rather than a single test point as described in the procedure linked to in the original post.
The reason I even thought about it is when doing the z calibration, it ends up with a postage stamp area that we are supposed to inspect and judge in order to assess whether or not the z height is proper. I'm an engineer and machinist, and I don't rely on my eyes for measurements.
That's more a limitation of the on-board calibration routine. The on-board Live-Z procedure is notoriously tricky to interpret if you're just getting started with a Prusa. If you have not already done so, try Jeff Jordan's "Life Adjust" procedure for calibrating your Live-Z setting. It is much easier to use and understand than the onboard routine and much easier to make mid-print adjustments accurately with. In general, start high (less negative) and work lower (more negative) in large increments (e.g. 0.1mm) until the filament starts to stick on its own. When you've got your Live-Z setting adjusted properly, you should be able to gently rub the extruded lines on the PEI surface without dislodging them. Then start lowering (more negative) the level until there are no gaps between layers. You should not be able to peel the lines apart after printing, but the top should be regular.
I get that you're a professional and I'm not interested in the least about arguing about any of this. I only want to point out that the procedure described in the reddit post is from the very early days of the Mk3 release (the author of that post was apparently using a Mk2s) before some of these steps were refined, and the results described in the linked reddit thread are promptly thrown away when you then calibrate Live-Z.
Or to put it another way: If you've precisely measured your 1st layer height at 0.2mm and you're getting bad adhesion in other spots, are you going to use Live-Z to adjust that height in those spots? You're not going to get a completely smooth top surface with FFF printing, so how you measure will be important. Different filaments require varying amounts of that squish for good adhesion. I've not seen any official tolerances published for the Mk3 in any case.
That small rectangle that we get at the end of first layer calibration tells a lot:
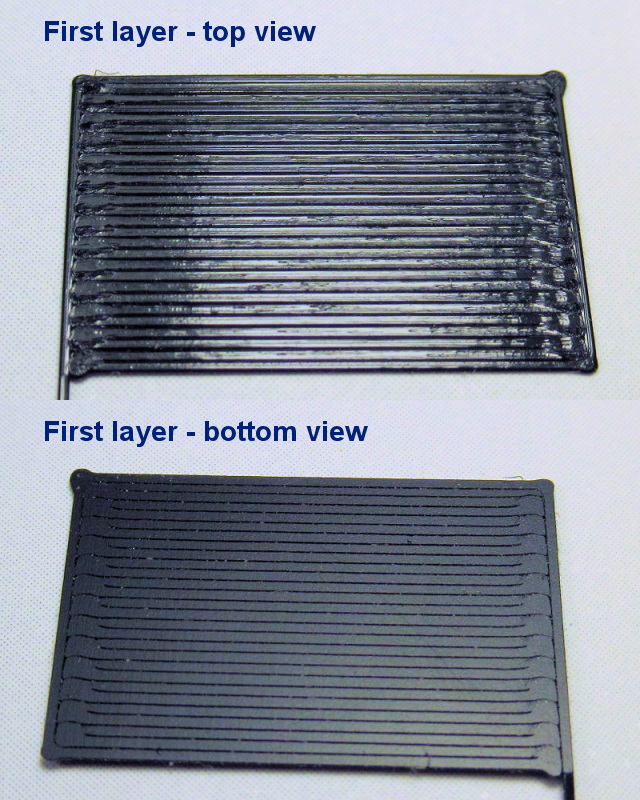
There's actually no need to measure it's thickness (even you can do that with digital caliper). It's important that lines of filament are connected so you can't see trough rectangle at all. Also if you bend the rectangle, it must feel solid and not separate into individual lines.
I don't see myself as experienced 3D printer user, but I can get such layer in two (or max three) attempts. Of course, to get good first layer, first we need to make sure that printer has correct geometry. For Mini though, it's always good to check if Z-axis is perpendicular to print bed.
[Mini+] [MK3S+BEAR]
Thanks
I currently have no issues at all. I'm just preparing to be printing actual products, and want to include everything it takes to get good results. I will accept your explanations even if it feels a bit flat to me. I like being able to quantify. This all began when I bought the exact same Prusament filament, and it was so different in how it printed, I thought a z adjustment would be needed, and I wanted to know the height so as to be able to quickly change it when using that filament. So it's all good. I'll follow the manual. Thanks again.
Lots of Internet knowledge makes sense for older tech
I currently have no issues at all. I'm just preparing to be printing actual products, and want to include everything it takes to get good results.
Hey, don't get me wrong. I wrestled with some of the same issues. It was only when I moved from my Prusa to a cheap printer without these features that it clicked why people were so worried about it. If you're using a Sidewinder with only stiff and imprecise wheels to adjust your 1st layer, "shortcuts" like that procedure you get within range on that 1st layer much more quickly. I actually do something similar to the procedure described but don't sweat it being anything more than "a bit high" (the ol' 0.1mm piece of paper slide test) and do a final mesh bed level adjustment based on printed results at each of 25 individual test points. And then I re-do it all whenever I sneeze or change filament and it goes back out of whack. I simply don't worry about it on my Prusa. I'm so glad I went Prusa on my first 3D printer.
I will accept your explanations even if it feels a bit flat to me. I like being able to quantify.
That's great, and I would encourage you to challenge everything I or any other random response on the Internet suggests and test for yourself. I'm just summarizing my own conclusions having been through the same process. Most importantly, as you get familiar with it, test and verify until your most demanding customer -- you -- are satisfied. Nobody else matters.
This all began when I bought the exact same Prusament filament, and it was so different in how it printed, I thought a z adjustment would be needed, and I wanted to know the height so as to be able to quickly change it when using that filament. So it's all good. I'll follow the manual. Thanks again.
Hope this is helpful. I just wanted to point out that a lot of what you may find for older tech may not directly apply. I've learned to quit worrying about precision on individual layers and instead focus on getting my final prints within tolerances. So long as I can get a snap-fit with 0.2mm tolerances and print out threads designed in Fusion 360 without having to hand-tweak dimensions, I'm happy. I'm just a hobbyist though.
even if it feels a bit flat to me.
The example on photo is exactly 0.2mm thick.
[Mini+] [MK3S+BEAR]
A new milestone in 3D printing
even if it feels a bit flat to me.
The example on photo is exactly 0.2mm thick.
I think this is the first 3D printer dad joke I've encountered!
Great stuff guys.
I can't tell you how impressed I am with how this printer (or the process of 3d printing) works. I've been struggling to design parts that work, and find it a fun challenge.
Here's what I have been building. 
Niiice bench!
I can't tell you how impressed I am with how this printer (or the process of 3d printing) works. I've been struggling to design parts that work, and find it a fun challenge.
I'm impressed with your workbench! Looks like you're getting great results. Is that a grinder of some sort?
Feeler gauge... that brought back memories of my Wanhao and the continuous battle to get that stupid bed level for a good first layer. Feeler gauge, blue tape, hairspray, just happy to say good riddance to all that crap.
Yes, it's a spice grinder.
I thought 3d printing it would be a mistake. It's great. I still have issues with printing over some supports.. What I find interesting is how seemingly insignificant changes can have dramatic effects on how a part prints. If modifying the design doesn't fix a minor issue, I'll be back here with more questions.
Feeler
I still use them with my Ender3 and CR-10S Pro. Never needed to use them with my Prusas.
Feeler gauge... that brought back memories of my Wanhao and the continuous battle to get that stupid bed level for a good first layer. Feeler gauge, blue tape, hairspray, just happy to say good riddance to all that crap.
--------------------
Chuck H
3D Printer Review Blog