RE: What is wrong with this pic?
@cwbullet
Can't handle the chemicals or the enclosures required, but maybe someday.
Have had much better quality prints, but maybe spoiled by earlier machines..
Will continue trying.. maybe some fresh filament as well..
RE: What is wrong with this pic?
@sink
Keep trying and you will get it. How many printers do you have?
--------------------
Chuck H
3D Printer Review Blog
RE: What is wrong with this pic?
Last run.. better .. will try some other stuff..
@cwbullet
6 right now.. I usually keep the Prusas for a year or so and then replace with a new model.. They have held their value extremely well in the past, just need to figure this out.. One more somewhere between Prusa and me..
Right now, 5 Prusa (3 S + 2 S+), 1 CoreXY, rarely,, actually almost never used, thinking about selling it for parts and picking up the XL once it arrives ..
All other printers were sold, a P3 Steel XL, a few Artillery Sidewinders, a CR-10S Pro, couple of Enders .. All were ok, well the P3 sucked pretty bad, but I learned on it, but they were not Prusas especially when it came to print quality..
Something about these MK3S+s has me stymied .. will figure it our sooner or later..
Thanks for your help..
RE: What is wrong with this pic?
How did you finally improve your print quality?
It seems like I have the same issue.. posted here: Problem with grooves in 3D print
I actually have a prusa mk3s+ as well and unfortunately posted the thread in the wrong forum.
RE: What is wrong with this pic?
@hubert
A lot of the suggestions here played a part, but to be perfectly honest, I am not sure if it was one particular thing or a combination, scientific method right out the door here, no patience ( or time) for adjust..test, adjust .. test and so on.
Here is a list:
1- Greased all rods with Super Lube and the Z axis rods with Fine Mechanics Oil. Wanted to try both so I did.. X and Y got SuperLube. I did not clean and repack bearings when I originally built the kit or completely disassemble and do it now. Am building a new one right now and will be doing that with this one.
2- Tightened the screws holding the Z axis motors to the lower mounts, they didn't feel loose but could be tightened further. Made sure the upper parts were holding the rods and z axis screws were tight and not allowing side to side motion.
3- Checked the Y axis base clamps and they seemed fine. Movement seemed good before and after and did re-lube those rods and wiper excess.
4- Took the belt off the X axis motor, actually took the stepper off the mount.
5- Took the back extruder cover off.
6- Made sure the axis movement was smooth and easy, no catches at all. Actually added a bit more lube to the rods and wiped off the excess.
7- Loosened that adjustment screw on the back of the mount, almost all the way, just a bit holding the screw into the nut. Tightened it just a bit when all was done.
8. Reset the pulley and the idler bearing and made sure the belt upper and lower were parallel and moved well and easy. Tightened belt to what felt reasonable and similar to my other Prusas. Not too loose but not too tight.
9. Reset the back extruder cover back in place and tightened the screws just enough to keep the extruder from vibrating on the rods. Tight enough to rstrict movement but did not tighten all the way.
10. Ran the wizard and did a a complete retest and reset.
11. Reran live-z and adjusted
12. Ran test print and was much happier with results, not yet ready to say fully happy, but results are visibly better..
Thinking about an extruder calibration and playing with the extrusion multiplier but busy with other build right now.. Will do that this weekend probably..
Cheers and thanks to all for help ..
RE: What is wrong with this pic?
The T-nuts are a type of plastic (Delrin) that does not require lubricants. Oiling or greasing the threaded rods may cause problems as even SuperLube will melt Delrin.
RE: What is wrong with this pic?
@tim-2
Did not grease the lead screws or go near the T-Nuts, other than to check play and checking the top pieces, only the hardened steel rods were greased.
RE: What is wrong with this pic?
@hubert
Left one maybe important step out..
Opened the idler door by loosening the screw until the door was free.
Checked the Bondtech gear alignment and was fine.
Tightened the idler door just barely until the filament was extruding cleanly and then left it that way.
The screw wound up being much less tight than it had been.
RE: What is wrong with this pic?
"Even superlube will melt Delrin".
Yes. Yes it will. Delrin is meant to be run Dry.
RE: What is wrong with this pic?
Delrin is used as guides for 1010 aluminum t-slotted extrusion. It is slick and tough stuff and never needs lubrication.
--------------------
Chuck H
3D Printer Review Blog
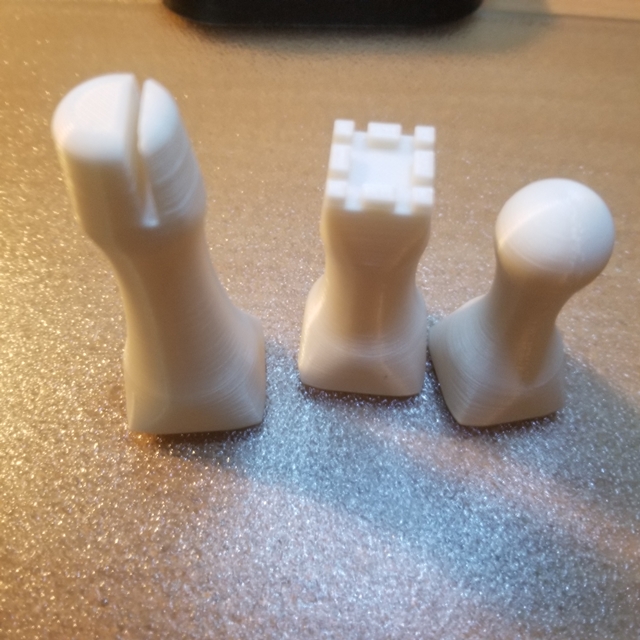
RE: What is wrong with this pic?

Piece on left; Best so far .. playing with
Extruder linearity correction calibration
RE: What is wrong with this pic?
@sink
LC has no effect on the ridges you are trying to wrestle.
RE: What is wrong with this pic?
@tim-2
What is LC?
--------------------
Chuck H
3D Printer Review Blog
RE: What is wrong with this pic?
@cwbullet
LC trims the sine table used by the TMC controllers to help correct non-linearity in the micro stepping. It can help with microscopic vertical artifacts running up the face of a printed wall. Light can dance off the artifacts making them visible, and tuning LC can alter the shape of the haversine correction to help null the amplitude of the variations. In short, it helps make cheap steppers work more like good steppers.
https://www.trinamic.com/fileadmin/assets/Products/ICs_Documents/TMC2130_datasheet.pdf pg 78
RE: What is wrong with this pic?
@tim-2
Got it from the video Prusa put out to help improve print quality, link below, and followed the instructions to reduce ridges and waves. Picture does show an improvement and adjusting the LC does seem to have an affect.. The closer to an E LC of 1 I get, the smother the ridges seem to have become and interestingly, with seam position set to Nearest, with E LC off, I get a seam while with E LC on and set to 1.05 as in the pic, or 1.12, my first try, no seam. Running a third test now with E LC set to 1.03.
If E LC is having an affect, saying something about the stepper quality?
RE: What is wrong with this pic?
@sink
Thanks for the link. Interesting - LC for the extruder is not something I've actually spent a lot of time looking at. Usually I only worried about X and Y, and the effect was generally so trivial I've stopped doing it as a matter of course. Something to think about again with the latest firmware changing motor drive currents.
If it's helping your prints, hard to argue with doing the cal. But I am still of the mind the effect is not huge - and everything else needs to be 100% to see the difference. The value Prusa allows to be entered only changes the shape of the sine used - like a crest factor - not individual ustep corrections the TMC allows and the feature was designed for. And, I honestly can't see how it would affect seam quality: the extruder rotation is not sync'd to when or where seams are placed in any way shape or form.
RE: What is wrong with this pic?
@tim-2
Yeah, the seam affect is totally weird, no clue as to why yet.. Ran again @ 1.03 and 1.05 produced better results. Will keep playing with the settings. Guess the machine is getting about as close to "dialed in" as it going to and the print quality is noticeably better.. Wonder how this will affect the MK3S machines?
RE: What is wrong with this pic?
@sink
The motors and drivers are the same ... expect similar gains if everything else is equal.
RE: What is wrong with this pic?
Very interesting. It definitely adds complexity to getting quality prints.
--------------------
Chuck H
3D Printer Review Blog
RE: What is wrong with this pic?
@cwbullet
At times a bit like staring into the Mirror of Erised..