PLA adhesion issue & question
Prusa Mk3s kit completed 10 days ago.
Prusament PLA (came with kit 11 days ago)
215°/60° extruder/bed temp
Slic3r PE slicing software
First layer calibration looks OK to me, but I. could be mistaken, new at this.
FirstLayerCalibration20190415.jpg
(not sure I uploaded the pic correctly)
Curling up of all 4 corners of a 60mm x 60mm print (box bottom)
Aborted print, removed material from bed & flexible sheet from heated bed
Cleaned printing sheet with alcohol, which I have been doing about every 3rd print
Restarted print
Still curling of a corner but only one this time, left front.
Aborted print, removed material
Changed color of PLA
Started a print on a larger box
Curling of one corner (same one referenced above, front left)
Rest of print looks pretty good.
What next?
plain dish soap & water?
Acetone? (machine is only 2 weeks old, about 40 hours of print time)
More alcohol? have been using 70% isopropyl because I couldn't find 90% when I was looking
lower the bed temperature to 55°?
raise the bed temperature to 65°?
re-position model in Slic3r?
something else?
Thanks
Dave
Re: PLA adhesion issue & question
I'm a fan of the plain dish soap & water.
I don't use anything else.
I have a Prusa,therefore I research.
Re: PLA adhesion issue & question
That calibration patch looks ok-ish, but try the procedure as described here: https://shop.prusa3d.com/forum/assembly-and-first-prints-troubleshooting-f62/life-adjust-z-my-way-t2981.html
Also, some print beds are more warped than others, i.e. the spacers between the carriage and the print bed don't always have the same length. If this is the case in your case, there are a few threads around here about bed levelling. Also, the new 7x7 mesh bed levelling is supposed to be able to deal better with tough cases.
Cleaning the PEI sheet is important for PLA - I usually just use isopropanol, but the bed seems to grow into it with time. At the beginning, I had to do a dish soap/warm water wash after every couple of prints. I haven't touched my PEI bed with acetone yet.
Re: PLA adhesion issue & question
Bed calibration needs large patches. Nine 20 mm squares spread about the bed is best for an overview of bed flatness. Though one large pad in the center is good for setting First Layer offset. Large enough you can make an adjustment and watch what happens for a bit. Also, if you have problems with less than perfect bed flatness, use the 7x7 bed mesh calibration that is available in the v3.7 firmware.
Curling up, poor adhesion, even some warpage is caused by contamination on the bed and filament. Never touch the bed or handle the filament with bare hands. Loading is the only time my fingers touch filament, and then only the first inch or two.
My PEI sheet cleanliness routine goes like this:
Hot Water wash: often, as needed
Handle the bed only by the edges.
Wash the bed in hot water, use a fresh paper towel as a wash cloth, with a few drops of plain dish soap (Dawn, unscented, no anti-bacterial, etc.). Rinse well in hot water - if you have very soft water, rinse a bit longer.
Dry the bed with a fresh paper towel.
Handle the bed only by the edges.
Place bed on printer.
Alcohol rinse: every few prints
Once in a while, an alcohol rinse is helpful to remove PLA residue. It does not remove finger oils.
Pour a 5 cm puddle of 91%+ alcohol in the middle of the bed, with clean hands use a fresh paper towel to scrub the bed. Wipe up all the alcohol.
Streak test: when contamination is suspected and after a wash
With a fresh piece of paper towel, and very clean fingers, dampen the towel with 91%+ alcohol, and wipe the bed side to side moving back to front, like you're painting it with alcohol. The alcohol should be thin enough on the towel it quickly evaporates. If you see any streaks, the bed is dirty and needs a wash.
Acetone wash: infrequent
Pour a 2 cm puddle of acetone on the bed, scrub it around with a fresh paper towel. It will evaporate fast as you clean. This step removes PEI oxides that form over time and with heat, and improves PLA adhesion to a like new state.
fyi: soap and detergent are chemistry differences and don't affect the outcome: both remove contaminants we want removed.
Re: PLA adhesion issue & question
We have a new i3 MK3 printer. Assembly went smooth. Calibration appears to be fine.
However, every print we run gets about 2 layers down before the hot end starts dragging the entire print around like a dog on a leash.
We have wiped down with 99% isopropyl alcohol and even tried wiping down with acetone. Our prints just don't stay stuck.
We are using the PLA roll that came with the printer.
-Frustrated
Re: PLA adhesion issue & question
Curling up of all 4 corners of a 60mm x 60mm print (box bottom)
Aborted print, removed material from bed & flexible sheet from heated bed
Cleaned printing sheet with alcohol, which I have been doing about every 3rd print
Restarted print
Still curling of a corner but only one this time, left front.
So after cleaning it improves, that's the problem.
Clean every print.
Clean with dish soap,
clean with acetone if above does not work.
Also if curling, make a big brim attach to the print
Re: PLA adhesion issue & question
[...] We have wiped down with 99% isopropyl alcohol and even tried wiping down with acetone. Our prints just don't stay stuck.
We are using the PLA roll that came with the printer.
You are suffering from bed adhesion problems. The part pops off the PEI surface and gets dragged around. Here's some copypasta...
Adhesion problems are usually caused by 2 main problems:
And above all else, avoid touching the PEI print surface.
Try those 2 steps. If you're uncertain of the Live-Z results, post pics here of the 75x75 print bottom and you'll get quick help. In general, start high (less negative) and work lower (more negative) in large increments (e.g. 0.1mm) until the filament starts to stick on its own. When it's right, you should be able to gently rub it without it coming loose. Then start lowering (more negative) the level until there are no gaps between layers.
If you want more detail, I've dumped everything I know about adhesion and bed cleaning here and Live-Z calibration here (draft).
Re: PLA adhesion issue & question
We have a new i3 MK3 printer. Assembly went smooth. Calibration appears to be fine.
However, every print we run gets about 2 layers down before the hot end starts dragging the entire print around like a dog on a leash.
We have wiped down with 99% isopropyl alcohol and even tried wiping down with acetone. Our prints just don't stay stuck.
We are using the PLA roll that came with the printer.
-Frustrated
Scroll up and read the bed wash instructions and follow them. You'll complain the entire way your bed isn't dirty, but you'll be happy you did the soap and water wash.  ps: Alcohol and acetone turn fingerprints into a microscopic layer of grease coating the area you wiped: they don't remove the grease like a soap and water wash does.
And then what Bob said: First Layer thickness is an art form when you are new; but as you get some experience you can tell at a glance when dirt or first layer is going to kill a print. Your bed looks dirty, and you may also have a very thick first layer. A bed wash takes three minutes, and a test patch for setting layer one cal takes another five (using a 10 cm patch).
Re: PLA adhesion issue & question
The suggestions have been great.
-Bed was thoroughly cleaned with Dawn dish soap
-bed was wiped again with 99% isopropyl alcohol
-built in calibration showed fine
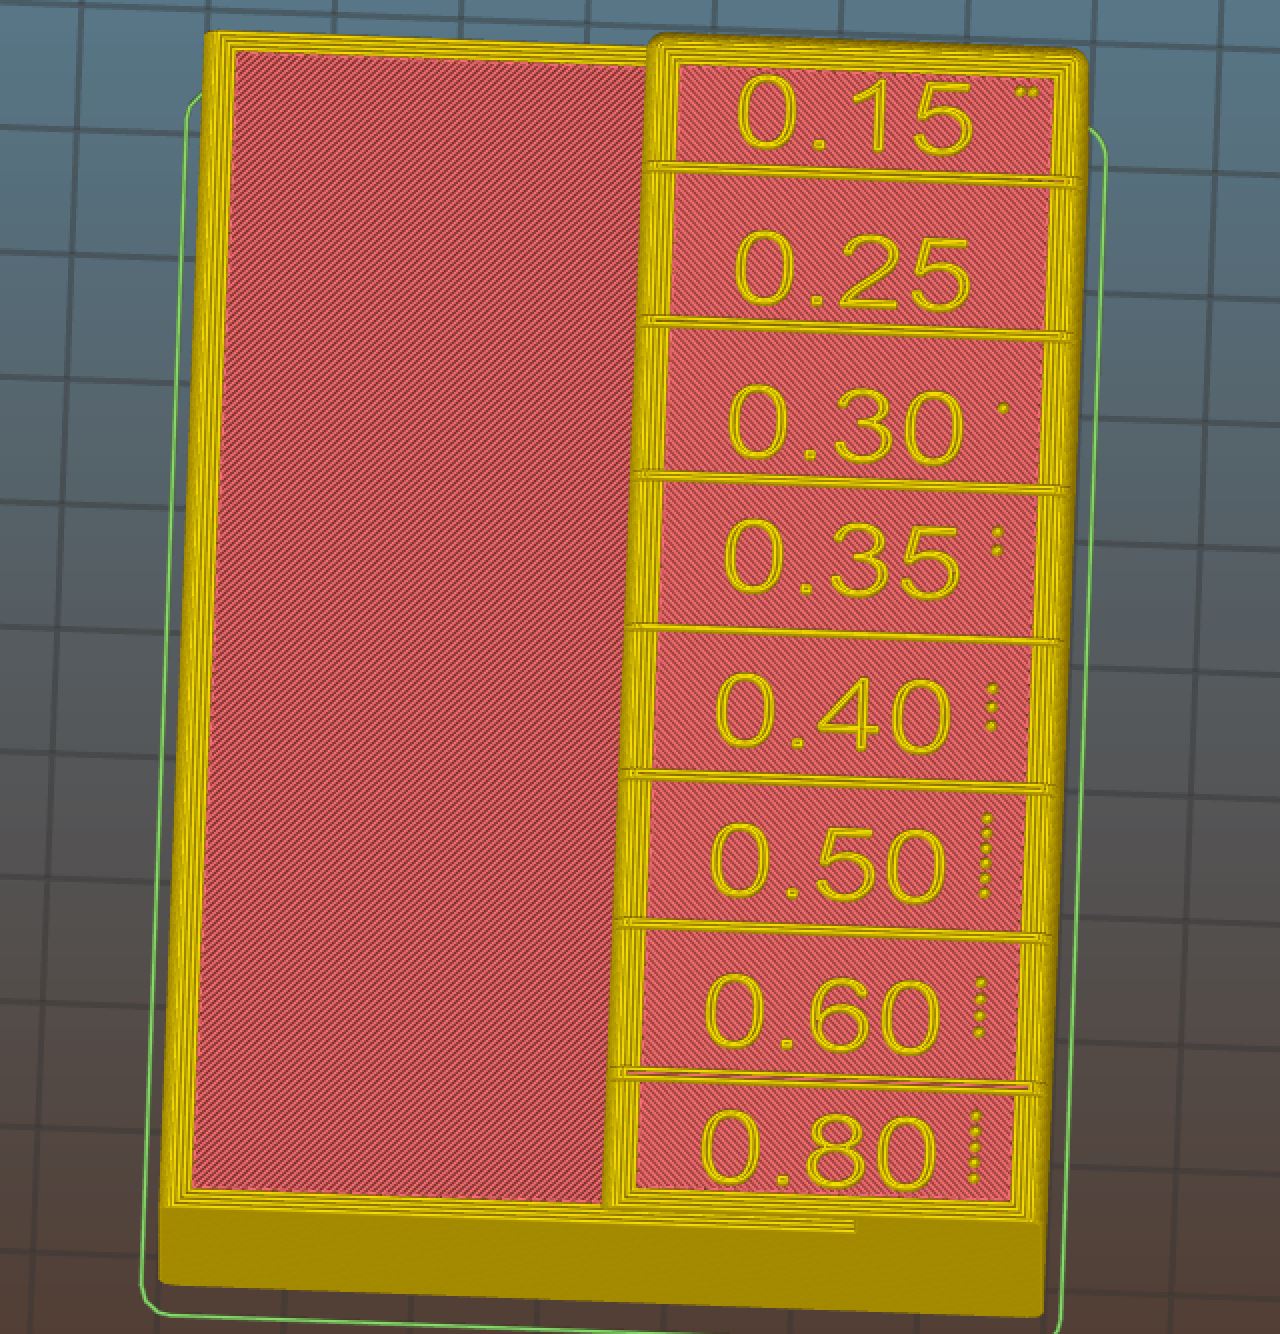
-I downloaded the gcode file for the z-axis calibration. After 3 tries, it appears that I have great looking print. the results was dropping the z-axis by 550
My first two attempts are real prints were duds. One worked great on a different brand printere. The second was the treefrog file that came with the printer.
See attached pic.
Keep those suggestions coming. I'm still searching for a great print.
Re: PLA adhesion issue & question
In the bottom-most square, your Live-Z is still way too high (not negative enough). Those gaps between lines should not be present.
[...]
See attached pic.
Keep those suggestions coming. I'm still searching for a great print.
Here's an example of the Life Adjust print, showing the lines and outside gaps progressively closing as the nozzle is lowered (Live-Z made more negative towards the center of the print.
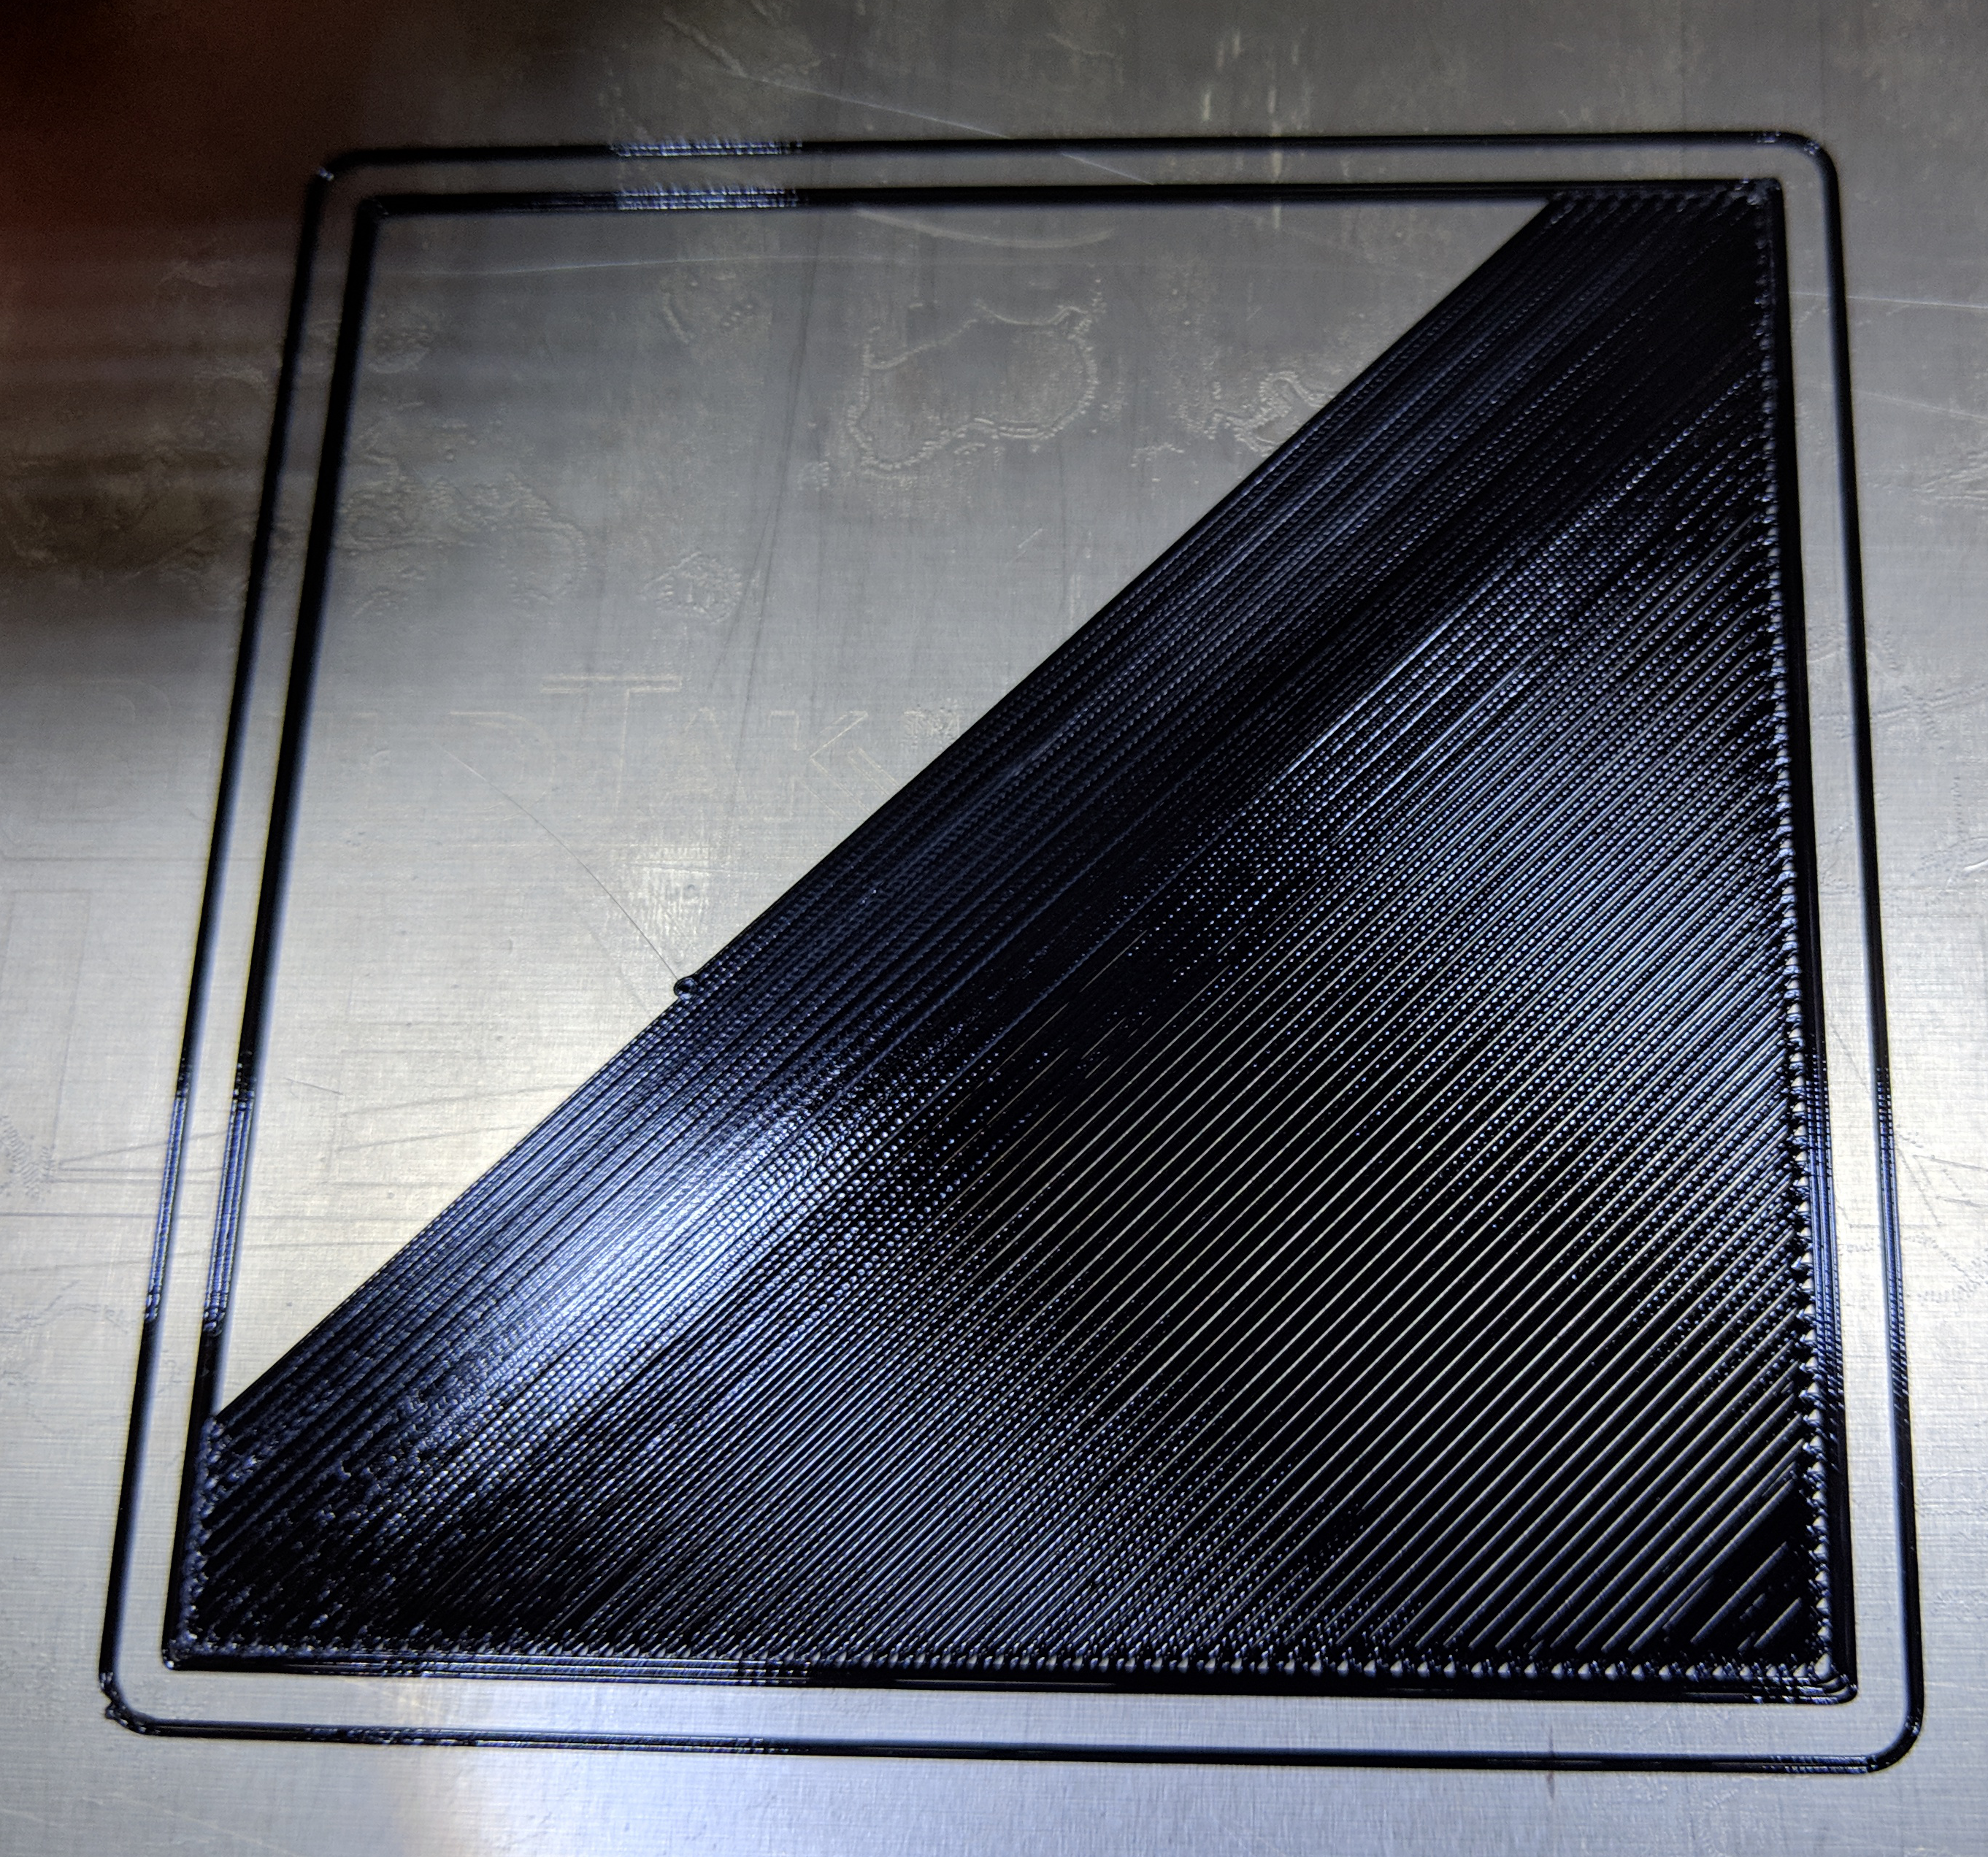
The final result should look like this, with no gaps between linesor at the edges between the interior lines and perimeter, no ripples or distortions on adjacent lines. (Pics can be tricky - the shiny bits are reflected light, not the PEI surface showing through).
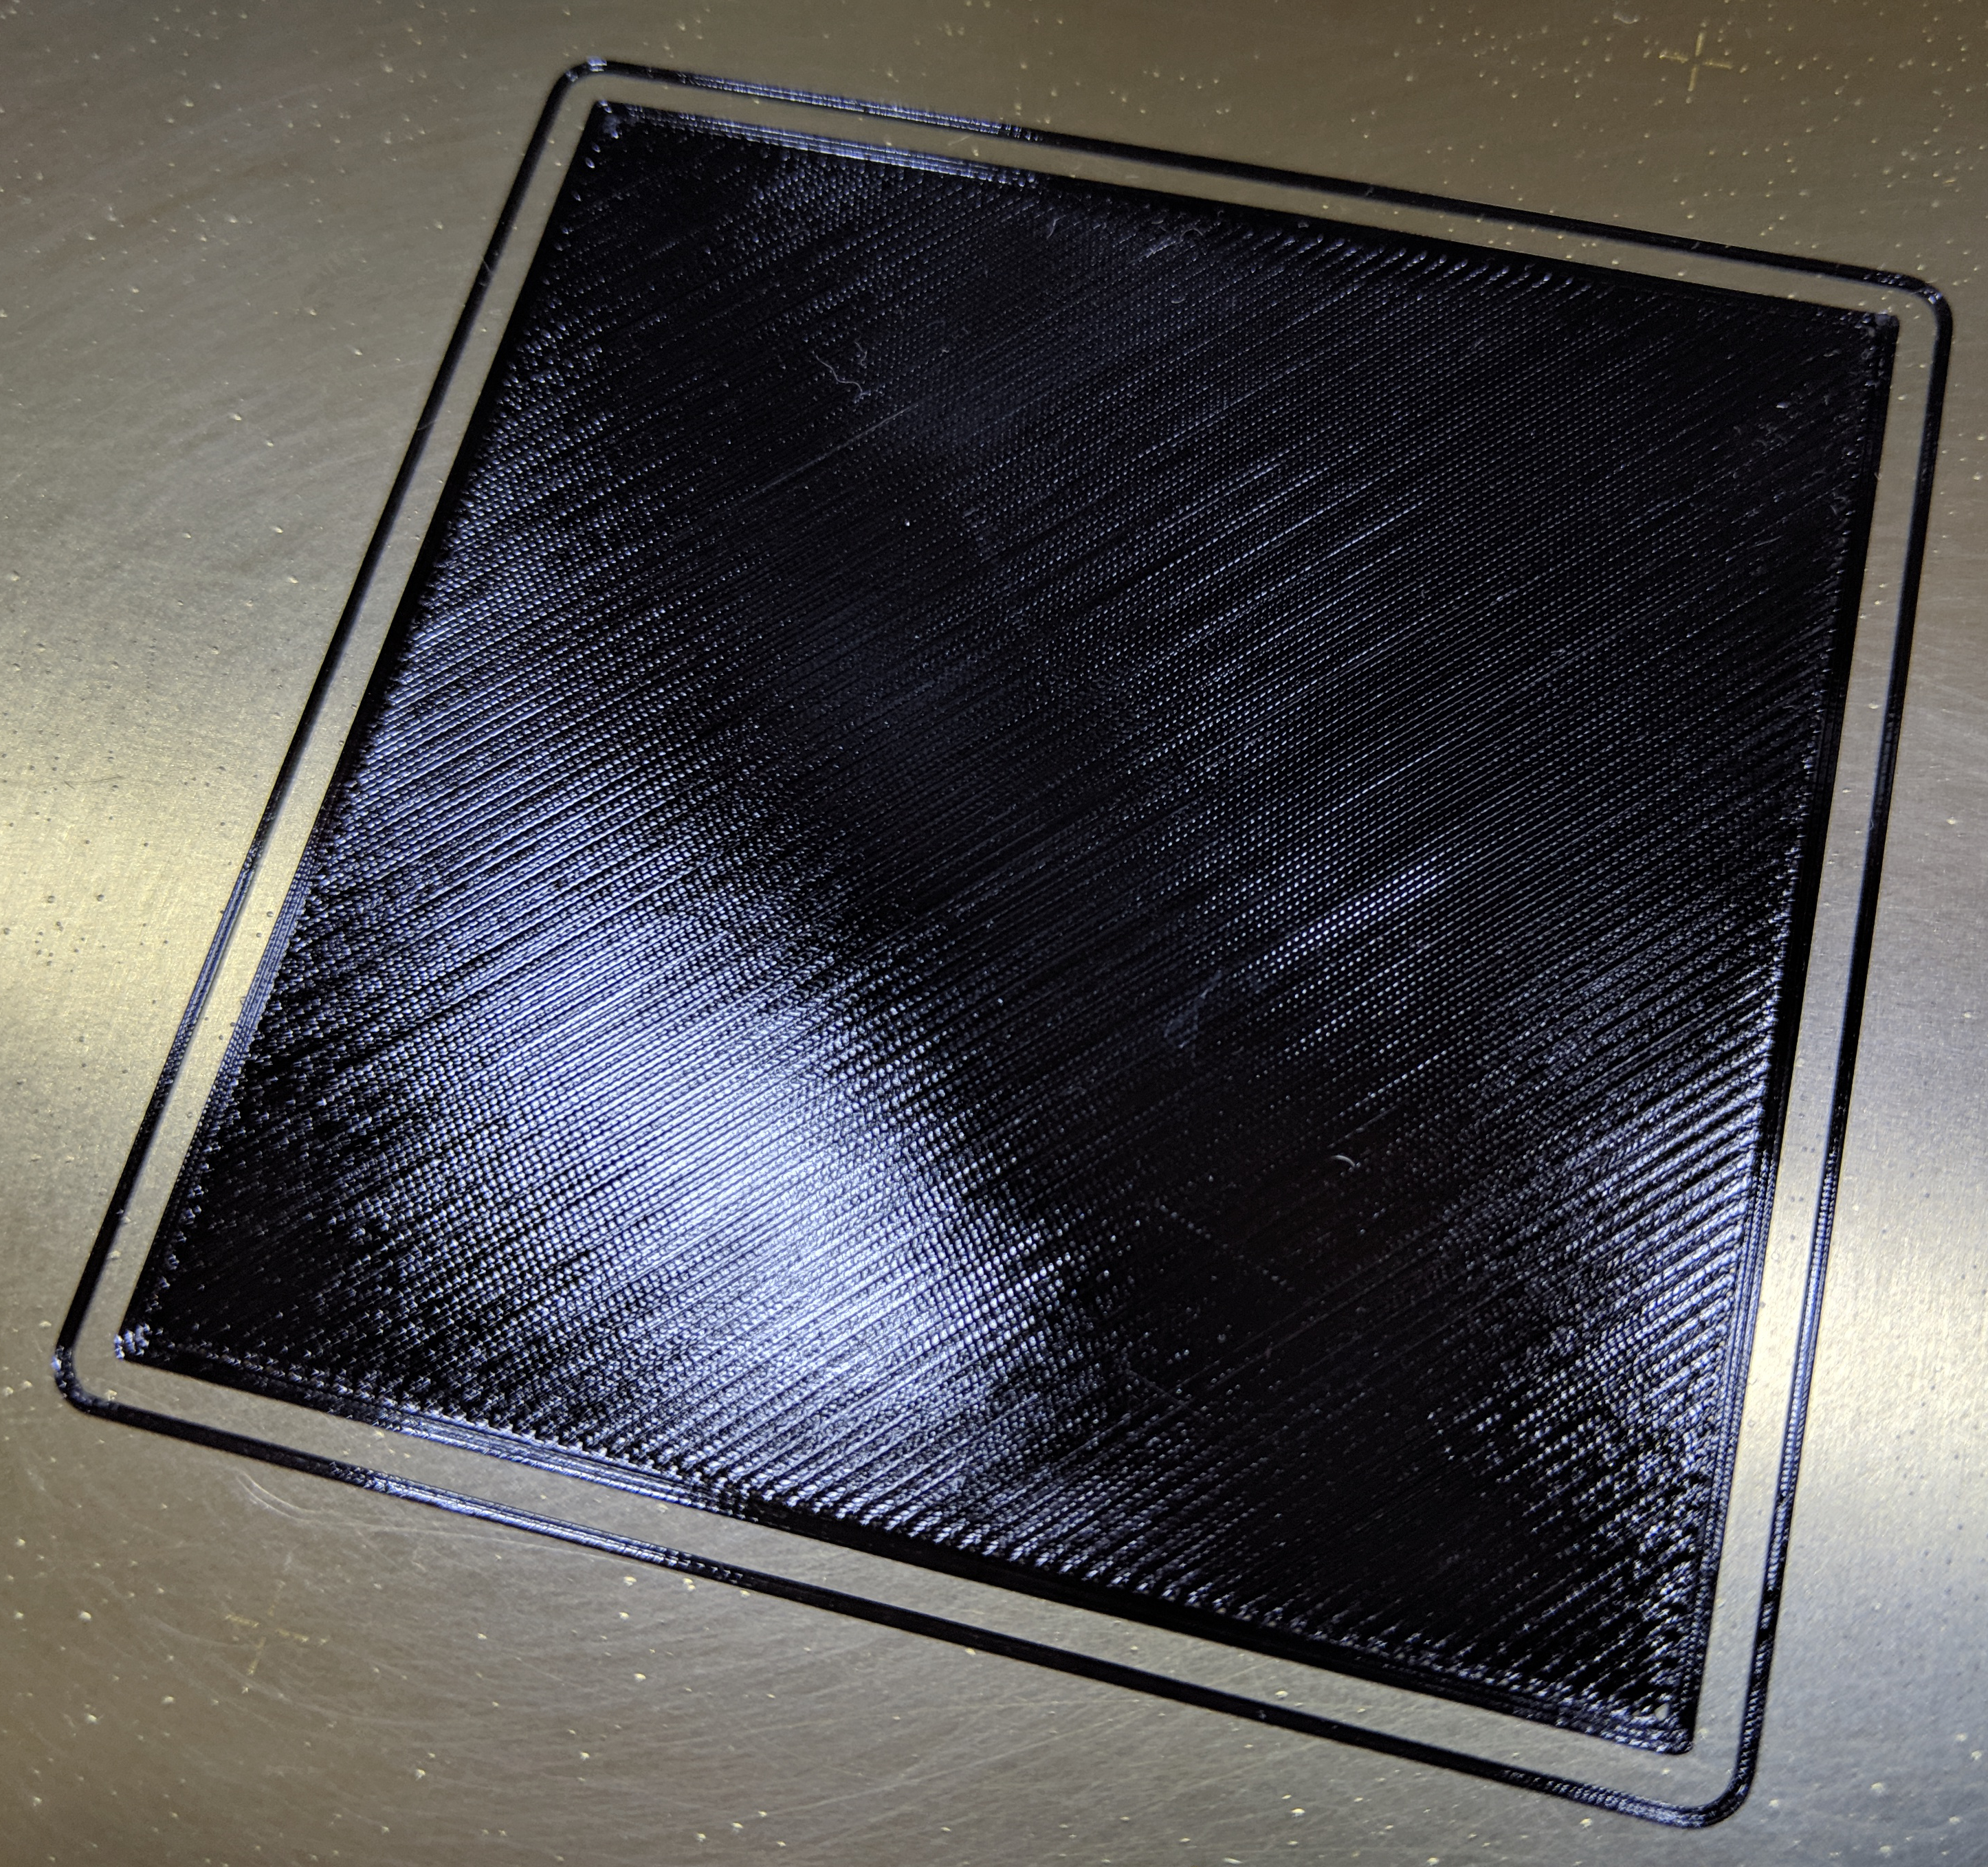
I've added some pics to show the procedure here that might help.
Re: PLA adhesion issue & question
The suggestions have been great.
-Bed was thoroughly cleaned with Dawn dish soap
-bed was wiped again with 99% isopropyl alcohol
-built in calibration showed fine
-I downloaded the gcode file for the z-axis calibration. After 3 tries, it appears that I have great looking print. the results was dropping the z-axis by 550
My first two attempts are real prints were duds. One worked great on a different brand printere. The second was the treefrog file that came with the printer.
See attached pic.
Keep those suggestions coming. I'm still searching for a great print.
We can also still see streaks on the bed in the first picture. Clean it again, and don't handle/contact the wet part of the alcohol swab/cloth with your bare hands. It will wick oils from your fingers and deposit them on the bed!
Re: PLA adhesion issue & question
I'll add wash the bed, and do not use any alcohol. The bed will be clean enough from the wash. The streaks here are a guaranteed fail.
Also, as Bob has said, the images look like live-z is still high.