Re: Parts print perfectly until knocked off the bed
Using Tim's settings and a print speed of 80%, I was able to print 83% of the the part before failure. I was actually in the room when I heard the part start to separate and I attempted to hold it down by hand, but the nozzle was pushing against the part hard enough that it wasn't possible to hold it in place by hand.
The current theory is that this is a bed adhesion issue, but after trying to hold the part in place against the force of the nozzle, I'm not convinced. I don't think that under normal circumstance the nozzle should be hitting the print with that much force.
I'm going to give it a shot with another slicer (Simplify 3D) with some custom supports. If anyone has any other ideas let me know and I'll give them a try.
Thanks again for the suggestions.
Re: Parts print perfectly until knocked off the bed
Dang ... sorry to hear it didn't work. As for hand-holding a part during printing, it's impossible to hold the part accurately enough to avoid collisions.
The new slice, I don't think it's a slicing issue., and with that small a base, it probably won't work. Tall and skinny is all about surface area in contact with the bed. Torque on the part caused by the extruder is large. And the farther off the bed the more the torque is 'amplified' - think using levers to move rocks you can't lift.
I'm pretty sure it's either a layer 1 issue, or it's a slick bed. Since it made it to 83%, your layer 1 is probably acceptable and the bed is not sticky enough. I don't want to sound like a harpy, but can you describe how you prepared the bed for that last attempt that got to 83%?
As a side note: something I did early on that helped when I was fighting this, was to apply gluestick to the bed. Yes, gluestick is less sticky than a well prepared bed, but a lot stickier than a poorly dressed bed. Plus, when you wash it off, I think it actually works better than detergents.
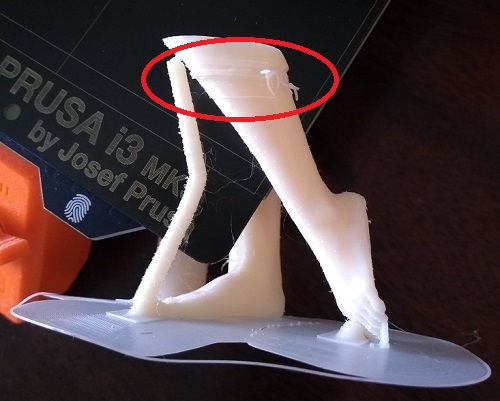
Also, Joan's suggestions for adding lateral supports - large bases off to the sides of the part coming in a 45 degrees with small attachments - is quite useful for wiggly tall parts. Here's a symptom of part wiggle that needed a lot more support before I ever finished the print.
Re: Parts print perfectly until knocked off the bed
Sorry to hear this part is still bothering you!
I admire your dedication, hope you'll soon succeed!
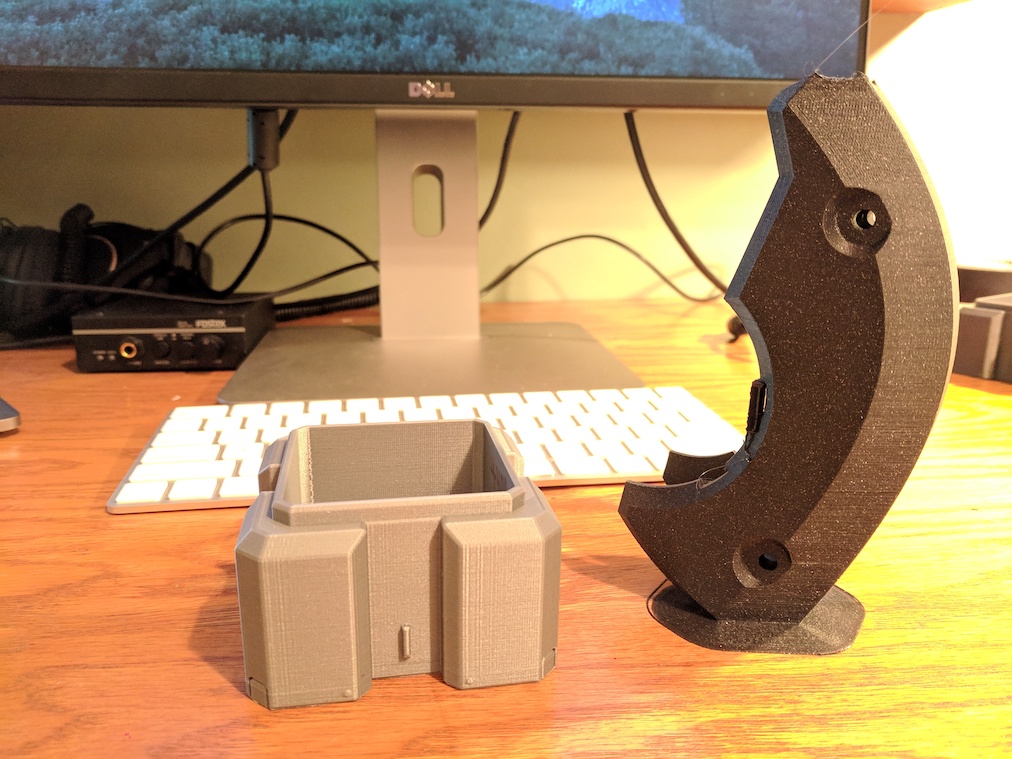
As an example, I am attaching a photo of the most extreme print I have done so far.
The inner part of the self watering planter from Thingverse, with a huge top and a very small contact surface.
I think this proves 2 things: it can be done, and the forces between nozzle and print are small, when everything goes well.
I was a little nervous, but that print stuck pretty well to the bed.
Now how to get you there...
If I had this issue, I would print small items to test the adhesion. It is painful to do a big print that fails just before the end!
When my MK3 was new I didn't have an issue, but then with a new roll and new brand of PLA I had both warping and adhesion problems.
I printed the "Spannerhands V3 filament box", large, almost 20 hour prints and the base warped in a corner and immediately fell off the print bed when I got it off the printer. So adhesion was minimal, and still the print finished.
After that I washed the bed with dishwasher and that helped better than IPA and Acethone in my opinion.
Tim recommended washing the bed with all 3,, soap, Acethone and IPA, I think it's better to only wash it with soap and hot water.
Anyway, try it out, test with small objects and find yout what gives yout the best adhesion.
You can aso try gluestick and compare.
The second issue is potential warping.
I have less experience with that, but thin overhang edges also warp on my prints, and certainly increase forces and risk of breaking lose.
I have the impression that again, slowing down the print helps. Also the question is if your printer is exposed to drafts, which increase this issue. Mine is sitting in a LACK enclosure.
One more thing came to my mind.
The default Prusa profiles for PLA have Z-hop enabled, which should prevent the nozzle from catching on the print when passing over it during a travel move. Make sure this is enabled.
So, to summarize, get your bed to stick, slow down the print even more, make sure Z-hop is active, and then I hope you can finally report success!

Re: Parts print perfectly until knocked off the bed
A dishwasher might work well as long as the detergent doesn't use "spot" preventers. Leaving a thin layer of surfactant on the bed is exactly what bed cleaning is trying to remove.
Then again, maybe some detergents help by leaving an extra coating of polyethylene ... 😯
Polyethyleneimine, Sulfonated
Cleaning Agent
Keeps Food Particles From Resettling On Dishes
Re: Parts print perfectly until knocked off the bed
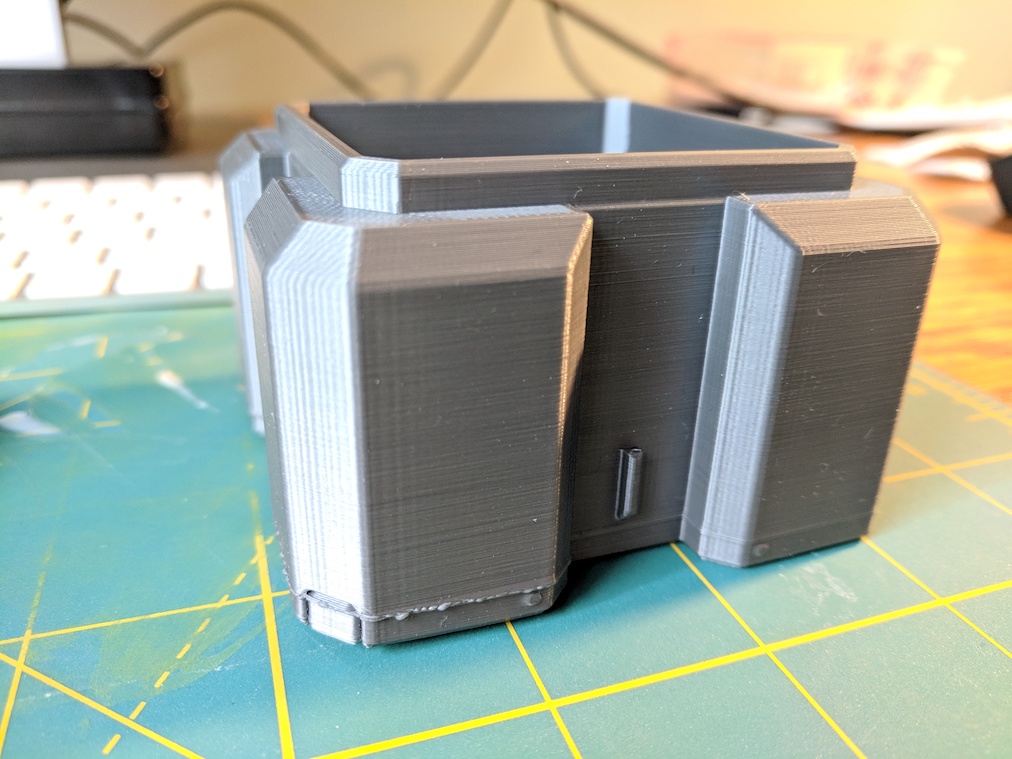
I actually have a pretty interesting update. I was setting up a new print on my old printer nearby when I heard a crunching noise from the MK3. At first I thought it was the sound of the part peeling off of the bed again, but check this out:
https://photos.app.goo.gl/aP5PEkV2oS6YQaWw9 (watch with audio)
To me it appears that the nozzle is crushing the printed part near the supports. Believe it or not the print actually survived this and is still printing.
Interestingly, the entire part and support material are still completely adhered to the bed. I tried pushing it off by hand in multiple places and it wouldn't budge at all. After watching this it seems obvious to me that this weird behavior is what's knocking the parts off the bed.
Any idea what's causing this? I'm thinking about moving the print to a different part of the bed to avoid any surface anomalies in the current spot. Georg mentioned troubleshooting with some diagnostic/benchmark prints, any recommendations that might pinpoint this particular issue?
Re: Parts print perfectly until knocked off the bed
You can see there is a fragment of filament in back of the part that is floating around. It will probably wedge at some point and break the part loose.
And this fragment on the bed came from somewhere.
These turn up when some of the support structure isn't well attached to the bed and move such that the extruder prints filament where the support used to be; and the same when a perimeter isn't supported the extruder prints into free air.
They can also happen when the nozzle is clogging and misses a layer ... the next layer ends up as a ball floating around and eventually breaks the part loose.
What is the material you are printing?
Re: Parts print perfectly until knocked off the bed
What is the material you are printing?
This is Prusament Galaxy Black PLA.
The stray bits of filament seem you pointed out show up whenever supports are used. Can't find a way to get rid of them.
Steven
Re: Parts print perfectly until knocked off the bed
Just finished... part prints just fine ... no fragments or debris. Printed on a Mk3 at 0.2 using brim, extra perimeters, supports below 12 degrees. And the part is very secure, I'm pretty sure the printer would report a collision before it 'knocked' the part off the bed. Printed from SD card.
Supports never leave debris when I print even huge amounts unless the support has issues - like a 2x2x150mm or even a single line support inches tall (yes, Slic3r will create those). I'll get the occasional random whisker, but those can happen when printing most anything. If I hear the clicking, I'll pause and clip any I find. I write them off as fast infill extrudes not adhering.
Maybe you do have something going on with extruder flow being too high or printing way too fast. I've attached my gcode ...


Re: Parts print perfectly until knocked off the bed
My 2 cents :
1..Z-Hop was mentioned. Part could be knocked by filament strings caused by Z-hop?
2..Extrusion rate - have you measured this? This could be causing the excess filament you've noticed on the part and bed?
Texy
Re: Parts print perfectly until knocked off the bed
Wow, what a nice print. Thanks for taking the time to do this. It's good to know that this part is definitely printable. I owe you one!
I'll give it another shot with your g-code this evening. Until now I've been printing at .15mm, so maybe switching to .2mm will make a difference. Interested to see how it goes with your settings.
1..Z-Hop was mentioned. Part could be knocked by filament strings caused by Z-hop?
I strongly suspect this too. Can this only be prevented by disabling Z-hop? Or are there other parameters that I can use to prevent this?
Re: Parts print perfectly until knocked off the bed
Increasing retraction is meant to cure, but not always successful, and you'd need to experiment a little. Choose a 'string' test model and go play, obviously with the filament you intend to use for your intended print...
Texy
Re: Parts print perfectly until knocked off the bed
Texy - the video shows that fragments of extruded print are not adhering to the part. The most common reason is the printer is extruding to a spot where there is no support.
Weak adhesion to the bed or when building supports on the part the supports can break free and wobble, eventually they are no longer under the nozzle where they should be. So the printer extrudes a bit of plastic into free air where it dangles from the nozzle until the printer moves to a spot where there is material. As it starts printing at the new area (usually the part) that dribble of plastic sticks and is now a 0.4mm whisker sticking up for the nozzle to snag on. On the next layer, another whisker is applied to that same spot. Eventually you get a ball of plastic that can jam the printer.
Re: Parts print perfectly until knocked off the bed
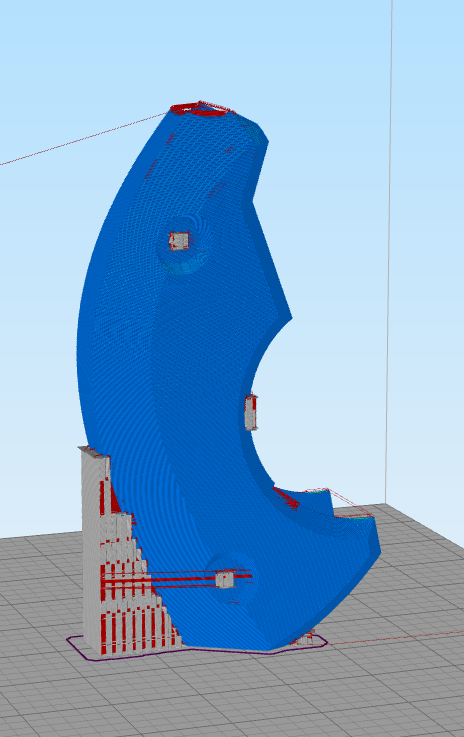
Alright I tried a simpler part in the hopes that any issues would be easier to see. This one was printed with PLA with the same settings as the part discussed earlier. Based on my experience printing parts like this on my other printer, I didn't expect to have any issues with this part unless something was seriously out of wack with my Prusa. The results were pretty disappointing:
Notice the random line near the base, which wraps all the way around the object.

Three of four corners are lifting

First layer - z-height looks perfect in the lower right, but there's definitely something wrong in the upper corners.
The top 80% is just about flawless, but I would consider this a failed print because of that random line at the bottom and the warping in the corners.
Any ideas what's causing these issues? Any chance they're related to the issues seen in the previous model? I know the bed adhesion will be blamed for the corners lifting, but I promise the bed is clean (cleaned recently with dish soap and acetone, cleaned between prints with IPA, never touching the bed with bare hands). I can't reasonably make it cleaner between every print. As for the The random line at the bottom, I have no idea what could be causing this, but it occurred identically in two separate prints. It's probably worth noting that the line occurs at the same layer as the interior floor of the box.
Re: Parts print perfectly until knocked off the bed
Layer 1 is very bad -- Z-offset is way too high. It alone can account for many the part failures you've been having. It may also account for some of the warping.
The blobfest near layer 50 is due to Layer 1 delamination from the bed and allowing the part to distort, causing the nozzle to grind against the part and plastic extruding horizontally.
The upper layers exhibit ringing and acceleration artifacts, but also exhibit position fluctuations that may indicate improper belt tension in the X and Y axis. This generally affects print surface quality - but if extreme can lead to extrusion errors.
A view inside the part might help analysis.
As an FYI, large flat areas (150x150 up) can be an issue because of simple thermal expansion effects. It is a separate discussion. See
https://shop.prusa3d.com/forum/how-do-i-print-this-printing-help--f63/warpage-pla-large-flats-t25798.html
Re: Parts print perfectly until knocked off the bed
Alright I tried a simpler part in the hopes that any issues would be easier to see. This one was printed with PLA with the same settings as the part discussed earlier. Based on my experience printing parts like this on my other printer, I didn't expect to have any issues with this part unless something was seriously out of wack with my Prusa. The results were pretty disappointing:
IMG_20181119_111442.jpg
Notice the random line near the base, which wraps all the way around the object.
IMG_20181119_111537.jpg
Three of four corners are lifting
IMG_20181119_111309.jpg
First layer - z-height looks perfect in the lower right, but there's definitely something wrong in the upper corners.
The top 80% is just about flawless, but I would consider this a failed print because of that random line at the bottom and the warping in the corners.
Any ideas what's causing these issues? Any chance they're related to the issues seen in the previous model? I know the bed adhesion will be blamed for the corners lifting, but I promise the bed is clean (cleaned recently with dish soap and acetone, cleaned between prints with IPA, never touching the bed with bare hands). I can't reasonably make it cleaner between every print. As for the The random line at the bottom, I have no idea what could be causing this, but it occurred identically in two separate prints. It's probably worth noting that the line occurs at the same layer as the interior floor of the box.
Are you still using 70% IPA to clean the bed as you said in your very first post? 70% is great as a disinfectant but not so great to clean a build plate. The 30% that isn't IPA may leave its own residues behind, you need 99% IPA.
Re: Parts print perfectly until knocked off the bed
Based on the results above I went with a value of 710.
I think you need to recheck the values as your live z looks way too high (in the box print)
maybe repeat your tests but use a narrower z bands and check across different parts of your plate
i3 Mk3 [aug 2018] upgrade>>> i3MK3/S+[Dec 2023]
Re: Parts print perfectly until knocked off the bed
Layer 1 is very bad -- Z-offset is way too high. It alone can account for many the part failures you've been having. It may also account for some of the warping.
You got it! This was the issue all along.
This adjustment fixed every issue covered in this thread. No more failed prints, no more random blobs. The quality is outstanding now.
For the prints above I cranked the z-adjustment up from ~710 to 780. The ideal first layer diagrams in the Prusa handbook made it seem like my results at 710 were right in the sweet spot, so I was reluctant to go higher. Actually I was under the impression that I was pushing it even at 725. I wouldn't have figured it out if it wasn't for you guys so thanks everyone for your theories and suggestions. And Tim, I wish I could buy you a beer or something, thanks for taking the time to help me out and eventually finding the solution. I owe you one.
Steven
Re: Parts print perfectly until knocked off the bed
Steve,
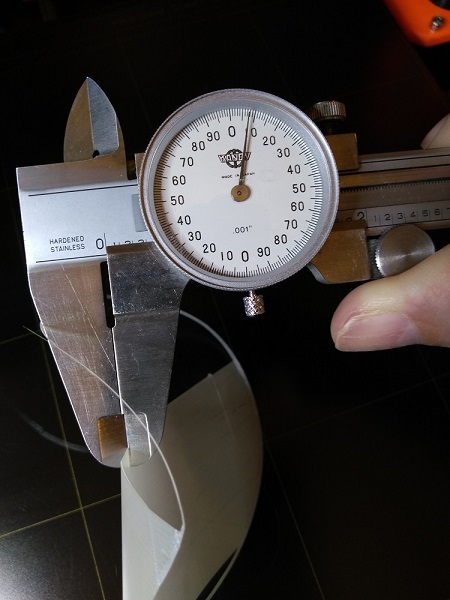
Z is the first hurdle I jumped over. But I have an engineering background and knew intuitively it was probably the most important aspect of printing. A few prints in confirmed my intuition (the hard way).
Now I use a measuring device to ensure my layer 1 is correct. Anything around 0.007 to 0.008 is perfect. My bed is smooth, yours is rippled, thus YMMV.
This is a spendy model: https://www.amazon.com/dp/B00002254I
This is a cheapy model: https://www.amazon.com/dp/B00B5XJW7I
Re: Parts print perfectly until knocked off the bed
Just adding one more quick update to this: After the initial successful print at .1mm, two subsequent prints failed on the same layer at 90% completion. Since then I've moved to .15mm layer height and have two successful prints with those settings. The bed adhesion on prints at .15mm layer height is significantly improved to the point where some force is needed to remove them part the build surface.
Unless there is a way to increase bed adhesion for low layer heights, I'm going to conclude that this part in this orientation can't be printed reliably at .1mm or .05mm layer heights.
Thanks again everyone for your help in troubleshooting this print. Hopefully others will find this thread helpful too.
Steven
Re: Parts print perfectly until knocked off the bed
I haven't seen any difference in adhesion based on orientation. What is real though is since 0.05 is four times as many passes as 0.20 there is a lot more aggregate stress on the part, 4x the chance of something misfiring and breaking free, so to speak.
Which part? Photo of the 90% problem, please.
Try this gcode, the parts should "snap" off the bed, not peel or just fall off.
