RE: life adjust Z - my way
@clownfish
Jeff Jordan had a set of files that just worked...
and he offered them to the forum users...
to be honest most folk don't question the files, they are too busy sorting their printers and getting on with life...
I never looked at the temperatures myself...
I haven't seen or heard from him for ages, but his files carry on...
regards Joan
I try to make safe suggestions,You should understand the context and ensure you are happy that they are safe before attempting to apply my suggestions, what you do, is YOUR responsibility. Location Halifax UK
RE: life adjust Z - my way
@jeffjordan
In a bind, if you have canned air duster for cleaning electronics, you can hold the can upside down and give it a little squirt in place of using coolant spray.
RE: life adjust Z - my way
This post saved my sanity. For some reason the test prints all worked for me no problem. Layer one actually looked pretty rough, but what did I know? Downloads of GCode tended to print fine, but when I sliced my own models, I was 50% on print success. It wasn't until I tried this test that I realized that I was about 0.25 too high. My skirt failing to stick and stringing should have been a dead giveaway, but I'm still learning.
RE: life adjust Z - my way
@jason-in-alaska
I have to thank Jeff also. This thread is full of information and learning lessons.
--------------------
Chuck H
3D Printer Review Blog
RE: life adjust Z - my way
[...] My skirt failing to stick and stringing should have been a dead giveaway, but I'm still learning.
That's one lesson I've learned: If your print is failing at parts that aren't under control of the slicer, quit trying to fix it in the slicer! If the prime line doesn't stick or is mashed, stop the print immediately and recalibrate Live-Z.
RE: life adjust Z - my way
My print looks solid until it gets to the last corners where the back and forth motion of the print extruders happens fastest. This produces a square that is solid in the center, but has partial partial gaps between strands at the corners. Any suggestions? Is this because the z axis is too low?
RE: life adjust Z - my way
Why does the PLA file not do a self balance before the file prints? Because it isn’t balanced, half of my print adheres correctly, the other half the nozzle is too high. You can imagine what the result is. Is there a fix?
RE: life adjust Z - my way
Why does the PLA file not do a self balance before the file prints? Because it isn’t balanced, half of my print adheres correctly, the other half the nozzle is too high. You can imagine what the result is. Is there a fix?
What do you mean by 'self balance'? Are you referring to the bed leveling procedure normally done before prints? That should be standard on any print sliced for the later I3 series printers.
If you have issues with some parts of the print being too high and others too low, you might switch to the 7x7 bed leveling, as it's more precise on the various portions of the print bed. You might also double-check the mechanical aspects of your system, as the print bed itself may be uneven.
RE: life adjust Z - my way
@greenmeansgo
this can also happen if your model is not flat on the slicer build plate please attach a zipped copy of your project file
regards Joan
I try to make safe suggestions,You should understand the context and ensure you are happy that they are safe before attempting to apply my suggestions, what you do, is YOUR responsibility. Location Halifax UK
RE: life adjust Z - my way
Prusa should make this the default for setting 1st layer Z. I struggled for hours using the built in method to get it close and I was happy. I printed all day yesterday with no issues. But then I changed filaments, just a different color, not type, and 1st layer would not stick 100%. I thought it was defective. Then while Google searching I see that no, others have had similar issues with Prusament Orange, and then I found the link to your method while reading those forums.
OMG, what a difference this makes! To be able to clearly see how the first layer looks in relation to the change you're making! I could never tell much difference with the built-in Z adj. From printing your test about 4 times, I discovered that .025 can make a big difference. Previously, I was just changing in .5 increments but using your method I could clearly see that there was an even better sweet spot waiting to be found.
My original Z adj was -1.5 but now using your method I have fine-tuned that to -1.55 and I have been printing this orange filament all day and no worries. I tried everything between -1.45 and -1.6 so I'm comfortable I have found this smooth sheet's PLA sweet spot.
Thank you, thank you, thank you!
RE: life adjust Z - my way
Still too high or under extrusion?
Good Morning calibration experts. I do have a wee little problem...
I am trying to get started with PC-Blend filament. After I made a stupid mistake with the first calibration attempt ( I didn't think properly and had the z way too low using an old value stored in an old sheet setting instead of starting at zero, which generated a super thin film of plastic that wouldn't come off at all), I am now a bit reluctant to be generous with my downward steps.
The images show the latest attempt. Top left half is 0.4 higher than the setting that caused the trouble. Difference between the two halves is 0.05. With less stickier filament I would simply go down further, mainly because of the holes between perimeter and inner lines.
My question: shall I do exactly that or start fiddling with the extrusion multiplier (currently 1.0 as per Prusament PC-Blend preset)?


RE: life adjust Z - my way
fyi
A can of air duster turned upside down works as a cooling spray for 1/2 the cost....
RE: life adjust Z - my way
hi community
just want to share with you my way of finding the right correction value for the life Z adjustment.
just in case that somebody still tries to get it right with the v2 calibration gcode that came with the kit, which i think is only of limited usability.💡
find attached a little gcode that should print a 75x75mm surface with 0.2mm height (PLA settings).
i simply print this file in a bright color (takes about 12 minutes) and change the life Z adjustment level in the middle of the print, when the diagonal of the square is reached.
so a little film is printed. a good idea is to write the settings with an edding at the sheet 😉 .
i repeat the procedure until i get a completely smooth and homogenous surface.
in addition it's a good idea to measure the thickness of the film with a micrometer gauge or a digital vernier calliper ❗➡ when you look at the attached picture, you can see at first sight, that the right foil (with the -365um and -400um) shows some small gaps, which indicates that you need to squish down the nozzle a little bit more.
furthermore you can see that the -500um setting delivered the best result, and as you can guess: it's thickness was exactly 0.20mm.anything more to explain ?
update:
just forget to tell you how you can get the film off from the heatbed without damaging it:
just use coolant spray at one edge. the sheet will immediately curl up and you can get it off easy as pie from the printing surface with your spatula.edit 17th january: just replaced the attached gcode file with one where i added a "G1 Z=10.000 F1800" at the end, just to make sure that the nozzle moves up a little bit more (would remain at 0.2mm after the print).
edit 29th of august: removed the first test sheet (which has been downloaded more than 1000 times) and replaced it by the most recent one (v4).
With the advent of the Prusa Mini the files above, proved unsatisfactory,
I add the file below in the hope that Mini users find it useful, the Contents are a .3mf file with the test patch on the build plate, so that you can edit it for new filaments, plus ready made test patches, for PETG, PLA and ABS.
Please let Joan.t know if there are any problems. 75mm square Mini Life Adjust Z.
➡ update (14.01.2018): calibration surfaces for PLA, ABS & PETG (generated with the latest S3D version, lin-advance, G87 and preheat procedure to avoid nozzle dripping (tnx 2 PJR)):
Attachment removed


Hi, I noticed that when using the PETG version of the file, the target temperature is 170c. Do I need to raise it to 240-250c?
RE: life adjust Z - my way
@prusanewuser
It should go up to temp after bed leveling before it starts the intro line.
RE: life adjust Z - my way
These files have been pretty awesome in calibrating the first layer. My only issue is that when it's done, the printer loses the X-Home position of the bed. If I start a print after I run the calibration with Jeff's file, the bed leveling check before the print starts where Jeff's file ends, I believe the middle of the X-axis. The way I clear it is by clicking the Home button in Octoprint Control tab and then run the print (from Octoprint).
Has anyone else experienced this? I'm a noob here so maybe I'm doing something wrong.
Thanks/Livius
RE: life adjust Z - my way
Good Luck Valady.
regards JoanPLEASE NOTE these values are for MY Printer, Your Values will be different
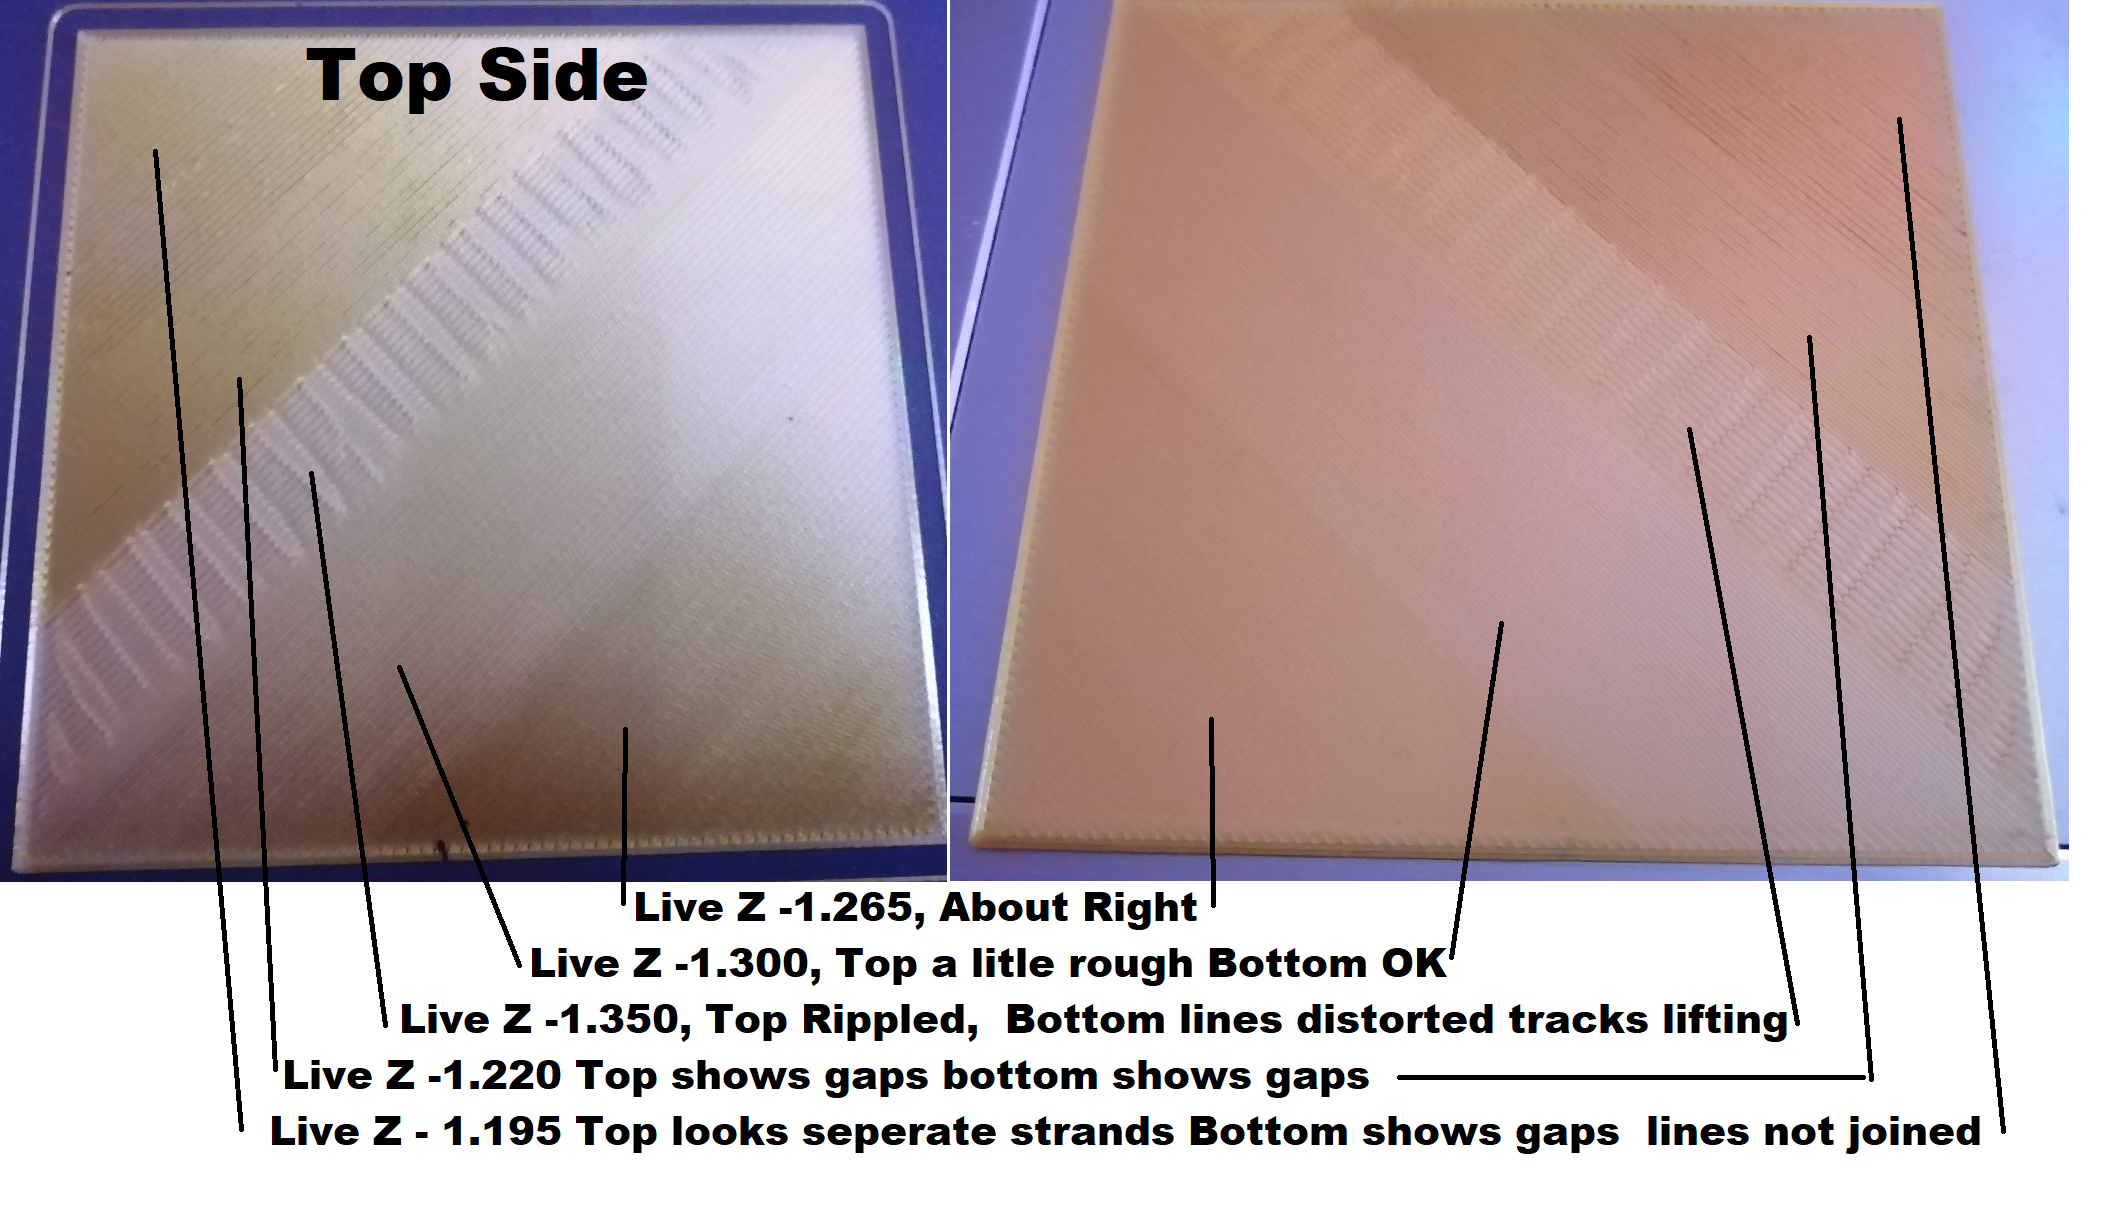
But the relationship will be indicative... Start the print, then as it prints, you can adjust the live Z, "LIVE" in real time... and see what the changes are. if you start off high, which i believe is the present state, you should see the surface change from loose and lumpy, to orderly separate lines, then to orderly strings, then merging strings, merged smooth topped strings, and as the live Z progresses past the sweet spot, the top surface will start to go rough, and if you continue increasing Live Z, the surface will deteriorate and become rippled.... if you get that far, reduce the live Z until the surface becomes smooth again. and you should be about right... if you now look at the underside of the test print, you should see a nice smooth surface or a nice even textured surface if the build plate is textured...
Good Luck!
Regards Joan
@joantabb
Joan
Would just like to say thank you.
This is a very useful guide picture and description of the first layer, I thought I had my first layer nailed and it was pretty good, however after reading this a little more tweaking and it is even better now.
👍
Tank you very much!
RE: life adjust Z - my way
my hat is off to you Jeff! you have seriously saved me from turning this thing to scrap and composing a nasty gram to prusa. ive had this thing for a year and in the beginning everything was printing great, i couldn't believe 3D printing could be so easy til one day i could not get a single print to stick and eventually awoke to find an overnite print had globbed up nearly my whole extruder requiring me to buy new assembly AND printed parts to rebuild the body. after purchasing parts, and upgrades etc. i put everything together to find the same issue, i stuffed my mk3s in a garage cabinet and left it there for months before finally having the gumption to face it again (yesterday)only to meet the same fate as before only this time reaching an even higher level of pisstivity. ive searched these forums high and low for an answer for months and found nothing til this thread. i am sincerely grateful for your sharing and would be happy to donate something towards any project you may be working on currently as im sure so many who have benefitted from you would as well.
RE: life adjust Z - my way
Sorry nube here, I have downloaded and started to print the 75 x 75 test print.
How do you adjust the Z height mid print and when?
Do you adjust after it has printed the square outline and when it starts to print the first diagonal lines?
RE: life adjust Z - my way
Sorry just found the live adjust setting.
It just beeped at me half way through the diagonals, I guess thats the signal to start adjusting?
Mine is set at -1.235 and looks OK?
RE: life adjust Z - my way
There will be a BEEP half way across, this is the point to adjust the live Z.
Tank you very much!