RE: life adjust Z - my way
I believe this thread as about to achieve sentience and will depart this world for the stars soon.
RE: life adjust Z - my way
Thank you Robert,
That action is beyond my capability, however 30 pages in three years, seems positively inactive , compared to
56 pages in 3 months on the
'Unofficial Prusa Mini Wait Thread '
🙂
Joan
I try to make safe suggestions,You should understand the context and ensure you are happy that they are safe before attempting to apply my suggestions, what you do, is YOUR responsibility. Location Halifax UK
RE: life adjust Z - my way
Jeff,
I have a MK2 that is behaving oddly, at least in my limited experience.
When I start a print to adjust the Live Z, things go as expected. That is, the print starts out as stringy, with gaps, and in obvious nbeed of adjustment. So I adjust the Live Z setting in.25mm steps, until the primt suface looks smooth, has no gaps, and the filament is squished slightly and welding to the previous layers. This left me with a setting that is about .650mm, after the first run.
However, when I run a print, its back to the first layer issues as if I have not adjusted the Live Z at all. When I check the Live Z setting it is still set at .650. If I again adjust during the print to make the first layer work, it will adjust to look right, after about .5mm - .6mm of adjustment. But once I start a new print, it behaves again as if the adjustment has not happenned, though the setting is again reflecting the additional changes, and sits at about 1.25mm total. This happened enough that my Live Z setting is now over 3mm, and still it does not appear to affect the actual print once a new print is started.
I have no idea why this is happening, and it didn't happen when I was printing with PLA. I recently started trying to do some prints with PETG, and this started when making adjustments for the new material. No physical changes have been made to the machine, though I re-ran the calibration for XYZ axis, which gave no apparent trouble, and a self-test, which shows as clear.
I can use any advice you have as to how to deal with this.
Josh
RE: life adjust Z - my way
Hi Josh,
the Mk2 printer PINDA is affected by temperature,
if you start the prints at different heights or different temperature settings, you will get different "Z" heights... (from the same live Z setting...)
so... I suggest you always move the extruder to the left of your "X" axis and say 60mm above the heatbed, before starting heating hopefully this will result in the same temperature when the printer starts the mesh bed levelling, and make life easier for you.
the actual height above the heat bed, is largely irrelevant, as long as you are consistent! so if you choose 5mm, always use 5mm... the problem with heating the printer with the nozzle low, is that it is more difficult to pull filament dribbles off as the extruder heats!
the extruder normally moves to the left at the end of the print, so that's probably best place to leave it
Note, if the extruder is set to the right of the X axis during heating, the Pinda may be partially or fully beyond the heatbed, and this is likely to give errors.
regards joan
I try to make safe suggestions,You should understand the context and ensure you are happy that they are safe before attempting to apply my suggestions, what you do, is YOUR responsibility. Location Halifax UK
RE: life adjust Z - my way
How would I set the extruder position to a static position at the start of each print? Is there a method to add that to the settings, or do I need to do it manually? Also, the config layer above had a delayed nozzle heating sequence, where it was 40 deg c below desired temp until the print was ready to start. Is that something I can add to my print sequence automatically?
Sorry for the beginner questions, but I am a total beginner at this... 🙂
RE: life adjust Z - my way
@zenbike
Hi Zenbike,
If you wish, you can add commands to the Start G code to move the extrude to your preferred position before heating, to try and resolve the Mk2 Pinda Sensitivity issue, and
you can add commands to the start G code to stage the heating to try and reduce nozzle leakage during the heating phase...
but one thin to remember is, that If you use someone else's G code, it may not contain these changes, so you might unexpectedly end up with dribbles or pinda sensitivity issues if the other person'r Gcode does not do as you normally do...
so it's still useful to know how to raise or lower the extruder manually...
with the printer on, and showing the idle screen, press and hold the control knob, and after a couple of seconds or so, you will go straight into the Z height adjustment menu... (BEWARE... if you have just turned the printer on, it will not know where the extruder is... ) so adjust the height by eye, or first auto home he extruder then adjust the height to your preferred start height!
This is the default Mk2 Start G code
-------------------------------
M862.3 P "[printer_model]" ; printer model check
M862.1 P[nozzle_diameter] ; nozzle diameter check
M115 U3.2.3 ; tell printer latest fw version
G90 ; use absolute coordinates
M83 ; extruder relative mode
M204 S[machine_max_acceleration_extruding] T[machine_max_acceleration_retracting] ; MK2 firmware only supports the old M204 format
M104 S[first_layer_temperature] ; set extruder temp
M140 S[first_layer_bed_temperature] ; set bed temp
M190 S[first_layer_bed_temperature] ; wait for bed temp
M109 S[first_layer_temperature] ; wait for extruder temp
G28 W ; home all without mesh bed level
G80 ; mesh bed leveling
G1 Y-3.0 F1000.0 ; go outside print area
G92 E0.0
G1 X60.0 E9.0 F1000.0 ; intro line
G1 X100.0 E12.5 F1000.0 ; intro line
G92 E0.0
-----------------------
you could change it to
-----------------------------------------------------
M862.3 P "[printer_model]" ; printer model check
M862.1 P[nozzle_diameter] ; nozzle diameter check
M115 U3.2.3 ; tell printer latest fw version
G90 ; use absolute coordinates
M83 ; extruder relative mode
M204 S[machine_max_acceleration_extruding] T[machine_max_acceleration_retracting] ; MK2 firmware only supports the old M204 format
G28 W ; home all without mesh bed level (Ascertain the actual extruder position )
G1 X60.0 ; Raise Head to known height (60mm in this case!) prior to heating the extruder and heatbed
; Note The extruder should already be at X0,0 due to the home all, command above.
M104 S170 ; set initial extruder temp to 170C
M140 S[first_layer_bed_temperature] ; set bed temp
M190 S[first_layer_bed_temperature] ; wait for bed temp
M104 S[first_layer_temperature] ; set extruder fist layer temp (delay final heating until heatbed is at temperature)
M109 S[first_layer_temperature] ; wait for extruder temp
G28 W ; home all without mesh bed level
G80 ; mesh bed leveling
G1 Y-3.0 F1000.0 ; go outside print area
G92 E0.0
G1 X60.0 E9.0 F1000.0 ; intro line
G1 X100.0 E12.5 F1000.0 ; intro line
G92 E0.0
-----------------------
in order to raise the extruder to 60mm before starting heating
I try to make safe suggestions,You should understand the context and ensure you are happy that they are safe before attempting to apply my suggestions, what you do, is YOUR responsibility. Location Halifax UK
RE: life adjust Z - my way
Hello, being new to 3D printing, I am super cautious with my printer and I don’t want to damage it. The head bed says to not print directly on it. I was wondering if this trick is possible using the smooth steel sheet. If not, are you sure that this won’t damage my heat bed, and what precautions can I take to make sure that this trick won’t damage it.
I have my live z axis set to -1.150. Is this too close to the bed? I had my first part print beautifully, and then my next one looked like trash. I made no adjustments to the printer both hardware and software in between the two prints. What can I do to solve this?
RE: life adjust Z - my way
Never mind, I figured it out. Yes, you can do the trick on the steel plate, and you can just print the first layer of the prusa logo, moving your live z adjust down .1 mm every 10 seconds. I started at -.5, and I got spaghetti monster so badly that it just dragged stuff around. I then used -.7 and got a very stringy but still printing base. I used my trick and lowered it down to -1.2 before the first layer finished. I then realized that that was still somewhat stringy by referencing the images provided. I started another one, then went down -.05mm every 10 seconds and then got a result that was very smooth. -1.350mm. Since there was some time left before the first layer was printed, I adjusted it up .025mm, let it run for 10 seconds, turned it down -.025 mm, going back to the one that was smooth, let that run for 5 seconds to get a separation, turned it down another -.025 mm and let it finish the first layer up. I then drew in lines where there were faint changes, then looked for myself and couldn’t find a big difference, so to get a second opinion, I asked another person which section was smoother. He said -1.350mm, so I set it to that in the calibration, immediately canceled that, and tried out my new layer height by printing the prusa logo fully. It printed even better than the first one I printed off (the one I said was beautiful earlier).
RE: life adjust Z - my way
Hello, being new to 3D printing, I am super cautious with my printer and I don’t want to damage it. The head bed says to not print directly on it. I was wondering if this trick is possible using the smooth steel sheet. If not, are you sure that this won’t damage my heat bed, and what precautions can I take to make sure that this trick won’t damage it.
You should only be running this procedure with a steel sheet of either smooth or textured variety mounted. If you manage to calibrate your Live-Z on the bare heated bed element, the results will be meaningless once you apply a steel print surface over it.
RE: life adjust Z - my way
@jeffjordan
What's an M300?
RE: life adjust Z - my way
@akerezy
M300 is the play tone marlin command. A full list of Marlin codes is available here https://marlinfw.org/meta/gcode/ . However please note that not all codes are implemented in all firmwares. So even though slicer can be set to send commands the firmware has to know what to do with it.
RE: life adjust Z - my way
@bobstro
Thank you!
RE: life adjust Z - my way
hi community
just want to share with you my way of finding the right correction value for the life Z adjustment.
just in case that somebody still tries to get it right with the v2 calibration gcode that came with the kit, which i think is only of limited usability.💡
find attached a little gcode that should print a 75x75mm surface with 0.2mm height (PLA settings).
i simply print this file in a bright color (takes about 12 minutes) and change the life Z adjustment level in the middle of the print, when the diagonal of the square is reached.
so a little film is printed. a good idea is to write the settings with an edding at the sheet 😉 .
i repeat the procedure until i get a completely smooth and homogenous surface.
in addition it's a good idea to measure the thickness of the film with a micrometer gauge or a digital vernier calliper ❗➡ when you look at the attached picture, you can see at first sight, that the right foil (with the -365um and -400um) shows some small gaps, which indicates that you need to squish down the nozzle a little bit more.
furthermore you can see that the -500um setting delivered the best result, and as you can guess: it's thickness was exactly 0.20mm.anything more to explain ?
update:
just forget to tell you how you can get the film off from the heatbed without damaging it:
just use coolant spray at one edge. the sheet will immediately curl up and you can get it off easy as pie from the printing surface with your spatula.edit 17th january: just replaced the attached gcode file with one where i added a "G1 Z=10.000 F1800" at the end, just to make sure that the nozzle moves up a little bit more (would remain at 0.2mm after the print).
edit 29th of august: removed the first test sheet (which has been downloaded more than 1000 times) and replaced it by the most recent one (v4).
.
➡ update (14.01.2018): calibration surfaces for PLA, ABS & PETG (generated with the latest S3D version, lin-advance, G87 and preheat procedure to avoid nozzle dripping (tnx 2 PJR)):
Attachment removed


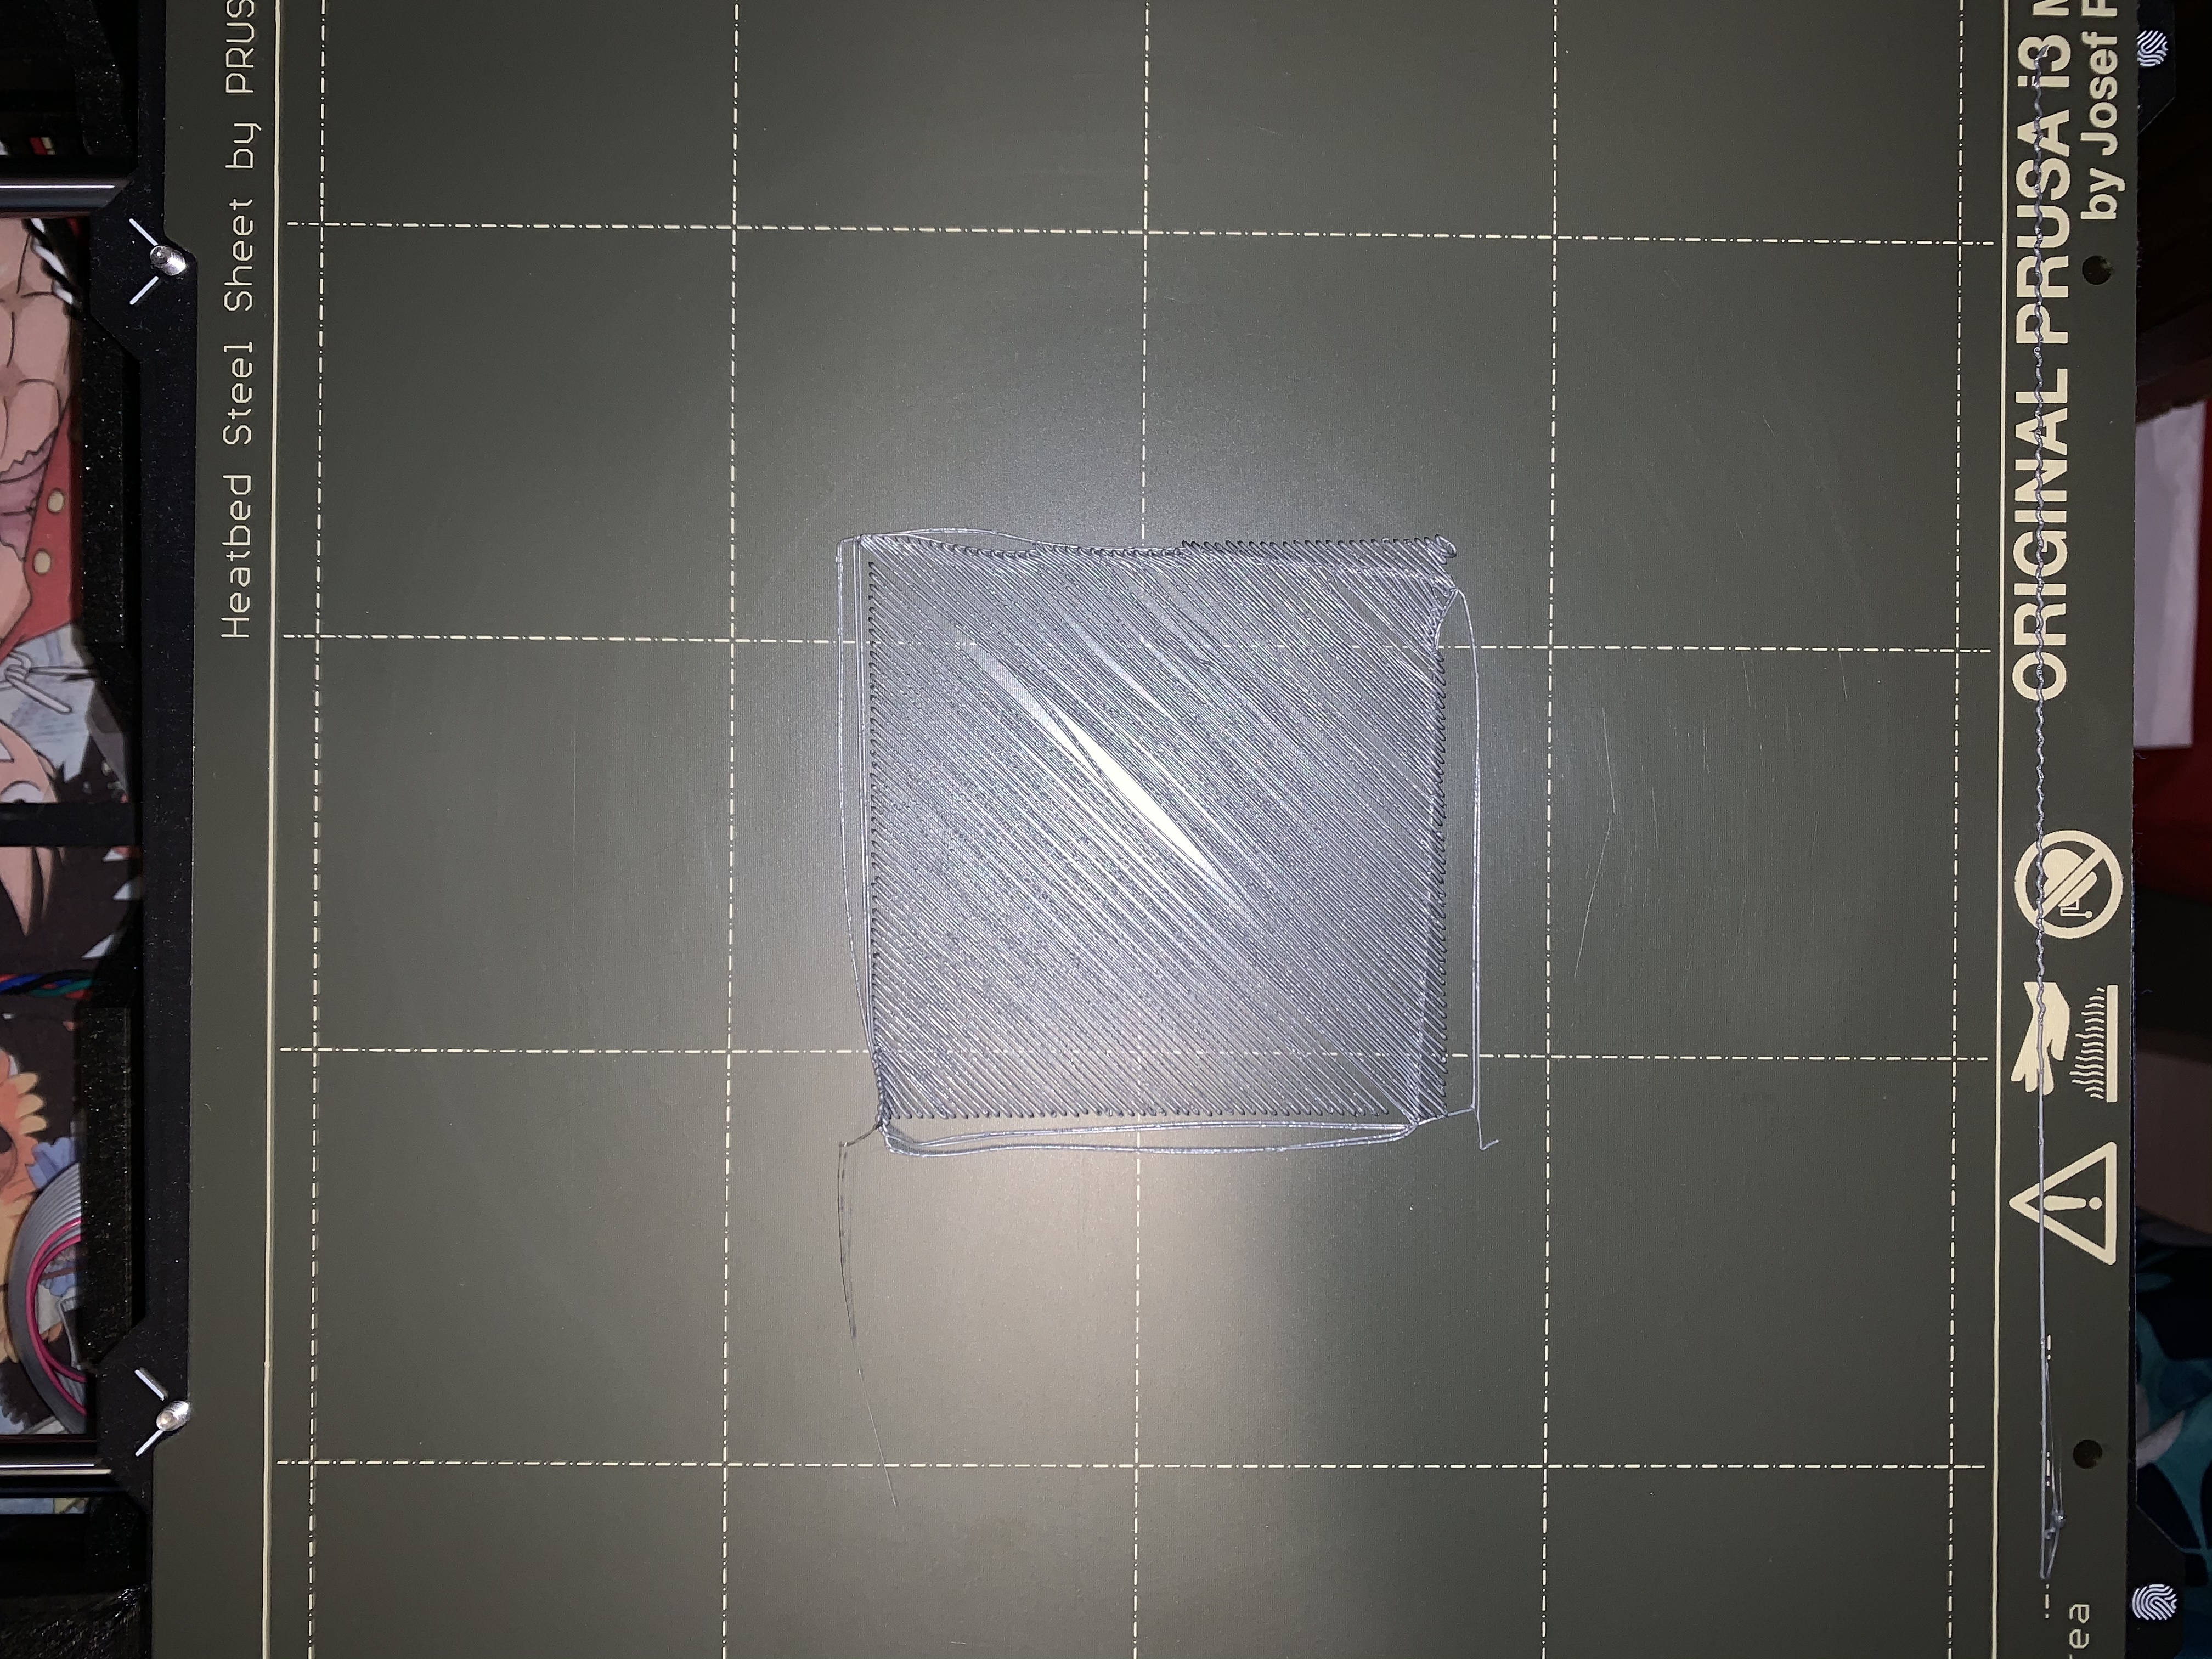
it is my result, what can I do now? thanks.
RE: life adjust Z - my way
it is my result, what can I do now? thanks.
Looks like you are way too high. Start over again and bring it down a good it (I'd make it more negative by (0.06mm) until the lines start to stick. Work down (more negative) until it starts to stick. You're getting close and it's better to be too high at the start, so no worries. Once you master it, it takes a minute to complete.
Before you start, though, make sure that bed is clean. It needs to be clean for proper adhesion. Take it to the kitchen sink and give it a wash with Dawn dish soap or your local equivalent (plain, no additives). Scrub it with a plain paper towle and dry it with another. Most important, do not touch the PEI print area.
RE: life adjust Z - my way
This is PERFECT! Thank you for posting this. It saved me many hours of hair pulling frustration!
Ed
RE: life adjust Z - my way
will this gcode also work in the mini?
(PS: bobstro- your website/wiki is an awesome resource! I've run across it before. thank you)
RE: life adjust Z - my way
Hi Rob,
whilst it will probably work on the Mini, the square will be off centre, because the bed is smaller... and the G code takes it's measurements from the x=0, Y=0, Z=0 corner
regards Joan
I try to make safe suggestions,You should understand the context and ensure you are happy that they are safe before attempting to apply my suggestions, what you do, is YOUR responsibility. Location Halifax UK
RE: life adjust Z - my way
will this gcode also work in the mini?
As Joan notes, it'll at minimum be off center. However, you can easily create your own. Load Jeff's 75x75mm square into PrusaSlicer and position it on the Mini bed. Ensure it's only 0.2mm high. Slice it and save the gcode. Worst case, it'll start printing in the far corner so it won't be quite as easy to see at the start.
(PS: bobstro- your website/wiki is an awesome resource! I've run across it before. thank you)
Glad the notes are useful. Let me know if spot any issues!
RE: life adjust Z - my way
So I probably missed why by not reading this entire thread, but in my defense this thread is HUGE!
When I run the PLA calibration print (v6.1) it looks like it sets the nozzle temp to 170C. Is that right? Thats crazy low for PLA and I canceled the print when I saw that as I was worried something might not be right about that?
If at first you don't succeed, redefine success!
RE: life adjust Z - my way
So I probably missed why by not reading this entire thread, but in my defense this thread is HUGE!
When I run the PLA calibration print (v6.1) it looks like it sets the nozzle temp to 170C. Is that right? Thats crazy low for PLA and I canceled the print when I saw that as I was worried something might not be right about that?
That's part of the 2 step warmup. It heats the filament to a no-ooze temp that's hot enough that any stuck filament will bend on homing, but not hot enough to cause oozing when doing mesh bed leveling. After mesh bed leveling is complete, it will resume heating the nozzle before continuing the print. Let it run.
If you're interested in more behind this, I've got a documented example here you can look through.