Re: life adjust Z - my way
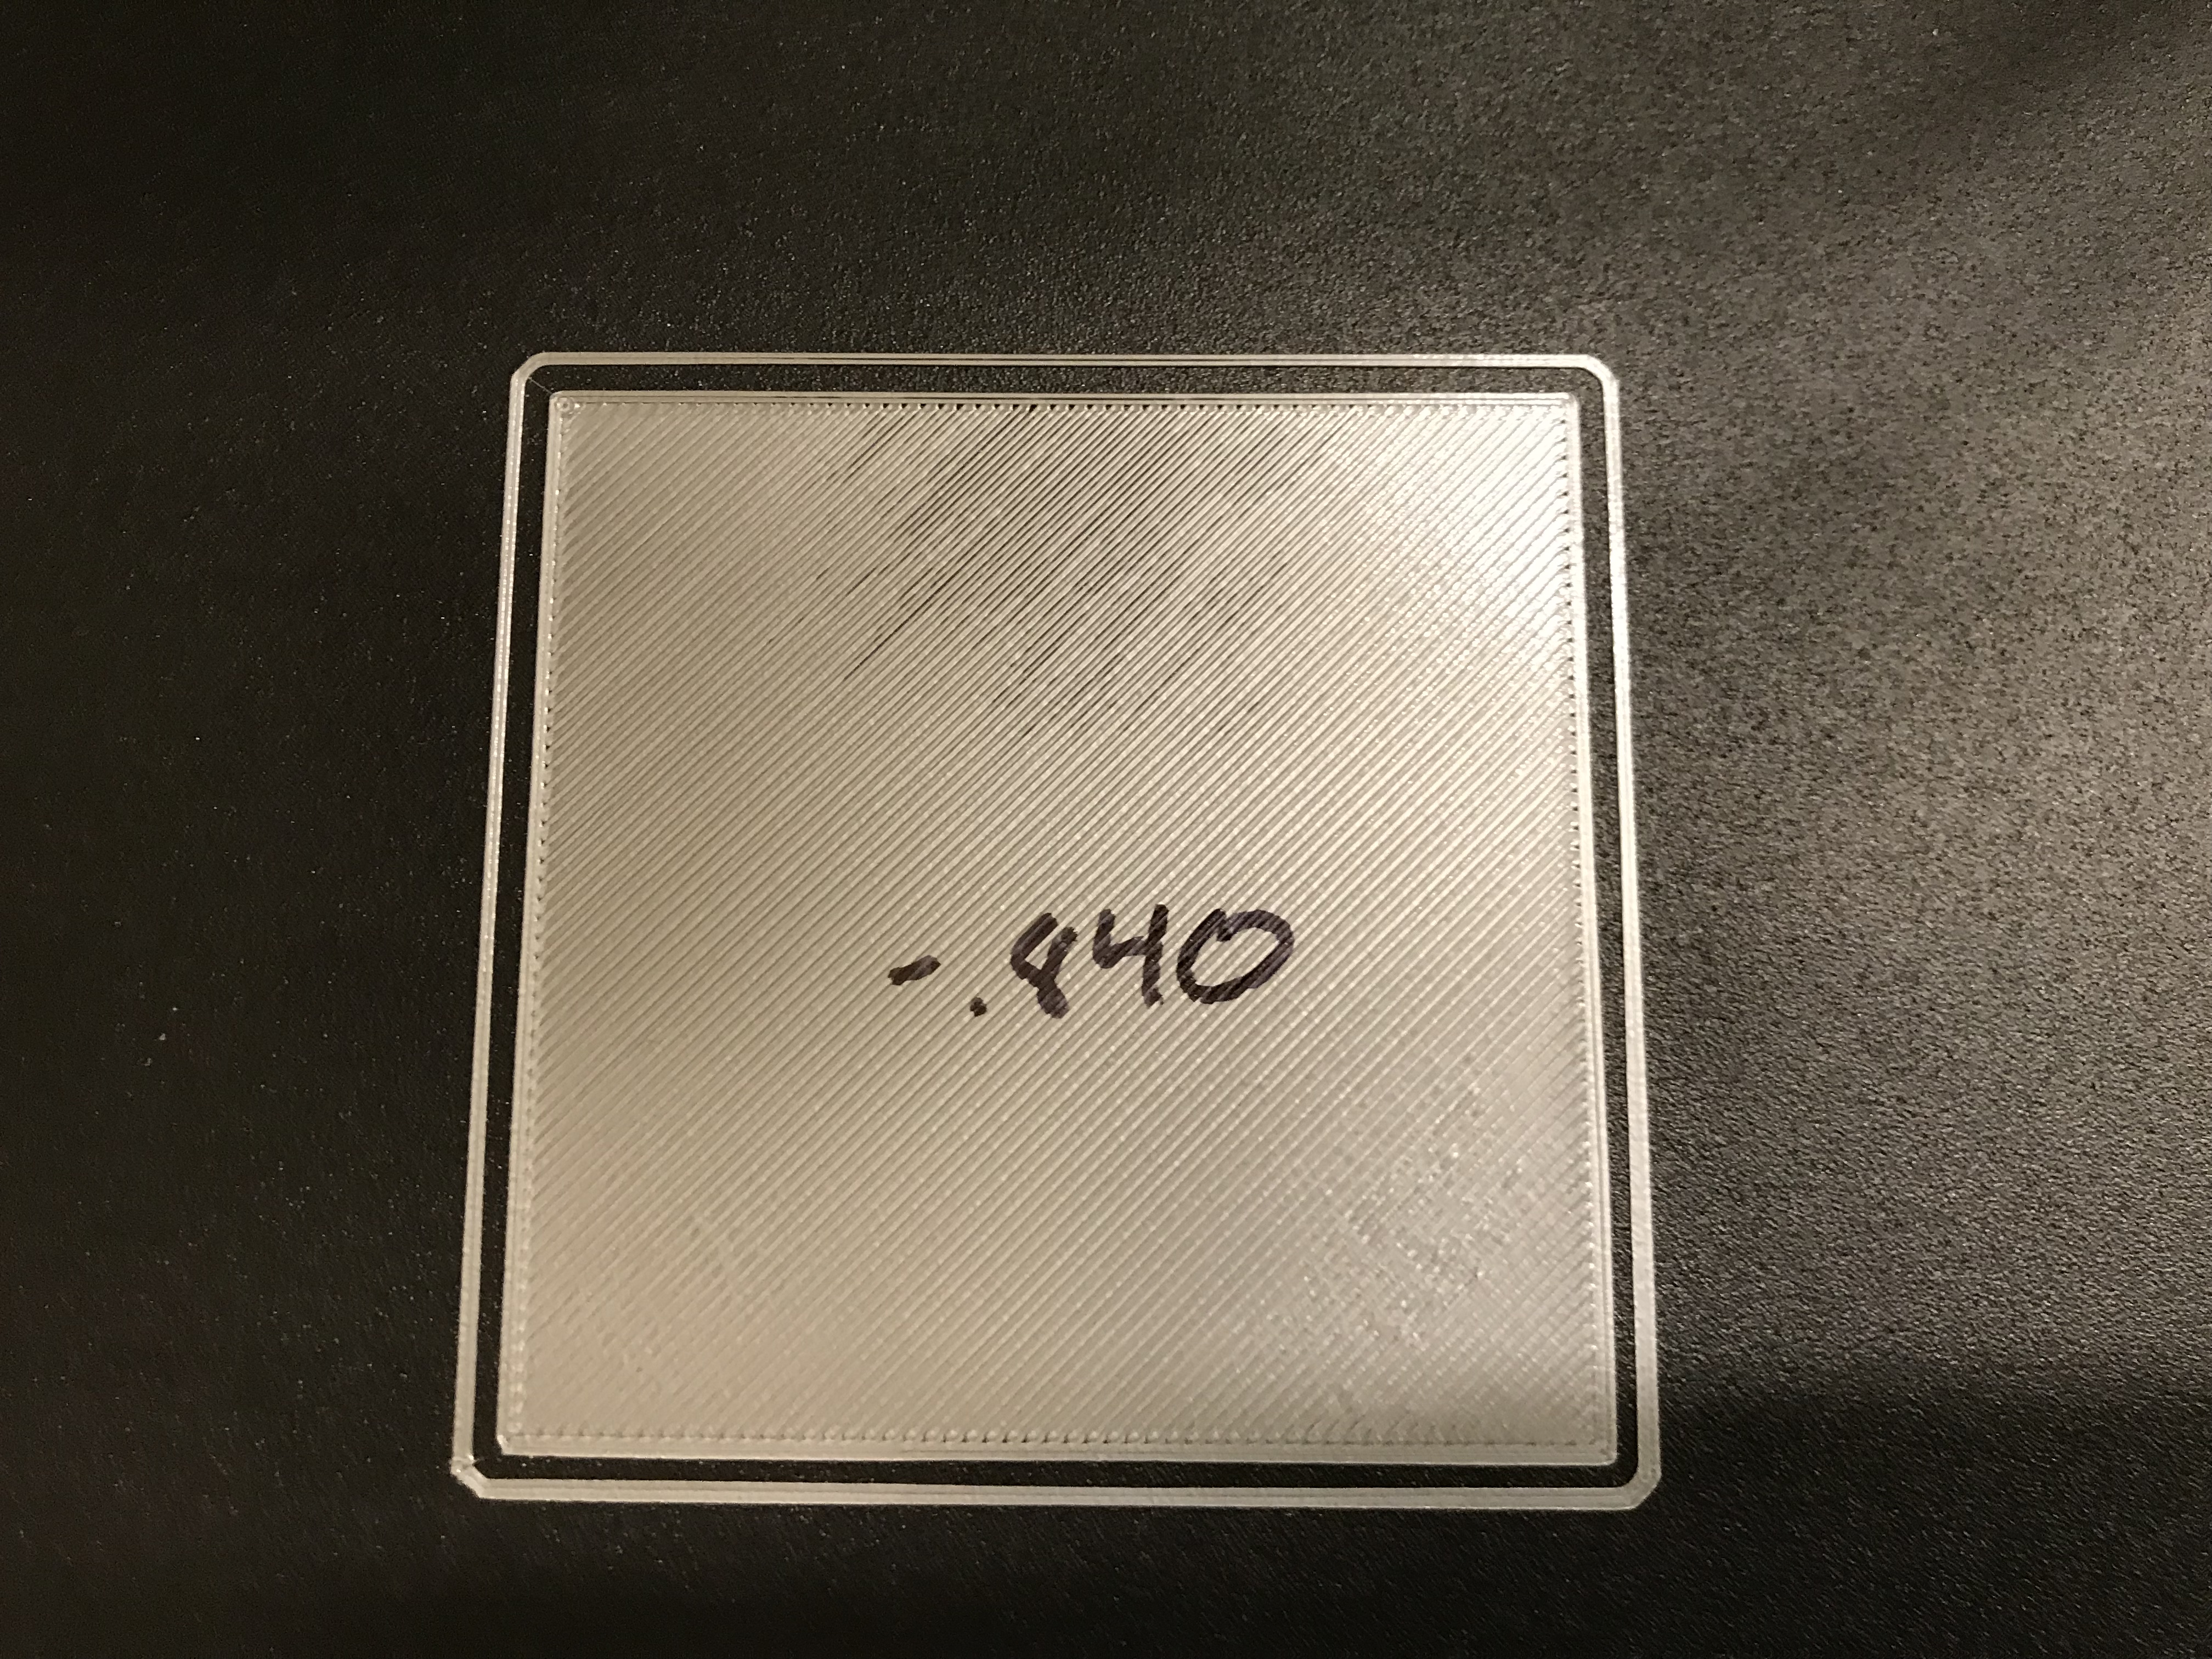
Any ideas? It looks like the nozzle is too low in the top corners and too high on the bottom? I’m having a hard time getting a consistent first layer.
Re: life adjust Z - my way
What was going on as those 2 pics were taken? In both cases, it looks like your Z was low when the print started in the bottom-right corner, got pretty good 1/4 of the way up in the 1st/1/2 way up in the 2nd, then continued to be raised until you had poor adhesion. You have numbers written on the sheets, but no indication of what the setting before was. Can you fill us in the the process you used?
Any ideas? It looks like the nozzle is too low in the top corners and too high on the bottom? I’m having a hard time getting a consistent first layer.
If you adjusting as you went, try starting at -0.850 (going by your markings). That looks pretty close, at least if I'm reading your markings correctly.
The entire print was set at those live z values. Although it kind of looks like it, no adjustments were made during the prints.
The print at -.850 I did reduce the flow to 95 before it started.
Edit: I pulled the bed apart and put it back together using wave washers, tightening them just until the bed was stable. I didn't bother leveling the bed with the washers but I have an even first layer now.
Re: life adjust Z - my way
I'm confused. Is it wise to try and calibrate with a gcode file that wasn't rendered on our own version of slic3r using our own default setings? What if our volumetric setting is different than that of the original creator of the foreign gcode? Is my understanding flawed here?
I've been using a few calibration stl files from thingiverse which I then render to gcode myself:
1) Large single square in center of bed, starting from left rear corner for easy realtime adjusting as print progresses: https://www.thingiverse.com/thing:2125379/
Once that looks as good as possible I move to this one:
2) 5 small squares (left right rear front center) revealing what bed mesh correction will be required:
https://www.thingiverse.com/thing:1776031

Once that looks as good as possible I do this brutal test, which for me is totally unprintable until Z-axis is set correctly across the bed:
3) More squares with curves whatnot that love to pull of the bed when scraped slightly:
https://www.thingiverse.com/thing:2899815

It's been a frantic week configuring my new MK3 but I seem to recall trying this Life-Z, and getting it nice, then printing something using my custom slic3r setup, and having everything fall apart.
Re: life adjust Z - my way
I'm confused. Is it wise to try and calibrate with a gcode file that wasn't rendered on our own version of slic3r using our own default setings? What if our volumetric setting is different than that of the original creator of the foreign gcode? Is my understanding flawed here?
I've been using a few calibration stl files from thingiverse which I then render to gcode myself:
Thank you! This worked amazingly well.
I put my heat bed on with wave washers underneath and only tightened the screws just enough to have a solid bed. From there I used the file in step 1 to get a decent live z value. I then repeated step 2 while tightening down the wave washers a little bit at a time where necessary and making adjustments to live z until that print was good. I repeated the same process with step 3 until it was dialed in.
After I finished that, I repeated the 3 prints and they all look fantastic!
Re: life adjust Z - my way
Thank you! This worked amazingly well.
Excellent! That last one with the circles had me pulling my hair out for much longer than I care to admit. Excuse me whilst I dash off to find some of these new fangled wave washers... 
Re: life adjust Z - my way
Hello everyone, I got my kit two weeks ago and assembled it last Monday. I've been trying to get a hang of it as well as calibrating my printer. I'm new to 3d printing so there's a long way to go. So far I can say I'm satisfied with my printer.
However, today I noticed a weird behaviour when printing the calibration print provided in the first page. From bottom right corner to middle everything is nice and smooth. Good adhesion and smooth surface (z is 0,915 mm). But starting from middle and through upper left corner, lines start to show "holes" inbetween and easily come apart when pulled. Nothing has been changed during the print.
I only could get it to work at 0,930 mm z offset.
Why do you think this happens?
I thought my my bed leveling was bad so I set rear and left bed adjustments to - 10 and - 15 respectively. With the same z offset I had a nice layer. Just little holes in the corners. So I raised z to - 0.920, expecting to have a better result. Surprise, I had the same issue I described above. So I disabled temperature calibration of pinda. First print, while pinda was heated came out perfect. Printing the second one now and I'll see.
Is this a known issue? Should I contact support?
Re: life adjust Z - my way
Getting ready to test your gcode on my Prusa I3 MK3. I am ok when printing small items but larger items tend to warp off the bed. Now, this is not always the case you might call it intermittent. Will your test work for the entire surface? Also, what is the max x y and z that can be printed? Thank you appreciate you taking the time to create this explanation.
Re: life adjust Z - my way
I'm confused. Is it wise to try and calibrate with a gcode file that wasn't rendered on our own version of slic3r using our own default setings? What if our volumetric setting is different than that of the original creator of the foreign gcode? Is my understanding flawed here?
I think the value of the pre-generated gcode files is that they are independent of your slicer. They provide a consistent way for a user to determine that they can manually calibrate a Z adjustment that works. If they then can't get something to work in their slicer, they know the hardware isn't at fault if they can get a good calibration print. For a beginner, this can be invaluable information, especially with the mix of slicers and information of varying quality floating around. It's good to be able to say "use this" and know it will be consistent.
[...]It's been a frantic week configuring my new MK3 but I seem to recall trying this Life-Z, and getting it nice, then printing something using my custom slic3r setup, and having everything fall apart.
I've seen some discussions of "other" slicers wherein it was suggested to make compensations for Z levels with slicer settings. One problem I'd see there is that you've now locked your gcode files to exactly that set of hardware parameters. If you swap out a worn nozzle, or even just have to tear things down and reassemble it all later, those previously-good gcode files won't print properly anymore. By doing Live-Z calibration to a default 0 level (no software compensation), you're leaving it up to such adjustments to be made on the printer directly.
That said, there's nothing wrong with quickly "graduating" to more sophisticated methods. I'm doing a lot of printing with various sized nozzles, so want my own versions. I also print in a variety of materials, some of which aren't provided with the pre-built set of gcode files, so I'm happy to generate my own. The key is that I've got (just) enough experience to know how not to screw things up in my slicer.
Re: life adjust Z - my way
I've seen some discussions of "other" slicers wherein it was suggested to make compensations for Z levels with slicer settings. One problem I'd see there is that you've now locked your gcode files to exactly that set of hardware parameters. If you swap out a worn nozzle, or even just have to tear things down and reassemble it all later, those previously-good gcode files won't print properly anymore. By doing Live-Z calibration to a default 0 level (no software compensation), you're leaving it up to such adjustments to be made on the printer directly.
My preference is to tune Z live adjust for just one filament type (i.e. PLA) and just put a relative Z offset in the slicer for the other filament types eg 0.2mm for PETG. This means if my live adjust changes due to a different nozzle or something else I just have to retune PLA and the slicer offsets take care of the other filaments.
Regards,
Martin
Martin Wolfe
Re: life adjust Z - my way
That is indeed a great idea. For anybody that manages to get their adjusted in the first place, I can see that being optimal. I assumed Pathogen was referring to the gcode at the start of this thread.
[...] My preference is to tune Z live adjust for just one filament type (i.e. PLA) and just put a relative Z offset in the slicer for the other filament types eg 0.2mm for PETG. This means if my live adjust changes due to a different nozzle or something else I just have to retune PLA and the slicer offsets take care of the other filaments.
I've been annoyed trying without success to embed gcode to pause with a message for different filaments, but you idea is even better. Thanks!
Edit: What slicer are you using? I see a z-offset parameter in Slic3r, but unfortunately, only on the printer page. I've found the following suggested for custom gcode:
; start code contains homing, pre-heating, auto-leveling, nozzle priming, etc.

G1 Z0.2 F500 ; Go to the level of 0.2 mm + your paper thickness

G92 Z0       ; This redefines the zero Z level
I assume this would only reset things for the current print, or until the next auto-level.
Re: life adjust Z - my way
Does anyone have the GCode used in the gcode files? I would like to add the start and stop procedure to all my prints to stop the nozzle oozing. I couldn't find anything in PJR's post history so I'm assuming its custom made? Could anyone please link to his or something similar?
Re: life adjust Z - my way
Edit: What slicer are you using? I see a z-offset parameter in Slic3r, but unfortunately, only on the printer page. I've found the following suggested for custom gcode:
; start code contains homing, pre-heating, auto-leveling, nozzle priming, etc.

G1 Z0.2 F500 ; Go to the level of 0.2 mm + your paper thickness

G92 Z0       ; This redefines the zero Z level
I assume this would only reset things for the current print, or until the next auto-level.
I use Slic3r. As you found I just dump it in the printer page. I maintain a couple of saved printer pre-sets. A generic one, the PETG one with the 0.2mm Z offset and one for Rigid Ink PLA to enable extruding at 170°C as that filament gives it's best result at 180°C and by default the MK3 does not extrude below 190C.
Regards,
Martin
Martin Wolfe
Re: life adjust Z - my way
by martin.w15 » Tue Jul 10, 2018 8:28 pm
My preference is to tune Z live adjust for just one filament type (i.e. PLA) and just put a relative Z offset in the slicer for the other filament types eg 0.2mm for PETG. This means if my live adjust changes due to a different nozzle or something else I just have to retune PLA and the slicer offsets take care of the other filaments.
Regards,
Martin
How would I do this in Simplify 3D? Where/how do you enter a relative Z offset from your base filament?
Re: life adjust Z - my way
Hi,
My extruder calibration asks for a multiplier of 1,13. Shouldn't the first layer calibration be done with the correct multiplier? Also, the prusa PLA filament is rather 1,70 than 1,75. Wouldn't it be advisable to consider both factors for first layer calibration?
Thanks for all the work!
Berthold
Re: life adjust Z - my way
Hi Jeff
Im getting a pretty nice surface finish at about -700 but my thickness is about .28 any ideas ?

Re: life adjust Z - my way
Im getting a pretty nice surface finish at about -700 but my thickness is about .28 any ideas ?
It looks a bit too high for my taste. Try -750 and make sure you don't measure the thickness along the print lines, but at right angle to them.
Re: life adjust Z - my way
Quick question - does anyone else have their z-axis move all the way to the top of the printer and force against the top end mechanical stops after the print finishes? It's similar to when you calibrate the z-axis - the on screen menu asks you to move it up until it hits the top of the printer and then it starts the calibration procedure.
I ask because I'm unable to get a reliable result from the printer due to this behavior. If I let the print finish, then reboot the printer before the z-axis gets to the top and hits the mechanical end stops , the value I put in remains consistent for future prints.
If I allow the printer to do what it wants and ram the z-axis into the top - and then attempt to redo this print, the existing values that worked on the prior print no longer work at all.
Maybe I'm not using the latest version of the gcode on this forum? I have pictures of my results, if that's helpful to anyone.
EDIT: I'm using the PET one that came from this file "S3D_calibration_surfaces_75x75@200um_v6.1.zip"
Re: life adjust Z - my way
As I newbie and trying to get Z Offset working for PETG I am trying some calibration but I am confused. I have created a test digram with 20mm x 20mm 0.2mm thick patches . 5 of them One in each corner and one in the centre. So I can check bed leveling.
Then in slic3r I have a base stl image with all 5 on the platter. I then have 4 users presets based on the Prusa PET Printer setting. They have Z offsets of
0.0, 0.1 , 0.2 and 0.3 .
I then set the printer setting , slice and export to gcode So 4 files created from each set of print settings.
BUT when I print for example the 0.1 offset whilst printing I see Z = 0.2. When I print the 0.3 I see Z = 0.5 .On the LCD what is going on ?