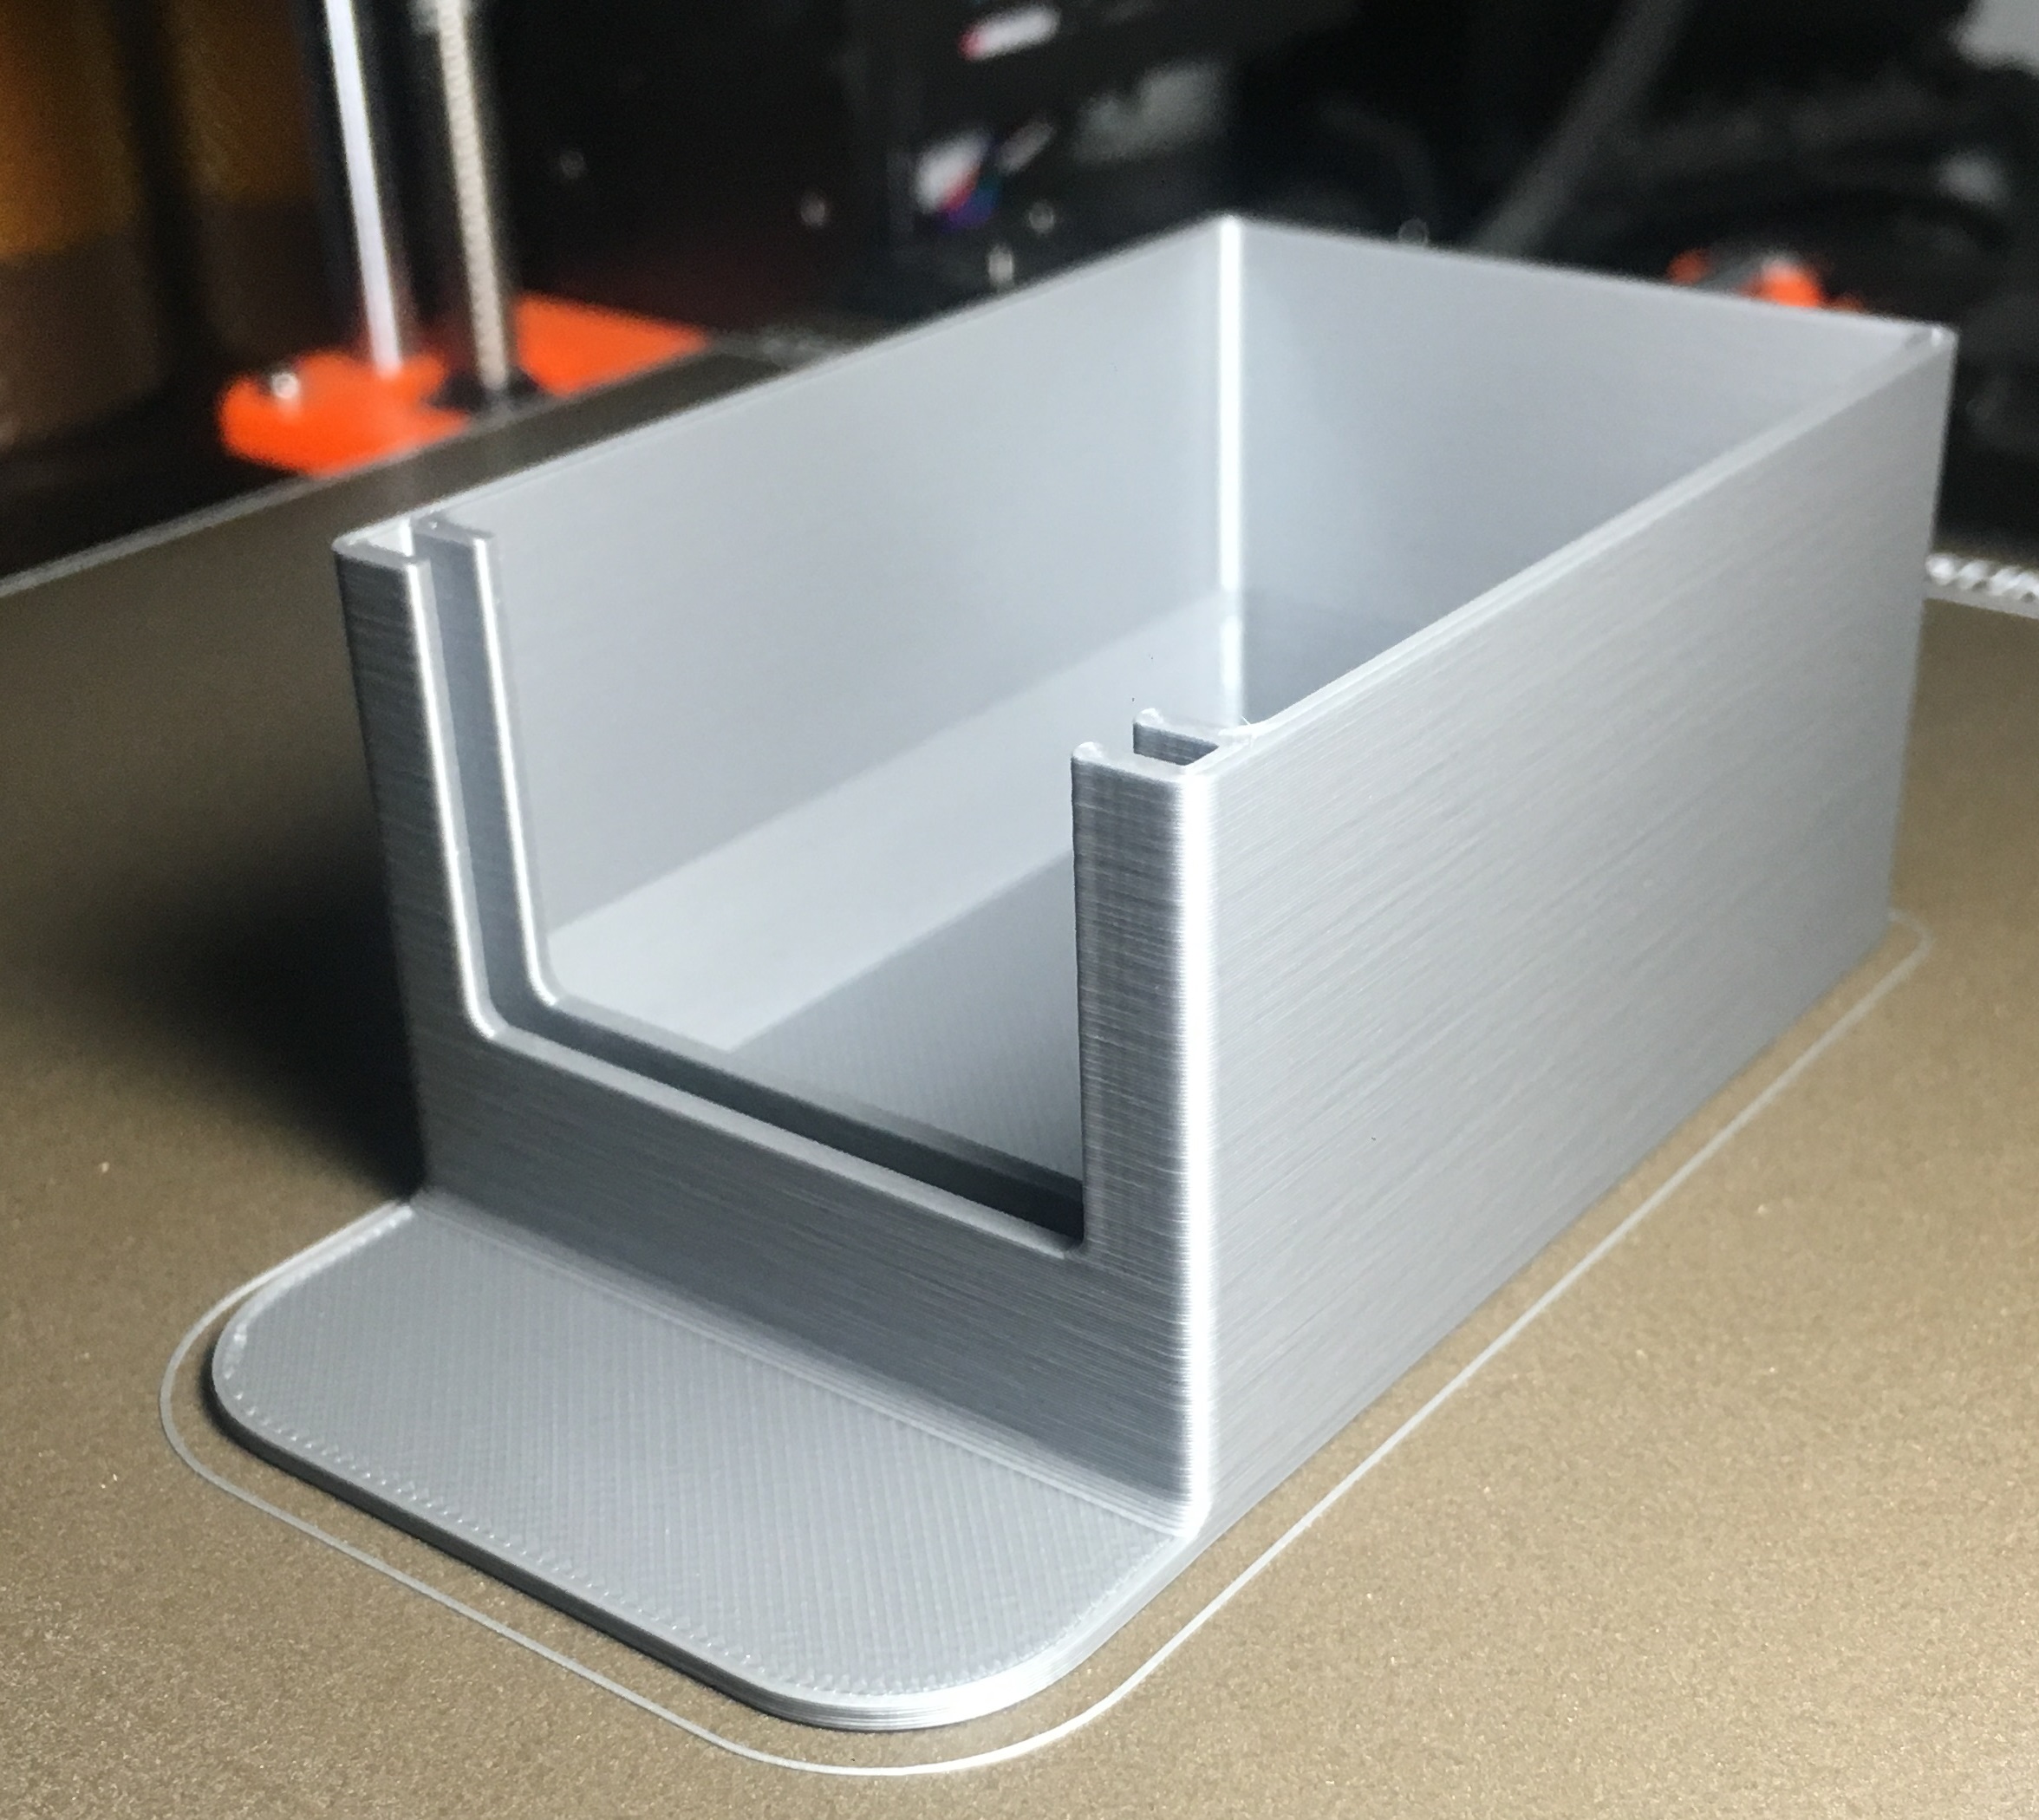
Horizontal lines problems
I’m getting these horizontal lines which wasn’t happening before so something must have moved. How can I solve these?
Thanks in advance!
EDIT: this is with the gray PLA Prusament that came with the printer. Uses the default Prusament preset in Prusa Slicer.
RE: Horizontal lines problems
Check a few things - check the screws on your X and Y pulleys for being properly tightened. Check whether your belts are the correct tightness (the # in the settings menu is NOT belt tension) by using the physical belt tension meter you can download and print in Prusament PETG (only)
Check for smooth movement on X and Y axis, if not smooth, remediate that.
RE: Horizontal lines problems
This is not a mistake of the printer, but of the slicer and model design. You will reduce such an behavior, if your model will more follow in dimensions the nozzle diameter. For example if the width of the wall will not be 1 mm, but more like 1.2mm (3 x 0.4).
RE: Horizontal lines problems
Check a few things - check the screws on your X and Y pulleys for being properly tightened. Check whether your belts are the correct tightness (the # in the settings menu is NOT belt tension) by using the physical belt tension meter you can download and print in Prusament PETG (only)
Check for smooth movement on X and Y axis, if not smooth, remediate that.
Dan Rogers, thanks for the info. I wasn't aware of the tension meter. I've ordered some Prusament PETG to try this out. For now I've printed it on generic PETG and can already see that the Y belt is a lot looser than the X one but I don't want to adjust anything until I get the Prusament model printed out next week.
When I run the belt test, 1 out of 4 times I get a "loose pulley motor x" error. The rest of the times, the numbers are off by 1. I wonder what that could mean. I would have expected that this test would fail a lot more consistently. Do you know if the results I'm getting are normal?
This is not a mistake of the printer, but of the slicer and model design. You will reduce such an behavior, if your model will more follow in dimensions the nozzle diameter. For example if the width of the wall will not be 1 mm, but more like 1.2mm (3 x 0.4).
Thanks for your help. In this case, I created the model myself and the walls are indeed a multiple of the nozzle head.
RE: Horizontal lines problems
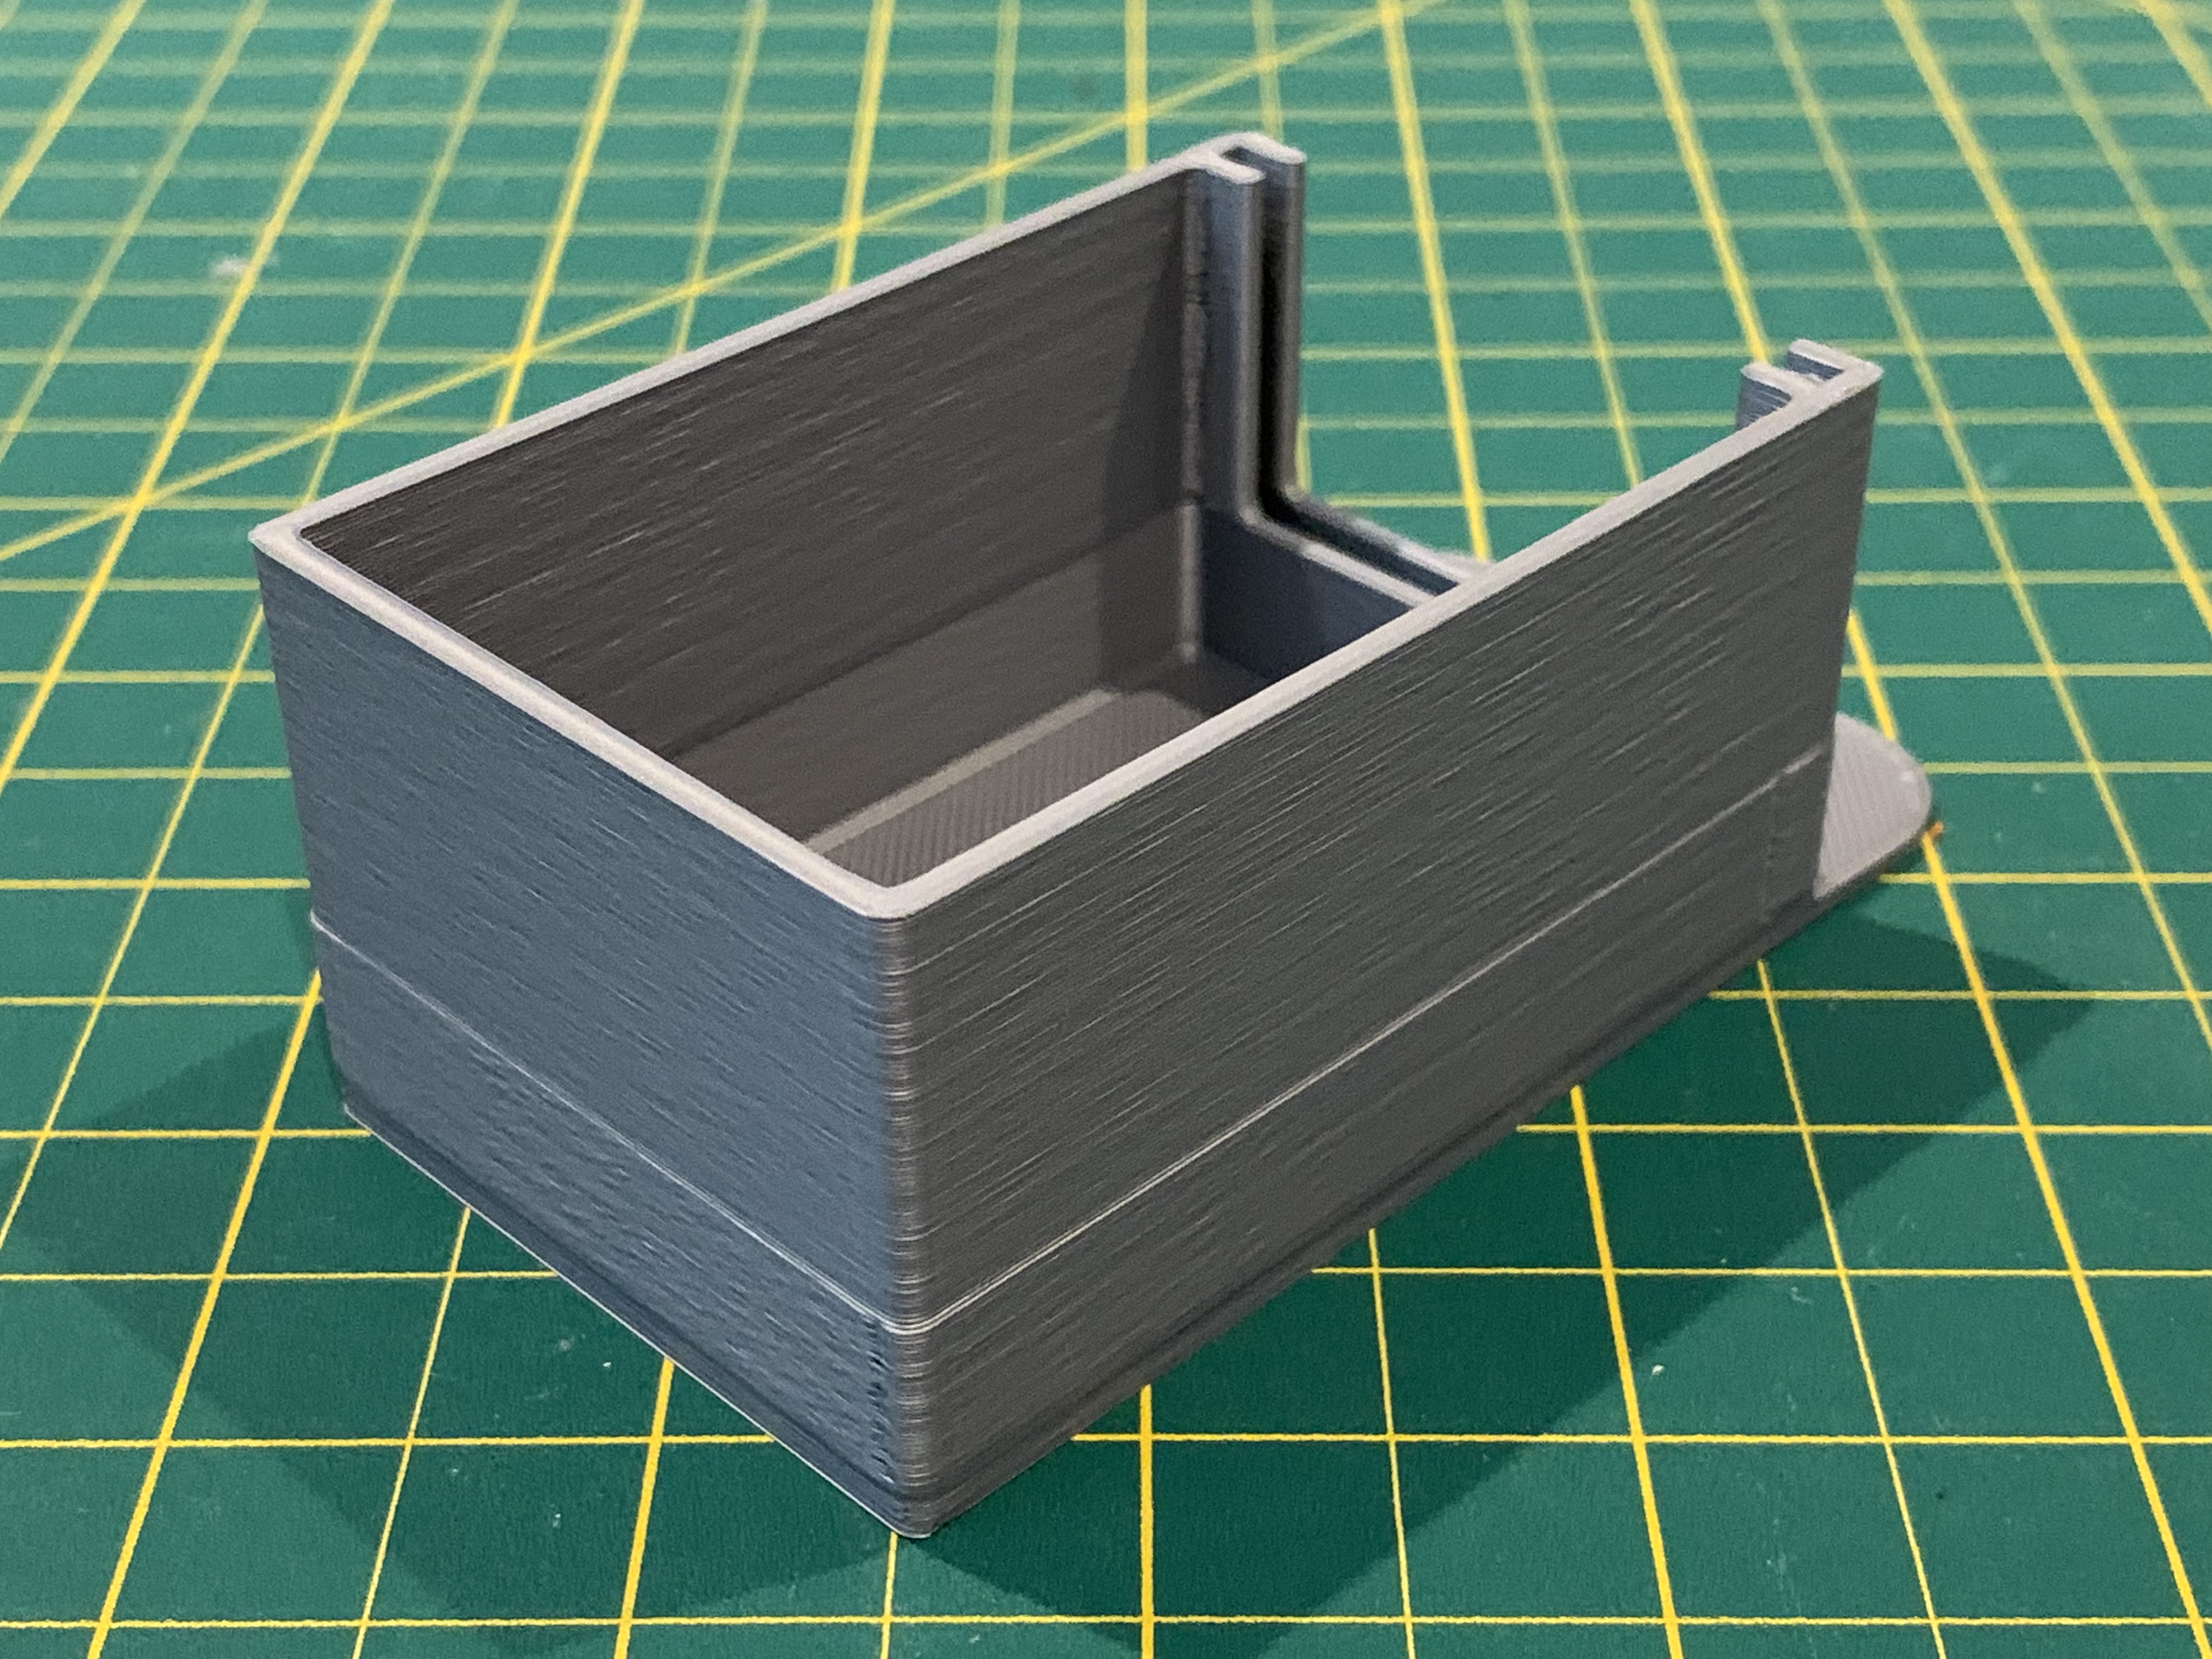
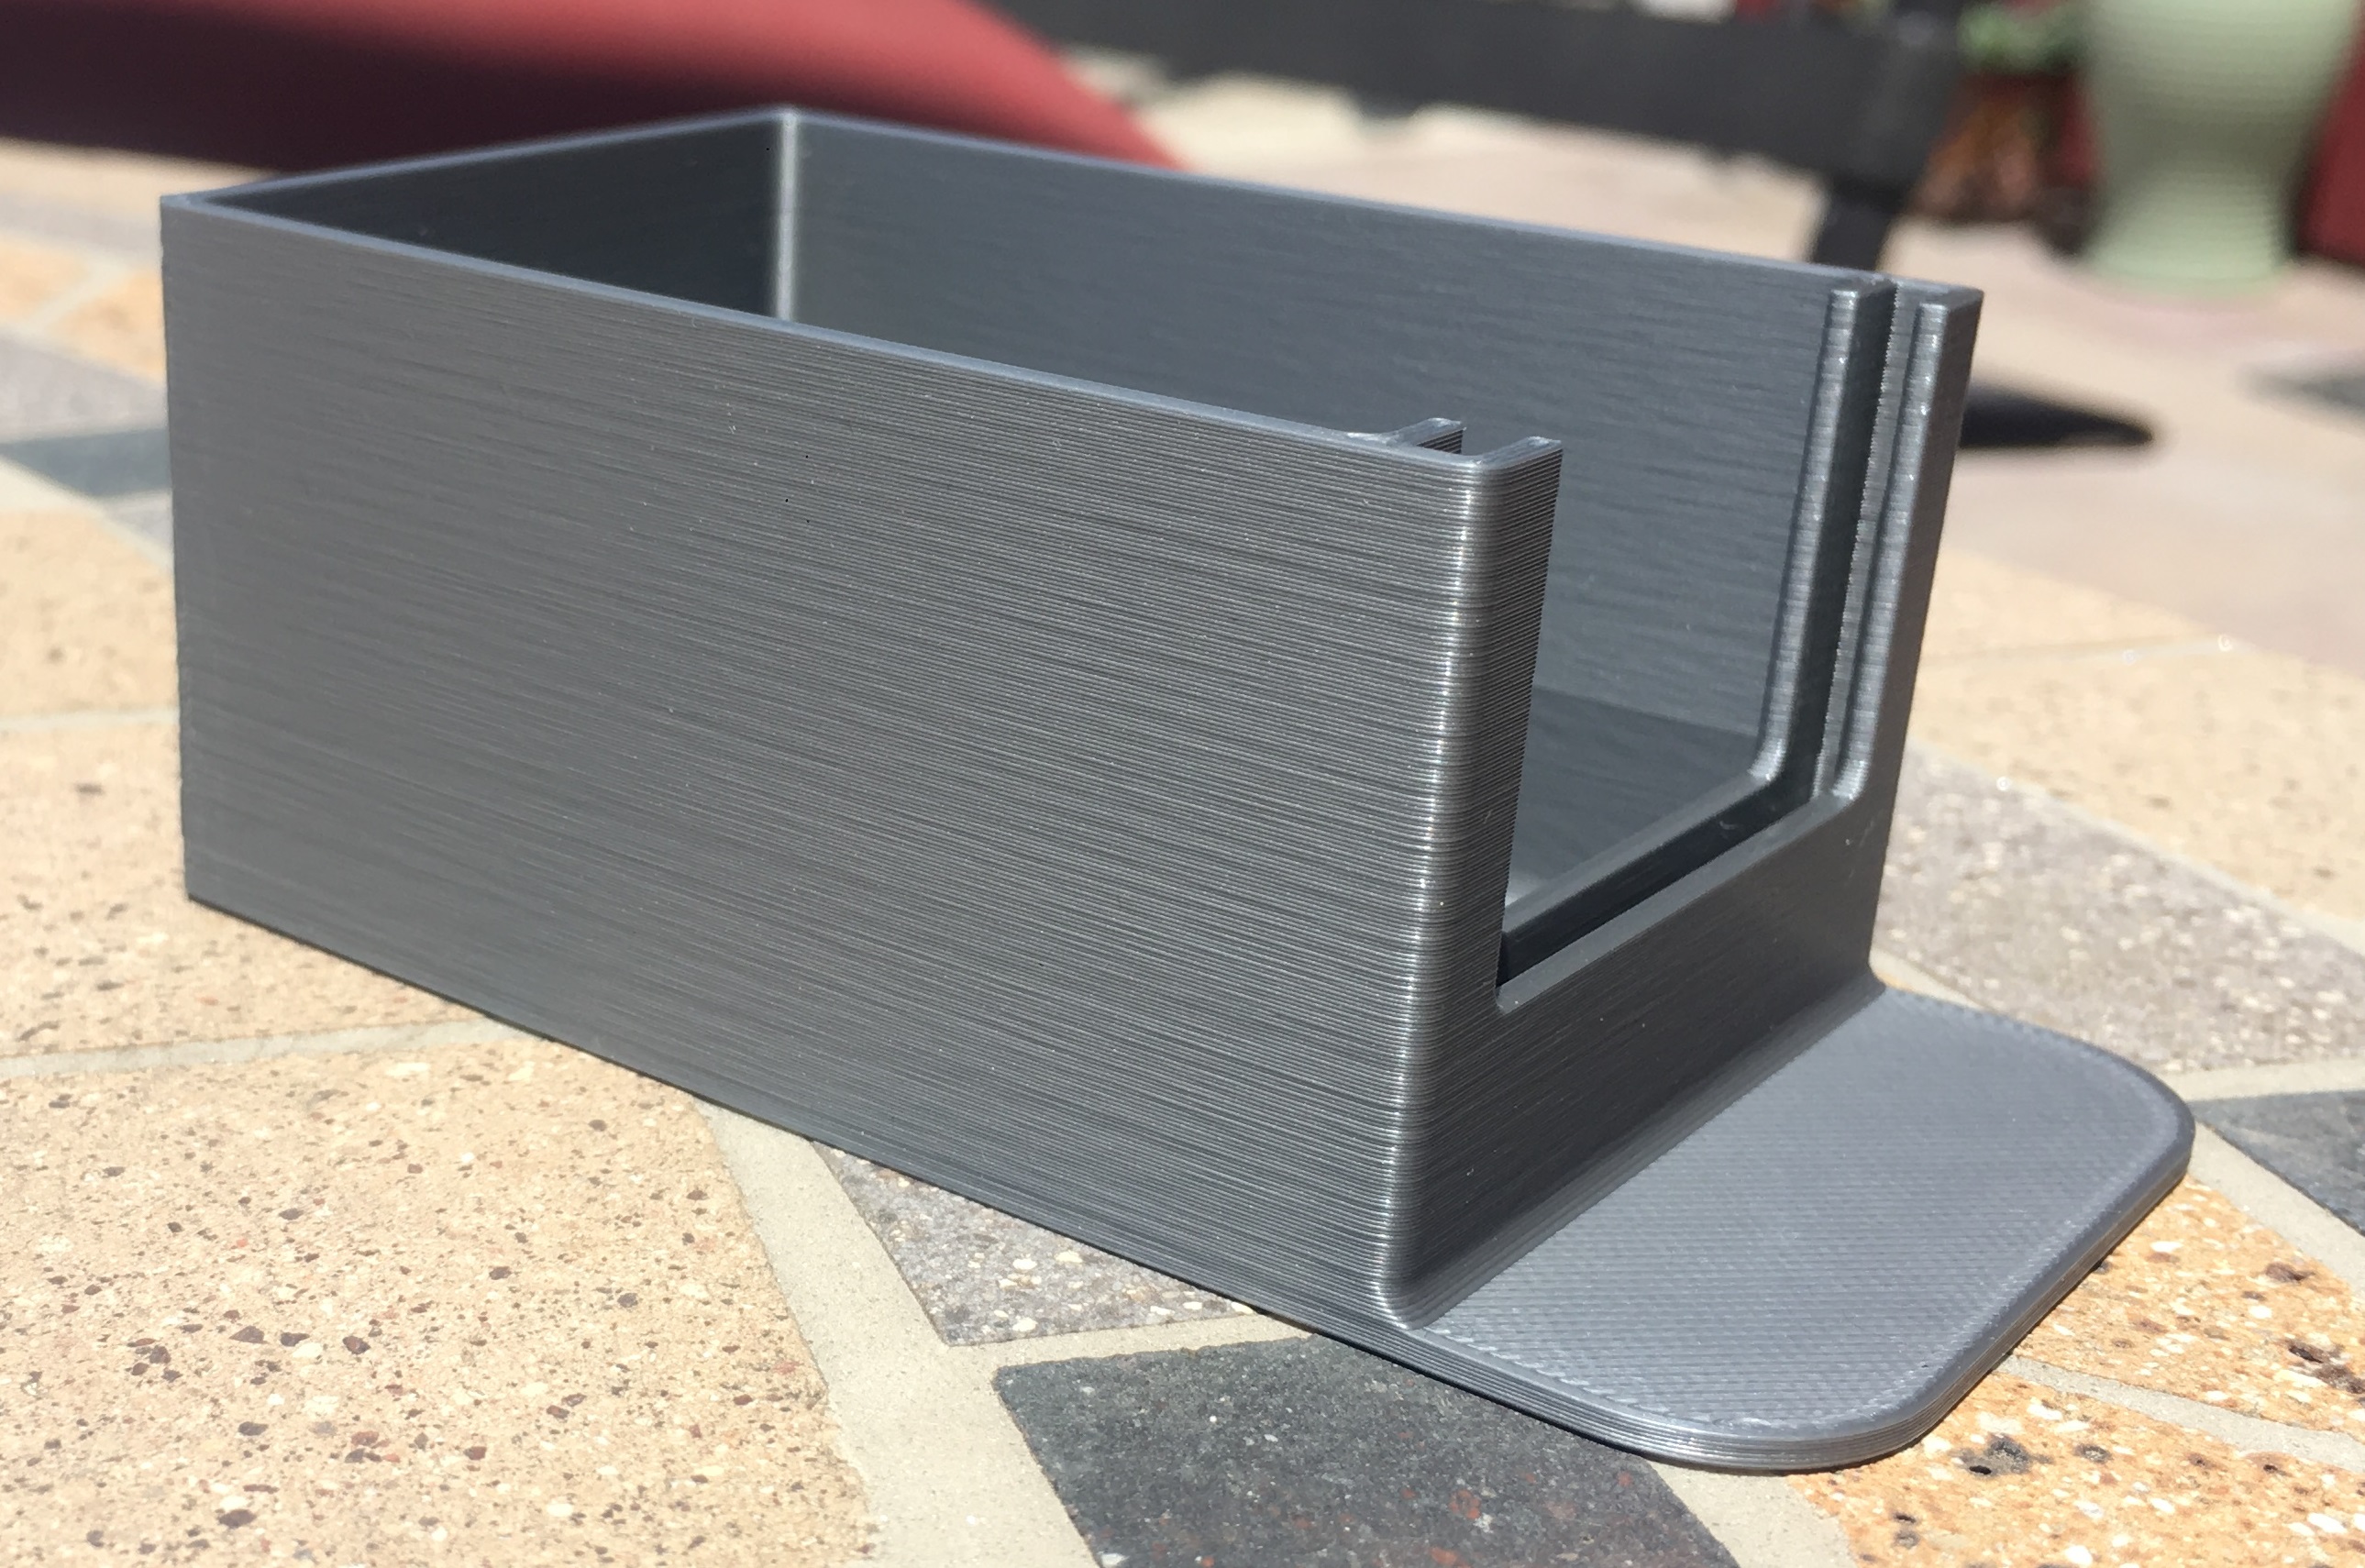
If the pulley is loose, you would have more issues in the print. Here the line is exactly in the height where the hole in the front wall begins. This is not coincidence.
Can you share your model or project?
RE: Horizontal lines problems
As per requested, here are the STL model and Fusion 360 project file.
Here the line is exactly in the height where the hole in the front wall begins. This is not coincidence.
Yeah, that's my first concern. The second being the rest of the sloppy wall lines.
RE: Horizontal lines problems
@treedee
Try something like this, Parts organizer box v10_Swiss.3mf I've reduced the extrusion widths, the corners you created might be problematic in there design, sharp intersecting with round at a point, but see how this works and please report back with your results, it's always nice to have a conclusion when trying to help someone.
Good Luck
Swiss_Cheese
The Filament Whisperer
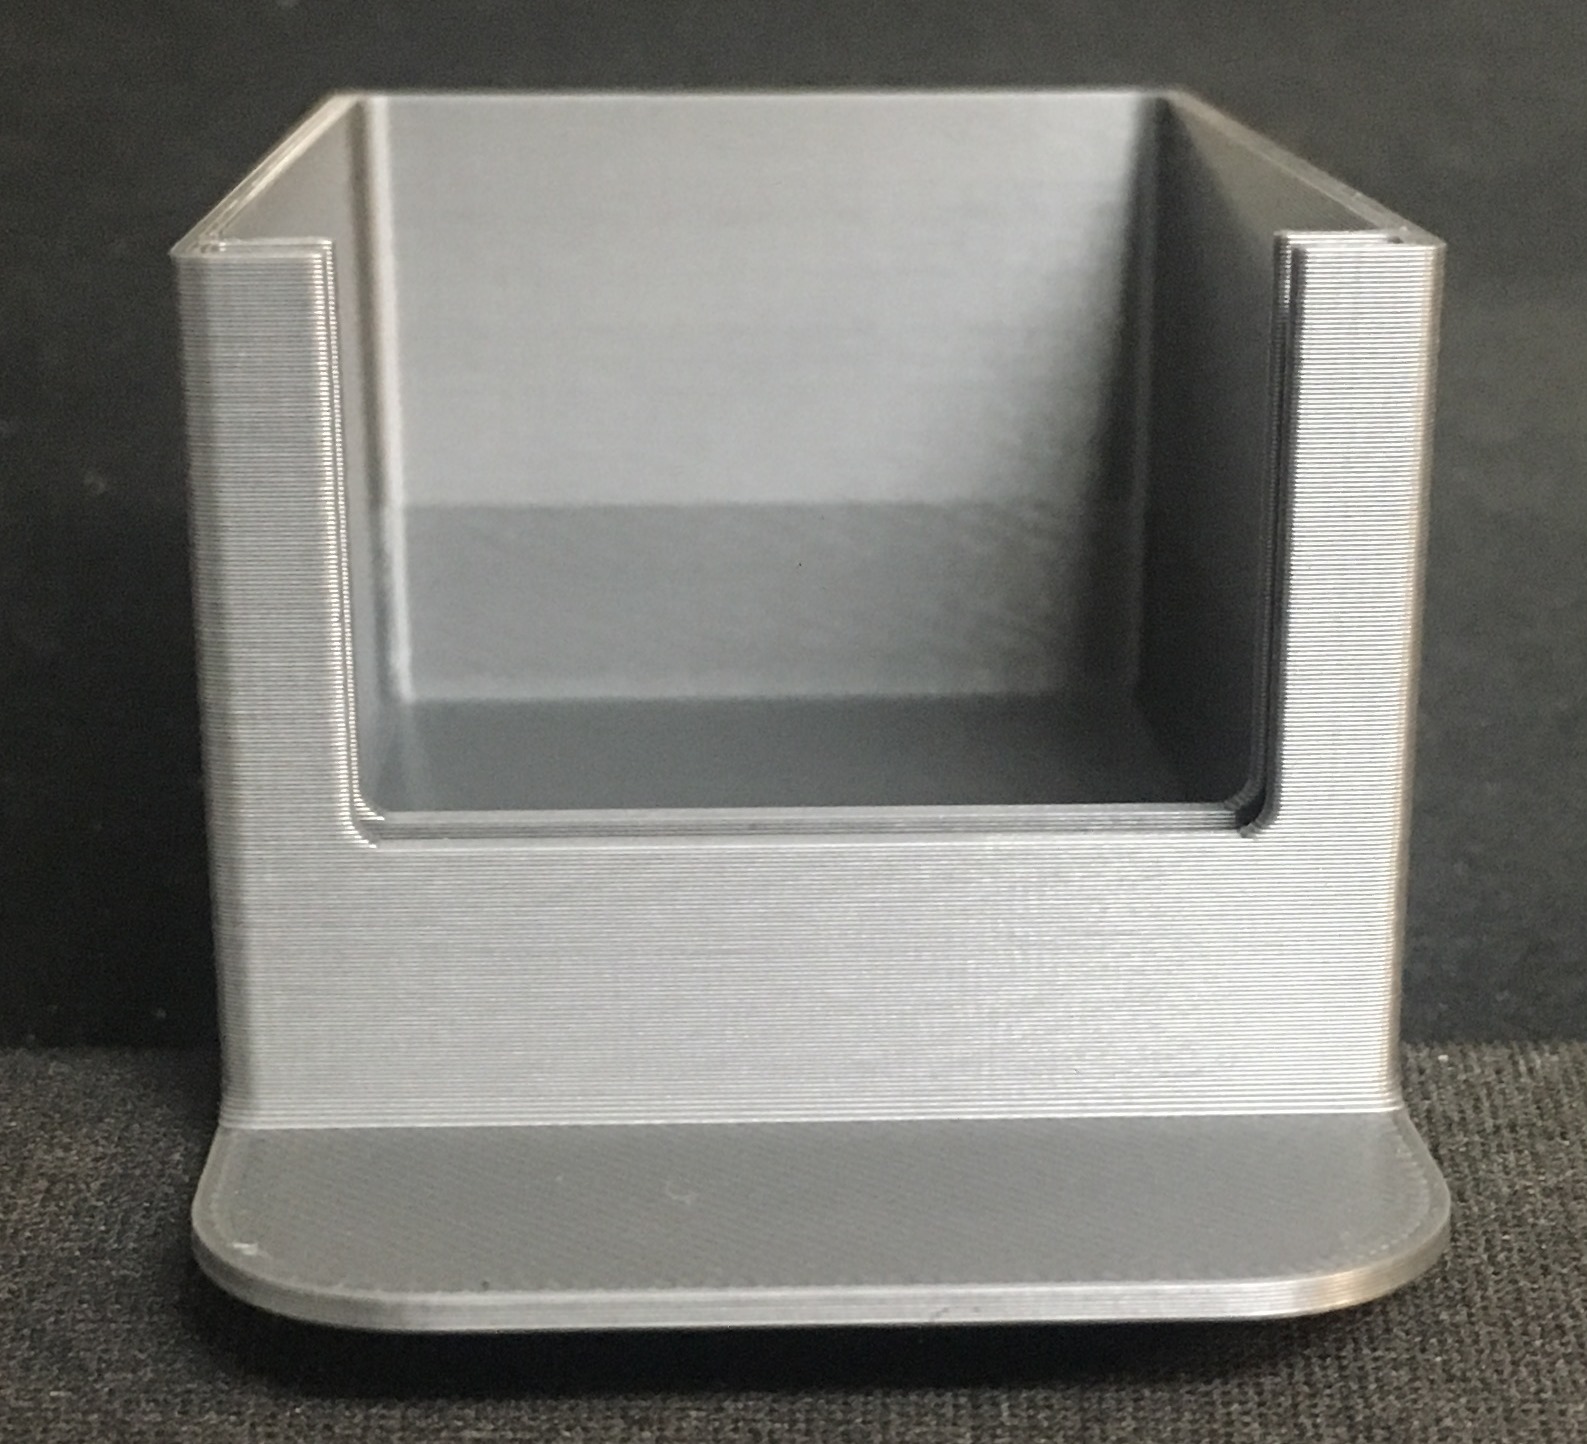
RE: Horizontal lines problems
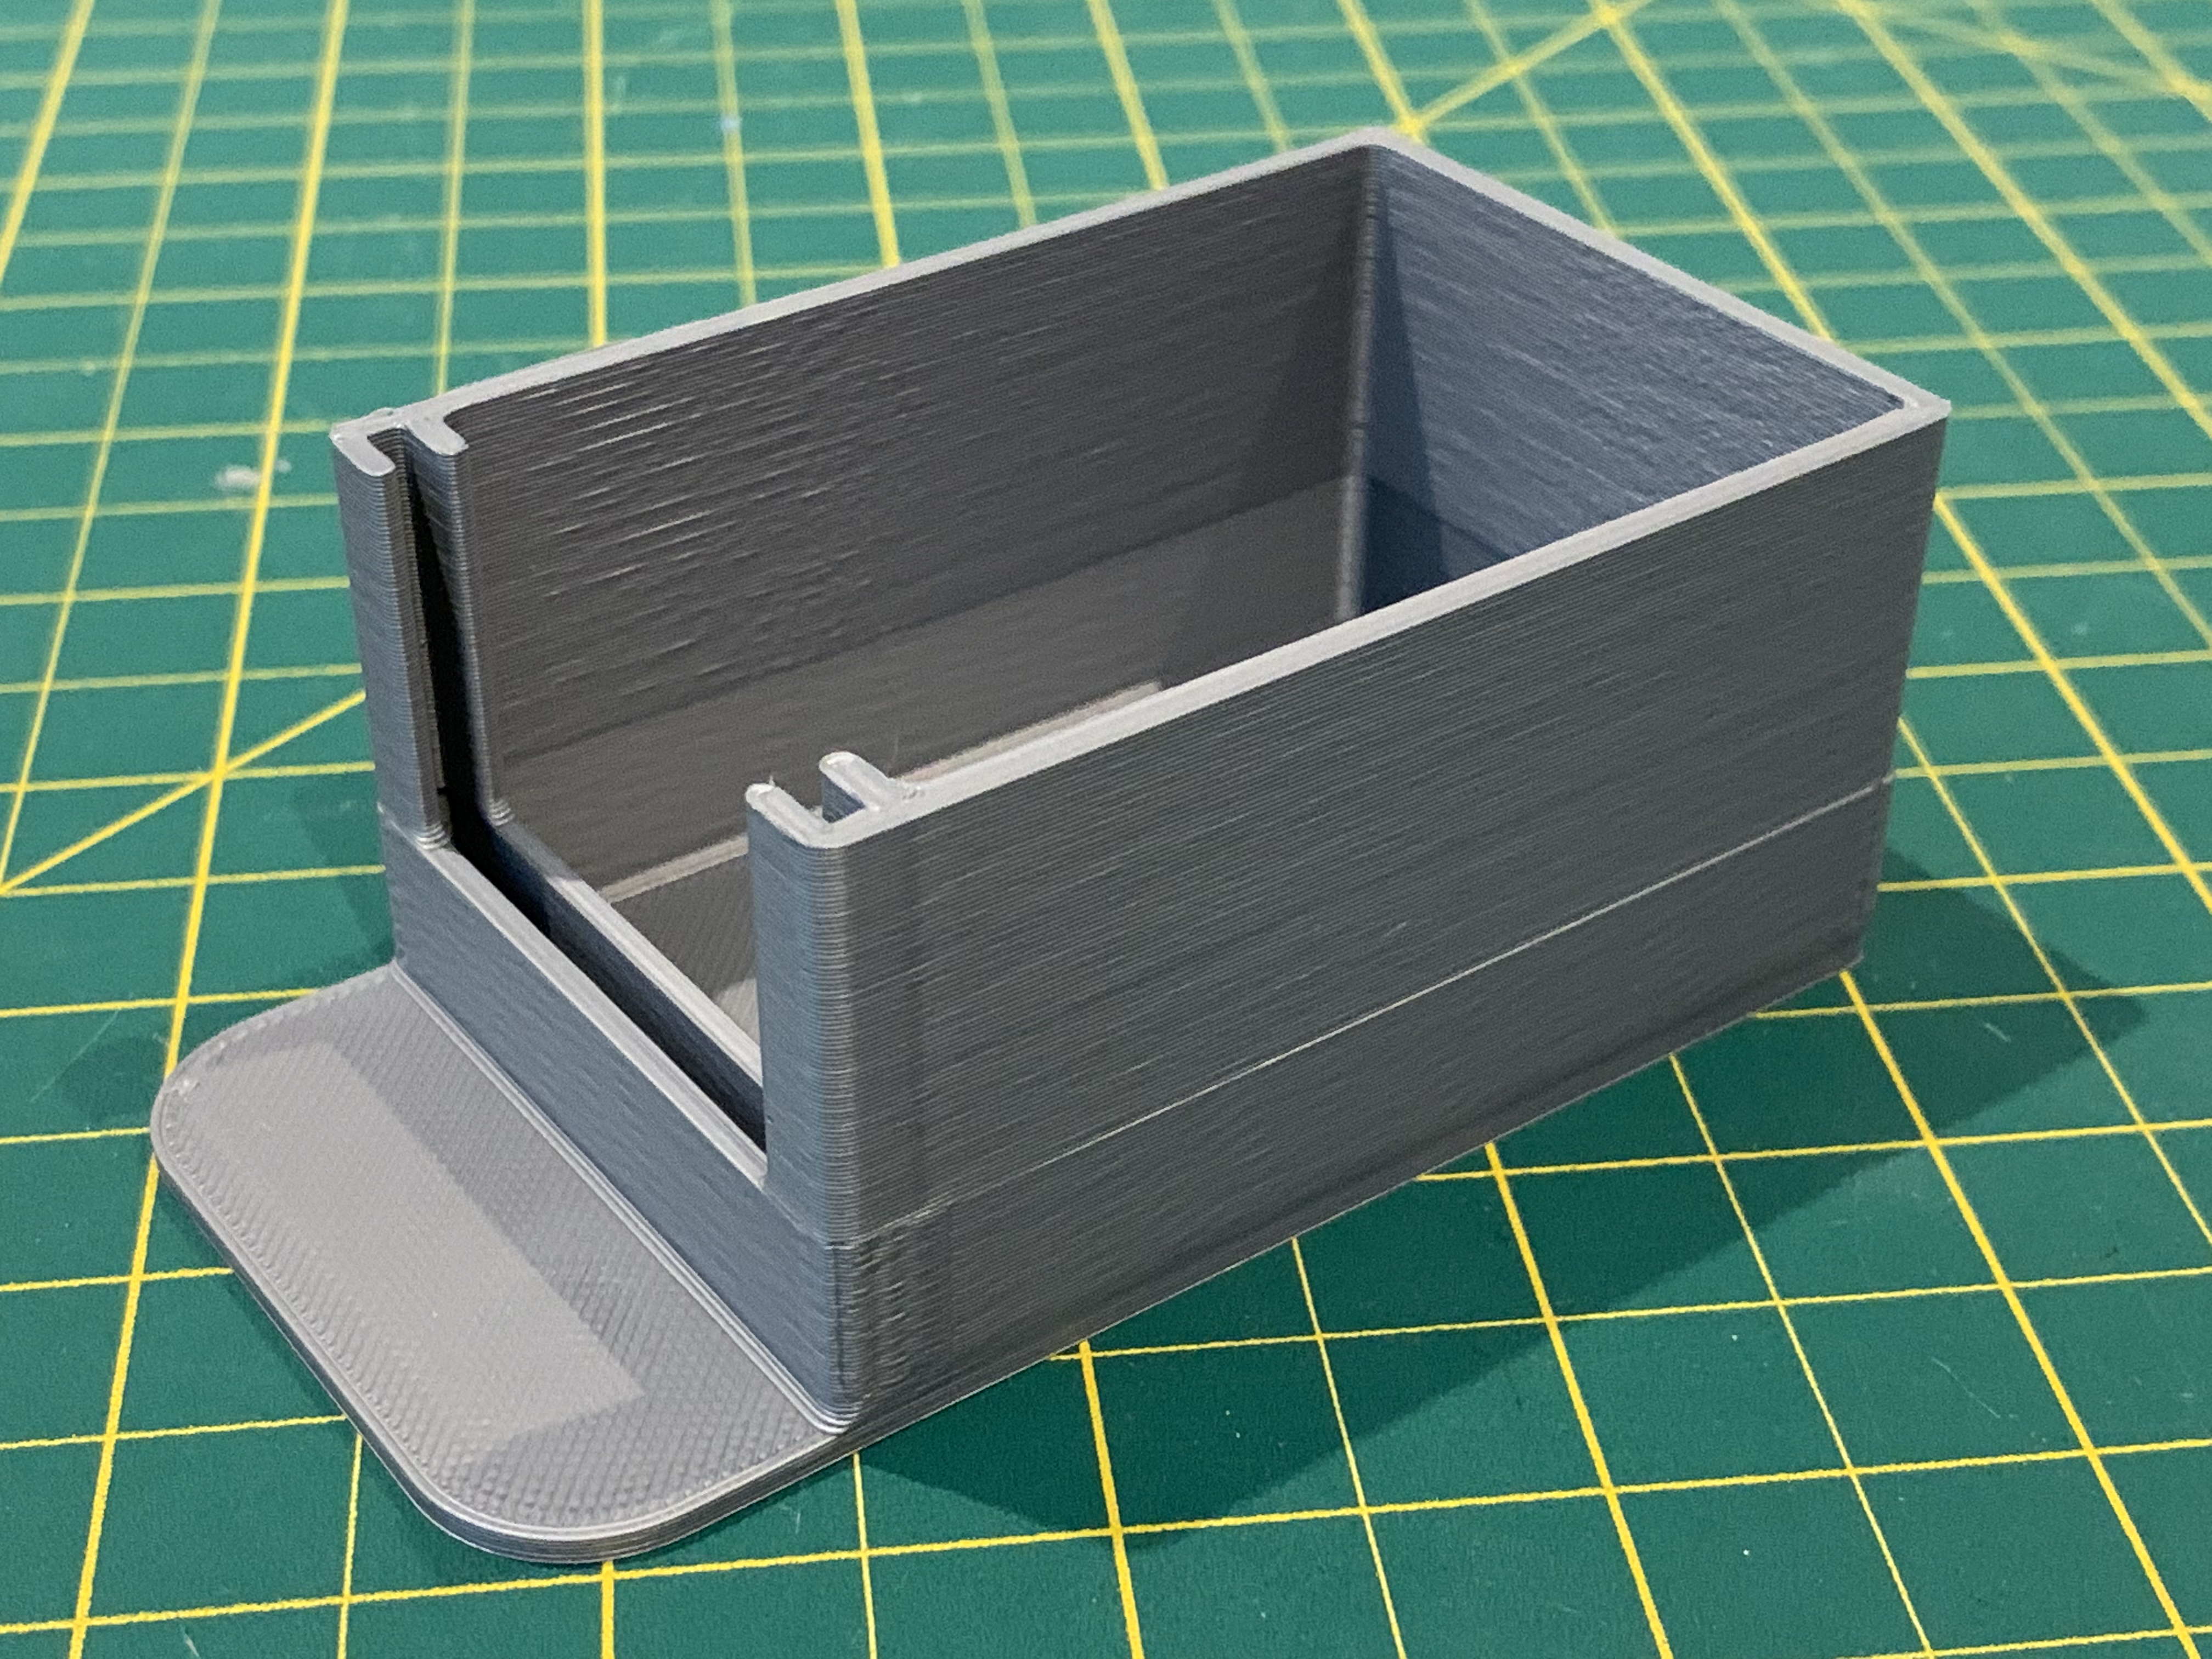
You can see, that also on my print there is a residual of that horizontal line in the height of the front hole start. It is just a bit better than yours. I agree with Swiss_Cheese that it looks like a bit over extruded. So you can try the model Swiss_Cheese sent to you, if it will be better you can play with extrusion calibration.
Btw my print is not the ideal of beauty, printer is 5 years old, rods and bearings remember... 😉
RE: Horizontal lines problems
@treedee
Try something like this, Parts organizer box v10_Swiss.3mf I've reduced the extrusion widths, the corners you created might be problematic in there design, sharp intersecting with round at a point, but see how this works and please report back with your results, it's always nice to have a conclusion when trying to help someone.
Good Luck
Swiss_Cheese
This is great, thanks! I'm finishing up a print (3hs left) and will give this a shot. Will post back the results, for sure.
I have a couple of follow-up questions for you:
1. I noticed that other than lowering the Extrusion Width > Perimeters, and Extrusion Width > External Perimeters by 0.4mm you changed other things in the preset, like removing the Gap Fill, and lowering the Minimum top shell thickness by 0.01mm. Were these because you used one of your PLA presets and they got carried over into the file or did you make these changes on purpose?
2. Could you explain in more detail what you mean by "the corners you created might be problematic in there design, sharp intersecting with round at a point". Maybe if you just draw an arrow pointing towards the problematic part in the model I can figure the rest out.
@milos-v Thanks for taking the time to print the model. I really appreciate it. It definitely looks better than mine! When you printer it, did you use the Prusament PLA preset in Prusa Slicer or did you change any other parameters?
RE: Horizontal lines problems
The print was without any changes in settings. Not now sure if Prusament PLA or Prusa PLA, but that does not matter. 0,2 layer height. No modification to the profile.
In general, I am not much fan to making some big modifications to profile, except for temperature of filament. It is good to determine the cause of the problem. But if really over extrusion is the issue, better than change the profile I would go through the extruder calibration procedure. I can share the procedure if you need later, but you should be able to find on forum or inet. I do not think that profile modification is needed for such a simple print. Because then you can modify profile for every print and that is sure not what is expected.
RE: Horizontal lines problems
@treedee
I lowed the extrusion width to 0.42 not 0.4 and the minimum shell thickness top was 0.6 not 0.01mm, I removed the gap fill because in this case it was causing a problem on the corners.
this .3mf was produced in slicer 2.3.0
what version are you using?
The Filament Whisperer
RE: Horizontal lines problems
@treedee
I'm not in agreement with @milos-v statements, I know that if you sit in your chair and push the button slice your prints only using default settings and profiles your not going to get high quality results, and in many cases not even acceptable results. Every print needs to be tuned most filaments need their profiles tailored, the combination of these things will allow you to achieve your best results. it takes time and education to get there, and for sure it is what is expected.
That's my opinion.
Swiss_Cheese
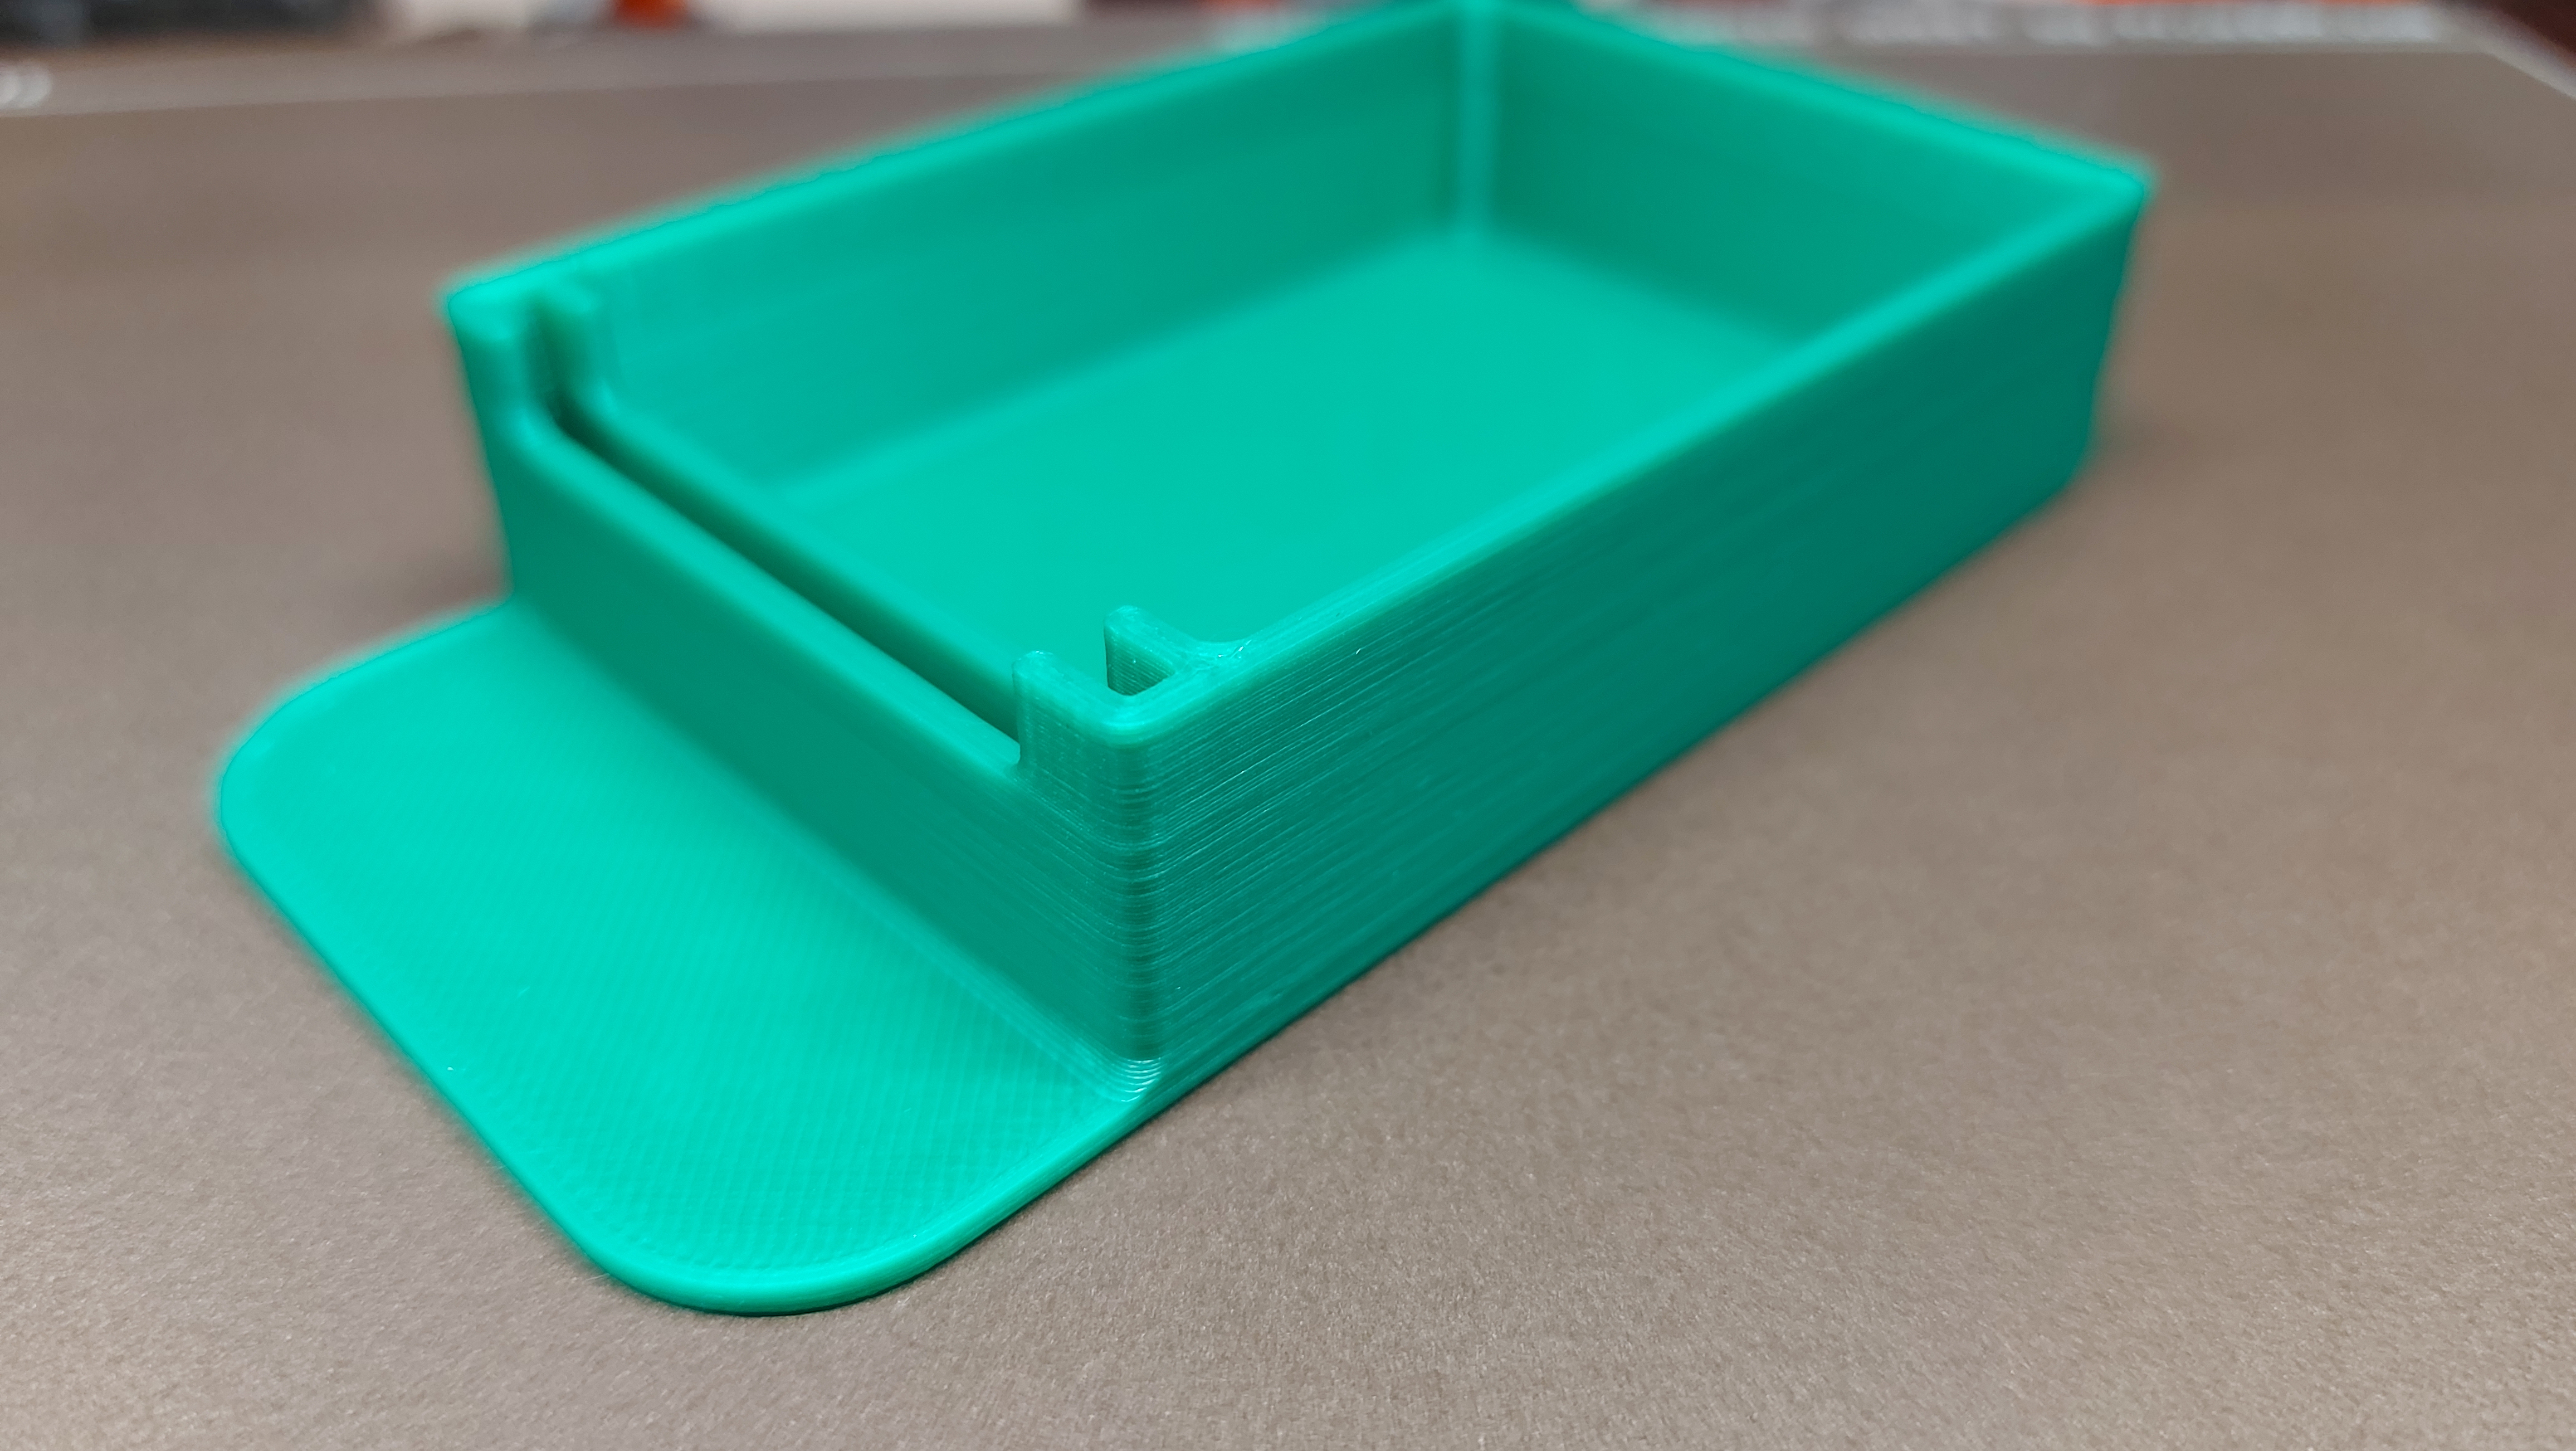
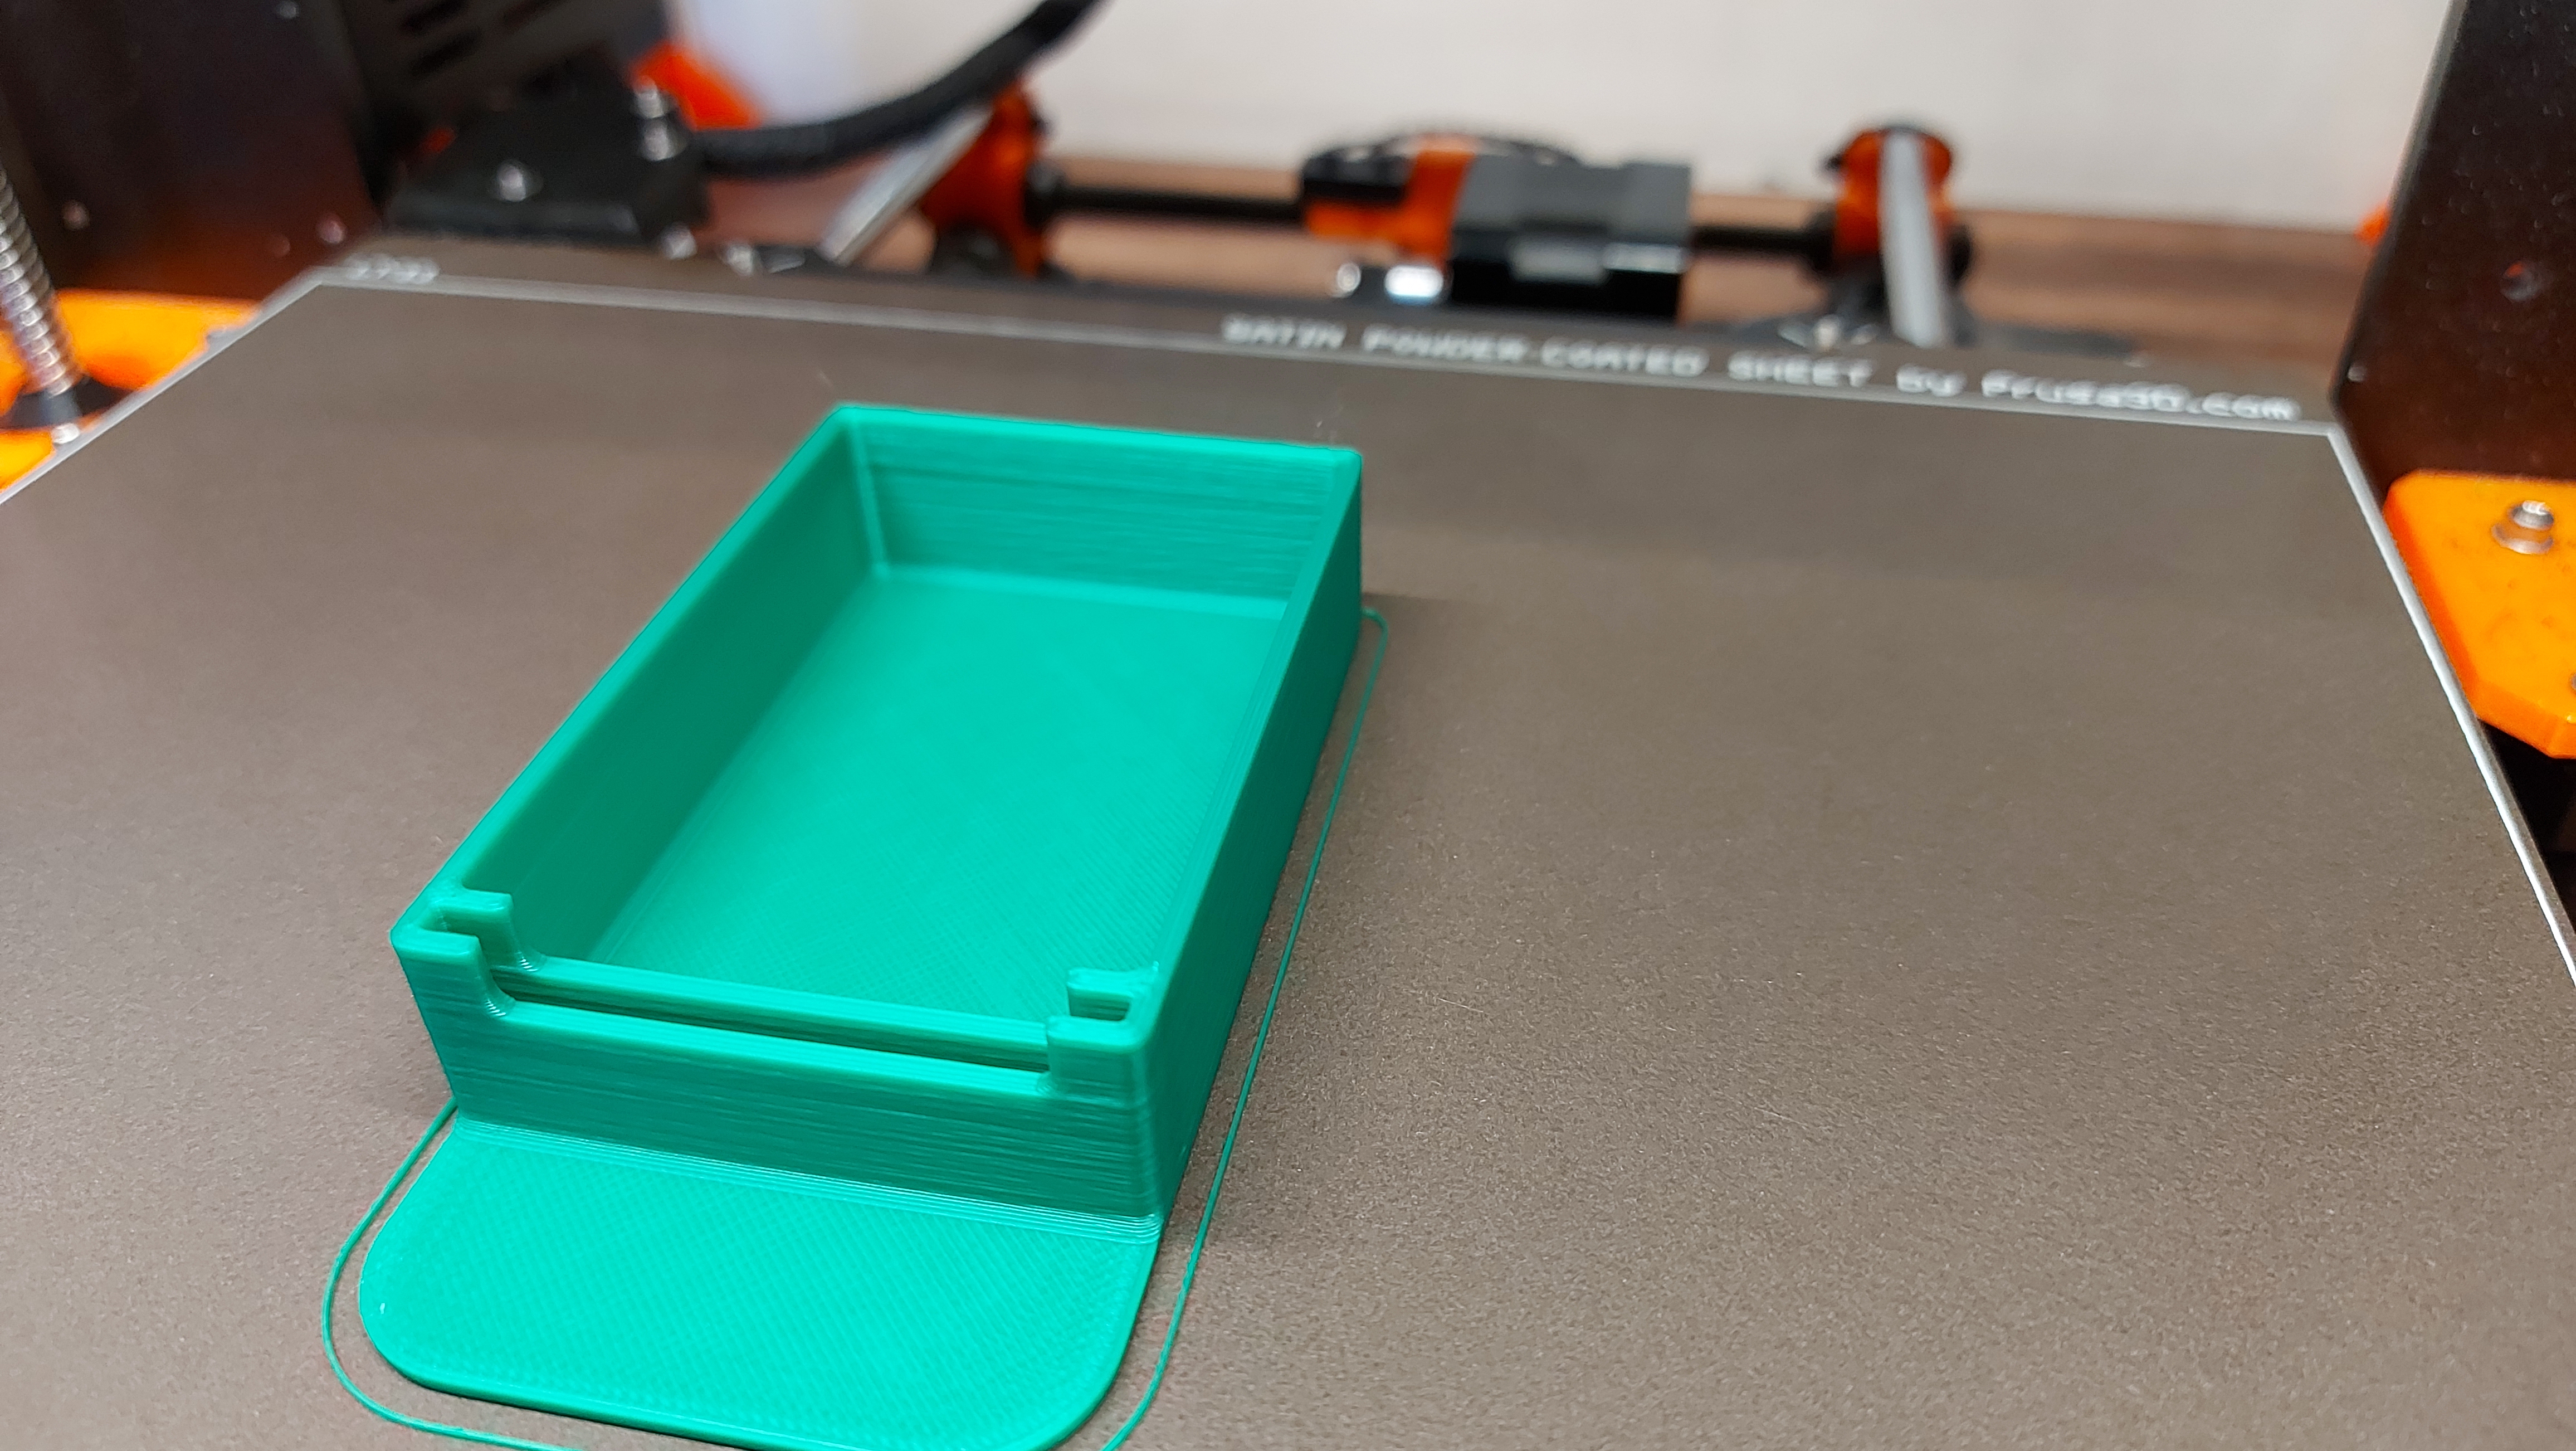
A newer adjusted Profile after printing this in ABS, Overture (white) PLA and Prusa PLA (the stuff that came with the printer)
Parts organizer box v10_SwissV2.3mf
This was produced in PrusaSlicer 2.3.0 hopefully someone can learn someone can learn something from it.
These were my results for Prusa PLA (the stuff that came with the printer) .
I tried to show it inside and out as well as in different light so the detail can be seen, I left them large so they can be zoomed in on.

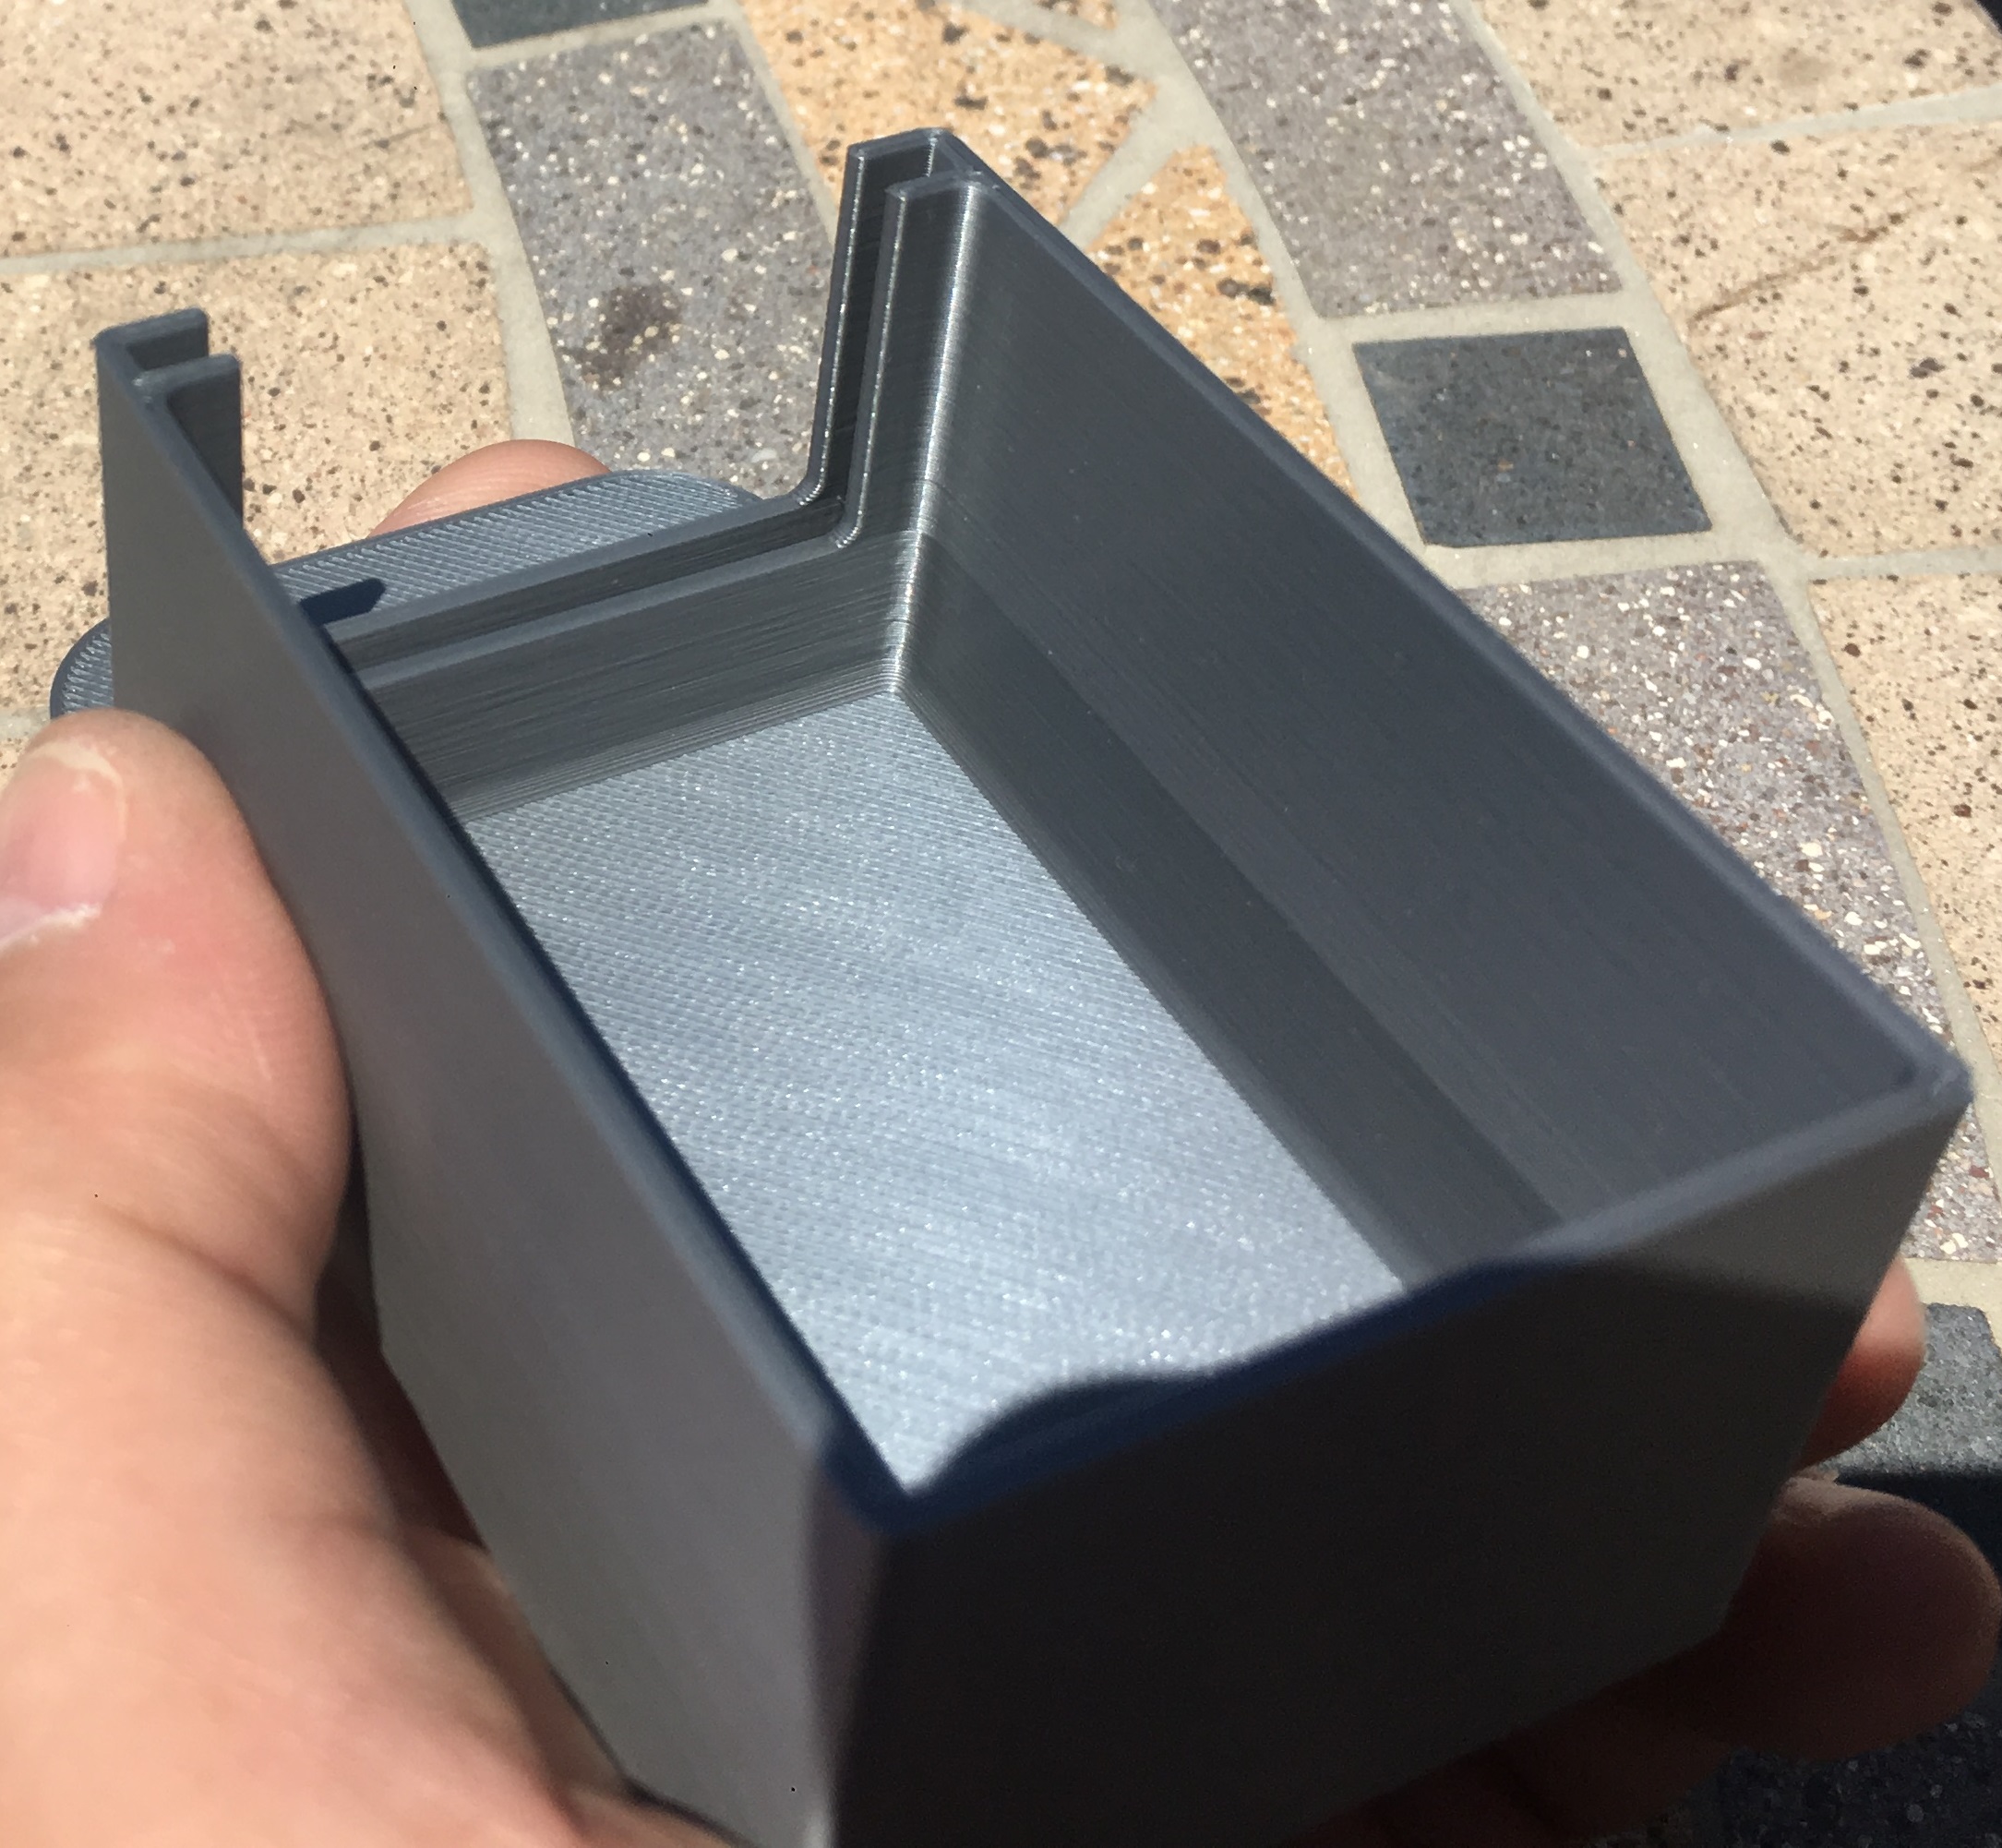
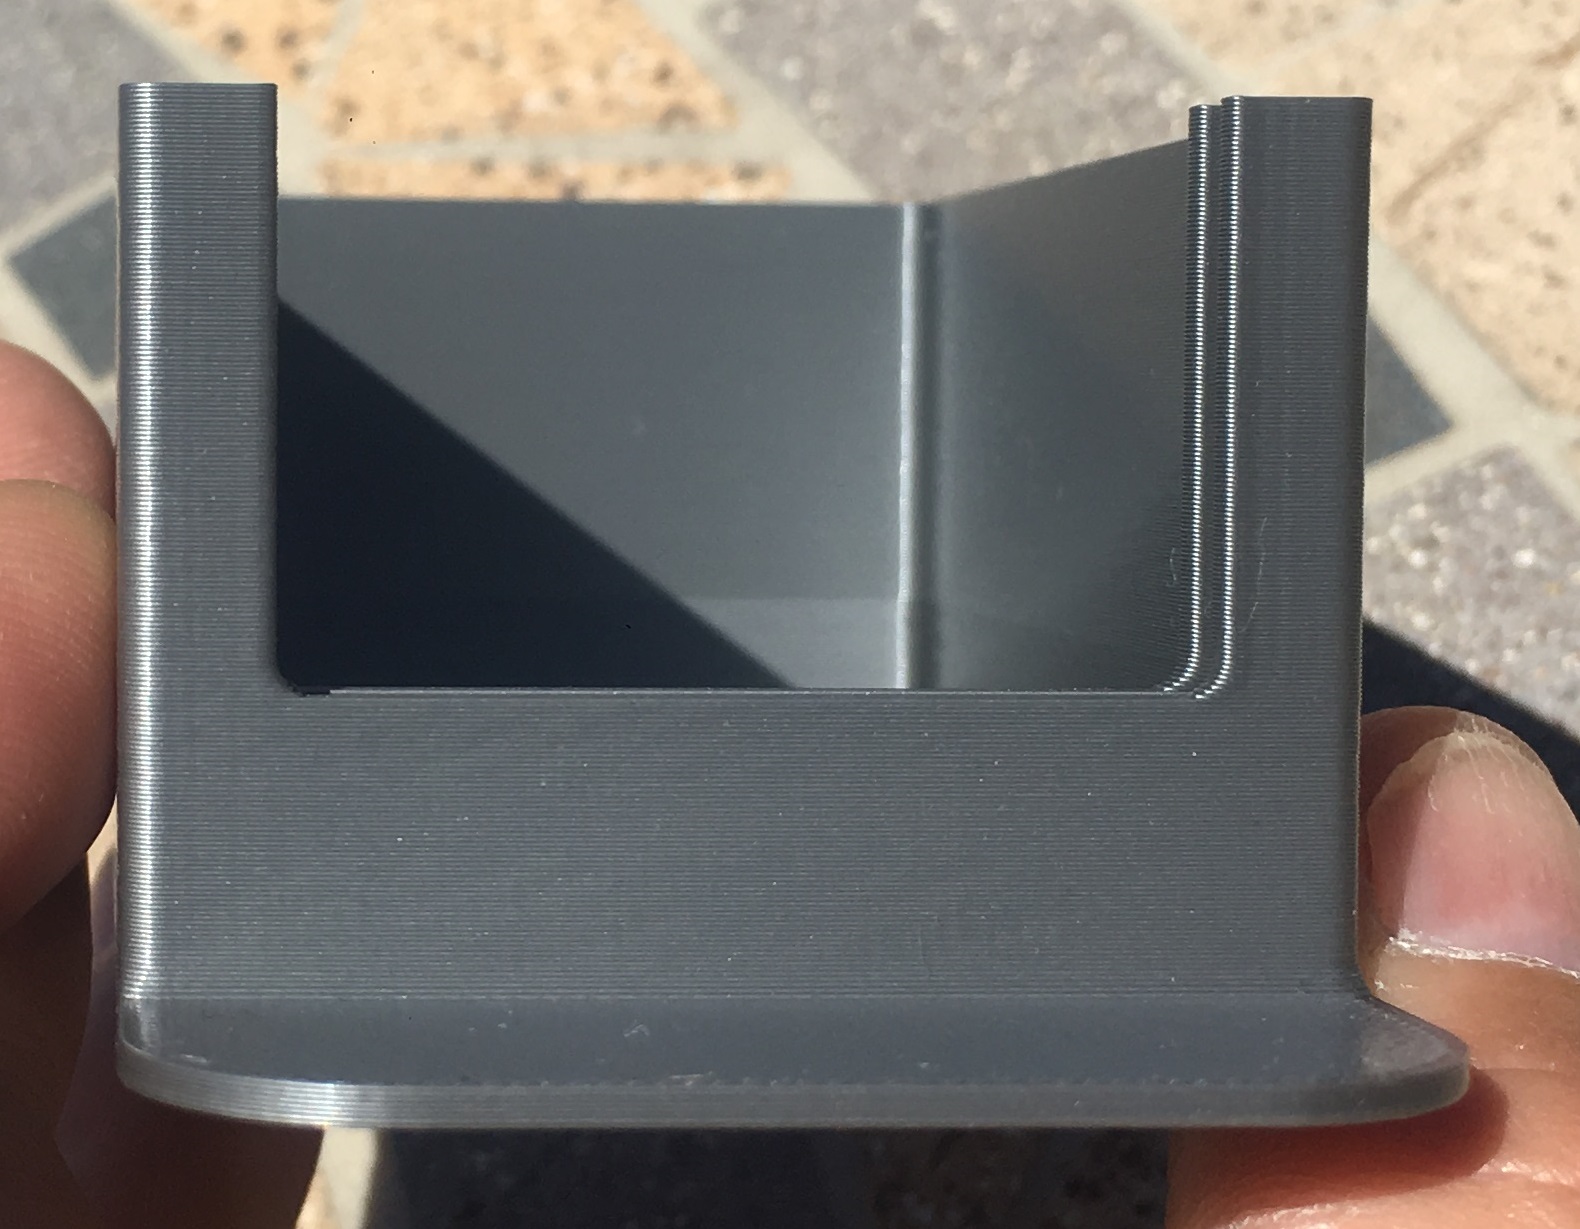

This was produced on a well maintained 4 year old Prusa, guess I only have a year left before it won't print nice anymore.
Good Luck
The Filament Whisperer
RE: Horizontal lines problems
@swiss_cheese
Hey man, it was a BOX printed with PLA from Prusa. Who would change profile because of that? If you will be printing some benchy with PC, I sure agree that you would like to tune it up. But tuning profile for simple prints? That means you have to print everything three times. That is crazy. Load the stl, select profile based on filament, generate gcode, print. That should be the sequence. If it does not work like this, there is most probably a kind of HW issue. You could see that even my print with standard settings was not so bad as treedee's was. So the issue will not be in profile.
But I also see possible problem in overextruding here. I would solve by trying to decrease the filament flow, but directly during the print from menu. No need to change profile to test this. He can make it even in half print, to see the difference. If it helps, perhaps extruder calibration will solve it.
RE: Horizontal lines problems
@swiss_cheese
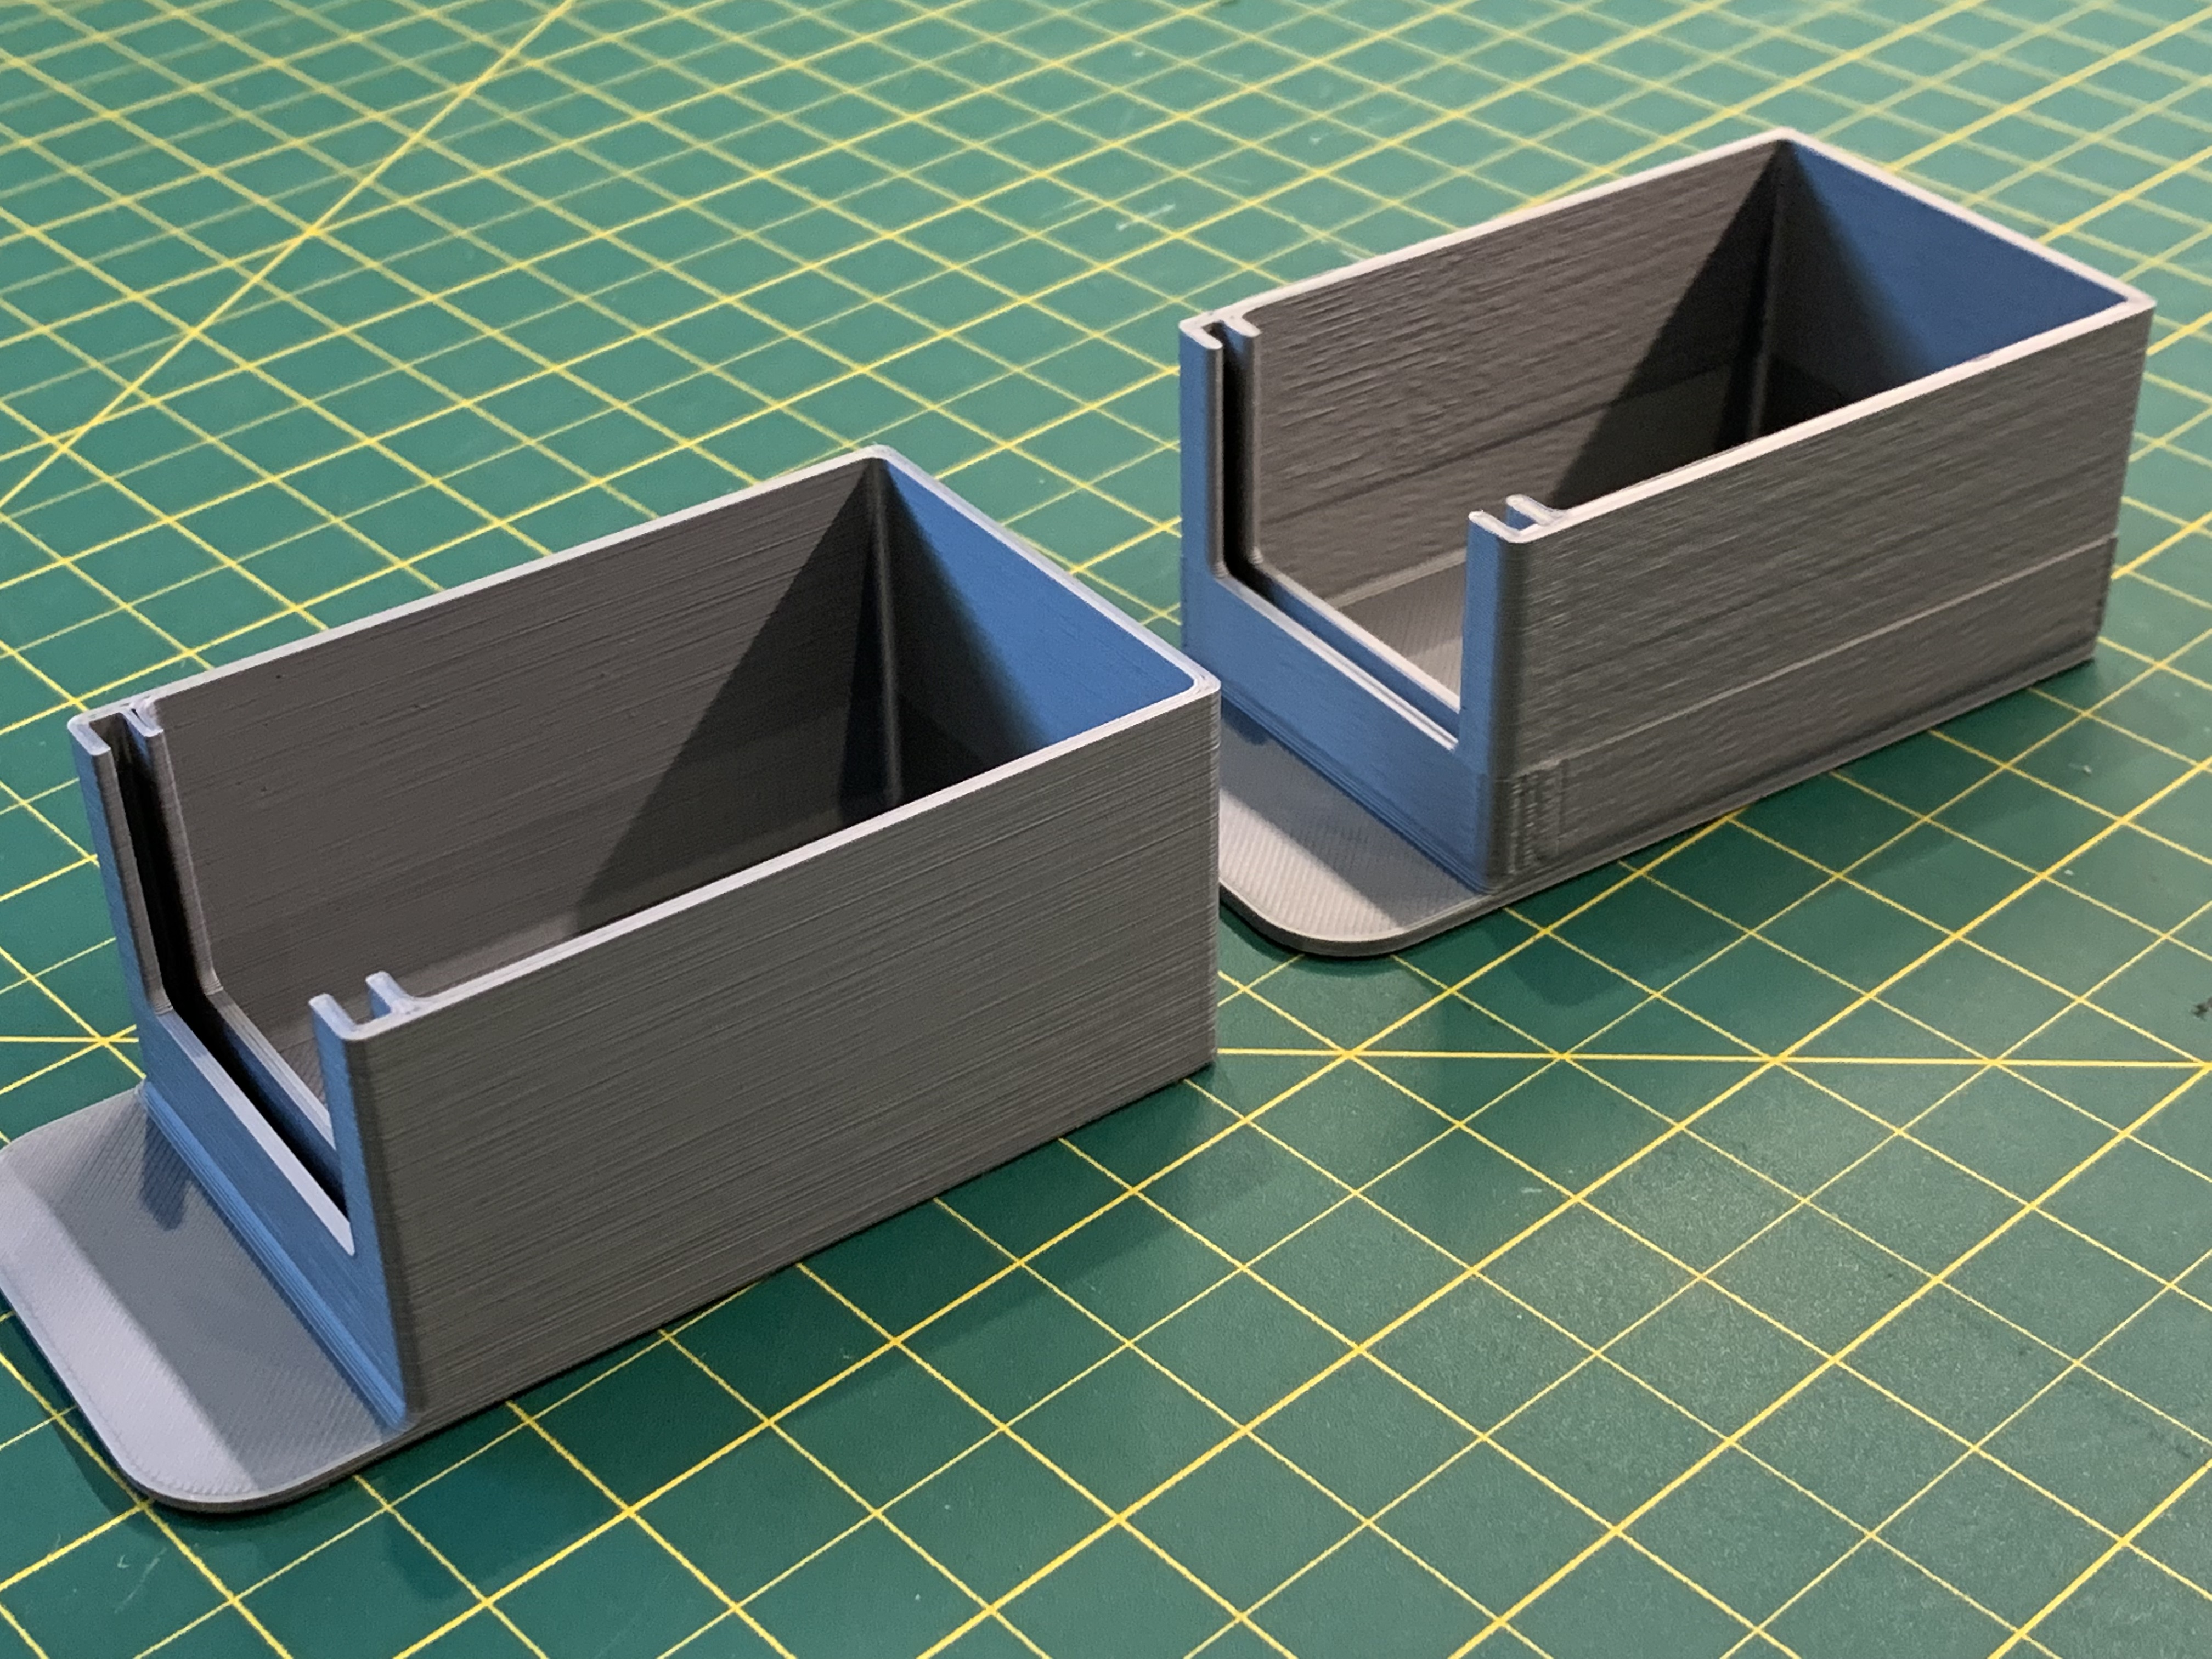
I just finished printing the box using the first profile you sent and the improvement is pretty substantial. I will make another print with the second profile you sent tomorrow for further comparison. You can see the original print on the right side and the one with your first profile on the left side. The walls are very uniform now and the overall quality of the print is superior. Thanks!
RE: Horizontal lines problems
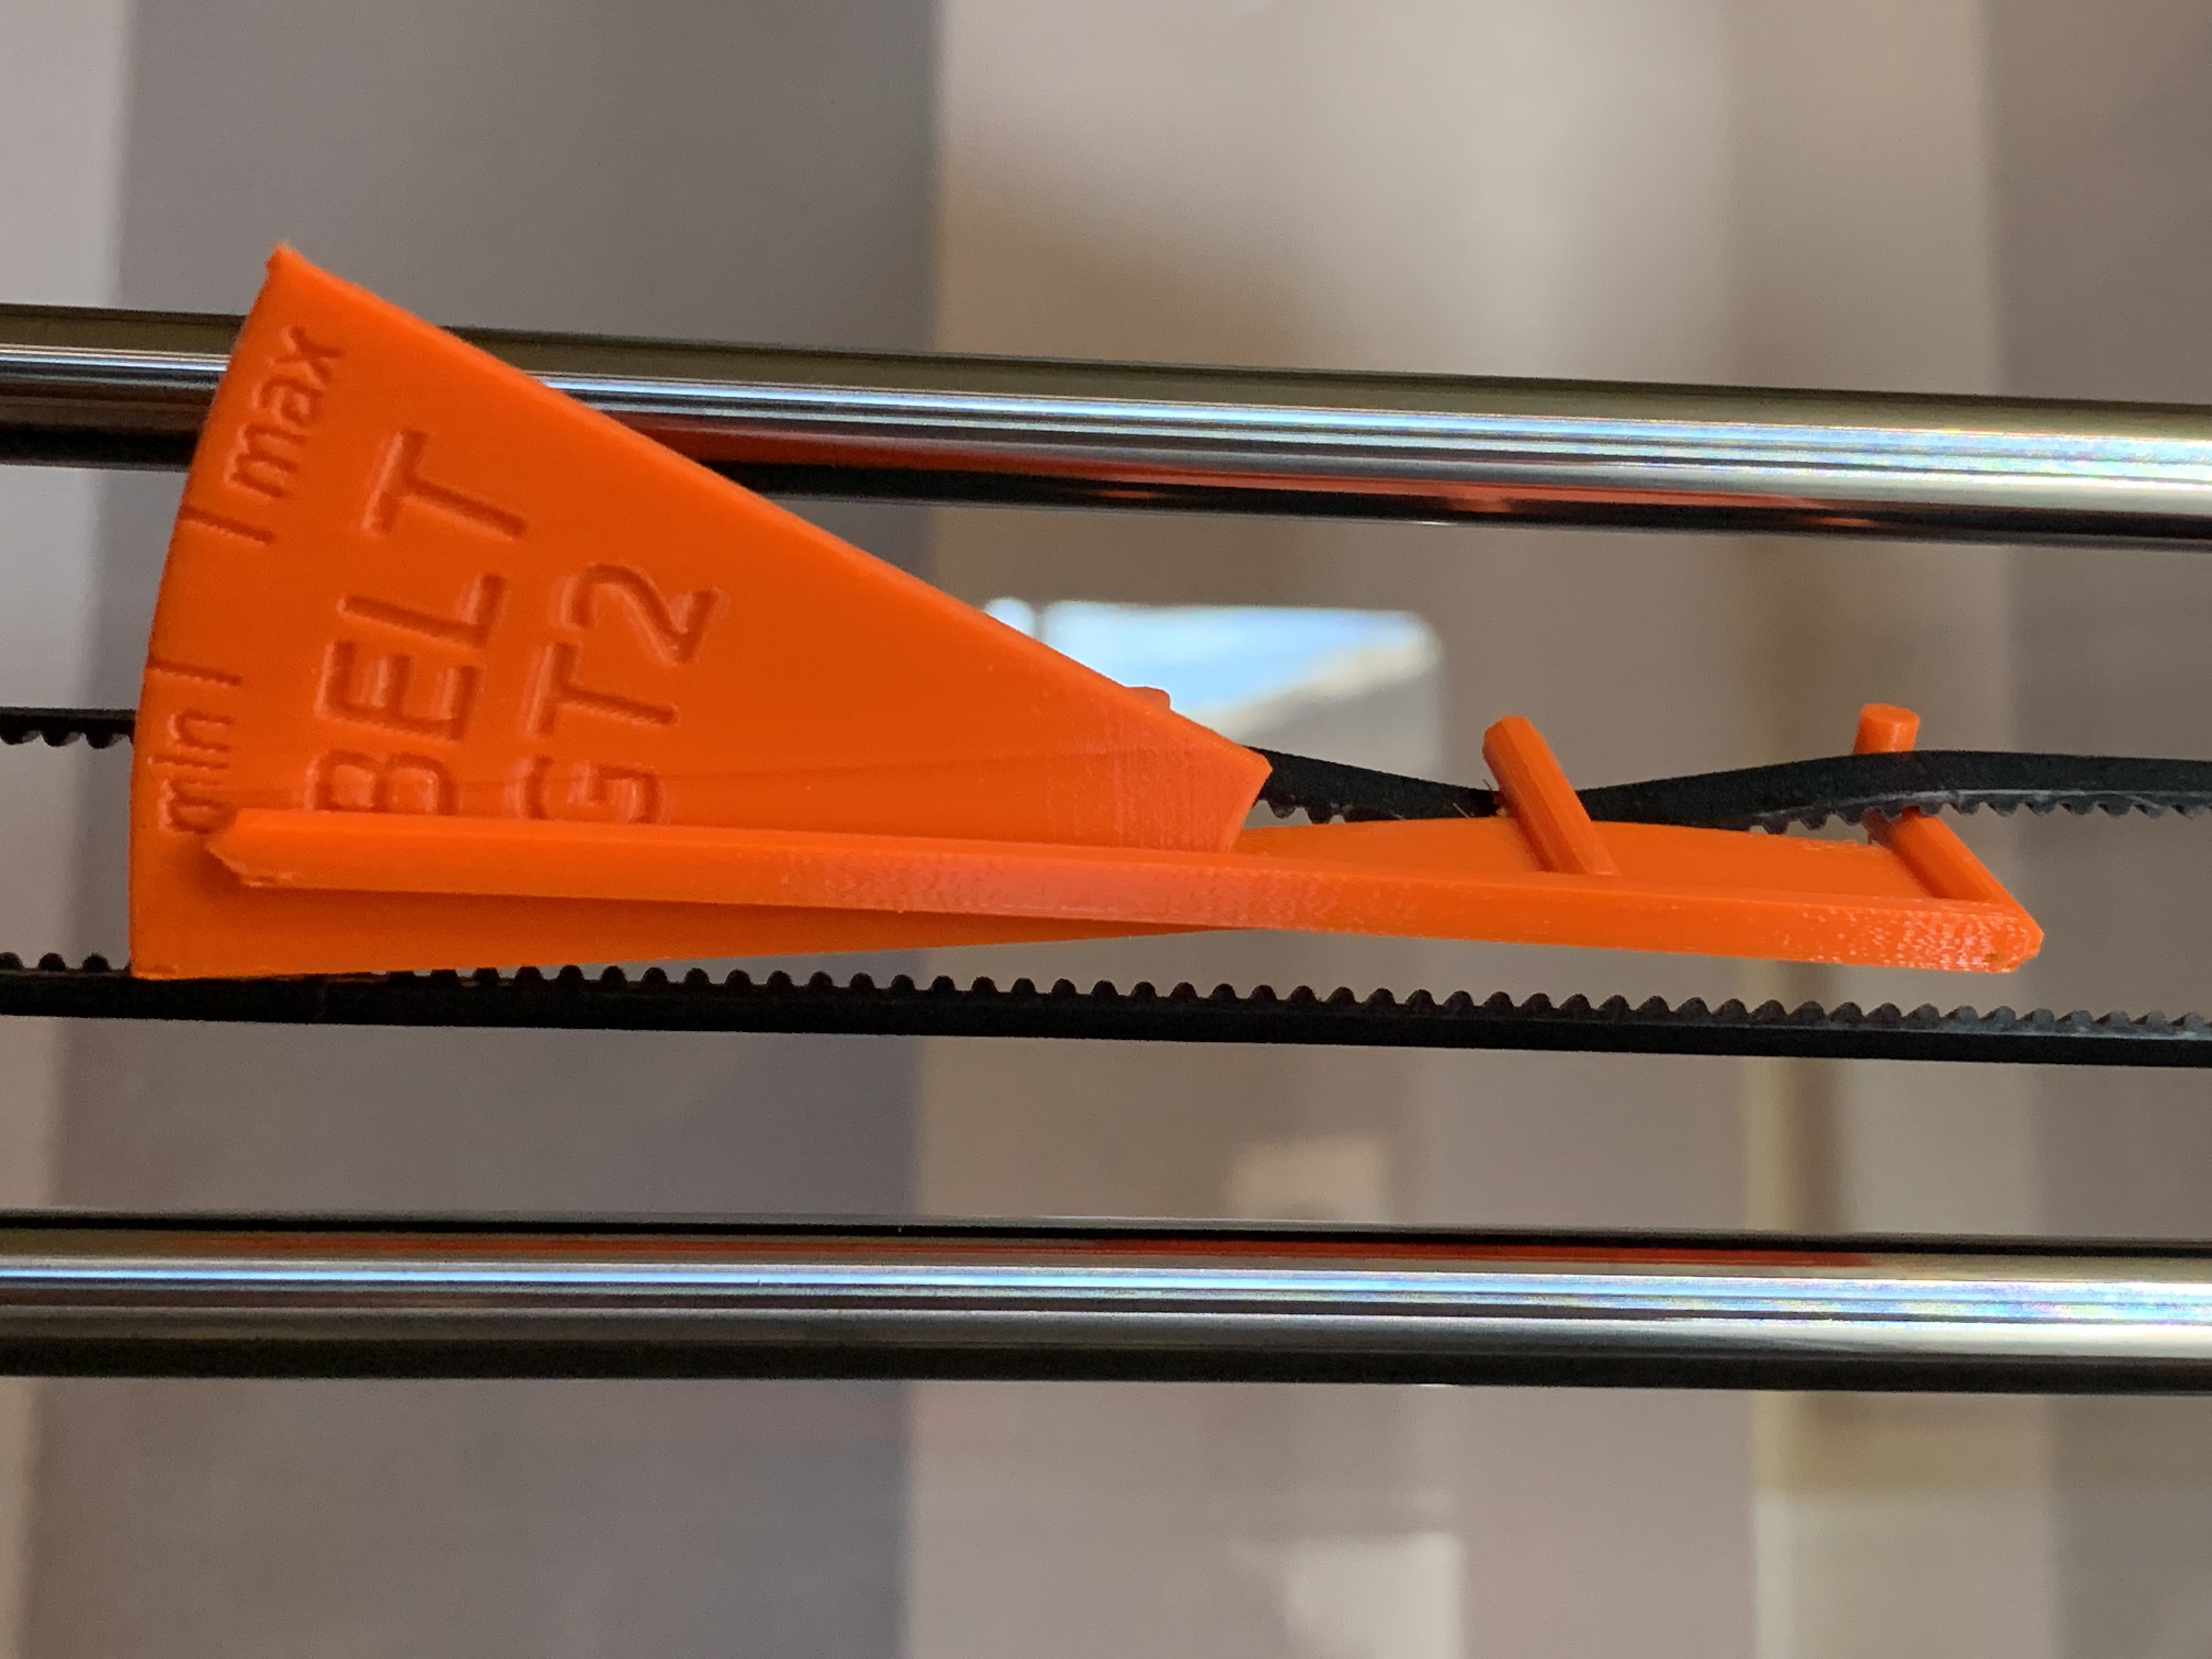
On a related note, I finally received the Prusament PETG and printed the belt tension meters. My belts are WAY too loose so I will definitely need to fix them!
Y belt:
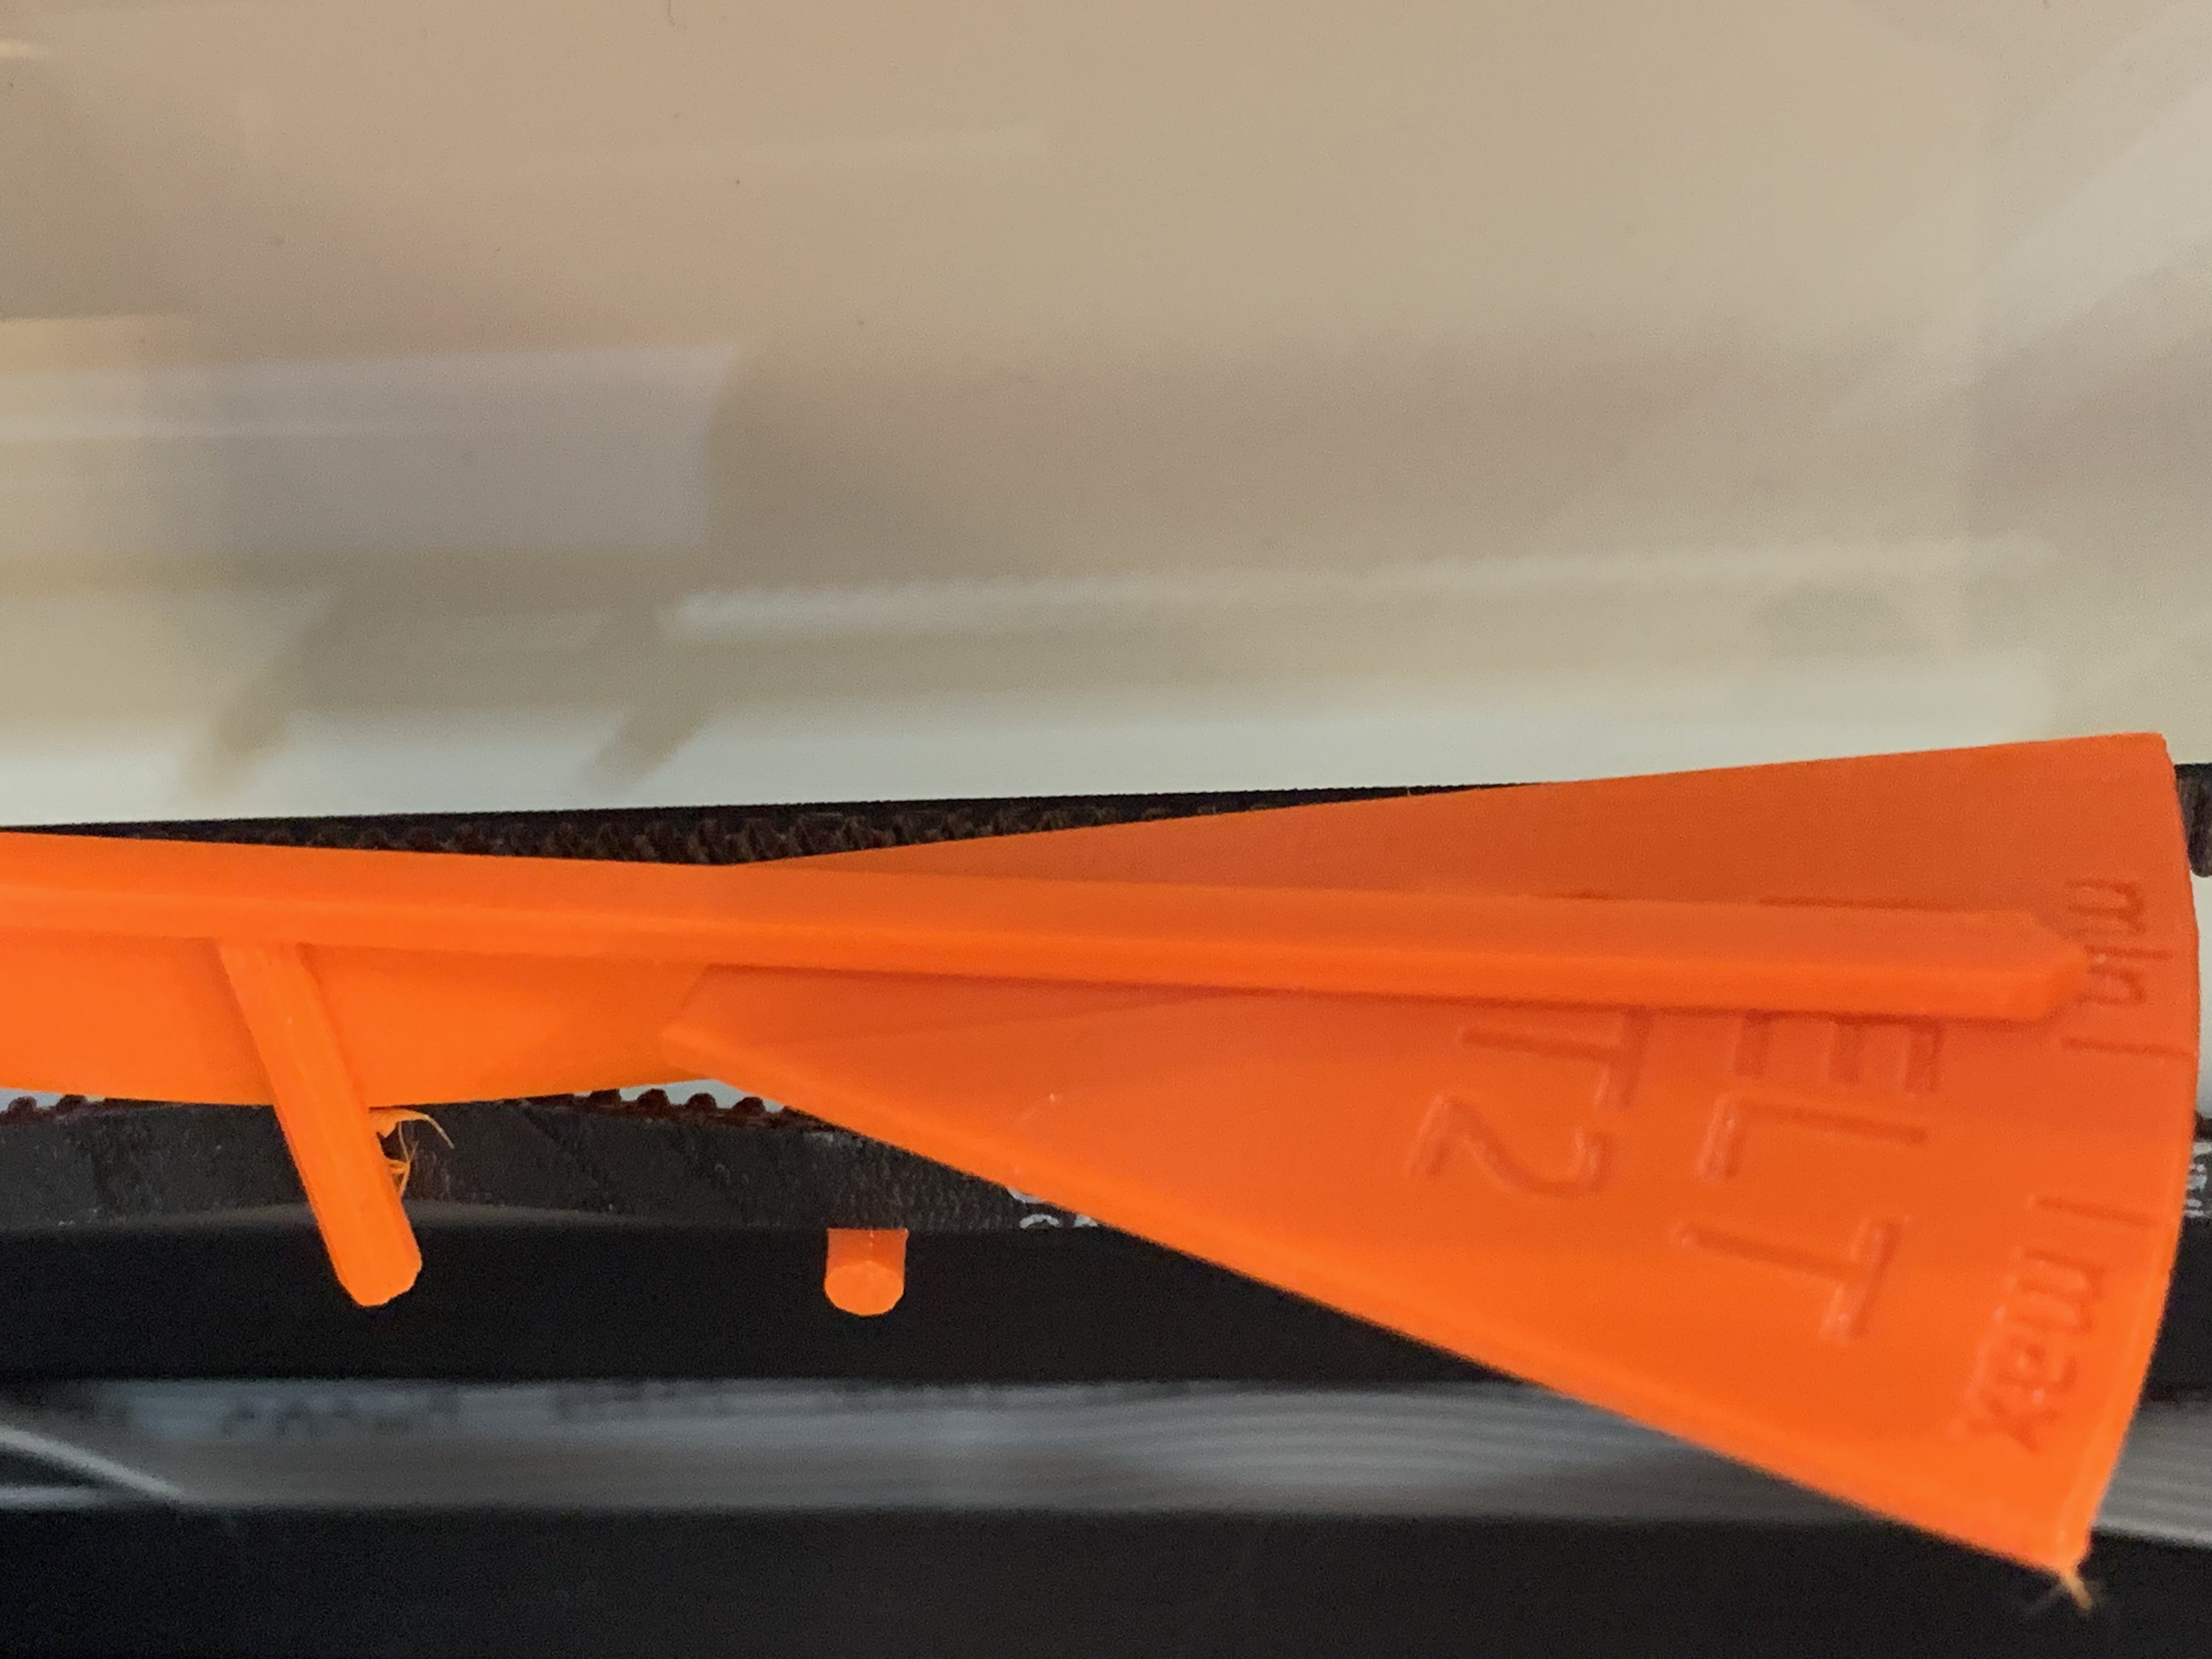
X belt:
RE: Horizontal lines problems
@treedee
Your welcome,
I've actually printed 8 of these now, they have proven to be very useful, and I like the tabs on the front. Are you planning on modeling the housing that holds the drawers? or was this just to replace some lost drawers form a store bought product?
Take care adjusting your belts, they do seem loose based on the images and I agree that the PETG gauge is a better way to adjust them, at this point I don't use either I've just learned what to look for after several years, your prints are looking great even with the loose belts, use your pre-adjusted belt prints ( the box) as a benchmark to look for improvements or changes.
feel free to PM if needed
Good Luck
Swiss_Cheese
The Filament Whisperer
RE: Horizontal lines problems
I’m getting these horizontal lines which wasn’t happening before so something must have moved. How can I solve these?
Glad you got your print looking nice. The fact that you were able to print nicely before and something changed is what I'd focus on. Things should not be changing without good reason. Tightening the belts and checking mechanical issues as @Dan Rogers suggests is important. I'd be curious to see if your original print settings work as well as before after you tighten those belts. My old Mk3 is offline after the 3 month PPE printing sprint finally caught up to it. I've replaced the X belt and bearings, only to find that the X idler bearing seems to be shot. It's not the age of the printer, it's the usage that causes problems. I'm not complaining -- my Mk3 was positively heroic printing 24x7 for days on end -- but they do need regular upkeep to maintain quality. See if a bit of maintenance restores your print quality with your original settings.
In this case, I created the model myself and the walls are indeed a multiple of the nozzle head.
Are you designing parts intended to be printed by others? It's great to find settings that work for a print that work with a specific hardware setup, but you can't count on all your users (customers?) having the identical setup. You either want to design your part to print well on as many printer setups as possible, or you need to provide painfully clear instructions for successful printing.
If you are designing your own parts, you can easily avoid a lot of the thin wall (search for "buldge" for examples) issues. I notice that you've designed your part with 1/16 inch/~1.59mm thick walls. Be aware that PrusaSlicer does not produce walls that are the sum of your perimeters thick. There is a varying amount of overlap for part strength. I've got detailed notes here along with references to the math pages that describe this in detail, but the tl;dr is:
The wall thicknesses PrusaSlicer calculates for walls varies based on extrusion width and layer height.
This matters a lot with freestanding (thin) walls. Never just take some guy on the Internet's advice without verifying for yourself. You can see this in PrusaSlicer for yourself:
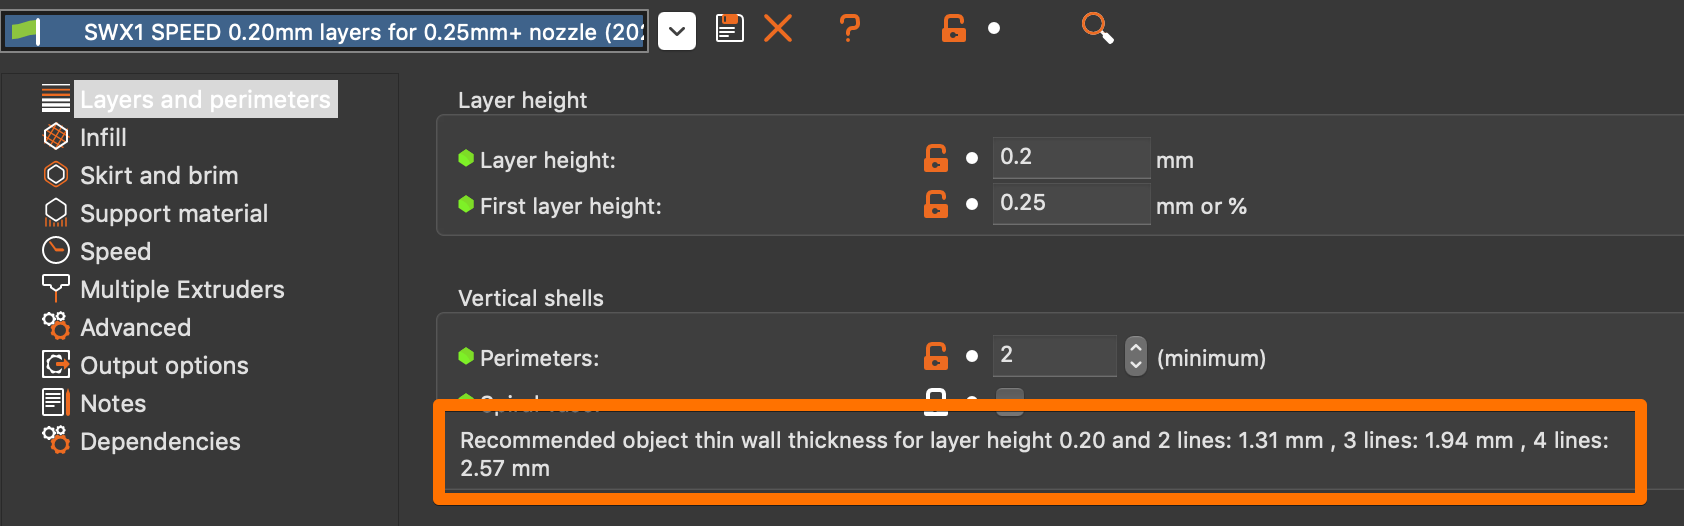
Using a 0.6mm nozzle and 0.2mm layer heights, the recommended thin (freestanding) wall thickness for 2 perimeters is 1.31mm (fine for your 1/6in walls), but if the user selects 3 perimeters, it is 1.94mm (thicker than your 1/16in walls). Now just change the layer height:
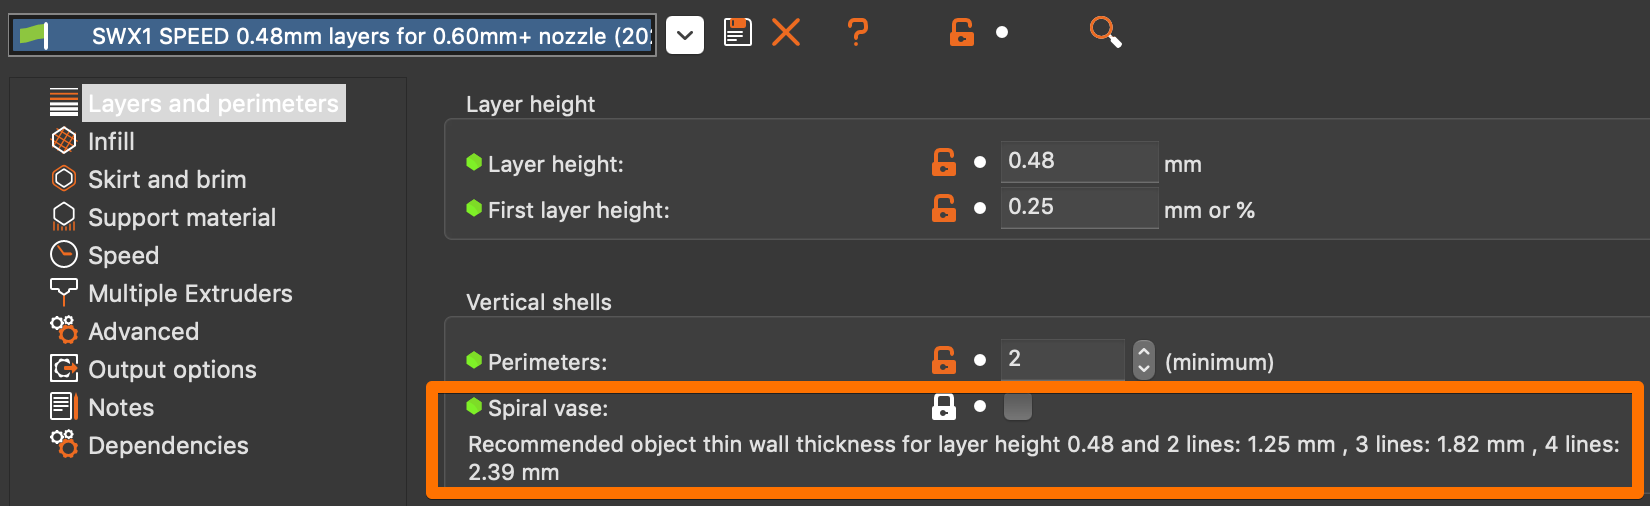
Notice that the recommended wall thickness for 2 perimeters has changed to 1.25mm and 3 to 1.82mm.
Vary from these guidelines and PrusaSlicer attempts to compensate with gap fill and other workarounds as perimeters don't evenly fit. With thin wall detection (shudder) enabled, it can get really ugly. There are several threads here about dealing with thin wall issues (search for "buldge") but the key point I want to make is that as a designer you can largely avoid these and make life easier for your customers (free or paid). As @Milos V correctly pointed out, the design of the part is often a contributor to these sorts of problems. Simply designing with thicker walls can improve results in many cases, assuming you don't have hardware issues.
Now if you're just doing a one-off design and not sharing the print with others, this may not be a big deal. No need to worry about it if you've found settings that work. But consider the eccentricities of your customers if you are producing for others...
Looking at your part, using the Prusa 0.2mm SPEED settings, it will take an estimated 1h56m to print. This appears to be a functional part, so my inclination would be to print with a 0.6mm nozzle with 1mm extrusions, 0.48mm layer heights. This reduces print time to 44m. I personally like the "3d printed" aesthetic, so like the resulting appearance, so this result "looks good" to me.
I may be using different filaments, different nozzle sizes, and different slicers. Each of these introduces slight changes to the results. As a designer, you can reduce support problems, complaints, and returns/refunds by "problem proofing" your designs. Fortunately, you're using Fusion 360, so these are easy to incorporate.
Just some thoughts based on teaching myself 3D modeling with Fusion 360. Good luck with your prints!
RE: Horizontal lines problems
When modeling for FFF/FDM printing we do need to take into account the limitations of our hardware, however I don't think we should allow the default settings of our hardware to dictate our model designs. Many hardware configurations have A range of functional adaption that can be applied, allowing us to make the model we desire and adjust the ranges of features (based off) of and adjusting the defaults to the available hardware\software. To this point it becomes a matter of education, we must not only understand the technologies limitations we must also understand the different ways we can manipulate it, we can design parts for uneducated users and suffer the defaults or we can educate, as you mentioned.
In 30 years of designing I have never designed my printable parts for the uneducated, it has always been expected that people using the tech should educate themselves, and that the design is what the design is so that it suits its purpose. We had to teach them how to use the Stratasys and formlabs printers also.
Using this case as an example, It is assumed the designer wanted the walls to be (nominally) 1.6mm, (a fine design choice IMO) and was printing with a default hardware configuration with a 0.4 nozzle.
We can just say to the user, "The design is at fault, it doesn't match the printing defaults or allow for the limitations of the Hardware", you need to redesign.
In some cases this may be true, in this case the design is sound, and a (little) education was needed, I don't know that I would have gone into information overload about it. That said I always appreciate it personally, but I try not to pile the information on to heavy until I see where a user is at in their education (to much can be confusing). I am guilty of mansplaining sometimes 😉
I see here many times users giving advice that is not sound,
"That is crazy. Load the stl, select profile based on filament, generate gcode, print. That should be the sequence. If it does not work like this, there is most probably a kind of HW issue."
And the ever present,
"your walls are not thick enough"
These statements imply to users that have not yet learned how to use the settings and options that they have at their disposal, that there is no other way, and this simply isn't true. (there is a lot of the blind leading the blind here)
You learn as you move forward to recognize the issue and you learn what options you have for adjustment, both in design and in the medium (your printer and software) in this case.
I’m getting these horizontal lines which wasn’t happening before so something must have moved. How can I solve these?
My take on this was that you had not experienced this with other models, and that perhaps this was your first "thin wall" experience and you didn't understand why this was occurring.
apologies if I guessed wrong, I am happy that things are working out now, as I mentioned before feel free PM me if you have any questions.
Regards,
Swiss_Cheese
Just another guy on the Internet
The Filament Whisperer
RE: Horizontal lines problems
[...] When modeling for FFF/FDM printing we do need to take into account the limitations of our hardware, however I don't think we should allow the default settings of our hardware to dictate our model designs. Many hardware configurations have A range of functional adaption that can be applied, allowing us to make the model we desire and adjust the ranges of features (based off) of and adjusting the defaults to the available hardware\software.
I agree that we shouldn't limit users to defaults, but I also agree that our personal preferences shouldn't dictate what the user wants to use. Or if we're going to do so, we need to be very explicit as to what those assumptions are. As an example, we often see problems the "3d printable" RC airplane designs that are (or at least were initially) provided with little or no instruction.
[...] In 30 years of designing I have never designed my printable parts for the uneducated, it has always been expected that people using the tech should educate themselves, and that the design is what the design is so that it suits its purpose. We had to teach them how to use the Stratasys and formlabs printers also.
Based on your mention of Stratasys, I'm going to assume these weren't small volume paying customers! I'm all for spending time with individuals -- do it myself -- and with sharing information -- also do that myself -- but my point is that if I'm designing a part for release to a small number of individuals (e.g., Thingiverse), particularly for free, I do not want to obligate myself to volunteering time and effort into providing support when a simple design tweak can avoid common issues. Taking into consideration the different printing preferences can save headaches. I don't see wall thickness as any more complicated a design problem than adding in a bit of sacrificial support to aid printing.
Using this case as an example, It is assumed the designer wanted the walls to be (nominally) 1.6mm, (a fine design choice IMO) and was printing with a default hardware configuration with a 0.4 nozzle.
Nothing is "wrong" with 1/16in, but converting between metric and imperial can lead to all sorts of fun. I haven't assumed anything, but it is worth asking the designer -- he is here after all -- if he is aware that using thinner walls is a common source of problems. A lot of new designers use fillets on undersides without fully understanding what a pain they can be, but are usually just as happy to use a chamfer once it's pointed out. The slicer is going to try to work with 1.59mm and the adjustments we're talking about are all sub-millimeter. Realizing that a lot of users WILL be using defaults and adding some extra thickness can save everyone headaches.
We can just say to the user, "The design is at fault, it doesn't match the printing defaults or allow for the limitations of the Hardware", you need to redesign.
Do you mean the designer as the user or the customer (paid or free) of the STL as the user? As I wrote before, if this is a one-off personal-only project, it doesn't matter. However, a lot of people doing their own designs are (hopefully) interested in producing good models for 3D printing by a wide audience of varying skill levels. Mind you, there is a lot of crap on Thingiverse and other sites, but I sure don't want mine to be in that category. Being aware of practical issues users face when printing a design is just as worthwhile as being aware of slicer settings. I don't see a distinction myself.
[...] In some cases this may be true, in this case the design is sound, and a (little) education was needed, I don't know that I would have gone into information overload about it. That said I always appreciate it personally, but I try not to pile the information on to heavy until I see where a user is at in their education (to much can be confusing). I am guilty of mansplaining sometimes 😉
I've dedicated pages of notes to over-explaining, and I do try to be brief here (and fail often at it). I don't think doing so with design considerations is any worse than for slicer settings.
"That is crazy. Load the stl, select profile based on filament, generate gcode, print. That should be the sequence. If it does not work like this, there is most probably a kind of HW issue."
And the ever present,
"your walls are not thick enough"
Again, I'll point to the notorious RC plane STLs as an example of where "your walls arent' thick enough" (or more correctly, "the design you paid good money for is barely 3D printable") as an example of when that response is perfectly reasonable. We see all sorts of problems when people try to print poor designs downloaded of Thingiverse and other sites. Sure, it can be fun to figure out how to print a challenging print. Angus on Maker's Muse has made a living out of it. But there are a LOT of users here who would just like to get good quality prints consistently, without spending a lot of time on it. If I can design a part with a slightly thicker wall to make it easier on the user, I'm certainly going to. If someone indicates a print that succeeded before is now displaying quality problems, I'm sure as hell going to suggest checking out the hardware and filament before twiddling the slicer settings that worked previously!
These statements imply to users that have not yet learned how to use the settings and options that they have at their disposal, that there is no other way, and this simply isn't true. (there is a lot of the blind leading the blind here)
I'm not sure what exactly you mean here, but I'm not so obtuse as to miss hints. Providing guidance is good, both for slicer settings and design settings. I'm just an amateur designer and wish I'd been given a few hints starting out with Fusion 360. Providing guidance for users to print difficult STLs is a good thing -- again, have done so many times -- as is providing guidance for users designing parts to avoid many common printing challenges.
You learn as you move forward to recognize the issue and you learn what options you have for adjustment, both in design and in the medium (your printer and software) in this case.
That applies equally to design as well as slicing. I'm not sure what you mean here.
RE: Horizontal lines problems
Sorry for the delay, I was out on holidays.
I've actually printed 8 of these now, they have proven to be very useful, and I like the tabs on the front. Are you planning on modeling the housing that holds the drawers? or was this just to replace some lost drawers form a store bought product?
@swiss_cheese I looked around for the best way to have a massive amount of drawers (about 100), the variables being cost, time to make (or delivery if bought), and usability. My research ended up with me designing them and printing them being the best option considering these variables and what was available to me at the time. I'm building two big sets of wall mounted cabinets; one for my wood shop (to hold hardware mostly), and another one for my hobby electronics space (to hold small electronic parts and other assorted tools). I'm planning to build the cabinets out of wood and route built in channels so that I can run an LED strip on the inside roof of each row and illuminate the contents of each drawer. That's why they have a space to insert in an acrylic front. I'm glad you found them useful! I may eventually post them to Thingiverse.
Are you designing parts intended to be printed by others?
@bobstro No, this is just for my own use. I'm not planning to have 3D printing become a commercial endeavour anywhere in the future.
Thank you for all the information you posted. I was not aware of the nuances you mentioned and I learned a lot. I must say that I'm much more comfortable with CNC routing where I can confidently tweak gcode manually and expect great results. I'm nowhere near as comfortable with 3D printing.
My take on this was that you had not experienced this with other models, and that perhaps this was your first "thin wall" experience and you didn't understand why this was occurring.
@swiss_cheese You're assumption was 100% correct!
Here's a little update. I was Googling around when I realized that there is an upgrade to the i3 mk3s (the i3mk3s+). So I bought the upgrade, printed the PETG parts using the Prusa PETG filament and Prusa's provided gcode (they printed perfectly). As I was disassembling the extruder I found that the whole bottom part was absolutely flooded with PLA, as in, I removed every screw and nut and the thing was all stuck together. In order to be able to remove the hotend I had to go at it with a soldering iron for about an hour. I couldn't really remove the PLA from the heatsink so I bought a brand new one and the two printed parts for the extruder back. I'm in the process of putting things together and when I'm done, my extruder will be completely new. I'm only reusing the screws and the metal ball as everything else is different. Armed with the extra knowledge I gained I expect I will be able to tune the printer a bit better this time around. Out of curiosity I'll print a new box and will post the result here. I'm not sure when I'll be able to finish this (couple weeks?) but stay tuned.
And most of all, a big thank you for all those who provided guidance in this thread!