Help before I send this thing back.
For 800 bucks, I would expect this to not have to have so much hacking to make it work. I have been very disappointed with this product "after" assembly.
This things has some unreasonable vibrations in the bed from what I suspect poor quality fitting bearings. The U clamps are tight, I double checked. Moving at 80mm/s results in one of the loudest printers I have ever owned. Absolutely unacceptable. I was told this thing is silent. Mine is crazy loud "in stealth mode". I am pretty sure I have gone back thru everything on the build instructions and have not misses anything, but maybe someone here had similar issues and there is a simple easy solution.
Second, for the life of me I cannot get anything to stick to the textured bed (the only one I have).
I am a bit disappointed they do not list the Z height the First Layer Height is supposed to be performed at. Using a visual while its printing is epic fail as you cannot see anything really until its done. And since its done, it would be a whole lot easier to measure the first layer and adjust to what it should be.....which is what I did. I did the bed adjust and tweaked the for corners so my first layer was with .0005" of each other and then ran a test print with a first layer of .2mm and measured that and tweaked the Z adjust to fall in line. My Z offset is spot on! For what ever reason, I cannot get anythng to stick.
Does textured surface need more squish? If I program a .2mm layer, does it really need to be smaller to adhere?
Currently its just peels up and forces me to abort.
Please, I really wanted to like this printer based on a coworkers experience, and i have see prints off it and they do look very nice, but my printer is not giving me similar results.
Any help would be appreciated. I have already contacted Prusa, but I am posting here too in hopes I get a faster answer.
RE: Help before I send this thing back.
Spend some time with Prusa live chat. Log into the online store and contact them there. Your experience is not typical and you likely have some problems that can be easily fixed. Don't give up so quickly and you'll be rewarded.
RE: Help before I send this thing back.
Use petg filament on the textured sheet , this sticks better, then you can learn easier to get a good first layer.
And mk3 printer is silent and works very good.
And spend time in the forum to learn about the mk3, and what works and what does not work.
RE: Help before I send this thing back.
Hello.
The PEI is best for PLA, textured good for PETG and cleaning is important.
The U clamps not too tight as it say on the notice and the orientation of the balls is important too. Where is posed the imp3D ? a noisy thing ?
And how long for assembly ? take your time, it is not a marathon ...
So, keep hope.
RE: Help before I send this thing back.
It is a kit, the user assembly manual has instructions, and key steps are pretty clearly marked to avoid problems. But it isn't uncommon for people to try to build the printer in a few hours as if it is a race, and not take the time to read the instructions carefully. It is a kit. So if you make a mistake in assembling, it is not Prusa's fault.
U-clamps too tight - per the manual - is not a proper build. And too tight can make the printer noisy, or worse, stop it from working at all.
That said, my printer makes noises of about 50dbA at one meter in Stealth, 60dBA in Normal. I can print and watch TV without being disturbed by the printer about 12 feet away. My refrigerator makes about the same level of noise. My in-sink garbage disposal is much louder.
As for Z-height or Live-Z as it is called in the firmware, they don't say because it depends on how you assembled the printer. It can change because of many factors. But the range is 0.000 to -2.000 mm. Most see numbers between -0.500 and -1.200. If you start with any large negative number, you WILL scratch the print surface. So start less negative, and work your way down to a proper thickness.
As for how thick should layer one be? It is always 0.200 mm. One a smooth bed, this is pretty easy to achieve. On a textured bed, not so much. Plus, the Prusa textured sheet is well known for having print problems with PLA. Most hate it for that reason alone. Support CHAT is best for getting that resolved. If PLA is what you plan on using, order or exchange it for a Smooth PEI sheet and save yourself a mountain of headaches, and buy a textured sheet from someone else: not Prusa's.
Oh - one other thing, if you over tighten the belts, you can make the Prusa sing - stepper motors love harmonics. When X and Y are both singing, the harmonies can get quite loud. Too tight also damages motor bearings.
RE: Help before I send this thing back.
@tim-m30
I contacted prusa and showed them a video of the noise mine was making. They agree something is clearly wrong. After speaking with them, they are sending me out new bearings and rods for my Y Axis. The printer says the belts are fine, but I read in the booklet the numbers go up and down depending on how tight the belt is, I think I may loosen them to the point where the numbers is just inside the range prusa suggests they be at, perhaps looser belts might help dampen some of the sounds.
My stealthmode currently is far far FAAAAAR louder than my normal mode. So yeah I have something wrong. Most all the noise is coming from Y Axis. The bearing U Clamps were tightened just like the book says....screw in till they touch and 90Deg more. So I am not to tight on that part. The orientation too was followed per the inspections.
When I get the new rods and bearings and install them, I am hoping this resolves the issue.
RE: Help before I send this thing back.
@tool_aenima1
Good to hear Prusa is helping out.
-
In my opinion Prusa has two major foo-pahs in their instructions: they claim the bearings do not need to be cleaned and greased. Every bearing manufacturer - unless the bearings are sold pre-lubricated with appropriate G2 Lithium grease - recommend bearing be cleaned and greased.
Be sure to add grease to the bearings BEFORE installing them. Prusa ships bearing in the same ultra-light preserving oil they come with from the factory. That oil is not suitable for operation.
-
Second gripe is the belt tension mythology they promote. For the belt tension - honestly - just ignore whatever the printer is telling you about belt tension. Those numbers indicate the amount of friction the motors must overcome to move the axis. If you tightened the belts to get the numbers Prusa claims, your belts are much too tight.
Gates specifies these 6mm belts from 2 lbf to 25 lbf. In our Mk3 printers, the belts need to be tensioned to somewhere between 2 lbf and 8 lbf - any more than that will damage the motor bearings. I keep my belts around 6 lbf.
With the bed to the back, and extruder far left, apply 200 grams of force to the lower belt in each pair, the lower belt should deflect about 6 mm on X, 5 mm on Y.
For a data point, my belts are properly tensioned and my belt numbers as reported by the firmware are each over 300.
-
The U-bolts on my printer, when I followed the book - were too tight and binding. So I now tighten the nuts evenly until the bearings no longer wiggle. It wouldn't hurt to loosen the nuts a bit to see if it helps. On Mk3S printers, the extruder case can also crimp the bearings if the screws near them are too tight. So some folk need to loosen those screws a half turn to free up X.
-
While waiting for new bearings, try the above, you might find something that will help.
RE: Help before I send this thing back.
@tim-m30
With the bed to the back, and extruder far left, apply 200 grams of force to the lower belt in each pair, the lower belt should deflect about 6 mm on X, 5 mm on Y.
Wow finally someone that has some good technical information i can work with.
The U-bolts on my printer, when I followed the book - were too tight and binding. So I now tighten the nuts evenly until the bearings no longer wiggle. It wouldn't hurt to loosen the nuts a bit to see if it helps. On Mk3S printers, the extruder case can also crimp the bearings if the screws near them are too tight. So some folk need to loosen those screws a half turn to free up X.
I just noticed this today on my X and had to back the screws out pretty much completely before the X totally freed up. I ran a benchy before and am running one now after and see if there is any difference in quality. I am noticing a strange pattern on one side of the benchy's hull. I will for sure take your advice on the belts and do that test and see where they are.
Thanks for the info.
RE: Help before I send this thing back.
@tim-m30
Hello again. Well I used the only lithium grease I had available, some WL-9 lithium grease on the X axis bearings since I had it all apart. Could you provide a link to the recommended grease by chance?
Also , I used your method of setting the tension of my belts at 6lbf. They are set now at 6lbf and printer reports numbers around 265-270. Seems yours still runs smoother and less friction than mine. Maybe it being new everything is still tight.
It has made a slight change in noise, it’s not as loud as it was before, but my Y is still very loud. I had not greased this axis though.
I would like to use the recommended grease and regrease them all.
thanks.
RE: Help before I send this thing back.
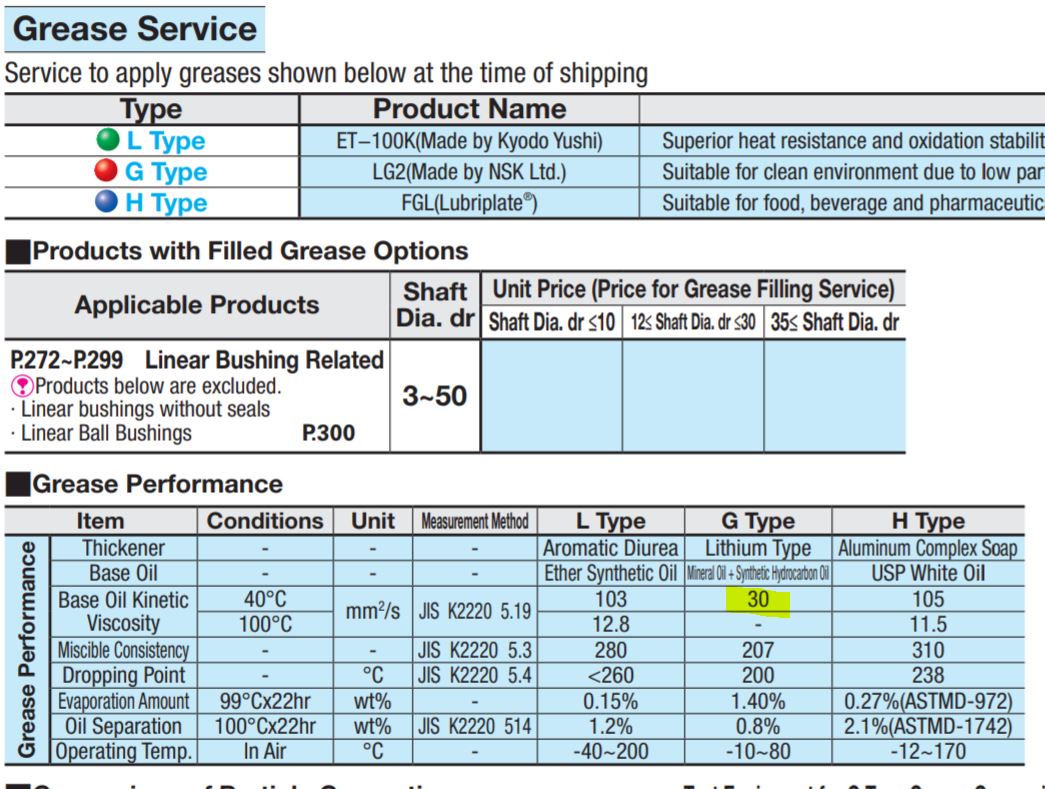
That grease should be fine. Misumi recommends Grade 2 Lithium. Some folk recommend something lighter, a Grade 1 or even Grade 0. Personally, as long as it is light grease, I use a synthetic with teflon, Superlube 21030 (some have suggested teflon is not good). A Misumi engineer I talked with said teflon is okay, but he also said even motor oil is better than nothing.
The main thing is to get a lubricant inside the bearings: and not use the shipping preservative as oil.
My numbers are low because I've already gone through a set of bearings and polished the rods in the process (no grease does that). Also, Prusa has changed the belt report - so my numbers may be incompatible with yours at this point.
ps: Your 270 is probably okay. I just checked mine, my last test was 295 on both X and Y, the new test is 274 on Y, and uggh! 244 on X. No wonder I've been seeing odd artifacts. X is very sticky on the right side of my rods. I have new bearings and rods because I knew this day was coming... lol. I will probably go with a pure lithium grease similar to what you are using, just to see if the teflon isn't helping.
RE: Help before I send this thing back.
This is for Misumi LM8 bearings ...
RE: Help before I send this thing back.
Im back. I got the new rods and bearings from prusa and installed them. Still have the issue. I greased the bearings, ubolts are tight, rebuilt the whole thing just to make sure the frame was not tweaked, etc. Nothing works. Have a look at the video to see what I am dealing with.
Prusa said they will get back to me by Monday with some info. Was hoping someone here had this issue and fixed it. Maybe I can get an answer before Monday.
Buying "more" things for this is simply out of the question. This will get returned if I have to spend more money on an already very expensive printer.
RE: Help before I send this thing back.
Just for a test, remove the screws from the holders of the rods and let them sit without any tension from the holders. Is it still making the noise? If the noise persists with lose rods, your ubolts might be too tight.
And thanks so much for a proper belt tensioning technique, that is extremely helpful.
RE: Help before I send this thing back.
Looking at the video I can't see the tie wraps holding down the rods?
It looks tight to me and possibly the bearings are shot but it may also be making the rods move and cause noise.
RE: Help before I send this thing back.
@lize
He has replaced the bearings and the problem persists. I doubt it is the rods and bearings.
--------------------
Chuck H
3D Printer Review Blog
RE: Help before I send this thing back.
@cwbullet
Sorry, I missed that part, thought those were still in the post.
Let's hope Prusa support can help.
RE: Help before I send this thing back.
@ferly
I'm not sure I follow. If your referring to the two screws holding in the plastic clips that let the rods snap into, then yes, I have removed them. The issue still remains.
@lize
Looking at the video I can't see the tie wraps holding down the rods?
Correct, I have not installed them yet. I swapped out the rods and bearings and haven't even gotten to the zip ties.
I can clearly hear the rattle coming from y axis, specifically the double bearing side rod bearing set.
If the noise persists with lose rods, your ubolts might be too tight.
I tightened both nuts equally while applying pressure to the ubold to keep it firm against the bearing. Once the nuts were close to the table, I began to move the ubolt back and forth along the bearing casing while slowly tightening the nuts until there was no more movement, I then gave it a 90deg turn from there.
It almost seems as if the prusa behaves better if the components are not aligned properly. If they are aligned to well the inherent slop between the rods and bearings becomes exaggerated when the motor is engaged and begin to resonate. I forced a misalignment by stuffing some paper between the bed and bearings and the noise vanished with exception to some faster stepper speeds increasing the resonance frequency. The table does not move as smoothly as it did without the paper, but the bed can still travel under its own weight across the rods when the printer is tilted, so its not that out of alignment.
I wish I knew what was causing the rattle. It sound very metallic in nature and I greased the bearings, so I would hope the grease would have dampened it a little, but it seems it has made no effect on the rattle, but the sound of the bearings traveling along the rod has reduced from the grease, so I don't know what part is vibrating.
I hope prusa can come up with something as well.
Thanks for all your inputs...
Also, @ferly, it wasn't me that came up with the belt tension idea, it was @-2
RE: Help before I send this thing back.
I tightened the ubolts only so I couldnt move them with my fingers. They do need a lot of tension to stay in place, but can very easily be overtightend. Try to lose the tension to the point where you could almost turn them by hand.
Well your misfortune shed light on the correct belt tension, so something good came from it. So thank you ;).
RE: Help before I send this thing back.
@ferly
Good point. I have a mini that I could not get to print. I over tightened a screw.
--------------------
Chuck H
3D Printer Review Blog
RE: Help before I send this thing back.
I meant to say, they do not need a lot of tension...