Re: Replacement bearings recommendation
That's the quote misumi is giving me on their site. $32 to ship to here in Canada versus $10 one hour away in the USA.
I suspect it's UPS and their brokerage fees.
Is that the only way to get misumi bearings is direct from them?
Re: Replacement bearings recommendation
I have completed my assessment of All IGUS bearings[...]
LMUU8
RJZM-01-08
RJZM-02-08
RJ4JP-01-08
I hope this rests the myths and assumptions about IGUS bearing use in 3D printers.[...]
Hey there, I'm quite confused. Why haven't you tried RJUM-21-10 (low clearance 10mm bearing), or RJUM-23-10 (low clearance 10mm self aligned bearing)? Wouldn't these perform better because they come compressed? The only downside I can find is the smallest they go is 10 mm. No 8 mm variant.
War... War never changes.
Re: Replacement bearings recommendation
Hey there, I'm quite confused. Why haven't you tried RJUM-21-10 (low clearance 10mm bearing), or RJUM-23-10 (low clearance 10mm self aligned bearing)? Wouldn't these perform better because they come compressed? The only downside I can find is the smallest they go is 10 mm. No 8 mm variant.
You answered your own question.
Re: Replacement bearings recommendation
I'm waiting for my first Prusa to arrive, a Mk3 kit. Since it seems like the rods and bearings that come from the factory aren't so great, I want to upgrade them when I build my printer. I plan on buying Misumi rods and bearings since they seem to be the go-to. My questions:
1) What length rods do I need for the Mk3? Are they different from the 320, 330, 370mm lengths of the earlier versions?
2) How many bearings do I need, total? Should I get extras?
Thanks!
Re: Replacement bearings recommendation
According to my MK3 3D model, your numbers are correct for rod lengths.
X 370mm
Y 330mm
Z 320mm
Same as MK2.
As for the bearings and rods? They are standard quality not poor. Consumer grade would be more what I'd call them and work perfectly fine for that purpose. Mine scored in by month 4 but my printer is rarely idle. Bed rods will go bad first but are also easiest to rotate to eek out more life, my bed rods are now hardened chrome Misumi and after one month of hard use have absolutely no sign of wear. So if you insist on spending money, Misumi is not a bad choice when building your kit.
FYI, I got Misumi bearing steel induction hardened chrome g6 tolerance rods with sealed bearings. Bearings and rods for Y axis was ~$54 shipped taking about a week to my door from order.
Rod: Misumi PSFJ8-330 (change the last three digits to the size you want)
Bearing: Misumi LMU8
MK2S kit owner since 8/15/2017
Re: Replacement bearings recommendation
I might give these bearings a try for the heat bed rails. These are 16mm O.D. but that should not cause a problem and I've read that others have successfully used similar 16mm bearings in place of the original 15mm bearings. I like these particular ones as the tolerance specification for the I.D. is much tighter than the Igus https://www.igus.com/wpck/3663/drylin_r_rjum_01 bearings.
However...these will require extremely accurate alignment and possibly require use of a 16mm OD self aligning bearing in the third single bearing position.
Frelon Lined Style:
https://www.mcmaster.com/#60605k92/=1ax8r6k
Ball Bearing Style:
https://www.mcmaster.com/#61205k75/=1ax9jik
Misumi Ball Bearing:
https://us.misumi-ec.com/vona2/detail/110300026540/?PNSearch=LMU8&HissuCode=LMU8&searchFlow=suggest2products&Keyword=LMU8
Self Aligning Ball Bearing Style:
https://www.mcmaster.com/#standard-linear-bearings/=1ax9ddo
I ordered the Misumi LMU8 bearings for the Y-axis for now. Will use the stock rods from the MK3.
MK3 Kit, Designed, built 4x4 CNC Plasma Cutting Table, Motorcycles Bigdogbro's Adventures
http://www.youtube.com/channel/UC5djrxBeeOKB9_6rHnn6G8A
Re: Replacement bearings recommendation
Is anyone using the SKF bearings? If so what are you experiences with them and are they a good fit in regards to slop? Can the MK2S 'U' bolts still be used?
Thanks
Re: Replacement bearings recommendation
Is anyone using the SKF bearings? If so what are you experiences with them and are they a good fit in regards to slop? Can the MK2S 'U' bolts still be used?
Thanks
Read about SKF bearings on page one... .
I have read most pages on this thread. I also had to decide between the normal bearings, the Misumi, the SKF or other HQ Linear Ball Bearing or some gliding bearings like the ones from IGUS.
However, after a deeper research, I found sintered bronze bearings and think they suit best for this application. Unfortunately, I only see very few people knowing them and even a fewer using them.
I have completed my assessment of All IGUS bearings that have been considered viable by many on this forum. I want to thank IGUS for providing a set of all bearings listed below and am only saddened the results were not flattering to them. But, it is better to know and accept the trade offs than believe your own bias or print inferior parts due to misguided assumptions. As it is quite a chore to replace bearings central to operation of a 3D printer, I hope armed with the information here, you can avoid and or commit to such work for your modding queue.
LMUU8
RJZM-01-08
RJZM-02-08
RJ4JP-01-08
Sintered Bronze Bearings (h7) with silver steel rods (h9):
Cons:
Conclusion: If you have the right equipment or you can find a skilled person to do the press fit and building the housings and your rods are precisely aligned, these bearings are the best of both worlds: High precision and silent operation.
Has anyone here sintered bronze bearings?
Re: Replacement bearings recommendation
I got new misumi rods with misumi bearings and there is more slop than the ones that came with the prusa (i have 12 misumi bearings, all the same thing). also more strange vibration sounds. they may roll better though and not mark the rods but still seems like a waste of money, IMO.
The RJZM-01-08 have too much slop... way too much for my taste, plus they don't fit without mods. on the bed if the holes weren't milled 100% aligned like mine, they will bind... you need a new housing and yet reduces the build height more.
bronze may work but i just found the standard Igus RJ4JP-01-08 compression fit seems to fit the bill, especially after going through a few different types and spending $$$. They have way less slop without being compressed than RJZM-01-08 and seem perfect once slightly compressed. smooth like butter and no noise...(outside the crazy stepper vibration anyway).
Re: Replacement bearings recommendation
I agree, Misumi bearing is the culprit and I have the closed ones. They are looser than stock bearings but are higher quality constructions, not sure if the slop is enough to compromise detail, but as stock bearings have a tendency to pop balls, snag and grind, I'll take the smoother quality and slight slack of Misumi-on-Misumi for now. Haven't heard about IGUS-on-IGUS yet, I'd be curious to know how that works out. If all IGUS kills slop but retains action, I'd jump ship because high end IGUS is so smooth, you get goose bumps sliding them. Low end IGUS, I've found to be bitey (stiction on direction change), harsh (grinding sensation) near as bad as ball bearings (compared to high end IGUS) and have slop anyway. If you're on a budget and want silence at the compromise of a little quality, IGUS RJ4JP is a good choice, clamping them a little will kill slop but then you get more grind and stiction...so no, not for me. All Misumi.
MK2S kit owner since 8/15/2017
Re: Replacement bearings recommendation
So, what is the final word? My Y axis was making a lot of noise so I purchased Misumi bearings to replace the stock ones. The Misumi bearings are even louder than the stock ones!
What are the best bearings for the MK2s for the Y axis? Where can I get them? Should I also replace the rods with stainless steel ones? If so, which ones for the Y axis and where I can order them? I am looking for long lasting and quiet ones!
Thanks!
Re: Replacement bearings recommendation
OK, so I can't believe this even worked... I feel like there should be something 'wrong' with doing this that ought to make it infeasible or pointless... but I'm frankly getting the best print quality I've ever seen from my printer, using RJ4JP-01-08 bearings that I've modified to reduce the slop to below what my frail human senses can detect.
If you try to wiggle one of the LM8UU bearings on one of the shafts, it feels perfectly solid (or at least, it should). No give that I can see.
If you do t he same with RJ4JP-01-08 bearing, there is a slight but very noticeable amount of wiggle. That's the slop everyone has been talking about.
Well, I modified some RJ4JP-01-08 bearings so they now pass the wiggle test. They have no give I can detect at all, they just feel completely solid on the shaft, and they slide well, but with a somewhat higher friction, 'snug' character to them. Anyway, I replaced every single bearing on my printer with these, and my print quality is uneffected, or maybe even better (though that might just be placebo). And its so quiet!!
This is seriously what I did:
1. Found some scrap piece of aluminum plate stock that was thicker than the length of one of the igus bearings.
2. Used a 37/64 inch drill bit and drill press to drill as clean of a hole as I could manage. It is also important to drill the hole all the way through, even if this is deeper than the length of the igus bearing.
37/64" is about 14.68mm. It really needs to be imperial, as metric only comes in 14.5mm which is too small, or 15mm, which is too large. ~14.7mm seems to be the sweet spot. Er, the sweet spot for our, uh, deformation die. That's what we're making with this aluminum chunk.
3. Grab a regular hammer, place the igus bearing at the mouth of the hole, and pound that sumbitch into the not-quite-big-enough hole. Don't worry, this is called percussive maintenance. It's like smashing something with a hammer, only you're fixing it. By smashing it.
4. Hammer hammer hammer. It will take several serious blows from the hammer. Pound it until it is flush with the surface of the aluminum chunk our hole was drilled into. There may be some slight marring of the surface of the igus bearing at the top from the hammer. Its purely cosmetic, but if you want to avoid this, you can use a rubber mallet and patience to avoid this.
5. With the bearing firmly ensconced within the hole, take one of the 8mm shafts and make sure it won't fit into the bearing hole. Yes, you want the rod to be unable to be inserted into the bearing. If you can push it in, then your hole is just a little too big and you'll need to try again but with an ever so slightly smaller hole.
6. Find some roughly cylinder-shaped object you don't mind hitting with a hammer that is larger than 8mm, but smaller than 14mm, and use it to either smash the igus bearing all the way through the hole so it pops out the other side, or just go in from the bottom and smash the igus bearing back out, it doesn't really matter.
7. Place the bearing on an 8mm shaft. It will probably take a little bit of initial force, but nothing requiring a tool, you can get it on with your bare hands. It should slide, but it will likely feel much too snug on the shaft. You have a couple of options: stick one end of the 8mm rod into a hand drill or something, and hold the bearing with pliers and just spin the rod inside the bearing as fast as you can for... well, many minutes. :). This will 'pre-wear' the bearing enough to make it slide more easily on the shaft.
Another option is to use a flame or heat gun to heat up the end of the shaft some, then slide the bearing up and down the hot part. Just don't make it too hot. You want it a little bit above 100 °C, but not by much. Slide the bearing up and down the hot part of the shaft a dozen times or so, then remove it and let both it and the shaft cool.
What we have done is permanently deformed the bearing by compressing it in our aluminum deformation 'die'. However, it has some flex to hit, which is why we had to use a 14.68mm hole. Remember how the 8mm wouldn't fit at all when it was in the hole? Well, after removing it, it has sprung back, but not quite all the way. We've robbed it of a ~100µm or so of inner diameter. We've permanently deformed it so it now has a bit of a transitional fit on our 8mm shafts. This fit means it still slides, but what will feel a bit too snug. It won't slide as easily as it should. So we then either wear down/deform away the tiniest bit of material using one of our rods and one of the methods above to reduce the fit to a locational clearance fit - it slides more easily, but will still be snug but not alarmingly so, and will be completely free of any slop.
I'm totally serious. There is probably some down side, like the bearings will wear out sooner, but I doubt it will be soon enough to matter. All i know is I'm getting quiet, excellent quality prints without any binding, as ridiculous as everything I just outlined probably sounds.
*shrug*. 🙂
This is fantastic.. reminds me of my early Woodworking projects which we now refer to as “beat to fit, paint to match”
Kudos
Re: Replacement bearings recommendation
The JPs are cheap enough to mess with but I'd try a more home-hobbiest approach first. Not all of us have chunks of aluminum stock or a precision drill press laying around. So, how about a pair of pipe clamps and a 3D printed crushing jig? Or maybe just the pipe clamps? Tighten until you have the right crush thus glide/tolerance desired. Integrating bearing clamp into a custom X-carriage and Y-carriage could be interesting. Far easier to dial-in assuming the clamps survive. Oven heating might help this process...this should go without saying but please don't use Microwave for this unless you like fire and smoke. As for myself, I am happy with my Misumi-only setup so I offer this idea as a more approachable experiment to make JPs work for you.
As far as rod and bearing pairings, I thought this would be common sense but in case you have no idea what the concept of material hardness is...
Any balled bearings are usually hardened steel, they should be matched with Hardened steel. NEVER soft-steel like stainless if metal-on-metal abrasion is involved.
Polymer bearings can take any metal rod material even aluminum.
In any case, if your rods are scarred enough to catch your nails in any direction, replace if you care enough to follow this thread. Oh, lube. Lube is good.
MK2S kit owner since 8/15/2017
Re: Replacement bearings recommendation
Not that I would want to boast....
https://www.thingiverse.com/thing:2732534
Use that with the RJ4JP-01-08 and be happy.
Re: Replacement bearings recommendation
Not that I would want to boast....
https://www.thingiverse.com/thing:2732534
Use that with the RJ4JP-01-08 and be happy.
Pretty much this.... misumi sucks, the other igus with the alu case have too much slop. these ones work just fine. done. only thing better is actual rails or try v-slot wheels.
Re: Replacement bearings recommendation
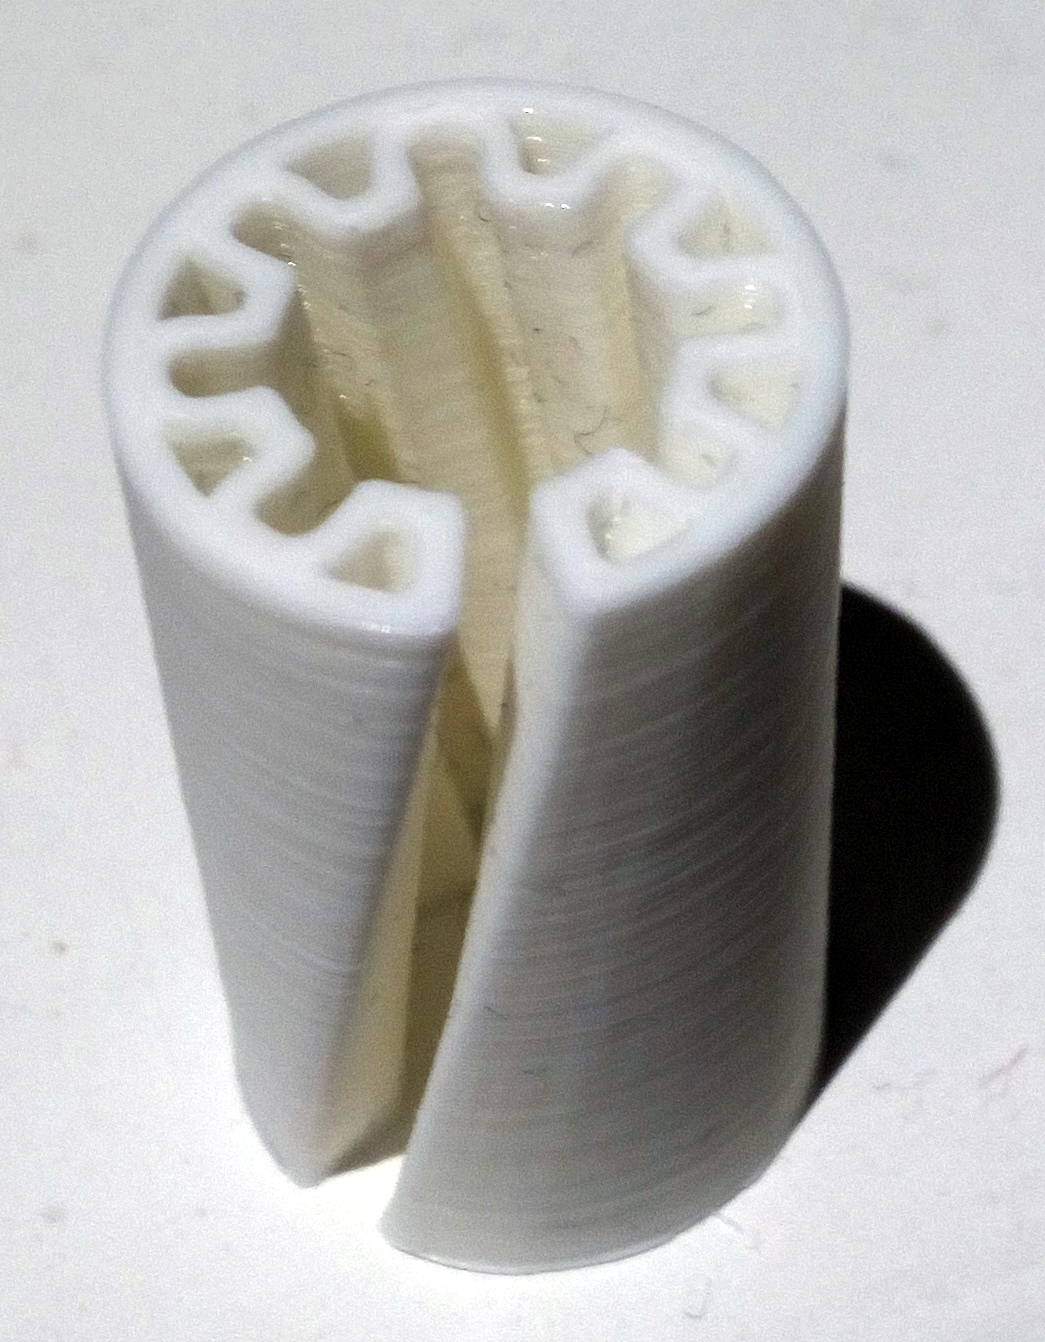
What about cutting the IGUS bearing (more or less like the attached image, neglect the helix shape) and using a tunable (with screws or whatever) collar to compress it to the right size, eliminating any slop (by tightening the collar)?
Re: Replacement bearings recommendation
Hi to all... Ho have the mk3.. I bought it 3 weeks ago. 100 hour of printing... And the stock bearing completly ruined the rods.. Lines engraved in the rods.. Only the x and y axis are ruined... The lubrificant on the rods are black... For the metal... I have contacted the custumer service by chat... And i wait for an answer... I want to change rods and all bearings. You agree?
Re: Replacement bearings recommendation
@giovanni
Yes, black residue and scoring is a bad sign. Do you have a magnet? MK3 are supposed to come with hardened steel but I've heard the first batch was "accidentally" shipped with MK2S's stainless steel rods, some issue with miscommunication, etc. Hardened steel are ferromagnetic meaning magnets will stick to them, stainless steel is not and won't. Also, during assembly it is possible that printed parts are misaligned or have bad prints. Result, the rods are not perfectly spaced or splay apart. This is bad as the rods must be perfectly parallel and perfectly spaced for best glide. If not, much more stiction (grabbing by bearings when changing direction) and friction. You can find out by disconnecting the x-belt so the X-carriage moves freely, then slide left and right several times. If there is any increase of friction, you have splay, if the X-carriage doesn't slide on it's own after giving it a good shove, the spacing is wrong. Those are the three things to check prior to calling support.
Hope this helps.
MK2S kit owner since 8/15/2017
Re: Replacement bearings recommendation
Sintered Bronze Bearings (h7) with silver steel rods (h9):
Cons:
Conclusion: If you have the right equipment or you can find a skilled person to do the press fit and building the housings and your rods are precisely aligned, these bearings are the best of both worlds: High precision and silent operation.
Has anyone here sintered bronze bearings?
This sounds interesting. Did you try this out?