Printing on air on top layers with low infill %
Hello,
i have bigger problems with the slicer, when the infill is lower. My problem is shown in this photos:
The red part is lower as the lila part.
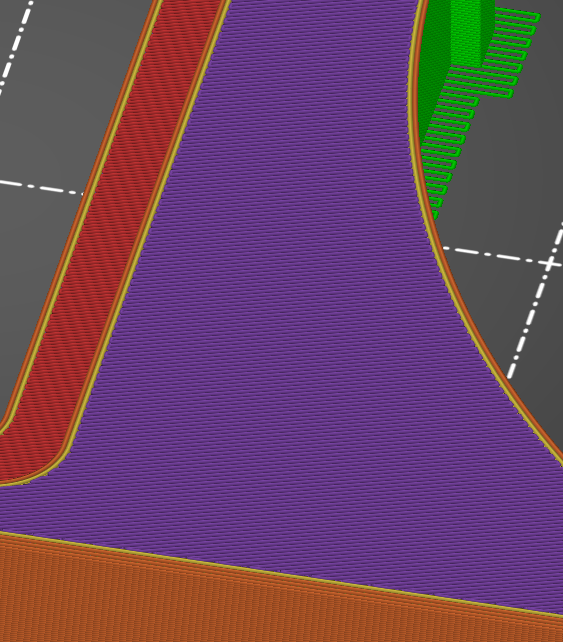
This is what i get: The blue first top layer is printing over air and changing the direction over air. Overhangs are possible, but no direction changes like this....
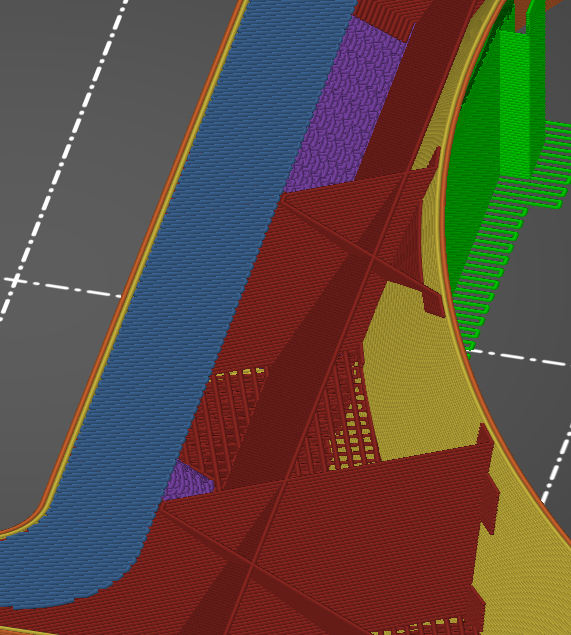
What i expect rfom the slicer: The top layer must go from wall to wall and NOT change the direction over air.
My solution was to make a extra setting for different layers. But the problem is also on all types of smaler parts, when the infill will get less dense.
I can not use it under 20%.
(Pictures are only a examle)
RE: Printing on air on top layers with low infill %
I’m not sure I’m understanding what you’re saying. Like I don’t know why the first picture looks different than the last. Seems to be the same model? Can you zip the 3mf file and upload it so folks can take a look and check your parameter settings?
RE: Printing on air on top layers with low infill %
Hi,
sure i will next day. It's late in germany (;
The first picture is a higher layer cut. There you can see, that the left part (red) is lower as the right part in lila. It's lila because the next layer (top red) is not shown. It's near the final part. Left is lower as the right part. So the slicer makes a roof that is not going complete to right, because the right part is taller. There is no roof. Only left begins the roof in pic 2 and 3.
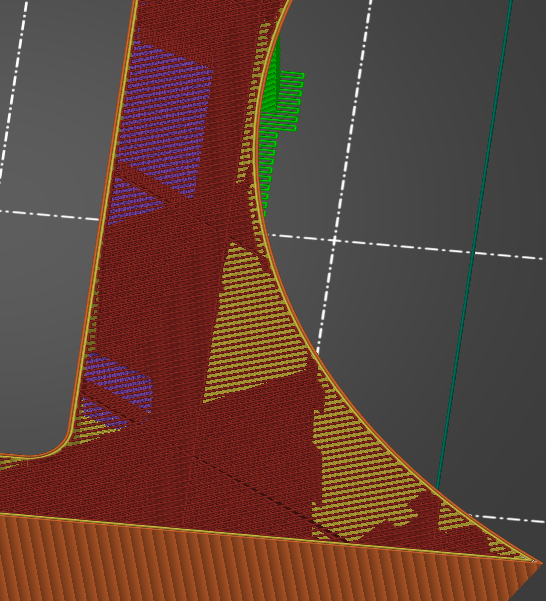
Picture 3 was same layer cut as picture 2 but with cheating and editing picture. My problem, is that the blue layer is changing direction while there is nothing under. Impossible.
RE: Printing on air on top layers with low infill %
Here is the sample:
RE: Printing on air on top layers with low infill %
Thanks for posting the 3mf. I just ran it through PS and don't see anything wrong. Of course the left side is lower because it's lower in the model so the slicer has to start printing the top layer before it does for the rest of the model. Maybe someone else in this forum sees anything I'm missing but from what I'm seeing the slicer does exactly what it is supposed to do?!?
Just a quick additional comment. The slicer will print infill as long as it can, to save material. So if the left side is lower, it will start printing the top layers there but continue to print infill for the right side as there's still a few layers left before it has to print top layer. Maybe that's what you meant?
Tut mir leid, dass ich nicht mehr helfen kann.
MfG
-r
RE: Printing on air on top layers with low infill %
Strage. My problem is the second picture with the blue layer. It is printing left and right to make a new top layer over the infill.
BUT: The blue layer ends over air. How can the filament change the direction over air? This is near impossble
Sure... little distances are possible to fly over air. But not that mutch. Overhangs are no problem. But this are no bridges. This are direction changes over air.
RE: Printing on air on top layers with low infill %
I;m still struggling to see the issue. I am using the 3MF you sent and slice the model without changing any parameters. Here’s what I’m seeing, looking at that bridge between the large rectangular opening and the cutout to the right, which I believe is what your pictures show.
Until layer 213 it creates uniform sparse infill in that area. At layer 214 it has to start creating the top perimeter for that lower area on the left (ledge around the rectangular opening), so it puts bridge infill down. Naturally much of it will be in the air because you have only 5% infill. It then puts in solid infill in that area through layer 217, finished with top layer on layer 218. All the time it continues to add 5% adaptive cubic infill in the area to the right. With layer 222, it finally begins to lay down the top layers for the rest of the model. All makes total sense to me. I guess you‘re looking at layer 214. Yes, some of that bridge infill is in thin air, but that‘s the definition of “bridge” infill. With 5% cubic infill you’ll have little for the bridge infill to work with. And your point about going from wall to wall… Why would the slicer do that? There’s still 8 layers where it can print material-saving infill in that area before it finally has to put down top layers in that space. So it only goes as far out as needed with the bridge infill to support the vertical wall that is being printed in the next few layers and reverses direction, I guess as you call it in thin air, and leaves the rest of that area free for more adaptive cubic infill. Again, makes sense to me.
Well, at least that’s my interpretation of what the slicer is doing here. But I’ve been called dense before…
If you’re seeing issues with the horizontal surfaces that form the small ledge around the open rectangle, I would add a modifier to increase infill in the few layers before the bridge infill is being printed, or bump overall infill up. I use 5% a lot myself but not to support large horizontal surfaces, they usually need more to not show “dimples”.
RE: Printing on air on top layers with low infill %
t lower area on the left (ledge around the rectangular opening), so it puts bridge infill down. Naturally much of it will be in the air because you
No. This is no bridge infill. Brding is when you have 2 Sides and move betewan this two points, so the PLa ist not falling down.
The slicer is doing a T like hanging in the Air Shit. Printing a T from bottom to top and expect, that the upper part of a T is flying in the wind.
It makes this flying pla anytime and very often and all otgher slicers do not expect to have flying PLA. They are making bridges like in picture 3.
Picture 3 is correct. Flying PLA not.
RE: Printing on air on top layers with low infill %
Is the problem that you are using a very sparse infill and the top finish is not fair?
If that is the case two possible solutions, Iron the top surface or use a height modifier to make the last few layers of infill more dense.
If that isn't the problem, perhaps try restating but just describing the unwanted result.
RE: Printing on air on top layers with low infill %
Hi,
it has nothing to do with the top finish. Of cause lots of reports are here in this forum that have bad top finish, because of the same bug. But they
looking on the wrong place for the reason.
Spares infill will cause this bad slicer practice to become a problem. But it is not the problem. The problem is, that the head is changing the direction while nothing is under it. PLA is not changing in the air the direction. It can make straight bridges. But no T type overhangs.
But in picture 2 is a T type overhang. Yes, because of spares infill. But this is not the excuse for a bug in the slicer.
but just describing the unwanted result.
I will not have a T type overhang that is impossible to be printed. I will a Bridge system, like in picture 3. Look at other slicers. They make no T overhangs. It is impossible to be printet. So whey make them? They will make bridges. Bridges are good. They are printable. T Type Overhangs not.
RE: Printing on air on top layers with low infill %
@pryor
Okay, now we’re arguing semantics. In the preview Prusaslicer colored that area in what it calls bridge infill. So I call it bridge infill, you can call it whatever you like.
As I tried to say, I see this behavior as the slicer trying to find a compromise between laying down top layer for that slightly recessed area, for which it has to deal with the fact that your sparse infill doesn’t give it much to work with (thus what you call printing in thin air); and the desire to continue to print infill where it has still room to grow upward. Sure, it could bridge all the way across as you suggested but then it would have to stop putting infill down in a large area in which it is still several layers before top layers are required.
Look, I’m not a PrusaSlicer apologist. I’m just presenting my interpretation of what we’re seeing here. I for one think this behavior makes sense, but feel free to disagree. I don’t have a problem with it; I don’t think what you’re suggesting is unreasonable. But if you feel strongly about it, I suggest you open a topic on the PrusaSlicer GitHub side and see if you can get traction for your suggested change to the slicer algorithm. This here is a user-to-user support forum and I don’t think the right venue to get new ideas in front of developers.
RE: Printing on air on top layers with low infill %
You are right (;
RE: Printing on air on top layers with low infill %
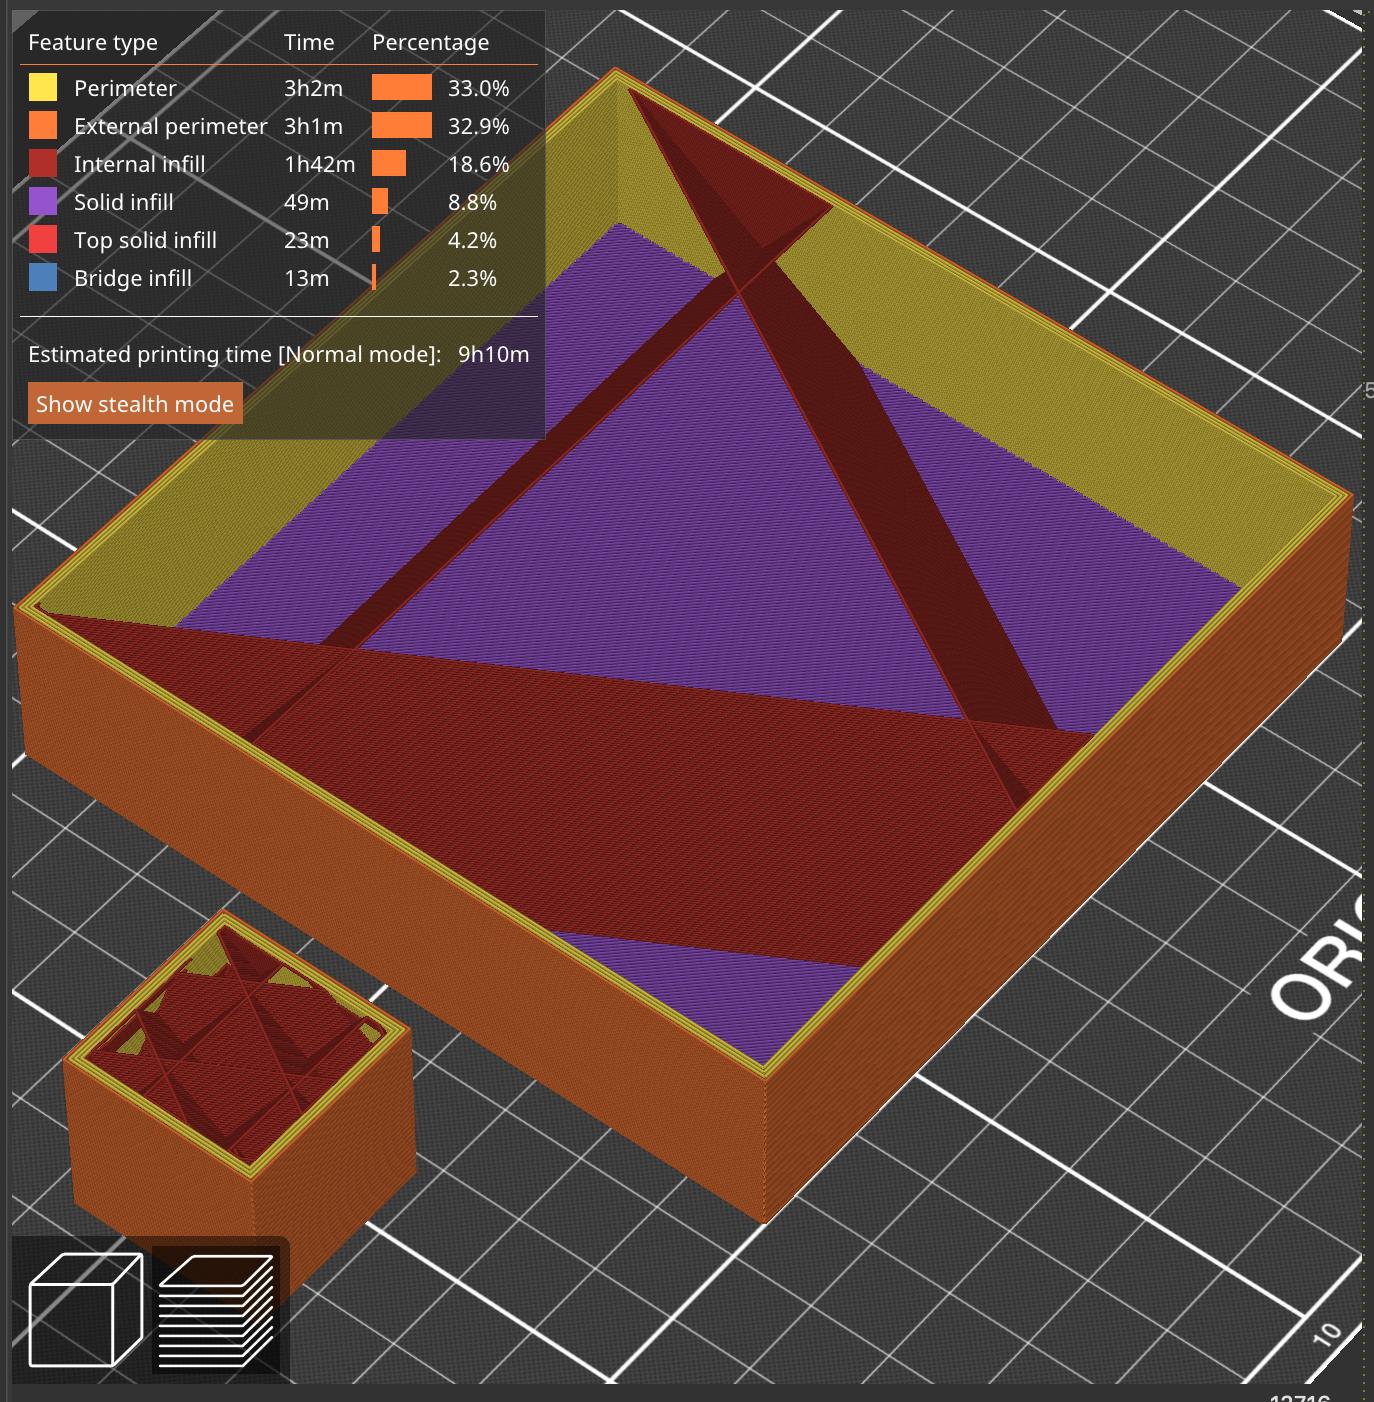
It sounds like @Pryor's concern is the printing of bridging and solid infill over sparse infill. The solution is really not to use sparse infill when you need to support large solid infill areas. Use denser infill near the top and sufficient layers and even if every layer doesn't print perfectly, there will be sufficient support to print the top surfaces correctly. The Support Cubic infill pattern is ideal for this as it will use a sparse pattern near the bottom when it can and gradually increase support density near the top. Of course, this won't be very effective on tiny prints. Here are results with 25mm and 100mm cubes. Note that the infill is calculated per part, so varying sized models can be printed successfully in the same batch.
Here are the lowest layers showing the sparse pattern for both cubes:
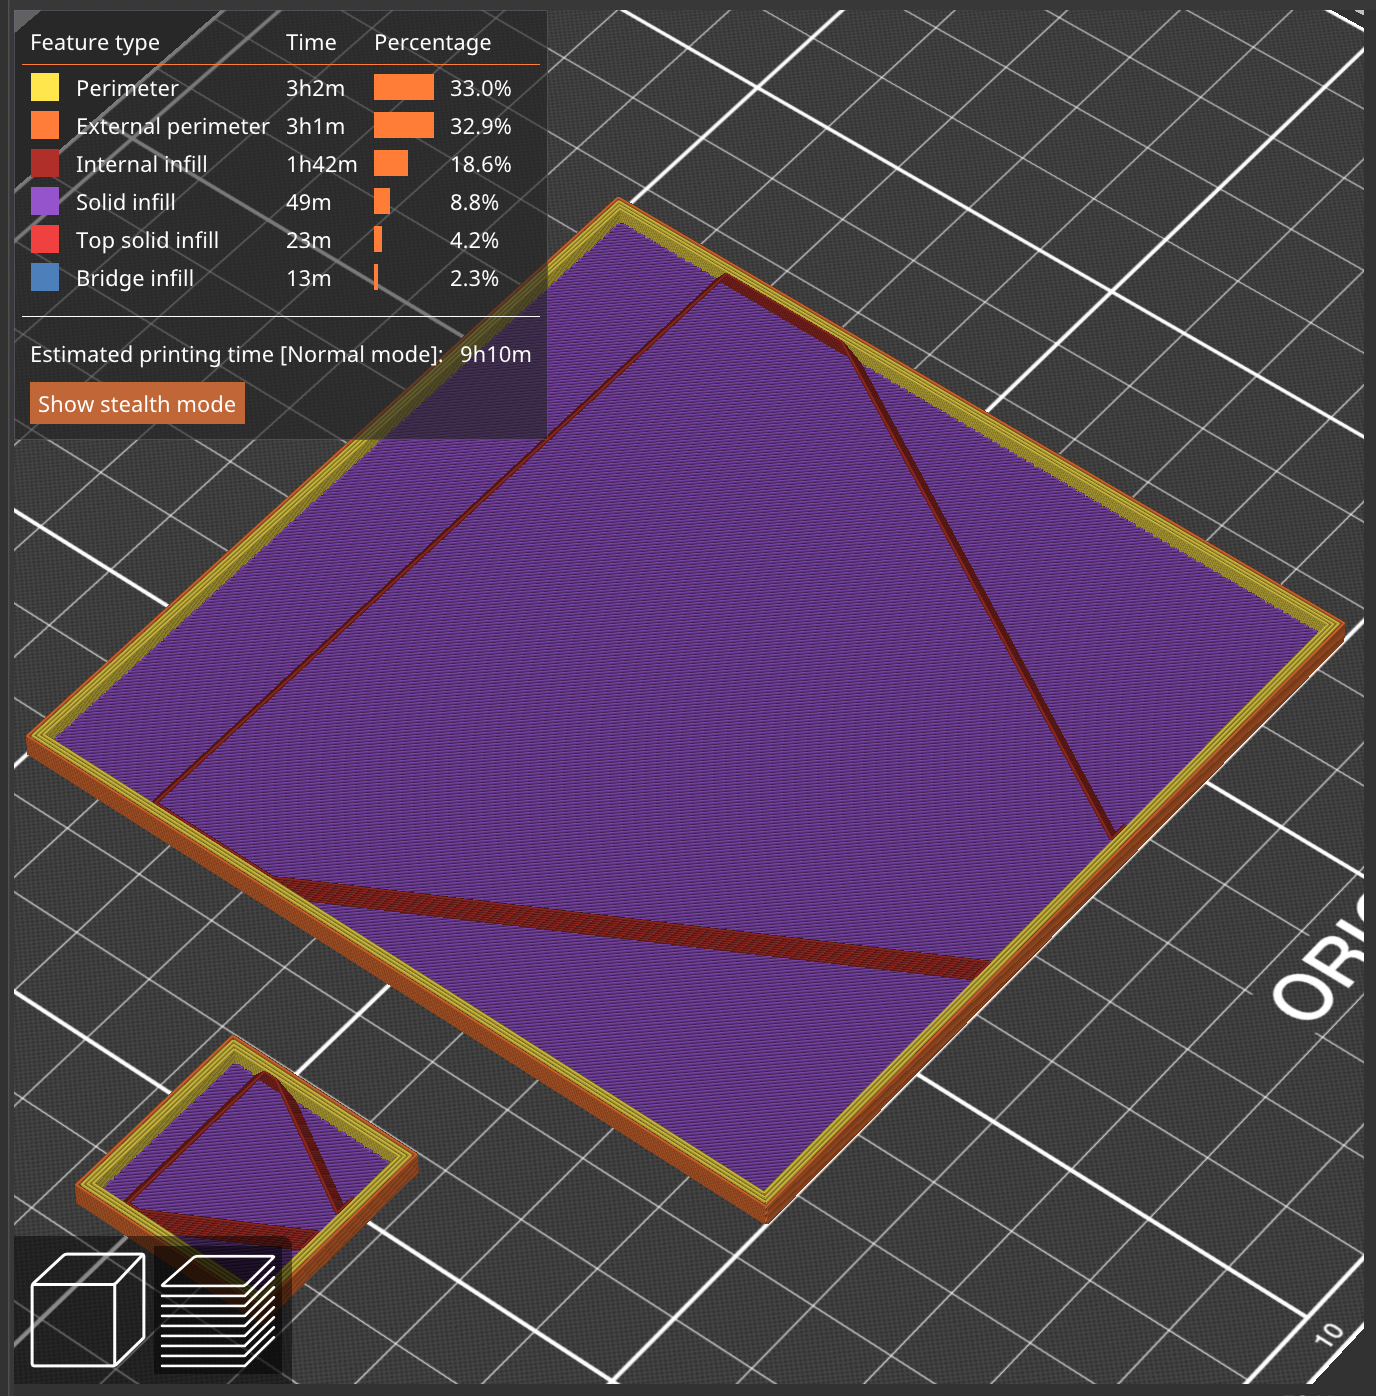
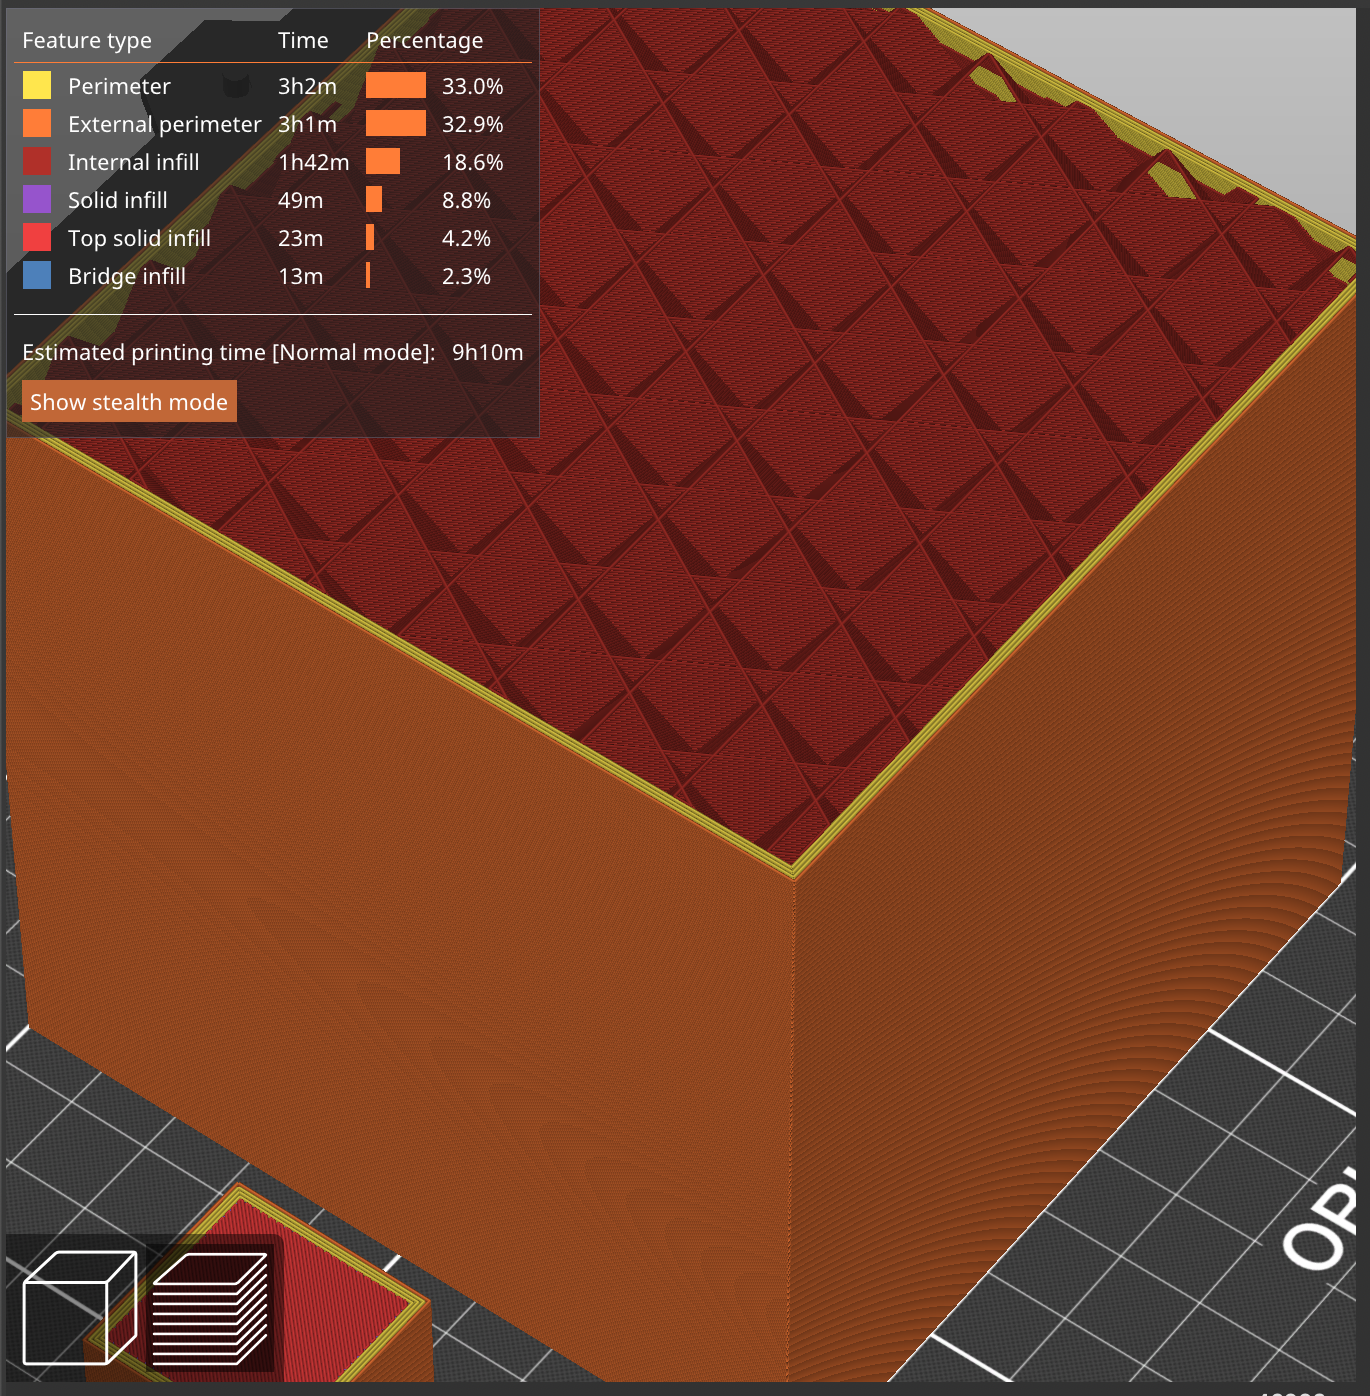
Here are the layers near the top of the 25mm cube showing the denser pattern for that model:
And finally here are the top layers of the 100mm cube showing the denser infill near the top:
This makes more sense to me as no unnecessary infill is printed, speeding up print times, while still providing the desired amount of support for top layers with solid infill. I'm no PrusaSlicer expert, but I recall that current consumer-grade (free) slicers don't do full look-ahead optimization. You always need sufficient top layers to prevent pillowing no matter what infill density you use, so I suspect this approach is much simpler to implement than trying to configure bridge and solid infill to detect what's underneath.
RE: Printing on air on top layers with low infill %
I just noticed the 3MF. I notice @Pryor is using Adaptive Cubic infill. With such narrow spaces, you might not see much gain with that versus Support Cubic.
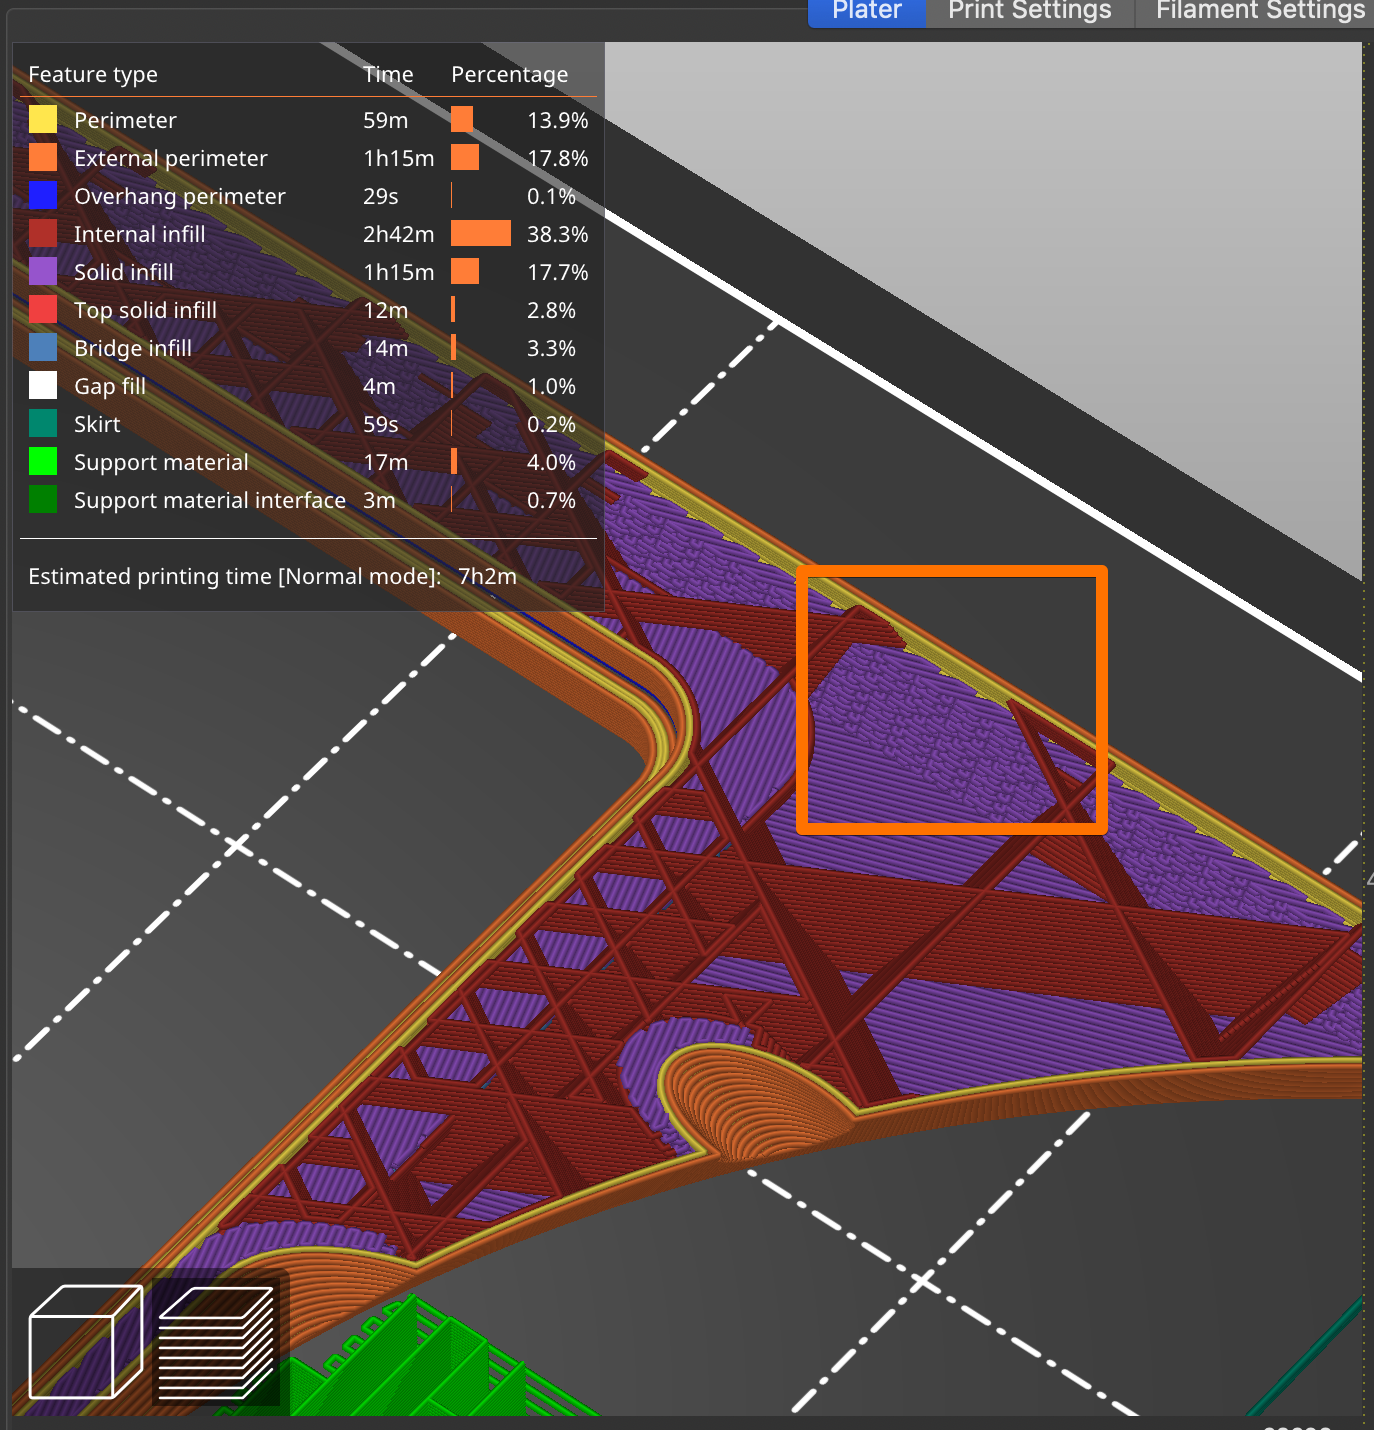
Is there a reason you printed this part face-down? I assume you want the textured finish. The groove around the frame seems to be a bit tricky with bridging when printed this way. I am curious to see how this curved overhang perimeter prints:

Edit: It looks like that blue overhang perimeter is all that is holding that inner frame in place.
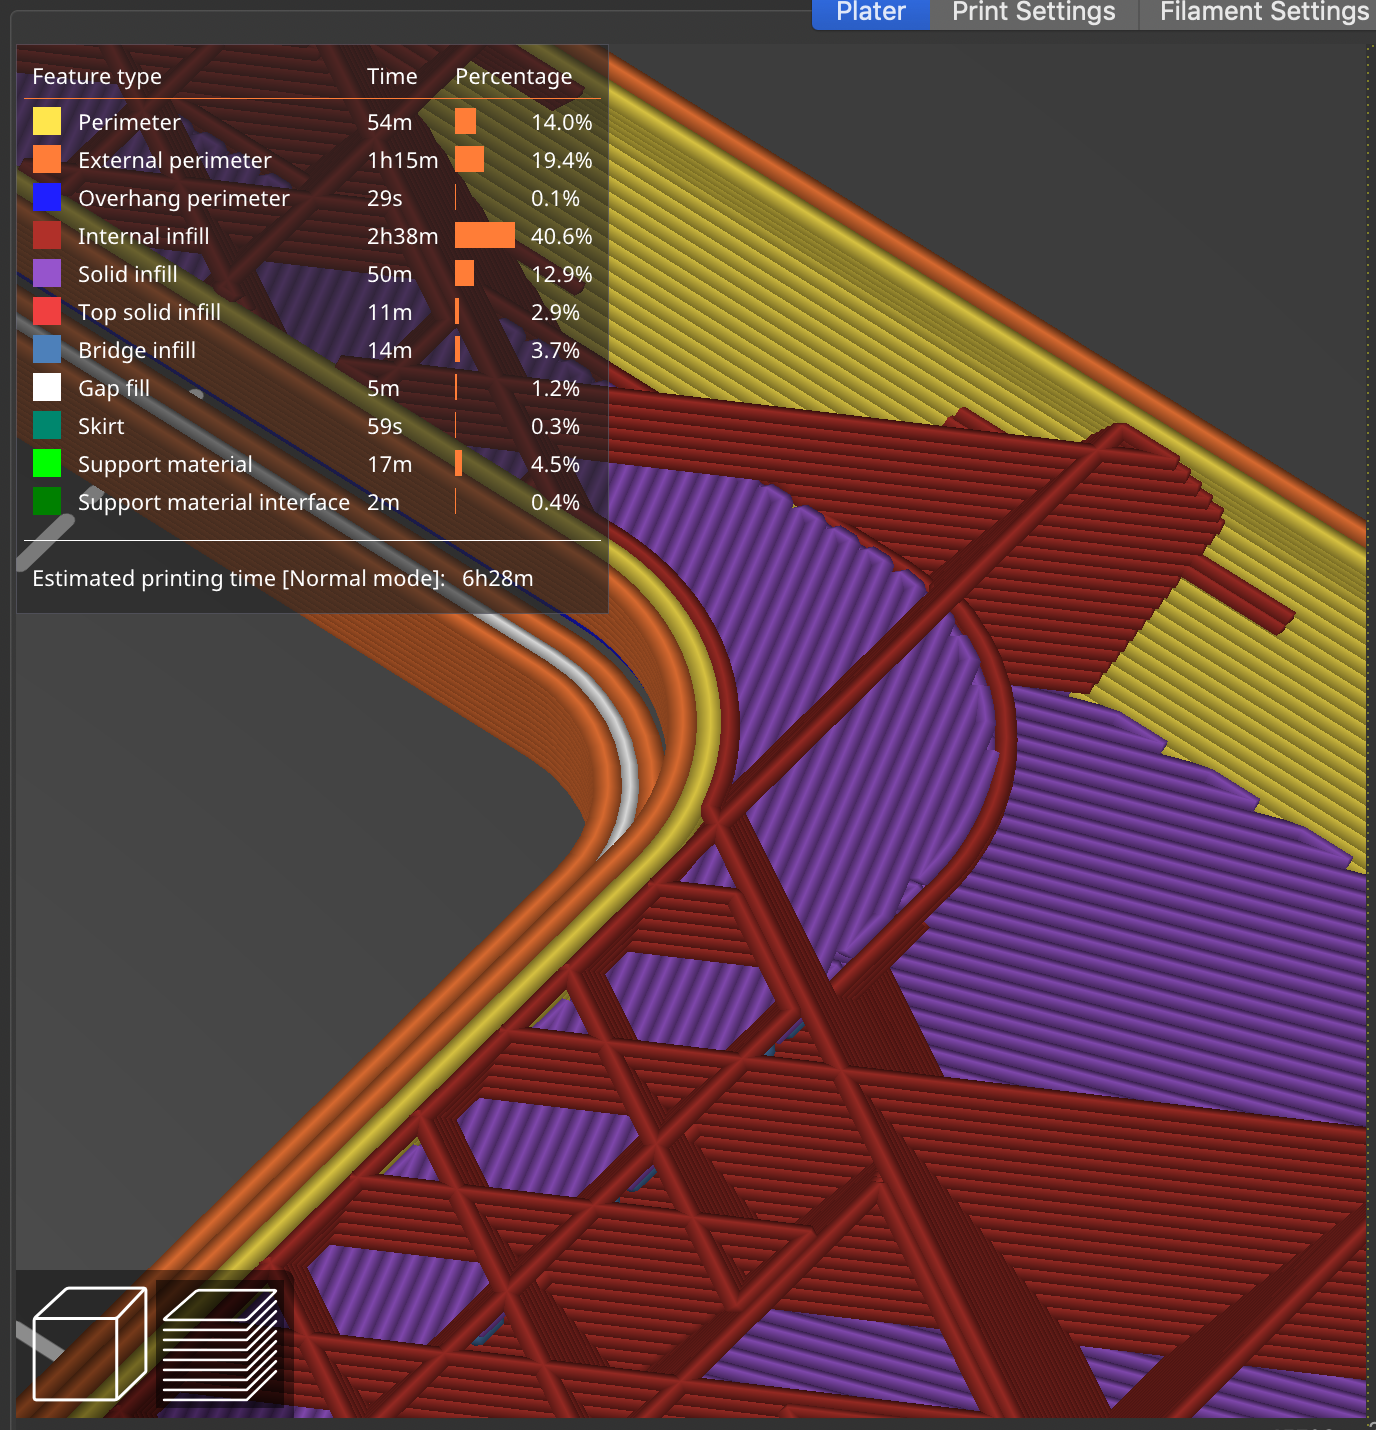
I noticed you're printing with 2 0.45mm perimeters. Unfortunately, this triggers the nasty wall thickening algorithm regardless of what Ensure vertical shell thickness setting you use. This will take a long time to print and hammer the bed around quite a bit while printing:
You can add a perimeter or increase your perimeter widths to 0.6mm and eliminate this, getting a thicker wall as a side benefit. The wider extrusions won't take much longer to print:
RE: Printing on air on top layers with low infill %
Hi,
the lower part of the sample part is "fake" part of the final part that will be broke up. This will force the slicer to make a bridge.
I can print this part without support and have a very nice surface on the first lower part where it hangs over.
It's a printing trick....
With the 0.45 perimater thing, i do not brother, that the outer wall will have nasty perimeter (;
As you see in your first picture, it ould be nice, to have a perimater around the blue part. This will create brdging and no direction changes over air, that are impossible.
One perimeter around the blue part is all it needs to solve this problem for all infill densitys.