Oh no we're skewed! Prusa Mini edition.
First a disclaimer, I'm by no means a 3d printing expert. I've had my printer only since November and have had many many issues. But in experiencing these issues I've actually learnt a tonne. This information has come from people on these forums, discussion with two friends of mine who are experienced 3d printers and just many hours experimenting and piecing together information. I wanted to post my findings here with regards to dealing with skew issues on the Prusa mini, in hope that it may help someone else. There is a tonne of information out there but it is spread all over the place.
Massive thanks to skreelink in particular for all his help and also anyone else who contributed to help me troubleshoot my issues in this thread.
Skew Fixes
XY Skew
This occurs when the horizontal arm of the printer is not parallel on the Y axis with the print bed below. It is either pulling forward towards the front of the printer, or backwards towards the back of the printer.
This will affect if a print is square, i.e. how the lines are printed horizontally on the bed. The vertical lines should be square due to the way the bed moves along the two tracks but the horizontal lines will not be if there is XY Skew.
You can test this by printing something square and using a set square, or measuring corner to corner and comparing the values.
There are two fixes I have found for this...
XZ Skew
This occurs when the horizontal arm of the printer is not parallel on the X axis with the print bed below. It is either tilting downward towards the print bed, or upwards towards the ceiling.
This affects the first layer calibration, the left hand side of the x-axis will be either too close or too far away from the print bed causing a slant. This is best seen with octoprint bed visualizer, and can be easily tweaked by following the instructions below. A small amount of skew should not cause issues as the printer can correct with mesh bed leveling.
There are two potential causes for this...
- The Z axis arm is not perpendicular to the bed
- The X axis arm is not perpendicular to the Z axis arm
- Both
Solving 1.
Follow the steps as provided by Prusa. Highly recommend using Octoprint bed visualizer before and after to visualise your changes.
Solving 2.
You can loosen the three screws holding the Z axis arm and adjust it to ensure it is at a 90 degree angle from the print bed. I did this by placing a small set square on my print bed, adjusting the position of the arm, then retightening the screws in the order specified.
Be warned, if you try to do this purely with a level, remember that your unless your printer is sitting on a 100% perfectly level surface, you wouldn't expect your Z axis arm to be perfectly level vertically either. The set square is a good solution to this, but unfortunately you cannot tighten the main screw with the bed positioned to allow you to measure how square the arm is. A better solution is likely a digital level that can take relative measurements and find 90 degrees (relative to the bed).
There are also some mods that may help here, I have not tried these
XY Skew
This is the skew that occurs as your print bed moves along the Y axis, the print bed's height from the nozzle is not consitent. This will occur if your print bed itself is not perfectly level from front to back. This is best seen with octoprint bed visualizer.
Unfortunately there is no simple fix for this.
If both front or both back corners are dipped, it might be possible that the Z axis arm is tilted slightly forward or slightly backward. If this were the case you may be able to loosen the three screws holding the Z-axis and adjust. This is pure speculation though.
If one corner is dipped and one is raised (on the front or the back) there is no quick fix. In my case the front right and back left corner were both dipped and this is not easily fixable.
Someone recommended to me to perhaps try the masking tape mod. This was actually an incredibly quick and easy way to level the print bed at a very low cost. Using octoprint each time I made an adjustment I focused on getting the front left and back left corners the same height, and likewise with the front right and rear right. I then leveled the bed almost completely using the XZ skew adjustments by Prusa. Unfortunately I quickly realised why this method is not a good idea, in one area where I had three layers of tape the plastic would not adhere to the steel sheet because the masking tape was insulating the heat. Because of this, I cannot recommend this mod.
So what is the solution? It's this and while it is the perfect solution it's also pretty involved and requires a lot of care to execute.
RE: Oh no we're skewed! Prusa Mini edition.
Update: Someone mentioned to me that even if masking tape mod was affecting heat dissipation over the steel sheet, that "should" not affect first layer calibration, perhaps only warping. So I'm going to give it another try and will report back.
RE: Oh no we're skewed! Prusa Mini edition.
Going to continue this on github, because I want to be able to update the document, planning to add some photos when I get a moment also.
https://github.com/s-taylor/prusa-mini-skew/blob/main/README.md
RE: Oh no we're skewed! Prusa Mini edition.
I discovered gskewer, available as octoprint plugin. Not tested but it looks promising.
Here the link https://github.com/Kranex/octoprint-gskewer.git
RE: Oh no we're skewed! Prusa Mini edition.
I received my mini in December, and the Prusament galaxy black filament doesn't work no matter what I try. Every other brand I've tried works fine though. Your bed mesh looks like mine in the opposite direction. Did you already do the silicone mod and if so did it work?
RE: Oh no we're skewed! Prusa Mini edition.
@judas
I had endless problems with prusament and ended up giving up. The issues might be attributed to having the bondtech extruder and heatbreak upgrades though, I'm not sure. I was also having a tonne of issues printing with the other PLA I use (eSun) but this was completely resolved after I changed my retraction settings to 2mm, but again that's likely attributed to the upgrades on the printer I have.
I have not yet done the silicone mod, I have done the masking tape mod to see how it works and it has delivered a completely level bed, still experimenting to see if it causes other issues though. I will do the silicone mod once the tubing arrives.
RE: Oh no we're skewed! Prusa Mini edition.
@nizmox
I couldn't get Prusament to work with the original heatbreak or the Bondtech one. I still don't know why it has problems considering it should be the most hassle free filament, but I'm done trying to use it. After printing petg with the original heatbreak, my hotend was completely plugged and the ptfe was short. I haven't had any issues since the Bondtech heatbreak though. Thanks for sharing your progress, I'll keep watching to see your silicone results!
RE: Oh no we're skewed! Prusa Mini edition.
@nizmox thanks for capturing this all in one place here and on GitHub. It was very helpful in fixing my skew and dialing in my mini. Specifically I had the most issues with my bed showing a steep right to left slant indicating my z wasn’t perpendicular to the bed.
In addition to the info in your guide for correcting my xy skew I got some good info from others in a different thread that I wanted to add here and possibly to the GitHub.
To get the z axis perpendicular and the x gantry parallel to the bed you should check two things specifically. Look at the gantry arm from the end and ensure there is no twist of the two rods. This can happen when the screws on the end idler are loose while adjusting skew or belt tension. Any slight twist will cause the print nozzle to change heights as it traverses the x gantry.
Second, the two screws on the side of the electrical box that attach it to the y extrusion can drastically affect the x gantry height at the far end as you tighten them more and more. Mine were tight and I found when I loosened them and then only snugged them up it significantly reduced my right to left slant on my bed level visualizer. You mentioned this for squaring the z post with a square but since I didn’t have one I just set the print head to a known height at the far right end above the bed with a thin flat print and then moved it to the far end and tightened the two side screws while watching the print head over my thin print so I could know how much it was pulling the head up
With these two adjustments I went from about 1.25mm drop from right to left on my bed to my bed being even from side to side.
I was very surprised how much difference the side screws made in the height of the nozzle over the bed. To view this effect I moved my print head to the far end of the gantry and then lowered it until it was just above the bed without touching. Then if you look down the bed from the right side you can loosen those two side screws a little at a time and can easily see the head moving down as you loosen them.
hope this helps some others as many bed visualization images I’ve seen from other mini owners have shown the same steep right to left slant I was seeing so I suspect it’s a common problem to have those screws too tight. 

PrusaSlicer. Stock MINI+. Novice printer.
RE: Oh no we're skewed! Prusa Mini edition.
@nizmox thanks for capturing this all in one place here and on GitHub. It was very helpful in fixing my skew and dialing in my mini. Specifically I had the most issues with my bed showing a steep right to left slant indicating my z wasn’t perpendicular to the bed.
In addition to the info in your guide for correcting my xy skew I got some good info from others in a different thread that I wanted to add here and possibly to the GitHub.
To get the z axis perpendicular and the x gantry parallel to the bed you should check two things specifically. Look at the gantry arm from the end and ensure there is no twist of the two rods. This can happen when the screws on the end idler are loose while adjusting skew or belt tension. Any slight twist will cause the print nozzle to change heights as it traverses the x gantry.
Second, the two screws on the side of the electrical box that attach it to the y extrusion can drastically affect the x gantry height at the far end as you tighten them more and more. Mine were tight and I found when I loosened them and then only snugged them up it significantly reduced my right to left slant on my bed level visualizer. You mentioned this for squaring the z post with a square but since I didn’t have one I just set the print head to a known height at the far right end above the bed with a thin flat print and then moved it to the far end and tightened the two side screws while watching the print head over my thin print so I could know how much it was pulling the head up
With these two adjustments I went from about 1.25mm drop from right to left on my bed to my bed being even from side to side.
I was very surprised how much difference the side screws made in the height of the nozzle over the bed. To view this effect I moved my print head to the far end of the gantry and then lowered it until it was just above the bed without touching. Then if you look down the bed from the right side you can loosen those two side screws a little at a time and can easily see the head moving down as you loosen them.
hope this helps some others as many bed visualization images I’ve seen from other mini owners have shown the same steep right to left slant I was seeing so I suspect it’s a common problem to have those screws too tight.
Hey mate,
Very glad this was of help to you! I'll try incorporating your suggestions into the guide, i'm still updating it now to try make it as clear as possible.
Thanks!
Simon
RE: Oh no we're skewed! Prusa Mini edition.
I discovered gskewer, available as octoprint plugin. Not tested but it looks promising.
Here the link https://github.com/Kranex/octoprint-gskewer.git
If you don't want to use octoprint I can create a prusaslicer post-processing script that does the same thing. I'm currently experimenting with a new method of calculating the error in the xy plane as I've found the one outlined for gskewer fiddly and prone to error.
Done it: https://github.com/Kranex/goskew
It's a standalone G-code skewer written in Go that can be used as a post-processing script in Slic3r and PrusaSlicer. I've included the STL and method I have used for calculating my skew compensation which requires only the printed calitriangle and a pair of callipers. I'd be very interested to know if it works well for anyone else. If my calculations and measurements are correct, I now have 0.71mm of skew in my X axis for every meter in the Y. I still need to print some skew sensitive models though to check.
Thanks, I've added this to the list as well, I might give it a try when I'm next messing with my printer.
RE: Oh no we're skewed! Prusa Mini edition.
XY Skew
Thanks for the info and link to shims. Just finished getting X and Y properly perpendicular (minimal skew). Both my fully assembled Prusa Mini+ (Nov 2020) and a new kit Prusa Mini+ (May 2021) ended up requiring a 1.6mm shim. A to C and B to D diagonal lengths are almost identical (within 0.1 mm). It's great to print a square and get a square!
RE: Oh no we're skewed! Prusa Mini edition.
@nizmox thanks for capturing this all in one place here and on GitHub. It was very helpful in fixing my skew and dialing in my mini. Specifically I had the most issues with my bed showing a steep right to left slant indicating my z wasn’t perpendicular to the bed.
In addition to the info in your guide for correcting my xy skew I got some good info from others in a different thread that I wanted to add here and possibly to the GitHub.
To get the z axis perpendicular and the x gantry parallel to the bed you should check two things specifically. Look at the gantry arm from the end and ensure there is no twist of the two rods. This can happen when the screws on the end idler are loose while adjusting skew or belt tension. Any slight twist will cause the print nozzle to change heights as it traverses the x gantry.
Second, the two screws on the side of the electrical box that attach it to the y extrusion can drastically affect the x gantry height at the far end as you tighten them more and more. Mine were tight and I found when I loosened them and then only snugged them up it significantly reduced my right to left slant on my bed level visualizer. You mentioned this for squaring the z post with a square but since I didn’t have one I just set the print head to a known height at the far right end above the bed with a thin flat print and then moved it to the far end and tightened the two side screws while watching the print head over my thin print so I could know how much it was pulling the head up
With these two adjustments I went from about 1.25mm drop from right to left on my bed to my bed being even from side to side.
I was very surprised how much difference the side screws made in the height of the nozzle over the bed. To view this effect I moved my print head to the far end of the gantry and then lowered it until it was just above the bed without touching. Then if you look down the bed from the right side you can loosen those two side screws a little at a time and can easily see the head moving down as you loosen them.
hope this helps some others as many bed visualization images I’ve seen from other mini owners have shown the same steep right to left slant I was seeing so I suspect it’s a common problem to have those screws too tight.
Thanks for compiling all this info @nizmox ! this is very useful.
Hey @tankertech! I also had this issue... I tightened the ZY screws too much (the ones that go through the electronic box to the Y carriage) and that gave me a "purple" bed just like yours... I actually found your report on the Mini+ Silicon Mod forum about this, and that's how I fixed my skewing issues (i think!)...
I found this post because I'm also evaluating the Silicon Mod for my Mini+ as well... I posted my current printer's state so that I could get some opinions regarding the feasibility of the mod. Since I don't want to spam the thread with possible skewing issues, I brought this matter here so that I can get your feedback regarding the squareness my printer.
This is my current printer state (without any mods), my Z values are ranging from -0.129 to 0.174 making a total deviation of ~0.303.
Note that the range is [-1,1].
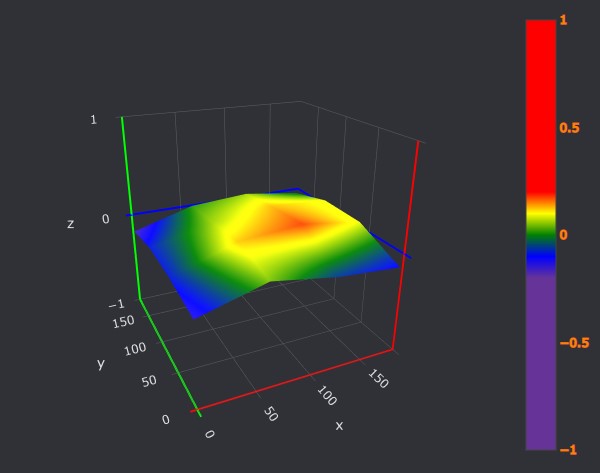
Looking at the picture, do you consider my printer to be skewed?
Thank you!
Prusa Mini+ full stock
RE:
Thanks for compiling all this info @nizmox ! this is very useful.
Hey @tankertech! I also had this issue... I tightened the ZY screws too much (the ones that go through the electronic box to the Y carriage) and that gave me a "purple" bed just like yours... I actually found your report on the Mini+ Silicon Mod forum about this, and that's how I fixed my skewing issues (i think!)...
I found this post because I'm also evaluating the Silicon Mod for my Mini+ as well... I posted my current printer's state so that I could get some opinions regarding the feasibility of the mod. Since I don't want to spam the thread with possible skewing issues, I brought this matter here so that I can get your feedback regarding the squareness my printer.
This is my current printer state (without any mods), my Z values are ranging from -0.129 to 0.174 making a total deviation of ~0.303.
Note that the range is [-1,1].
Looking at the picture, do you consider my printer to be skewed?
Thank you!
Hi @calex
Glad you found the guide useful! It's really hard to say if 0.3 is too much or insignificant. When I had a skewed bed I found that if I printed large parts they were convex/concave as a result which in some prints threw off the dimensions. But then my delta was closer to 0.7.
I used the masking tape mod for quite a while and a couple of times when I thought it might have been causing issues I removed it, then realised it wasn't the issue. So if you're after a quick fix that's worth a shot, just don't use too much tape or it will affect the bed temp. Also be very careful to use tape that is removable without leaving residue.
After that I just decided to go do the full blown silicone mod. It's actually not hard to do, the hardest part is getting all the pieces you need for it. Since doing that, I've gone from having a 0.7 difference to as low as a 0.07 difference. Once it gets to a difference of about 0.15 it gets very hard to adjust though as the adjustments are tiny. Right now my delta is about 0.15 and that's good enough for me.
If it hasn't caused you noticable issues I'd probably just leave it? My gut feel is 0.3 is pretty good. But if you're a perfectionist like me it's not too difficult either. You just need to take some care not to over flex the printbed. Hope that helps!
RE: Oh no we're skewed! Prusa Mini edition.

So I totally need to tear the printer apart and apply the silicone mod, right? 🙂 0.24 delta across diagonals.
Mini+ (kit) - Revo Micro | Antler Cooling | WiFi (4.4.0RC1)
RE: Oh no we're skewed! Prusa Mini edition.
You need to reduce the graph scale so that it's easier to spot the differences 😉
Prusa Mini+ full stock
RE: Oh no we're skewed! Prusa Mini edition.
How do you change the scale? I tried to do that with the octo plug in and I messed it up some how. I ended up just looking at the numbers and figuring it out but the scale was a mess. LOL I haven't messed with it since. I think I had it around .17 from highest to lowest on the points.
RE:
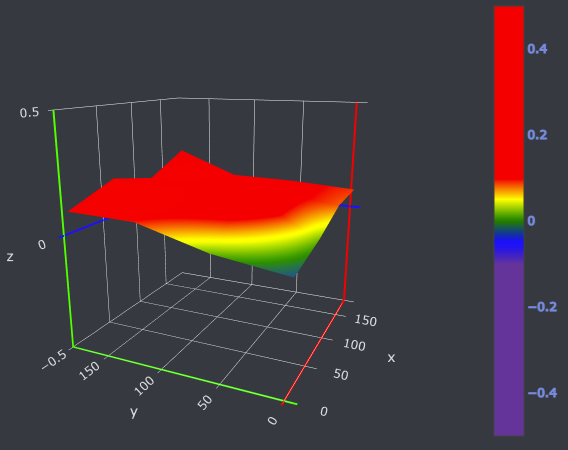
You wanted ugly? OK, here you go. Zoomed in to +0.5 / -0.5.
To zoom, click the gear icon below the visualization or go into settings form the main screen. On the Bed Visualizer Settings, go to the Visualization tab and change the Z Limits. I got it to show by restarting Octoprint.
I might try sticking a piece of tape under the bed at the front left corner 9between the bed & standoff). might lift that the tiny bit it wants.
Mini+ (kit) - Revo Micro | Antler Cooling | WiFi (4.4.0RC1)
RE: Oh no we're skewed! Prusa Mini edition.
I went back to work at this some more. I tried a modified masking tape mod, putting patches of tape between the bed and standoff and that was working. Then I got way off and started from scratch, dismounting the bed entirely. I removed all tape and re-mounted the bed, getting all screws just snug--stopping as soon as there was resistance. Then started the bed mesh after heat soaking. I used the bbenji github to translate and ended up here after a few adjustment iterations.
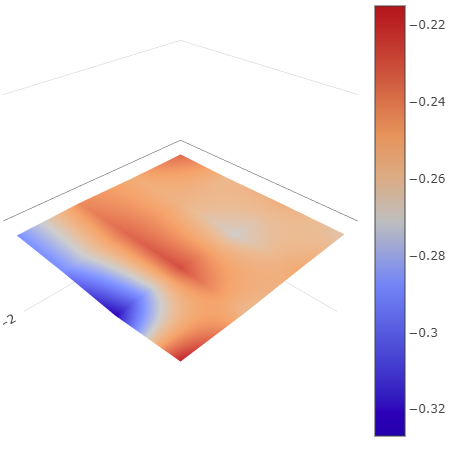

Not bad I think. I'm getting beautiful first layers now. Calling it done for now.
Mini+ (kit) - Revo Micro | Antler Cooling | WiFi (4.4.0RC1)