4.1.0 Firmware for Original Prusa MINI
This is the final release of the firmware. This changelog is a summary of the previous release (RC1) with a few additional bug fixes introduced in this release.
Summary
- Improved behavior after USB drive removal
- Marlin Card Reader replaced
- Printer acoustic signalization
- Support for NTP servers
- Filament load/unload procedure adjusted
- Preheat function improved
- Tune menu extended
- File browser improved
- Horizontal scrolling text function added
- Octoprint screen further improved
- OctoPrint vs filament change
- Watchdog dump feature
- Safety measures for filament load/unload
- Reworked temperature regulation
- Faster print head heat-up process
- Correct remaining time estimation for non-default speeds
- Short G-codes not printed completely
- Splashscreen fixed
- Bug fixes
Detailed description
Improved behavior after USB drive removal
If the USB drive was accidentally removed or randomly disconnected during the print, the printer failed to continue. Now, the printer parks the print head in the rear right corner of the heatbed, enters the “Pause” state and awaits user input. The user should re-insert the USB driver, then press the “Resume” button. The printer then returns to the last G-code coordinate before the interruption and if the USB drive with the G-code is correctly recognized, the printer continues with the print. Otherwise, the print head is again parked in the rear right corner.
Disclaimer: Even though the printer is capable of resuming the print after the USB drive is disconnected, it is recommended to keep the drive plugged in throughout the entire print. Disconnecting the USB drive and rewriting or adjusting the printed file might lead to unpredictable results.
Marlin Card Reader replaced
The Marlin Card Reader implementation is directly connected to the accidental USB drive removal behavior. We have modified the Marlin Card Reader with our own code and implemented it in the MINI firmware. Its main feature was to treat USB flash drives as SD cards. However, in case of any error during the print (e.g. unintentional USB drive removal) it sometimes ended up with a critical error leading to a failed print, in rare cases even caused a Watchdog reset.
The new implementation uses a FatFs library, which is a generic FAT/exFAT filesystem module for small embedded systems and replaces the previous “Marlin Card Reader” entirely. The USB drive is now treated properly and most of the crash scenarios are also fixed in this update.
Printer acoustic signalization
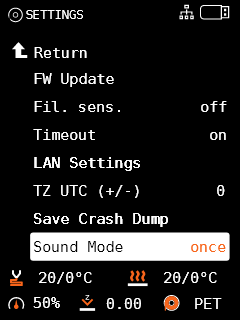
Firmware 4.1.0 brings 4 levels of the acoustic signalization - Loud, Once, Silent and Assist. The user is able to choose between each level in the printer's menu Settings > Sound Mode. You can also change the sound settings during the print in the Tune menu.
Level description:
- Loud - printer uses acoustic signalization to notify the users of a failure or if confirmation is needed
- Once - this level is similar to Loud, but all beeps are played only once
- Silent - most of the beeps are muted, the user is informed only in case of a serious error
- Assist - a mode for visually impaired users, the printer plays a different sound while scrolling through the menu and at the end of the menu.
Support for the NTP servers
Starting this release the printer is able to get the current time using the NTP servers. This feature requires an active connection to the internet and brings a great addition to the running print.
An offline printer reads the duration of the print from the G-code and displays the remaining time on the screen. However, when the printer is online and acquires the current time, it adds the time from the G-code needed to complete the print and on the screen displays the estimated time when the print will be finished.
Note that the NTP servers aren't able to retrieve the time zone your printer is in. In order to see the correct time, please head to the Settings > TZ UTC (+/-) and set the number of hours, which will be either added or subtracted from the NTP server time.
For example, our offices in Prague are UTC+2h, therefore the time zone settings have to be adjusted by +2 hours.
Filament load/unload procedure adjusted
Previously, in order to load the filament, the printer needed to be fully preheated. As soon as the desired temperature was reached, the printer asked the user to load the filament through the extruder gears. From there, the filament was loaded all the way to the print head and extruded out of the nozzle. In case of any issue during the loading procedure, the user was unable to repeat the action or cancel it.
Filament load
Starting this release the overall logic driving the filament load is changed. The user is able to load the filament into the extruder gears (on the Z-axis) before the hotend is fully heated up and as soon as the temperature is reached, the printer automatically loads the filament all the way through the print head to the nozzle including the purge procedure at the very end.

After the filament loading procedure is finished, the printer will ask whether the color of the filament flowing out of the nozzle is correct. The following options are displayed:
- YES - filament loading procedure is considered finished, the printer returns to the previous menu
- NO - the filament is pushed again through the hotend again
- RETRY - the entire procedure returns to the beginning and awaits user confirmation about correctly loaded filament
Filament unload
Changes were also applied to the filament unload procedure, which is slightly more complicated than the loading. The printer now handles the filament unload procedure more carefully in order to achieve better results with almost no stringing and to avoid the creation of bumps near the tip of the filament strand. This improves the life expectancy of the PTFE tube inside the hotend and also the Bowden connecting the print head to the extruder. This new approach also avoids grinding of the filament while it passes through the extruder gears.
This method is also used during a color-change (M600). The previous method could sometimes cause jams and might have led to print failures. The print head is now always parked in the front of the printer to allow for easier access.
If you still experience stringing or grinding of filament, please let us know using the Issues section on the GitHub. Include information about your filament (type/brand etc.).
Temperature fluctuations fixed
During the phase of the fast filament load/unload (happening between the extruder and print head) the temperature fluctuated significantly. The issue was identified in the incorrect setting of the PID regulation.
The most common cause was the fast loading sequence responsible for moving the filament between the extruder and the print head into the nozzle, which affected the PID_EXTRUSION_SCALING parameter. Once the sequence started, the printer immediately expected the filament to be already in the nozzle, increasing the temperature, but since there wasn't any material at the moment to use the extra heat, the overall temperature rose up, sometimes even by 10 °C. The incorrect assumption was done also during the unload procedure, causing the temperature to drop about 5 °C from the target.
The solution we applied to solve this issue was to temporarily disable the PID_EXTRUSION_SCALING parameter during the filament load and unload procedure leading to the stabilization of the temperature.
Preheat function improved
Several optimizations were made to the preheat function in order to shorten the overall time before the actual print is started. Now, regardless of the target print temperature as soon as the temperature of 170 °C is reached, the printer will allow for:
- the filament to be loaded to the print head
- the mesh bed leveling (MBL) to be performed

Also, the lower temperature in the print head prevents the filament from dripping down onto the heatbed. Once the MBL procedure finishes successfully, the printer proceeds to heat up the hotend to reach the target temperature and starts the print.
Preheat scenario (PLA used as an example):
- The user selects “Preheat” from the menu and then the material (PLA) they intend to load. The print head starts to preheat to target temperature (215 °C), but stops at 170 °C.
- As soon as the temperature of 170 °C is reached, the number on the screen starts to flash green, informing the user that the printer is ready to load the filament.
- For advanced users - the printer is also ready to perform the Mesh Bed Levelling, if this is specifically set in the G-code
Print scenario (PLA used as an example):
- The user selects “Print” from the menu, the material (PLA) is already loaded. The print head starts to heat up or cool down to reach the temperature of 170 °C. However, the printer knows (and displays) that the target temperature is 215 °C.
- The heatbed is heated up to the final temperature, in our case 60 °C
- As soon as the temperature of 170 °C in the print head is reached, the printer performs the MBL procedure.
- Once MBL is successfully finished, the printer continues to heat up the print head to the target temperature and starts the print.
Tune menu extended
Some parts of the printer’s menu are not accessible during the print for safety reasons. As a result, some important information might not be available to the user. From this release forward, the Tune menu is extended with “LAN settings”, “Version Info” and “Sound mode” submenus.
Thanks to this change, the IP address can be obtained even during the print and the user is able to monitor the progress using the Prusa Connect web interface. Similarly, the printer can be quickly muted for overnight prints.
File browser improvements
In case the G-codes were stored on the USB drive in various subdirectories, the user was able to list through the files and see the preview, but when the “Back” button was pressed, the printer incorrectly returned to the root directory. Now, the printer closes the preview, stays in the given subdirectory keeping the scroll and cursor position, thus enabling the user to continue previewing other G-code files in the same directory.
Also, the previous firmware releases sometimes experienced issues if the files were stored in multiple subdirectories. In this release, the total length limit of the path is raised to approximately 103 characters, which implies 103/(8+3) levels. The whole path is internally represented as DOS short file name 8.3 format.
Horizontal scrolling text function added
This function, well-known from the MK3 and MK3S 3D printers, is now available for the MINI, enabling it to read file names, which are longer than the width of the screen. If the cursor stays on the name, the text will start to scroll to reveal the entire length.
In the RC1 release the printer sometimes incorrectly used the rolling text if a subfolder was opened. Both issues (displaying the remains of the previous folder name, not scrolling the text from the beginning) are now fixed.
Octoprint screen further improved
Previously, when a remote print over OctoPrint was started, the printer locked the screen and displayed an “Octoprint” dialog. There were only two options available, open the “Tune” menu in case of adjustments needed during the print or reset (reboot) the printer using the hardware button if the print was failing.
However, not every failing print must be addressed by rebooting the printer, sometimes the print can be saved and for this reason in this release, this functionality is further improved with new options next to the “Tune” menu:
- Tune - standard adjustments to the running print
- Pause - a command is sent to the Octoprint server to pause the print
- Disconnect - a command is sent to the Octoprint server to disconnect from the printer. This also cancels the running print.
Between the RC1 and FINAL release of the 4.1.0 firmware, the developers added a confirmation screen if the “Disconnect” button was selected by accident to avoid immediate cancellation of the current print.
OctoPrint vs filament change
The RC1 release brought improvements to OctoPrint, but also introduced incorrect handling of the filament change scenario (M600). The display remained blocked, effectively blocking the user interaction, which is necessary to perform the filament change.
Now, as soon as the M600 command is received by the printer from the OctoPrint server, the print is paused, the print head parked and filament unloaded. The printer then waits for the user to load the new filament. As soon as the filament change is confirmed by the user, the printer unpauses the print and continues with the next set of instructions in the G-code.
Note: While printing over the serial line, the printer ignores the filament sensor, even when properly connected. However, it works for the filament change. The developers are working on a fix for the upcoming firmware release.
Watchdog dump feature
This feature is an extension of the “Crash Dump feature” introduced in the firmware 4.0.3. Starting this release, the data is saved and included in the crash log even if “Watchdog reset” scenario occurs.
The path to retrieve the crash log remains the same Settings > Save Crash Dump. Note that the USB drive must be connected to the printer in order to save (export) the dump file.
Safety measures for filament load/unload
The MINI remembers information about successfully loaded filament and its type. This release of the firmware adds several safety measures based on knowing this information. Depending on whether the filament is loaded to or unloaded from the printer, some actions are unavailable (greyed out) in order to protect it.
- Change Filament - in case the filament is not loaded, this action is disabled
- Purge Filament - only available, when the filament is loaded
- Load Filament - in case the filament is loaded, this action is disabled
- Unload Filament - available at all times, the printer automatically heats up

Unloaded and loaded filament
Note to the “Unload Filament” action, which is available at all times to cover scenarios even the failures (e.g. filament not unloaded properly). It enables the user to remove the filament in any situation, thus it is considered as a safe option.
Note to the “Filament sensor”, which is used during these actions. If the sensor is connected and activated it won’t allow for continuing the filament load from the Extruder to the Print head if no filament is detected passing through the sensor.
Reworked temperature regulation
The new temperature regulation algorithm is based on the long term observation of the printer behavior. It incorporates new physical parameters such as heat transport delay, the effect of the surrounding temperature and the thermal capacity of the heating system. The aim of these adjustments is to minimize the overshoots caused by the system inertia and transport delay, achieve the target temperature faster and enable more precise regulation in the area of the stabilized temperature.
The adjustments include:
- Fixes and improvements to the Marlin PID regulator (I parameter limitation, D parameter computation)
- Manual tuning of the defaults PID constants - lower P and I to increase the stability
- Increase of the D smoothing factor
- Implementation of the feed-forward regulator based on the system model
- cooling loses by radiation, passive convection and print fan-forced convection
- the thermal capacity of the system (parameter Deg_per_seconds)
- transport delay of the sensor (thermistor) of the heating system (parameter Transport_delay_seconds)
- Rewriting and reenabling the Marlin PID_EXTRUSION_SCALING feature (regulating term based on the cooling effect caused by the extruded material).
More details can be found in this GitHub pull request.
Warning for the users: in case you observe any significant drops of the stabilized temperature (larger than ± 5 °C). Please report it and include the G-code.
Faster nozzle heat up process
In some scenarios, it took a while to heat-up the nozzle and stabilize the temperature (M109). The algorithm responsible for the temperature stabilization was improved, greatly reducing the overall waiting time.
The issue was in the algorithm, which expected the temperature regulation to be inaccurate, which is true for many devices. However, the implementation in the MINI printer is very close to an ideal PID regulator, for example, almost never overshoots the target temperature. As a result, the algorithm was waiting for something, which practically never happened and the timeout times were too long.
For example, if the temperature is now set to 215 °C, the system waits until the thermistor reads temperatures in range 212.50 - 217.49 °C (displayed as 213 - 217 °C). As soon as this range is reached for one second, it is declared as a stabilized temperature.
Correct remaining time estimation for non-default speeds
If the print speed was increased during the print using the menu Tune -> Speed (up to 255 %), the printer didn't recalculate the remaining time correctly. This is now fixed and the time from the G-code (calculated by the PrusaSlicer) is multiplied by a coefficient of the currently set speed.
It is important to note that the increase of the speed is effectively an increase of the filament feedrate, which doesn't mean that all the parts of the print (perimeters, infills, ... ) will be affected linearly. With some parts, the effect of the increased “speed” will be greater compared to the others. For this reason a “?” sign is displayed next to the time, informing the user that this time is a rough estimate.
Short G-codes not printed completely
While testing the printers internally using short G-codes created manually outside PrusaSlicer, it was discovered that the printer didn't execute all the lines in the G-code, therefore did not print the object completely.
The issue was caused by a wrong approach to the planner queue, where the queue was deleted as soon as the system reached the end of the file, ignoring the fact whether the last commands were actually done by the printer or not. Now, this is fixed and the system always waits until all the commands are performed.
Splashscreen fixed
Due to the code refactoring, in the RC1 build, the splash screen was displayed for a very short period of time, making it almost impossible to read the firmware information. This is now fixed.
Bug fixes
- The print fan continued cooling even when the print was finished. This is now fixed.
- Large memory requirements of the file browser are now fixed and the overall demand for memory lowered over ten times. Previously the issue was with:
- Setting a limit to simultaneously ordered objects to 64
- Dynamically allocating about 8 KB of the memory
- If more than 64 objects were present, they didn’t display at all
- Fixed Draw line feature, which was displaying some lines 1 pixel shorter.
- If the print is paused and then canceled, the printer now correctly cancels the heating and stops the print fan.
- The inability to stop the print while the printer was heating up is now fixed.
Supported printer:
- Original Prusa MINI
Download link:
How to flash the firmware on MINI:
- Copy the firmware file (.bbf) onto the USB drive with FAT32 formatting
- Insert the flash drive in the MINI's USB port
- Turn the printer ON (or reset it)
- A new screen will appear
- Confirm you want to flash the firmware
- Wait till the firmware is flashed and printer fully boots into the home screen
Please report any bug here:
github.com/prusa3d/Prusa-Firmware-Buddy/issues
As always, we wish you happy printing and look forward to your feedback!
RE: 4.1.0 Firmware for Original Prusa MINI
Shame the Z height bug is still in there, although reported for the RC release.
Texy
RE: 4.1.0 Firmware for Original Prusa MINI
Hi
I’ve done one single long print with this version which finished successfully, but the print moves to the bottom left of the bed and actually moved the print sheet. This has been reported on the mini fb group also. The cgode file I printed from has been used by me many times previously.
anyone else seen this issue?
texy
RE: 4.1.0 Firmware for Original Prusa MINI
Hi Texy,
can you please share links to both issues? I will talk to our devs.
RE: 4.1.0 Firmware for Original Prusa MINI
Hi
the z level Reported in the display issue was already reported via GitHub against the RC release. I’m not sure if this new issue with the head being moved after the print finishes has been reported there but it has been highlighted on one of the mini Facebook groups.
texy
RE: 4.1.0 Firmware for Original Prusa MINI
I have a serious issue with 4.1. Since I flashed it, my printer goes to the park position at the end of the print and then the X slowly moves left while the Z drops slowly to the bed. It happens on different prints, but is predictable. I am reinstalling 4.05 as the last stable firmware.
RE: 4.1.0 Firmware for Original Prusa MINI
Here is a picture of the final position after parking.
RE: 4.1.0 Firmware for Original Prusa MINI
Put this in the end G code box in Prusa Slicer:
{if layer_z < max_print_height}G1 Z{z_offset+min(layer_z+140, max_print_height)}{endif} F720 ; Move print head up
G1 X0 Y180 F4200 ; park print head
It will park high and to the left.
4.1.0 is working fine for me. The improved filament loading means that I can do color changes in the middle of the print now.
Regards,
Mark
That’s the strange thing - I have already got that cgode in my profiles - my Mini is ignoring it since updating to v4.1.0. I’ve gone back to rc4.1.0 until this is sorted.
Texy
RE: 4.1.0 Firmware for Original Prusa MINI
Hi @texy,
would be great, if you could share a short video regarding the last movements after print end and you 3mf file ,with marklgoldberg´s gcode inserted in.
I just made a testing print with 4.1.0 final and the head has parked at the right corner with bed moved to the front without any additional gcode.
Your information will be immediatelly forwarded to developers group.
Thanks
even an old man can learn new things 🙂
Standard I3 mk3s, MMU2S, Prusa Enclosure, Fusion 360, PrusaSlicer, Windows 10
PRUSA MINI+ Prusalink + Prusa Connect
RE: 4.1.0 Firmware for Original Prusa MINI
Hi @texy,
would be great, if you could share a short video regarding the last movements after print end and you 3mf file ,with marklgoldberg´s gcode inserted in.
I just made a testing print with 4.1.0 final and the head has parked at the right corner with bed moved to the front without any additional gcode.
Your information will be immediatelly forwarded to developers group.
Thanks
Hi Zoltan,
I understand this isn't effecting everyone - you would of heard more people complain if it had. However there is at least one other than myself with the problem - this video shows the issue : https://www.facebook.com/photo/?fbid=3407335432644077&set=gm.3320348641361793&__cft__ [0]=AZVoUr3IEyjqcKvk8XlYQt9A-50grrON2B_sVfv1cY49xfE4hVLpy4tqtS7oR2Co72SOgVf3mEPUJo056b5KLRMXBRo5jIKEJOSPzw2HZ_qRJ-fBCZCkhlfcm6WPm9SonyvM8m3zotIKUKIEvwm1LiZYAUhKdjTVO3G0kAEz9u_UtwDvzS3_5c9ZNkODu2v4ro4&__tn__=EH-R
This is on facebook so hopefully you can get to see it. Unfortunately I have orders to get out so cannot reload v4.10 at present.
What about the other issue with the z height being reported incorrectly on the display ?
Texy
RE: 4.1.0 Firmware for Original Prusa MINI
@texy,
unfortunatelly me and facebook we are not in relationship, so I could not see it.
After the selftest my MINI shows Z=203 (which anyway is correct) , is this the issue you are addressing?
even an old man can learn new things 🙂
Standard I3 mk3s, MMU2S, Prusa Enclosure, Fusion 360, PrusaSlicer, Windows 10
PRUSA MINI+ Prusalink + Prusa Connect
RE: 4.1.0 Firmware for Original Prusa MINI
@texy
can you pls. share the G-code? You can ZIP it and post here.
even an old man can learn new things 🙂
Standard I3 mk3s, MMU2S, Prusa Enclosure, Fusion 360, PrusaSlicer, Windows 10
PRUSA MINI+ Prusalink + Prusa Connect
RE: 4.1.0 Firmware for Original Prusa MINI
@texy
can you pls. share the G-code? You can ZIP it and post here.
OK - this afternoon I will upgrade to v4.1.0 again and post video and gcode.
Thanks for looking into this.
Texy
RE: 4.1.0 Firmware for Original Prusa MINI
@texy
can you pls. share the G-code? You can ZIP it and post here.
Apparently the facebook video has been sent to Lukas Chleba, who works at Prusa - do you know him ?
RE: 4.1.0 Firmware for Original Prusa MINI
ok, video has reached us. Just be aware the head parking is part of the slicer profile own g-code visible only for experts, so if you have it in your old printer profiles and you load your original 3mf file containing the above mentioned g-code, it overwrites the new profile and parks your haed at the place the video is showing.
So parking the haed after the print is finished is not hard coded in MINI Firmware - the printer only interprets the G-code inserted in slicer and slicer adds it to the final g-code.
even an old man can learn new things 🙂
Standard I3 mk3s, MMU2S, Prusa Enclosure, Fusion 360, PrusaSlicer, Windows 10
PRUSA MINI+ Prusalink + Prusa Connect
RE: 4.1.0 Firmware for Original Prusa MINI
OK. So I upgraded to v4.1.0 again and took a video, but it is now working correctly. 😮
The end of print parking gcode I put into the profile hasn't changed - I have been using this for a couple of months now.
Actually I reduced the +140 to +40 in order to save time between prints - remember it is relative to the last z level.
So FYI, this is the firmware updates I have done recently, in order :
v4.05
rc4.1.0
v4.1.0 - noticed the head parking issue, so needed to revert back to rc4.1.0 :
reverted to v4.05 as rc4.1.0 isn't seen as an upgrade option when running v4.1.0, then
updated to rc4.1.0, no head parking issue seen.
(today) - updated to v4.1.0, no head issue seen
Hope this helps,
Texy
RE: 4.1.0 Firmware for Original Prusa MINI
The video that had been shared of the parking issue is mine. It parked correctly with 4.05. It parked incorrectly with 4.1. I reverted to 4.05 and it parked correctly. I upgraded again to 4.10 and the bad parking returned. This was checked with multiple parts. It is not a gcode problem.
RE: 4.1.0 Firmware for Original Prusa MINI
Hi @stephen-c32,
can you please let us know, what is your correct parking interpretation? Can you please share with us your Gcode where the bad parking happened?
I have the following G-code, marked with yellow is the parking code

Thanks
Zoltan
even an old man can learn new things 🙂
Standard I3 mk3s, MMU2S, Prusa Enclosure, Fusion 360, PrusaSlicer, Windows 10
PRUSA MINI+ Prusalink + Prusa Connect
RE: 4.1.0 Firmware for Original Prusa MINI
The video that had been shared of the parking issue is mine. It parked correctly with 4.05. It parked incorrectly with 4.1. I reverted to 4.05 and it parked correctly. I upgraded again to 4.10 and the bad parking returned. This was checked with multiple parts. It is not a gcode problem.
I wouldn't be so sure, one of the bugs fixed in 4.1.0 was that the last part of the gcode file may not get executed. So there could be gcode at the end of the file that is now being executed that was not executed in 4.0.5.