A baffling failed print and a learning experience
I know I take pride in the fact that I have very few failed prints. With rare exceptions, the prints I've done, both with my own printers and before at the local 'makerspace' have come out as expected. Yeah, I've had a few mini-spaghetti-monsters and a couple of mini-blobs, all caught in time, but until yesterday everything had an obvious cause and reprints went smoothly.
Yesterday I wanted to print another copy of a print I originally did about two years ago at the 'makerspace', which is a styled case for a Raspberry Pi Zero single-board computer with a small 'Inky pHat' graphics display. I have the original .stl files as well as the original drafts, so I figured I would simply load the .stl files into PS, slice and print.

Piece of cake, right?
Wrong!
I sliced the front part of the case and started the print. I watched the probing and the prime line and the skirt and the start of the first layer, so I assumed all was well and I went off doing other things. When I checked on the print several minutes later, here's what I found.

As I walked in, the extruder was dragging the mess around by a thread, something reminding me of a futile attempt to walk a cat on a leash. 😉
Yeah, I muttered a few F-bombs, aborted the print, disposed of the spaghetti mess, cleaned off the plate, applied some Layerneer, watched the probing, prime line, skirt and the beginning of the first layer and all seemed OK.
Wrong again!
I checked in a few minutes and yet again, print separated from the plate and spaghetti was starting to form. (Yeah, more f-bombs.) The print I did before, on a Uprint, sliced with the stock slicer that I can't recall the name of right now (Galaxy???), printed as expected with no issues.
I cleaned the plate again and watched more carefully as the first few layers were laid down.
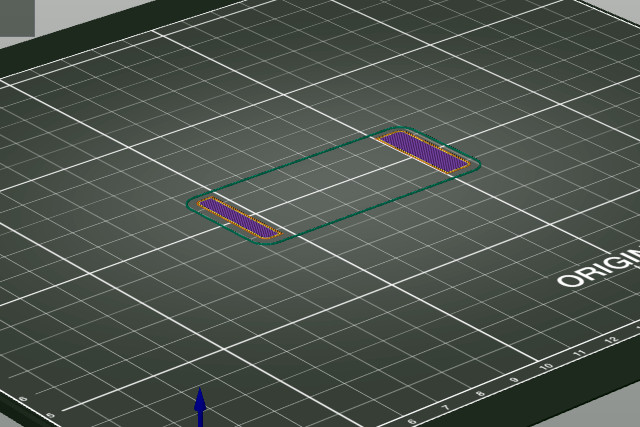
Then I realized that the problem was that not all of the first layer was actually printing. Two of the larger parts, two rectangles on the sides, were laying down properly, but nothing between them until about the fourth layer, resulting in a huge print-in-mid-air bridged section, which drooped in a chaotic manner and caught the nozzle on the next pass, yanking the print off the plate and starting the spaghetti.
A closer inspection in PS showed that yes, or rather no, not all of what was intended to be the first layer was being sliced as the first layer and the remaining portions were printed in mid air.
The fix was simple, just discard the first few layers and start the print about 1/2 of a mm into the .stl. Yes, this time it printed as expected and the print was fine and usable, although with slightly wider first layer sections, which were really NBD.
I then went back and inspected the case that was done some time ago, and yes, the lowest (front-most) layer of the parts between the rectangles was very sharp and obviously did not touch the build plate.
The slicer on the Uprint added soluble supports by default, and since this print has filleted edges on the front, supports helped, and obviously extended under the affected sections and supported them. (As an aside, on smaller prints on the Uprint, the soluble supports simply broke away and did not have to be soaked.)
The modified .stl then printed as expected and the Prusa I3 actually did a very good job of doing the rounded front side with very little artifact and without using any support material.

I went back to the original draft (FreeCAD drawing) and yes, the reason this happened was that the fillets on the front edges were too large and cut in to what was intended to be the first layer. GIGO! This was simple to fix, but sure had me stumped for a while.
RE: A baffling failed print and a learning experience
I see that in a lot of models - the first layer seems to assume people will love printing on a raft. Great fix - fix the dang thing.
RE: A baffling failed print and a learning experience
Early on, I downloaded a model with a "flat" underside and went through a similar process. After finally looking at it in preview mode, I realized only one end of the underside was actually making contact with the bed. This was before PrusaSlicer added the nice "lay flat" button.
RE: A baffling failed print and a learning experience
Many months ago I and another user had totally different results when trying to slice a certain model. I was using a rotate-90 and he used the place-face function. I've been using the place-face option ever since. Cura also has a 'snap to' placement function.